Updated Date: 07/07/2026
Configuring Per-App VPN with APM and F5 Access
Apple’s Network Extension framework supports layer-3 tunneling for both device-wide and Per-App VPN tunnels. This means that TCP and UDP protocols are supported for apps configured for Per-App VPN on F5 Access for iOS 3.x. Apps that are managed by a Mobile Device Manager (MDM) can be configured to automatically connect to a VPN when they are started. In addition, Mobile Safari can be managed for per-app VPN with a configuration profile and without an MDM. Per-app VPN gives IT granular control over corporate network access, and ensures that data transmitted by managed apps travels only through a VPN. Meanwhile, other data, like an employee’s personal web browsing activity, does not use the VPN. Per-app VPN also works with Safari on a per-URL basis.
A per-app VPN configuration requires three configuration components.
- A device under MDM management, or a configuration profile file installed manually. For more information, see Configuration Profile Reference.
- A managed app installed on the device, or Mobile Safari.
- F5 Access for iOS installed on the managed device.
Important: The managed app and the MDM profile must be deployed with an MDM solution, except in the case of Mobile Safari. The F5 Access configurations may or may not be deployed with an MDM solution. Any app other than Mobile Safari must be installed by the MDM solution, and associated with a VPN configuration.
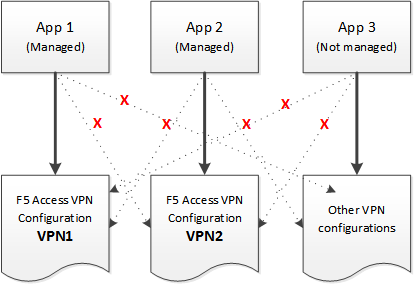
The per-app VPN framework allows the administrator to limit VPN access to explicit apps only. Specifically, it allows applications to use one F5 Access configuration (or VPN connection).
In practice, some applications may be associated with one F5 Access configuration, and other applications may be associated with other F5 Access configurations.
Important: Once an app is associated with an F5 Access configuration by the MDM, it will use that VPN only.
In this example, App 1 or App 2 can be active at the same time, because they use different VPN configurations.
Note: On iOS, you can only activate only one device-wide (user-initiated) VPN configuration at a time. However, multiple per-app VPNs can be active and connected simultaneously, on their own or in addition to the device VPN.
You create an access profile to provide the secured connection between the per-app VPN and the virtual server.
-
On the Main tab, click Access > Profiles / Policies.
The Access Profiles (Per-Session Policies) screen opens.
-
Click Create.
The New Profile screen opens.
-
In the Name field, type a name for the access profile.
-
From the Profile Type list, select SSL-VPN.
-
In the Language Settings area, add and remove accepted languages, and set the default language.
A browser uses the highest priority accepted language. If no browser language matches the accepted languages list, the browser uses the default language.
-
Click Finished.
The access profile appears in the Access Profiles List.
A version check allows you to distinguish between F5 Access for iOS 3.0.x and earlier versions. You can use this information to assign the required full network access resource to the 3.0.x branch, for example, in a Per-App VPN scenario.
-
On the Main tab, click Access > Profiles / Policies.
The Access Profiles (Per-Session Policies) screen opens.
-
In the Per-Session Policy column, click the Edit link for the access profile you want to configure.
The visual policy editor opens the access policy in a separate screen.
-
Click the (+) sign anywhere in the access policy to add a new action item.
An Add Item screen opens, listing predefined actions on tabs such as General Purpose, Authentication, and so on.
-
Click Add Item.
The screen is not active while the visual policy editor creates the action. The screen closes and a Properties screen displays.
-
Click the Endpoint Security (Server-Side) tab.
-
Select the Client Type item, and click Add Item.
-
Click Save.
-
On the Edge Client branch, click the (+) sign to add a new action item.
-
Click the Endpoint Security (Server-Side) tab.
-
Select the Client OS item, and click Add Item.
-
Click Save.
-
On the iOS branch, click the (+) sign to add a new action item.
-
Click the General Purpose tab.
-
Select the Empty item, and click Add Item.
-
On the Properties screen in the Name field, type
iOS Version. -
Click the Branch Rules tab.
-
Click Add Branch Rule.
-
In the Name field, type
Version 3. -
Click the change link in the Expression area.
A popup screen opens.
-
Click the Advanced tab.
Use this tab to enter Tcl expressions.
A text input field displays.
-
In the text field, type
expr { [mcget {session.client.app_version}] >= "3.0"}, and click Finished. -
Click Save.
-
Add a Network Access resource to the Version 3 branch. On the Version 3 branch, click the (+) sign to add a new action item.
-
Click the Assignment tab.
-
Select the Advanced Resource Assign item, and click Add Item.
-
Under Resource Assignment, click Add new entry.
-
Under Expression, click Add/Delete.
-
Click the Network Access tab, and select a Network Access resource to assign.
-
Click the Webtop tab, and select a webtop to assign.
-
Click Update.
-
Click Save.
-
On the fallback branch following the Advanced Resource Assign item, click the Deny ending.
-
Change the Deny ending to Allow, and click Save.
-
If you support F5 Access version 2.x clients, on the fallback branch, click the Deny ending.
-
Change the Deny ending to Allow, and click Save.
-
Click Apply Access Policy to save your configuration.
The access profile appears in the Access Profiles List.
Configure the virtual server to include this access policy, and make sure the Client SSL profile is enabled on the server.
A client certificate check allows you to authenticate the device to the access policy, without requiring any user interaction that would cause the creation of the per-app VPN tunnel to fail.
-
On the Main tab, click Access > Profiles / Policies.
-
In the Access Policy column, click the Edit link for the access profile you want to configure to launch the visual policy editor.
The visual policy editor opens the access policy in a separate screen.
-
Click the (+) sign anywhere in the access policy to add a new action item.
An Add Item screen opens, listing predefined actions on tabs such as General Purpose, Authentication, and so on.
-
Click Add Item.
The screen is not active while the visual policy editor creates the action. The screen closes and a Properties screen displays.
-
Click the Authentication tab.
-
Select the Client Cert Inspection item, and click Add Item.
-
The properties screen opens. Click Save.
-
On the Successful branch following the Client Cert Inspection item, click the Deny ending.
-
Change the Deny ending to Allow, and click Save.
-
Click Apply Access Policy to save your configuration.
The access profile appears in the Access Profiles List.
Configure the virtual server to include this access policy, and make sure the Client SSL profile is enabled on the server.
You configure specific settings in the Access Policy Manager® to provide per-app VPN tunnels. Per-app VPN tunnels are full network access tunnels, and require Network Access resources in the Access Policy. Configure these items on the Access Policy Manager.
- The virtual server must be configured with an access profile.
- The virtual server should be configured with a basic configuration for the network access resource.
- You must specify the Client SSL profile on the virtual server. You must also include the same CA bundle on the server that is used to generate the certificate for the client devices.
Note: Access policies for F5 Access Legacy 2.1.x have different requirements. If you are planning to have both clients connect to the same virtual server, refer to your F5 Acccess 2.1.0 documentation for more information.
You must have Access Policy Manager® licensed and provisioned.
A virtual server profile enables support for the network access used by per-app VPN tunnels.
-
On the Main tab, click Local Traffic > Virtual Servers.
The Virtual Server List screen opens.
-
Click the name of the virtual server you want to modify.
-
For the SSL Profile (Client) setting, from the Available list, select the name of the Client SSL profile you previously created, and using the Move button, move the name to the Selected list.
-
In the Access Policy area, from the Access Profile list, select the access profile.
-
From the Connectivity Profile list, select the connectivity profile.
-
Click Update to save the changes.
The virtual server is configured for per-app VPN.