Updated Date: 07/07/2026
Configuring Per-App VPN with APM and F5 Access
Apple’s VPN framework supports layer-3 tunneling for TCP and UDP connections. Apps can be configured to automatically connect to a VPN when they are started. Safari can be configured for per-app VPN with a configuration profile and without an MDM, and on a per-URL basis.
Note: An access policy for Per-App VPN on macOS is similar to a device-wide VPN access policy, except that items that require Web Logon, such as multi-factor authentication, are not supported.
A per-app VPN configuration requires two configuration components.
- A device under MDM management or a configuration profile installed manually. For more information, see macOS Sierra: Use configuration profiles.
- F5 Access for macOS installed on the device.
Note: Per-app VPN is currently not supported for Android apps on Chrome OS.
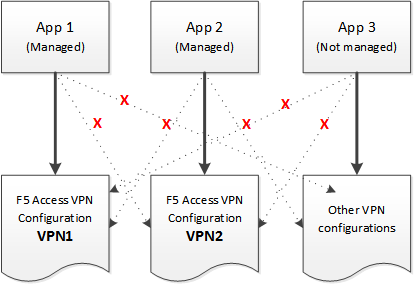
The per-app VPN framework allows the administrator to limit VPN access to explicit apps only. Specifically, it allows applications to use one F5 Access configuration (or VPN connection). Refer to the installation section for more details Overview: F5 Access for macOS Installation
Important: If the F5 Access configuration is not connected when the app starts, all traffic from the app is blocked.
In practice, some applications may be associated with one F5 Access configuration, and other applications may be associated with other F5 Access configurations.
Important: Once an app is associated with an F5 Access configuration by the MDM, it must use that VPN only.
In this example, only App 1 or App 2 can be active at one time.
Note: On macos, you can only activate one device-wide or Per-App VPN configuration at a time.
For per-app VPN, an access policy requires a specific configuration. The per-app VPN process does allow prompts or requests for information (logon and password) during logon. However, Web Logon is not supported.
You create an access profile to provide the secured connection between the per-app VPN and the virtual server.
-
On the Main tab, click Access Policy > Access Profiles.
The Access Profiles List screen opens.
-
Click Create.
The New Profile screen opens.
-
In the Name field, type a name for the access profile.
-
In the Language Settings area, add and remove accepted languages, and set the default language.
A browser uses the highest priority accepted language. If no browser language matches the accepted languages list, the browser uses the default language.
-
Click Finished.
The access profile appears in the Access Profiles List.
A client certificate check or on-demand cert auth check allows you to authenticate the device to the access policy.
-
Click Access > Profiles / Policies > Access Profiles (Per-Session Policies).
-
In the Per-Session Policy column, click the Edit link for the access profile you want to configure to launch the visual policy editor.
The visual policy editor opens the access policy in a separate screen.
-
Click the (+) sign anywhere in the access policy to add a new action item.
An Add Item screen opens, listing predefined actions on tabs such as General Purpose, Authentication, and so on.
-
Click Add Item.
The screen is not active while the visual policy editor creates the action. The screen closes and a Properties screen displays.
-
Click the Authentication tab.
-
Select the Client Cert Inspection item or On-Demand Cert Auth item, and click Add Item.
-
Click Apply Access Policy to save your configuration.
-
The properties screen opens. Click Save.
-
On the Successful branch following the Client Cert Inspection or On-Demand Cert Auth item, click the Deny ending.
-
Change the Deny ending to Allow, and click Save.
-
Click Apply Access Policy to save your configuration.
The access profile appears in the Access Profiles List.
Configure the virtual server to include this access policy, and make sure the Client SSL profile is enabled on the server.