Updated Date: 07/07/2026
Overview: F5 Access for macOS Devices
F5 Access for macOS provides Layer 3 network access for the BIG-IP APM module. The F5 Access for macOS SSL VPN application complements the existing Edge Client VPN product line, addressing similar use-case and deployment scenarios.
F5 Access for macOS incorporates Apple’s new Network Extension Framework. This change creates some major architectural shifts in the new F5 Access VPN application. As a result, there are currently feature differences between F5 Access and Edge Client for macOS.
Note: Users can install and use both F5 Access and Edge Client for macOS on the same system.
Self-signed BIG-IP certificates are not supported unless the CA certificate is first Trusted on the device. Set the system keychain settings to Always Trust.
Note: F5 Access for macOS is hosted in the Apple App Store, instead of on a BIG-IP system.
F5 Access for macOS has two components:
- App Extension: built on the Network Extension framework to provide traffic tunneling.
- F5 Access Container App: handles configuration management and state monitoring.
- Native
- Native authentication mode is the default mode that the administrator can use to set the user logon by using username and password, optional client certificate, or both. Interactive authentication, including SAML and external logon pages, are not supported in this mode. Native mode does not require user interaction if all the credentials are previously saved.
- Web (Web Logon)
- Web-based Authentication is supported in this version. In web authentication mode, the administrator can specify interactive Web-based multi-factor authentication in the access policy. Web authentication mode can be used to support an external logon page, SAML authentication, 2-factor logon with a one-time passcode, or other interactive methods. A user can specify Web logon mode when creating a configuration. All Web logon feature are supported.
- Client certificate required mode
- In this version, client certificate required mode is supported.

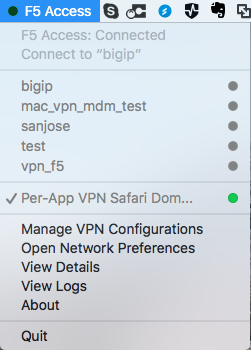
After F5 Access for macOS is installed, the container app is available from the macOS menu bar.
The following functions and status items can be viewed and accessed from the container app:
- Connection status: Shows the status of F5 Access, and the status of configured connections.
- Connect to: This menu item allows you to connect to a VPN from the list of VPN configurations. Connect to defaults to the most recently used configuration.
- List of VPN configurations: Shows the current configured VPN connections. The user can click a configuration to connect. Clicking another VPN configuration when connected causes the connection to switch VPN configurations.
- Manage VPN Configurations: Allows the user to add, edit, and remove VPN configurations. Note that configurations managed by a Mobile Device Manager (MDM) cannot be removed by the user.
- Open Network Preferences: Opens the network settings in the System Preferences app.
- View Details: Displays the connection details window.
- View Logs: Views the F5 Access logs. This can be useful for troubleshooting.
- About F5 Access: Shows information about the installed version of F5 Access
- Quit: Quits the container app. Note that this does not terminate the VPN connection.
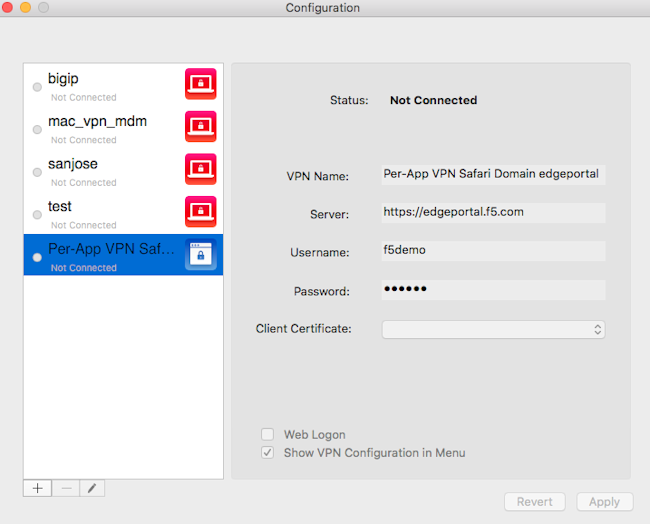
You create a configuration to establish a VPN connection to access network resources.
-
From the F5 Container App click Manage VPN Configurations.
-
Click + to add a configuration.
-
In the VPN Name field, type a VPN name.
-
In the Server field, type the server address.
-
In the Username field, type the username.
-
In the Password field, type the password.
-
In the Client Certificate field, select a common name for the client certificate.
-
To use a web page for logon, click Web Logon.
-
To show the VPN Configuration in the F5 Container App menu, click Show VPN Configuration in Menu.
-
Click Apply.
The VPN configuration is created. Start the VPN connection by selecting the configuration name from the F5 Container App menu.
You can edit or delete a configuration from the Container app after you have created it.
-
From the F5 Container App click Manage VPN Configurations.
-
Click the name of a VPN configuration.
-
To edit the configuration, click the pencil icon.
-
To delete the configuration, click the minus icon.
You create a configuration to establish a VPN connection to access network resources.
Important: You cannot edit or delete a VPN configuration created with a plist file from the VPN configurations dialog, though you can modify the username and password.
- Double-click a plist .mobileconfig file to install the VPN.
The VPN configuration is created. Start the VPN connection by selecting the configuration name from the F5 Container App menu.
This is a sample plist .mobileconfig file for VPN configuration.
The following example uses sample data only. For your own configuration, items like the PayloadDisplayName, Payload UUID, username, password and certificate information must be customized to your network and installation.
<?xml version="1.0" encoding="UTF-8"?>
<!DOCTYPE plist PUBLIC "-//Apple//DTD PLIST 1.0//EN" "http://www.apple.com/DTDs/PropertyList-1.0.dtd">
<plist version="1.0">
<dict>
<key>PayloadContent</key>
<array>
<dict>
<key>IPv4</key>
<dict>
<key>OverridePrimary</key>
<integer>0</integer>
</dict>
<key>PayloadDescription</key>
<string>Configures VPN settings, including authentication.</string>
<key>PayloadDisplayName</key>
<string>VPN (test_vpn_config)</string>
<key>PayloadIdentifier</key>
<string>com.f5.access.macos.vpn.profile</string>
<key>PayloadOrganization</key>
<string></string>
<key>PayloadType</key>
<string>com.apple.vpn.managed</string>
<key>PayloadUUID</key>
<string>3A0ED411-G45D-4551-AE35-650CE54B08D5</string>
<key>PayloadVersion</key>
<integer>1</integer>
<key>Proxies</key>
<dict/>
<key>UserDefinedName</key>
<string>test_vpn_config</string>
<key>VPN</key>
<dict>
<key>AuthName</key>
<string>username</string>
<key>AuthPassword</key>
<string>password</string>
<key>AuthenticationMethod</key>
<string>Password+Certificate</string>
<key>PayloadCertificateUUID</key>
<string>CF12345D-E819-4521-88DE-2AEB6E1DC3D8</string>
<key>RemoteAddress</key>
<string>https://selfip.example.com</string>
<key>ProviderType</key>
<string>packet-tunnel</string>
<key>ProviderBundleIdentifier</key>
<string>com.f5.access.macos.PacketTunnel</string>
</dict>
<key>VPNSubType</key>
<string>com.f5.access.macos</string>
<key>VPNType</key>
<string>VPN</string>
<key>VendorConfig</key>
<dict/>
</dict>
<dict>
<key>Password</key>
<string>123456</string>
<key>PayloadCertificateFileName</key>
<string>identity.p12</string>
<key>PayloadContent</key>
<data>
MIIJCQIBAzCCCM8GCSqGSIb3DQEHAaCCCMAEggi8MIIIuDCCA28GCSqGSIb3DQEHBqCCA2AwggNcAgEA
MIIDVQYJKoZIhvcNAQcBMBwGCiqGSIb3DQEMAQYwDgQIzdOkMx7b/skCAggAgIIDKNjtUzTS2/diyoiU
ArGTs6vaAcb6PW7bjR/5gObmwV+NHT4BVqGVfm9L+F7zkhgtSx/gTVISOLphruYjSdpiqVN8IVcL6uVR
... (etc...)
</data>
<key>PayloadDescription</key>
<string>Provides device authentication (certificate or identity).</string>
<key>PayloadDisplayName</key>
<string>identity.p12</string>
<key>PayloadIdentifier</key>
<string>com.f5.access.macos.vpn.credential</string>
<key>PayloadOrganization</key>
<string/>
<key>PayloadType</key>
<string>com.apple.security.pkcs12</string>
<key>PayloadUUID</key>
<string>C9BF4927-E819-4521-88DE-2AEB6E1DC3D8</string>
<key>PayloadVersion</key>
<integer>1</integer>
</dict>
</array>
<key>PayloadDescription</key>
<string>f5 mac tunnel test</string>
<key>PayloadDisplayName</key>
<string>mac_vpn_mdm_profile</string>
<key>PayloadIdentifier</key>
<string>com.f5.access.macos.vpn.profile</string>
<key>PayloadOrganization</key>
<string></string>
<key>PayloadRemovalDisallowed</key>
<false/>
<key>PayloadType</key>
<string>Configuration</string>
<key>PayloadUUID</key>
<string>A6F83919-B570-41FE-A84F-52DAC24838D8</string>
<key>PayloadVersion</key>
<integer>1</integer>
</dict>
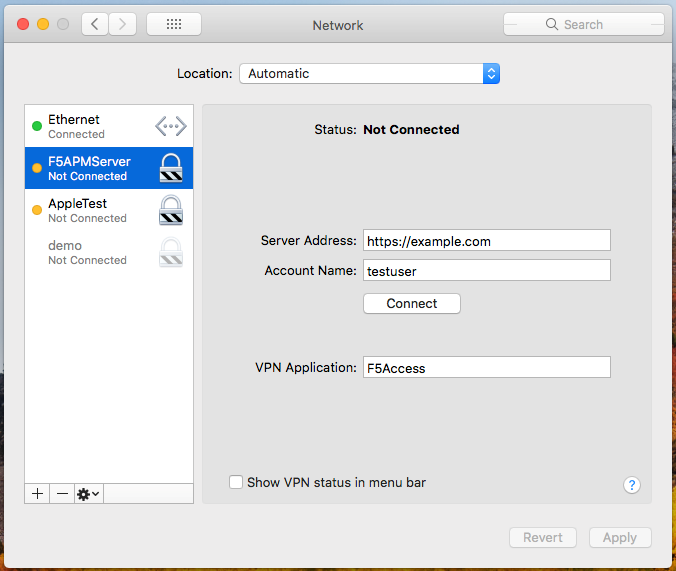
</plist>Starting a connection on F5 Access for macOS requires a configured BIG-IP Network Access access policy to which you can connect. All configurations created from the Container app are also available in the System Preference > Network panel.
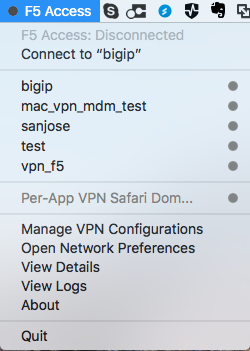
You start a connection to access network resources.
-
Log in to the macOS device and launch the F5 Access application from the Finder or the Launch Pad.
-
Start a connection by selecting an exisiting connection from the list.
-
You can also start a connection from the System Preference > Network panel.