Updated Date: 07/07/2026
Configuring Access Policy Manager for F5 Access
Before configuring F5 Access for Chrome OS devices, you must complete the following requirements:
- Set up BIG-IP® Access Policy Manager®.
- Run the Network Access Setup Wizard.
Additional information about network access and connectivity profiles can be found in the BIG-IP® Access Policy Manager®: Network Access Configuration guide.
To configure F5 Access for Chrome OS device support on BIG-IP Access Policy Manager, use the following configuration steps:
- Run the Network Access Setup Wizard.
- Optionally, set up SSO and ACLs for your network access. Refer to the BIG-IP Access Policy Manager Configuration Guide on the AskF5 Knowledge Base for instructions.
- Customize an access policy to support F5 Access.
You can configure separate access policy branches for F5 Access.
F5 Access does not support client-side checks; however, you can configure an access policy that provides network access for Chrome OS clients by using any of these methods:
- Create an access policy using Client-Side Capability. This provides a branch for clients that do not support client-side checks. Assign authentication and a network access resource to this branch.
- Use an existing access policy with client-side checks. The Chrome OS client will fail to the fallback branch of the first client-side check. Assign authentication and a network access resource to this branch.
- Add a Client OS Access Policy item, and assign authentication and resources to the Chrome OS branch.
F5 Access for Chrome OS is detected with the following access policy items:
| Access policy item | Value |
|---|---|
| Client Type | Edge Client |
| Client OS | Chrome OS (for Chrome OS devices) |
You can configure an access policy branch to direct Chrome OS device users to F5 Access, and direct non-F5 Access device users to a fallback branch.
This example display a simple access policy.
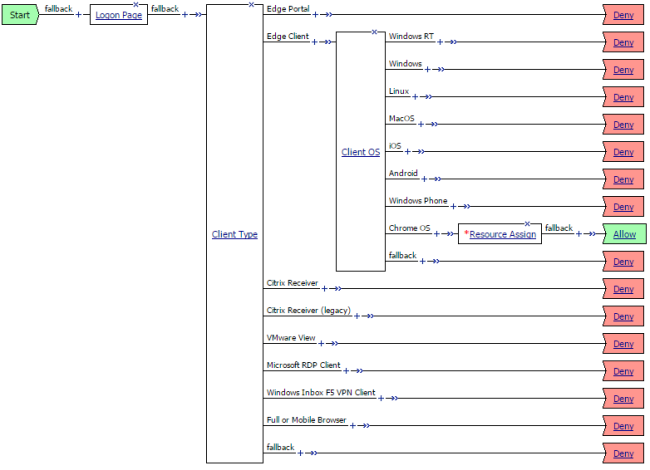
Create an access policy that supports F5 Access for Chrome OS.
-
On the Main tab, click Access Policy > Access Profiles.
The Access Profiles List screen opens.
-
In the Access Policy column, click the Edit link for the profile you want to configure to launch the visual policy editor.
The visual policy editor opens the access profile in a separate screen or tab.
-
Click the plus (+) sign that appears after the Logon Page action.
-
On the Endpoint Security (Server-Side) tab, select Client Type, and click Add Item.
-
Click Save.
-
Click the plus (+) sign that appears on the Edge Client branch of the Client Type action.
-
On the Endpoint Security (Server-Side) tab, select Client OS, and click Add Item.
-
On the Chrome OS branch, assign a network access resource.
-
On the Chrome OS branch, click the ending, and on the Select Ending screen, select Allow.
-
Click Save.
-
Click Apply Access Policy.
This access policy now supports F5 Access for Chrome OS.
RSA SecurID two-factor authentication is configured in an access policy. For more information, see Big-IP Access Policy Manager: Authentication Methods for your Access Policy Manager version.
Important: For Chrome OS, only URL token import is supported.
- To import from a URL, the user must enter the URL in Compact Token Format (CTF) with one of 2 supported prefixes:
http://127.0.0.1/securid/orf5access://securid/. - To import from a QR code, the user scans the QR code when the camera opens.
Note: F5 Access asks for permission to take pictures and record video on your device. This permission is required to scan QR codes and import RSA token from the device. If you select Deny for this permission, you will not be able to use the Scan QR Code feature.
The URL and QR code images can be generated with the RSA TokenConverter tool. See your RSA documentation for detailed information on installing and using TokenConverter.
The following examples include URL and QR code generation commands.
> java -jar TokenConverter.jar test.sdtid -android -p 123456 -o out.txt
> java -jar TokenConverter.jar test.sdtid -prefix f5access://securid/ctf?ctfData= -android -p 123456 -o out.txt
F5 Access can import tokens using the Cryptographic Token Key Initialization Protocol (CT-KIP). This eliminates the need to deliver a token in CTF format. F5 Access and the RSA authentication server (for example, RSA Authentication Manager) use a four-pass CT-KIP protocol to exchange information that dynamically establishes a shared seed on the mobile app and the server. In this way, the CT-KIP protocol protects against potential token seed interception.
Important: CT-KIP exchanges require netrwork connectivity between the RSA Authentication Manager and the mobile device.
The following URL formats are supported:
http://127.0.0.1/securid/ctkip?scheme=*<http or https>*&url=*<service\_address>*&activationCode=*<activation\_code\*>*
f5access://securid/ctkip?scheme*=<http or https>*&url=*<service\_address>*&activationCode=*<activation\_code\*>*&name=*<optional\_token\_name>*
Note: The activation code is required, but you do not need to provide the activation code in the URL. If the activation code is not included in the URL, the user is prompted to enter the activation code.