Updated Date: 07/07/2026
RADIUS Accounting
You can report user session information to an external RADIUS accounting server. If you select this mode only, the system assumes that you have set up another type of authentication method to authenticate and authorize your users to access their resources.
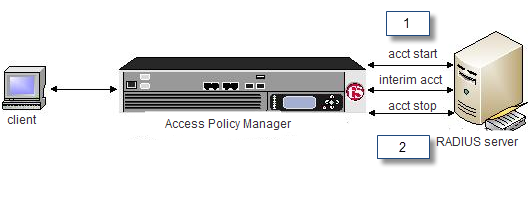
- After RADIUS accounting runs successfully in an access policy, Access Policy Manager sends an accounting start request message to the external RADIUS server. The
startmessage typically contains the user’s ID, networks address, point of attachment, and a unique session identifier. - When the session is destroyed, Access Policy Manager issues an accounting
stopmessage to the external RADIUS server, providing information on the final usage in terms of time, packets transferred, data transferred, and reason for disconnect, as well as other information related to the user’s access.
This accounting data is used primarily for billing, statistical, and general network monitoring purposes.
Note: You can perform both RADIUS authentication and accounting actions. Keep in mind that if you select this mode, the RADIUS server and the RADIUS accounting server must run on different service ports.
For RADIUS authentication, Access Policy Manager (APM) converts an attribute value to hex if it contains unprintable characters, or if it is the class attribute. APM converts the class attribute to hex even if it contains only printable values (by attribute type). No other attributes are encoded to hex if they do not contain unprintable characters.
1bf80e04.session.radius.last.attr.class 62 /
0x54230616000001370001ac1d423301caa87483dadf740000000000000007243be90d.session.radius.last.attr.class 119 0x6162636465666768696 /
a6b6c6d6e6f707172737475767778797a | 0x54220615000001370001ac1d423301caa87483 /
dadf7400000000000000063888eb70.session.radius.last.attr.login-lat-group 37 /
0x6d7920bda12067726f757032 | mygroup1In this case, only values that are unprintable are encoded to hex.
-
On the Main tab, click Access > Authentication > RADIUS.
The RADIUS servers screen opens.
-
Click Create.
The New Server properties screen opens.
-
In the Name field, type a unique name for the authentication server.
-
From the Mode list, select Accounting.
-
For the Server Connection setting, select one of these options:
- Select Use Pool to set up high availability for the AAA server.
- Select Direct to set up the AAA server for standalone functionality.
-
If you selected Use Pool, type a name in the Server Pool Name field.
You create a pool of servers on this screen.
-
Provide the addresses required for your server connection:
-
If you selected Direct, type an IP address in the Server Address field.
-
If you selected Use Pool, for each pool member you want to add, type an IP address in the Server Addresses field and click Add.
Note: When you configure a pool, you have the option to type the server address in route domain format:
**IPAddress**%*RouteDomain*.
-
-
If you selected Use Pool, you have the option to select a Server Pool Monitor to track the health of the server pool.
-
In the Accounting Service Port field, type the service port for your accounting server if the default value is not appropriate.
The default is
1813. -
In the Secret field, type the shared secret password of the server.
-
In the Confirm Secret field, re-type the shared secret password of the server.
-
In the Timeout field, type a timeout interval (in seconds) for the AAA server.
This setting is optional.
If you use the Timeout setting, you can also use the Retries setting. If these settings are enabled, the Access Policy Manager attempts to reach the AAA server within the specified time frame, in seconds. If the server does not respond, the Access Policy Manager retries the authentication attempt, depending on how many retries you specify.
-
In the Retries field, type the number of times the BIG-IP system should try to make a connection to the server after the first attempt fails.
This setting is optional.
-
Click Finished.
The new server displays on the list.
Before you set up an access policy to use RADIUS accounting, you must have at least one RADIUS AAA server configured. You should also have an access profile that is configured with actions that authenticate the user.
You add a RADIUS accounting action to an access policy to send RADIUS start and stop messages to a RADIUS server. RADIUS accounting does not authenticate a user.
-
On the Main tab, click Access > Profiles / Policies.
The Access Profiles (Per-Session Policies) screen opens.
-
In the Per-Session Policy column, click the Edit link for the access profile you want to configure.
The visual policy editor opens the access policy in a separate screen.
-
Click the (+) icon anywhere in the access policy to add a new item.
Note: Only an applicable subset of access policy items is available for selection in the visual policy editor for any access profile type.
A popup screen opens, listing predefined actions on tabs such as General Purpose, Authentication, and so on.
-
From the Authentication tab, select RADIUS Acct and click Add Item.
The popup screen closes. A properties popup screen opens.
-
From the AAA Server list, select a RADIUS accounting server and click Save.
The properties popup screen closes and the visual policy editor displays.
-
Click Apply Access Policy to save your configuration.
This adds the RADIUS accounting action to the access policy.
To apply this access policy to network traffic, add the access profile to a virtual server.
Note: To ensure that logging is configured to meet your requirements, verify the log settings for the access profile.
Confirm that the correct log settings are selected for the access profile to ensure that events are logged as you intend.
Note: Log settings are configured in the Access > Overview > Event Log > Settings area of the product. They enable and disable logging for access system and URL request filtering events. Log settings also specify log publishers that send log messages to specified destinations.
-
On the Main tab, click Access > Profiles / Policies.
The Access Profiles (Per-Session Policies) screen opens.
-
Click the name of the access profile that you want to edit.
The properties screen opens.
-
On the menu bar, click Logs.
The access profile log settings display.
-
Move log settings between the Available and Selected lists.
You can assign up to three log settings that enable access system logging to an access profile. You can assign additional log settings to an access profile provided that they enable logging for URl request logging only.
Note: Logging is disabled when the Selected list is empty.
-
Click Update.
An access profile is in effect when it is assigned to a virtual server.
You might run into problems with RADIUS authentication and accounting in some instances. Follow these tips to try to resolve any issues you might encounter.
|
Possible error messages |
Possible explanations and actions |
|---|---|
|
|
|
|
|
|
|
Action |
Steps |
|---|---|
|
Check to see if your access policy is attempting to perform authentication |
Note: Make sure that your log level is set to the appropriate level. The default log level is notice. |
|
Check the RADIUS Server configuration |
|
|
Confirm network connectivity |
|
|
Capture a TCP dump |
Important: If you decide to escalate the issue to customer support, you must provide a capture of the TCP dump when you encounter authentication issues that you cannot otherwise resolve on your own. |