Updated Date: 07/07/2026
Presenting a View Desktop on an APM Webtop
In this implementation, you integrate Access Policy Manager (APM®) with VMware View Connection Servers and present View Desktops on an APM dynamic webtop. APM authenticates to a View Connection Server and renders the View Desktops. APM load balances the View Connection Servers for high availability.
APM supports the necessary connections with two virtual servers that share the same destination IP address.
-
About client requirements to launch View Client from a webtop
-
Configuring USB redirection and passing variables to a Start Session Script
If you want to use Access Policy Manager (APM®) to launch a View Client from an APM webtop, you must install the standalone View Client on your client. The standalone View Client is available from VMware.
Access Policy Manager (APM®) can be configured to support USB redirection for View desktop resources. Redirection enables a remote desktop resource to access a USB drive on the client as if it was physically present on the desktop.
Note: For compatible clients and compatible VMware Horizon View servers, see BIG-IP® APM®: Client Compatibility Matrix on the AskF5™ web site located at http://support.f5.com/.
Single sign-on (SSO) does not work with the VMware Horizon View HTML5 client. After logging on to and authenticating with Access Policy Manager, a View Horizon HTML5 client must still provide credentials to connect to a View Connection Server. This limitation is due to the nature of the technology used in the client.
An iApps template is available for configuring Access Policy Manager and Local Traffic Manager to integrate with VMware Horizon View. The template can be used on the BIG-IP® system to create an application service that is capable of performing complex configurations. You can download the template from the F5 DevCentral™ iApp Codeshare wiki at https://devcentral.f5.com/wiki/iApp.VMware-Applications.ashx. A deployment guide is also available there.
When you create a remote desktop resource, Access Policy Manager (APM®) automatically creates an allow ACL for the IP addresses and ports specified in the resource. To disallow access to any other IP addresses and ports, you must create ACLs that deny access to them and assign the ACLs in the per-session policy. F5 recommends that you create an ACL that rejects access to all connections and put it last in the ACL order.
You can place an access control list (ACL) that rejects all connections last in the ACL order to keep users from accessing any host and port combinations other than those to which they have been explicitly allowed access by the other ACLs assigned to the policy.
-
On the Main tab, click Access > Access Control Lists.
The User-defined ACLs screen opens.
-
Click Create.
The New ACL screen opens.
-
In the Name field, type a name for the access control list.
-
From the Type list, retain the default value Static.
-
In the Description field, add a description of the access control list.
-
From the ACL Order list, select Last to add the ACL at the last position in the list.
-
Click the Create button.
The ACL Properties screen displays.
-
In the Access Control Entries area, click Add to add an entry.
The New Access Control Entry screen displays.
-
From the Type list, select L4.
-
For the Source IP Address, Source Port(s), Destination IP Address, and Destination Port(s) fields, retain the default value Any.
-
From the Action list, select Reject.
The reject action drops the packet. On TCP flows, it also sends a TCP RST message. On UDP flows, it also sends proper ICMP messages. On other protocols, it drops the packet silently.
-
Click Finished.
To use the ACL, assign it to a session using an Advanced Resource Assign or ACL Assign action in a per-session policy.
Note: If you assign this ACL and Network Access or Portal Access resources to the same policy, you might need to also create and assign ACLs that allow access for Network Access and Portal Access resources.
You create a pool of View Connection Servers to provide load-balancing and high-availability functions.
-
On the Main tab, click Local Traffic > Pools.
The Pool List screen opens.
-
Click Create.
The New Pool screen opens.
-
In the Name field, type a unique name for the pool.
-
In the Resources area, using the New Members setting, add each View Connection Server that you want to include in the pool:
-
Type an IP address in the Address field, or select a node address from the Node List.
-
In the Service Port field, type
443(if your View Connection Servers use HTTPS), or type80(if your View Connection Servers use HTTP).By default, View Connection Servers use HTTPS. However, if you configure your View Connection Servers for SSL offloading, they use HTTP.
-
Click Add.
-
-
Click Finished.
The new pool appears in the Pools list.
Configure a VMware View remote desktop resource so that you can log on to a View Connection Server and gain access to a standalone View Client, or launch a View desktop from an Access Policy Manager (APM) webtop, depending on the access policy.
-
On the Main tab, click Access > Connectivity / VPN > VDI / RDP > Remote Desktops.
The Remote Desktops screen opens.
-
Click Create.
The New Resource screen opens.
-
For the Type setting, select VMware View.
-
For the Destination setting, select Pool and from thePool Name list, select a pool of View Connection Servers that you configured previously.
-
For the Server Side SSL setting:
- Select the Enable check box if your View Connection Servers use HTTPS (default).
- Clear the Enable check box if your View Connection Servers use HTTP; that is, they are configured for SSL offloading.
-
In the Single Sign-On area, select the Enable SSO check box for single sign-on to a View Connection Server after logging in to APM.
Additional fields display. The SSO Method list displays Password-based; you must also configure credential sources.
-
In the Username Source field, accept the default or type the session variable to use as the source for the SSO user name.
-
In the Password Source field, accept the default or type the session variable to use as the source for the SSO user password.
-
In the Domain Source field, accept the default or type the session variable to use as the source for the SSO user domain.
-
-
In the Customization Settings for language_name area, type a Caption.
The caption is the display name of the VMware View resource on the APM full webtop.
-
Click Finished.
All other parameters are optional.
This creates the VMware View remote desktop resource. To use it, you must assign it along with a full webtop in an access policy.
A full webtop allows your users to connect and disconnect from a network access connection, portal access resources, SAML resources, app tunnels, remote desktops, and administrator-defined links.
-
On the Main tab, click Access > Webtops > Webtop Lists.
The Webtops screen displays.
-
Click Create.
The New Webtop screen opens.
-
In the Name field, type a name for the webtop.
-
From the Type list, select Full.
The Configuration area displays with additional settings configured at default values.
-
Click Finished.
The webtop is now configured, and appears in the list. You can edit the webtop further, or assign it to an access policy.
To use this webtop, it must be assigned to an access policy with an advanced resource assign action or with a webtop, links, and sections assign action. All resources assigned to the full webtop are displayed on the full webtop.
You create an access profile to provide the access policy configuration for a virtual server that establishes a secured session.
-
On the Main tab, click Access > Profiles / Policies.
The Access Profiles (Per-Session Policies) screen opens.
-
Click Create.
The New Profile screen opens.
-
In the Name field, type a name for the access profile.
Note: A access profile name must be unique among all access profile and any per-request policy names.
-
From the Profile Type list, select one these options:
-
LTM-APM: Select for a web access management configuration.
-
SSL-VPN: Select to configure network access, portal access, or application access. (Most access policy items are available for this type.)
-
ALL: Select to support LTM-APM and SSL-VPN access types.
-
SSO: Select to configure matching virtual servers for Single Sign-On (SSO).
Note: No access policy is associated with this type of access profile
-
RDG-RAP: Select to validate connections to hosts behind APM when APM acts as a gateway for RDP clients.
-
SWG - Explicit: Select to configure access using Secure Web Gateway explicit forward proxy.
-
SWG - Transparent: Select to configure access using Secure Web Gateway transparent forward proxy.
-
System Authentication: Select to configure administrator access to the BIG-IP system (when using APM as a pluggable authentication module).
-
Identity Service: Used internally to provide identity service for a supported integration. Only APM creates this type of profile.
Note: You can edit Identity Service profile properties.
Note: Depending on licensing, you might not see all of these profile types.
Additional settings display.
-
-
In the Language Settings area, add and remove accepted languages, and set the default language.
A browser uses the highest priority accepted language. If no browser language matches the accepted languages list, the browser uses the default language.
-
Click Finished.
The access profile displays in the Access Profiles List. Default-log-setting is assigned to the access profile.
Confirm that the correct log settings are selected for the access profile to ensure that events are logged as you intend.
Note: Log settings are configured in the Access > Overview > Event Log > Settings area of the product. They enable and disable logging for access system and URL request filtering events. Log settings also specify log publishers that send log messages to specified destinations.
-
On the Main tab, click Access > Profiles / Policies.
The Access Profiles (Per-Session Policies) screen opens.
-
Click the name of the access profile that you want to edit.
The properties screen opens.
-
On the menu bar, click Logs.
The access profile log settings display.
-
Move log settings between the Available and Selected lists.
You can assign up to three log settings that enable access system logging to an access profile. You can assign additional log settings to an access profile provided that they enable logging for URl request logging only.
Note: Logging is disabled when the Selected list is empty.
-
Click Update.
An access profile is in effect when it is assigned to a virtual server.
Before you can create an access policy for an Access Policy Manager (APM) dynamic webtop, you must configure AAA server objects in APM to use for authentication. (You can use any type of authentication.)
Note: An Active Directory AAA server must include the IP address of the domain controller and the FQDN of the Windows domain name. If anonymous binding to Active Directory is not allowed in your environment, you must provide the admin name and password for the Active Directory AAA server.
Configure an access policy to authenticate a user and enable APM dynamic webtop.
Note: This example access policy shows how to use RSA SecurID and Active Directory authentication. However, you can use any type of authentication.
-
On the Main tab, click Access > Profiles / Policies.
The Access Profiles (Per-Session Policies) screen opens.
-
In the Per-Session Policy column, click the Edit link for the access profile you want to configure.
The visual policy editor opens the access policy in a separate screen.
-
Click the (+) icon anywhere in the access policy to add a new item.
Note: Only an applicable subset of access policy items is available for selection in the visual policy editor for any access profile type.
A popup screen opens, listing predefined actions on tabs such as General Purpose, Authentication, and so on.
-
On the Endpoint Security (Server-Side) tab, select Client Type, and then click Add Item.
The Client Type action identifies clients and enables branching based on the client type.
A properties screen opens.
-
Click Save.
The properties screen closes and the visual policy editor displays the Client Type action.
-
From the Client Type action, click the (+) on the Full or Mobile Browser branch
-
From the Logon Page tab, select Logon Page, and click Add Item.
A properties screen displays.
-
Configure the Logon Page properties.
To support Active Directory authentication only, no changes are required. To support both Active Directory and RSA SecurID authentication, an additional password field is required and the labels for the password fields require change.
-
In the Logon Page Agent table row 3, for Type, select password.
-
In the Post Variable Name field, type
password1. -
In the Session Variable Name field, type
password1. -
In the Customization Area in Logon Page Input Field #2, type
RSA Tokencode.RSA Tokencode replaces the default label, Password.
-
In the Customization Area in Logon Page Input Field #3, type
AD Password. -
Click Save.
The properties screen closes.
The Logon Page is configured to display Username, RSA Tokencode, and AD Password. Logon Page Input Field #2 accepts the RSA Tokencode into the session.logon.last.password variable (from which authentication agents read it). Logon Page Input Field #3 saves the AD password into the session.logon.last.password1 variable.
-
-
To add RSA SecurID authentication, click the plus (+) icon between Logon Page and Deny:
-
From the Authentication tab, select RSA SecurID, and click Add Item.
-
In the properties screen from the Server list, select the AAA server that you created previously and click Save.
The properties screen closes.
-
After the RSA SecurID action, add a Variable Assign action.
Use the Variable Assign action to move the AD password into the session.logon.last.password variable.
-
Click Add new entry.
An empty entry appears in the Assignment table.
-
Click the
changelink next to the empty entry.A popup screen displays, where you can enter a variable and an expression.
-
From the left-side list, select Custom Variable (the default), and type
session.logon.last.password. -
From the right-side list, select Custom Expression (the default), and type
expr { "[mcget -secure session.logon.last.password1]" }.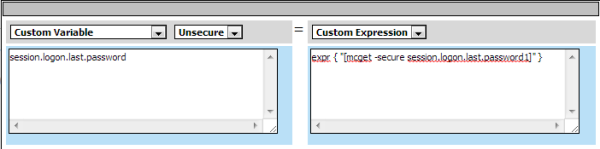
The AD password is now available for use in Active Directory authentication.
-
Click Finished to save the variable and expression, and return to the Variable Assign action screen.
-
-
Add the AD Auth action after one of these actions:
- Variable Assign - This action is present only if you added RSA SecurID authentication.
- Logon Page - Add here if you did not add RSA SecurID authentication. A properties screen for the AD Auth action opens.
-
Configure the properties for the AD Auth action:
-
From the AAA Server list, select the AAA server that you created previously.
-
Configure the rest of the properties as applicable to your configuration and click Save.
-
-
On the fallback path between the last action and Deny, click the Deny link, and then click Allow and Save.
-
Click Close.
You have an access policy that is configured to enable APM dynamic webtop after the appropriate authentication checks.
Before you start assigning resources to an access policy, open the existing access policy for edit.
Assign the full webtop and VMware View remote desktop resource that you configured previously to a session so that users can log into View Connection Servers and launch a View Desktop from the webtop.
Note: This policy shows how to use the Advanced Resource Assign action item to assign the resources. Alternatively, you can use the Resource Assign and Webtop, Links and Sections Assign action items.
-
Click the (+) icon anywhere in the access policy to add a new item.
Note: Only an applicable subset of access policy items is available for selection in the visual policy editor for any access profile type.
A popup screen opens, listing predefined actions on tabs such as General Purpose, Authentication, and so on.
-
On the Assignment tab, select Advanced Resource Assign and click Add Item.
The properties screen opens.
-
Click Add new entry.
An Empty entry displays.
-
Click the Add/Delete link below the entry.
The screen changes to display resources that you can add and delete.
-
Add resources to the policy:
-
On the Remote Desktop tab, select the VMware View remote desktop resource that you configured previously.
A system-defined ACL for the remote desktop resource is automatically assigned to the policy. The ACL specifies the allow action for the resource items associated with the remote desktop resource.
-
On the Static ACL tab, select an ACL that rejects all connections.
Important: Adding an ACL that is last in order and rejects all connections keeps users from accessing any host and port combinations other than those to which they have been explicitly allowed access by the other ACLs assigned to the policy.
-
On the Webtop tab, select a full webtop.
-
Select any other resources that you want to assign to the policy.
If you assign a Network Access resource to the policy, be sure to also assign an ACL that allows access to the resources that you want users to have. Otherwise, the ACL that rejects all connections blocks access.
If you assign a Portal Access resource to the policy, be sure to also assign an ACL that allows access to all parts of the web sites specified in the start URI or hosted content fields of the Portal Access configuration. Otherwise, the ACL that rejects all connections blocks access.
-
Click Update.
The popup screen closes.
-
-
Select Save to save any changes and return to the policy.
A VMware View remote desktop resource, ACLs, and an Access Policy Manager dynamic webtop are assigned to the session when the policy runs.
If Secure Tunnel is enabled on the VMware Horizon View server, Access Policy Manager (APM) supports USB redirection and enables support for configurations you might be able to perform using a Start Session Script on a VMware Horizon View server.
Add the VMware View Policy action to an access policy to enable or disable USB redirection for an APM View remote desktop resource. You can also specify variables to pass to the VMware Horizon View server for use in a Start Session Script that you must configure.
Note: For Start Session Script syntax and View Client variables and their usage, please refer to VMware documentation.
-
On the Main tab, click Access > Profiles / Policies.
The Access Profiles (Per-Session Policies) screen opens.
-
In the Per-Session Policy column, click the Edit link for the access profile you want to configure.
The visual policy editor opens the access policy in a separate screen.
-
Click the (+) icon anywhere in the access policy to add a new action item.
Note: Place the VMware View Policy action right before an advanced resource assign action.
-
Select the Assignment tab.
-
Select VMware View Policy and click Add Item.
The Properties popup screen opens.
-
To enable USB redirection, from the USB redirection list, select Enabled.
-
In the VMware View Start Session Script Variables area, specify any variables that you want to pass to a Start Session Script:
-
Click Add new entry.
A new row displays in the table.
-
In the Variable Name field, type a name.
The variable passes to the VMware Horizon View server in this format: **View_Client_**variable_name where variable_name is the name you type in this field. This format enables you to use any of the variables that have already been documented by VMware or to use any variable that you want to create.
-
In the Value field, type a value.
-
-
Select Save to save any changes and return to the policy.
Any variables that you specify in a VMware View Policy action are passed to the View Connection Server. To use them, you must configure a Start Session Script on the server.
You create a connectivity profile to configure client connections.
-
On the Main tab, click Access > Connectivity / VPN > Connectivity > Profiles.
A list of connectivity profiles displays.
-
Click Add.
The Create New Connectivity Profile popup screen opens and displays General Settings.
-
Type a Profile Name for the connectivity profile.
-
Select a Parent Profile from the list.
APM provides a default profile, connectivity.
-
Click OK.
The popup screen closes, and the Connectivity Profile List displays.
The connectivity profile displays in the list.
To provide functionality with a connectivity profile, you must add the connectivity profile and an access profile to a virtual server.
Before you start, obtain the CA certificate that was used to sign the SSL certificate on View Connection Servers and obtain a Certificate Revocation List (CRL).
You install the CA certificate and CRL, then update the server SSL profile to use them only if you want the BIG-IP system to check the validity of the certificate on the View Connection Server.
-
On the Main tab, click System > Certificate Management > Traffic Certificate Management.
The Traffic Certificate Management screen opens.
-
Click the Import button.
-
From the Import Type list, select Certificate.
-
For the Certificate Name setting:
- If you are importing a new certificate, select Create New and type a unique name in the field.
- If you are replacing an existing certificate, select Overwrite Existing and select a certificate name from the list.
-
For the Certificate Source setting, select Upload File and browse to select the certificate signed by the CA server.
-
Click Import.
The SSL Certificate List screen displays. The certificate is installed.
-
Click the Import button.
-
From Import Type list, select Certificate Revocation List.
-
For Certificate Revocation List Name, type a name.
-
For Certificate Revocation List Source, select Upload File and browse to select the CRL you obtained earlier.
-
Click Import.
The SSL Certificate List screen displays. The CRL is installed.
-
On the Main tab, click Local Traffic > Profiles > SSL > Server.
The Server SSL profile list screen opens.
-
Click the name of the server SSL profile you created previously.
The Properties screen displays.
-
Scroll down to the Server Authentication area.
-
From the Server Certificate list, select require.
-
From the Trusted Certificate Authorities list, select the name of the certificate you installed previously.
-
From the Certificate Revocation List (CRL) list, select the name of the CRL you installed previously.
-
Click Update.
The BIG-IP system is configured to check the validity of the certificate on the View Connection Server.
Before configuring an HTTPS virtual server for a dynamic webtop, create a connectivity profile in Access Policy Manager. (Default settings are acceptable.)
Create this virtual server to support launching a View Desktop from an APM dynamic webtop. This is the virtual server that users will specify in the browser.
Note: This is one of two virtual servers that you must configure. Use the same destination IP address for each one.
-
On the Main tab, click Local Traffic > Virtual Servers.
The Virtual Server List screen opens.
-
Click Create.
The New Virtual Server screen opens.
-
In the Name field, type a unique name for the virtual server.
-
In the Destination Address field, type the IP address for a host virtual server.
This field accepts an address in CIDR format (IP address/prefix). However, when you type the complete IP address for a host, you do not need to type a prefix after the address.
Use this same IP address for the virtual servers you create to handle PCoIP and UDP traffic.
-
In the Service Port field, type
443or select HTTPS from the list. -
From the HTTP Profile (Client) list, select a previously-created HTTP/2 profile for client-side traffic.
-
For the SSL Profile (Client) setting, in the Available box, select a profile name, and using the Move button, move the name to the Selected box.
-
For the SSL Profile (Server) setting, select pcoip-default-serverssl.
-
From the Source Address Translation list, select Auto Map.
-
In the Access Policy area, from the Access Profile list, select the access profile that you configured earlier.
-
From the Connectivity Profile list, select the connectivity profile.
-
From the VDI Profile list, select a VDI profile.
You can select the default profile, vdi.
-
Locate the Resources area of the screen and from the Default Persistence Profile list, select one of these profiles:
- cookie - This is the default cookie persistence profile. Cookie persistence is recommended.
- source_addr - This is the default source address translation persistence profile. Select it only when the cookie persistence type is not available.
-
Click Finished.
This virtual server handles access and handles XML protocol data.
Before you start, you must have configured a virtual server to process HTTPS traffic. You need to know the destination IP address of that virtual server.
You create this virtual server to support a PC over IP (PCoIP) data channel for View Client traffic.
-
On the Main tab, click Local Traffic > Virtual Servers.
The Virtual Server List screen opens.
-
Click Create.
The New Virtual Server screen opens.
-
In the Name field, type a unique name for the virtual server.
-
In the Destination Address field, type the IP address.
Note: Type the same IP address as for the virtual server that processes HTTPS traffic
-
In the Service Port field, type
4172. -
From the Protocol list, select UDP.
-
From the Protocol Profile (Client) list, select a predefined or user-defined UDP profile.
-
From the Source Address Translation list, select Auto Map.
-
In the Access Policy area, from the VDI Profile list, select a VDI profile.
You can select the default profile, vdi.
-
Click Finished.
If you configured the HTTPS and UDP virtual servers with a private IP address that is not reachable from the Internet, but instead a publicly available device (typically a firewall or a router) performs NAT for it, you need to perform these steps.
You update the access policy by assigning the variable view.proxy_addr to the hostname that the client uses to reach the virtual server. Otherwise, a View Client cannot connect when the virtual servers have a private IP address.
-
On the Main tab, click Access > Profiles / Policies.
The Access Profiles (Per-Session Policies) screen opens.
-
In the Per-Session Policy column, click the Edit link for the access profile you want to configure.
The visual policy editor opens the access policy in a separate screen.
-
Click the (+) icon anywhere in the access policy to add a new item.
Note: Only an applicable subset of access policy items is available for selection in the visual policy editor for any access profile type.
A popup screen opens, listing predefined actions on tabs such as General Purpose, Authentication, and so on.
-
Type
varin the search field, select Variable Assign from the results list, and then click Add Item.The Variable Assign properties screen opens.
-
Click the change link next to the empty entry.
A popup screen displays two panes, with Custom Variable selected on the left and Custom Expression selected on the right.
-
In the Custom Variable field, type
view.proxy_addr. -
In the Custom Expression field, type
expr {"*hostname*"}where hostname is the fully qualified domain name that the client uses to reach the virtual server.Tip: Another way to extract the initial hostname (either the IP address or fully qualified domain name) in the Custom Expression field is to type:
expr { [mcget {session.server.network.name}] } -
Click Finished to save the variable and expression and return to the Variable Assign action popup screen.
-
Click Save.
The properties screen closes and the policy displays.
-
Click the Apply Access Policy link to apply and activate the changes to the policy.
You must configure the virtual server for HTTPS on the BIG-IP system using the default port, 443.
If your VMware Horizon View configuration uses a custom port number, you can add a Variable Assign item to the per-request policy to use the custom port instead of port 443.
-
On the Main tab, click Access > Profiles / Policies.
The Access Profiles (Per-Session Policies) screen opens.
-
In the Per-Session Policy column, click the Edit link for the access profile you want to configure.
The visual policy editor opens the access policy in a separate screen.
-
Click the (+) icon anywhere in the access policy to add a new item.
Note: Only an applicable subset of access policy items is available for selection in the visual policy editor for any access profile type.
A popup screen opens, listing predefined actions on tabs such as General Purpose, Authentication, and so on.
-
On the Assignment tab, select Variable Assign and click Add Item.
A properties screen opens.
-
To use a port other than the default (443) for HTTPS traffic, add this entry:
-
Click Add new entry.
A new line is added to the list of entries.
-
Click the change link next to the empty entry.
A dialog box opens, where you can enter a variable and an expression.
-
In the field on the left, type
view.signal_port. -
On the right, select Text in place of Custom Expression, and type the port number in the field.
-
Click Finished.
The popup screen closes.
-
-
Click Save.
The properties screen closes and the policy displays.
-
Click the Apply Access Policy link to apply and activate the changes to the policy.