Updated Date: 07/07/2026
Using APM as a Proxy with Workspace One
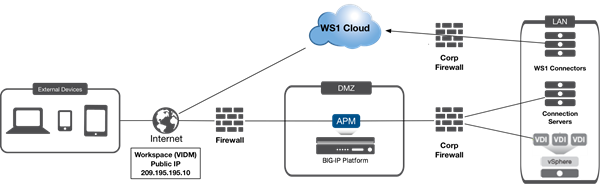
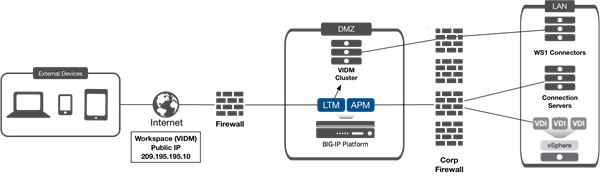
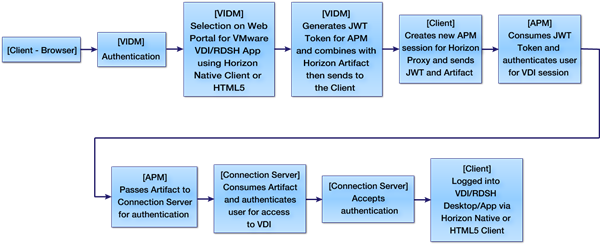
This implementation describes how to set up Workspace One Cloud as an Identity Provider (IDP) in front of F5 Access Policy Manager (APM) as a Service Provider (SP) using APM as a gateway for VMware Horizon. The configuration creates the single pane of glass that Workspace One/Identity Manager provides with the DMZ security and scalability that F5 PCoIP/Blast Proxy brings with VMware Horizon.
Workspace One and VMware Identity Manager combine applications and desktops into a single, aggregated workspace. Employees can then access the desktops and applications regardless of where they are based.
Instead of being deployed on-premise within a datacenter, Workspace One Cloud is deployed in the cloud. Organizations can centralize assets, devices, and applications, and manage users and data securely. The system also gains access to upgrades in real-time preventing maintenance outages during upgrades.
Together, VMware and F5 integrate additional layers of security and provide gateway access using Workspace One Cloud and Identity Manager.
VMware Identity Manager combines applications and desktops in a single, aggregated workspace. Employees can then access the desktops and applications regardless of where they are based. With fewer management points and flexible access, Identity Manager reduces the complexity of IT administration.
Identity Manager is delivered as a virtual appliance that is easy to deploy onsite and integrate with existing enterprise services or can be deployed on a Windows platform. Organizations can centralize assets, devices, and applications and manage users and data securely behind the firewall. Users can share and collaborate with external partners and customers securely when policy allows.
F5 and VMware have developed an integration to add additional layers of security and provide gateway access with VMware Identity Manager.
The following prerequisites must be completed before proceeding with the APM and Workspace One configuration. For additional information on BIG-IP system tasks, refer to the BIG-IP documentation on support.f5.com.
-
Create and import an SSL certificate that contains the load-balanced FQDN to use for Identity Manager Portal. (VIDM deployments only)
-
Upload the following to the BIG-IP system: (VIDM deployments only).
-
SSL certificate
-
Private Key for the load-balanced FQDN certificate
-
Primary CA or Root CA for the SSL certificate you uploaded to the BIG-IP system
Note: The Primary or Root CA for the FQDN certificate is also uploaded to the BIG-IP system and must be loaded onto each Identity Manager appliance.
-
-
Deploy and configure Workspace One and VMware Identity Manager.
- For VMware Identity Manager, configure a (3-Node) behind a LTM FQDN VIP on the BIG-IP system and set up VIDM in the domain and Horizon environment.
- For Workspace One Cloud, set up the environment with connectors to the domain and Horizon environment.
-
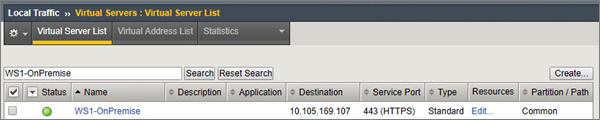
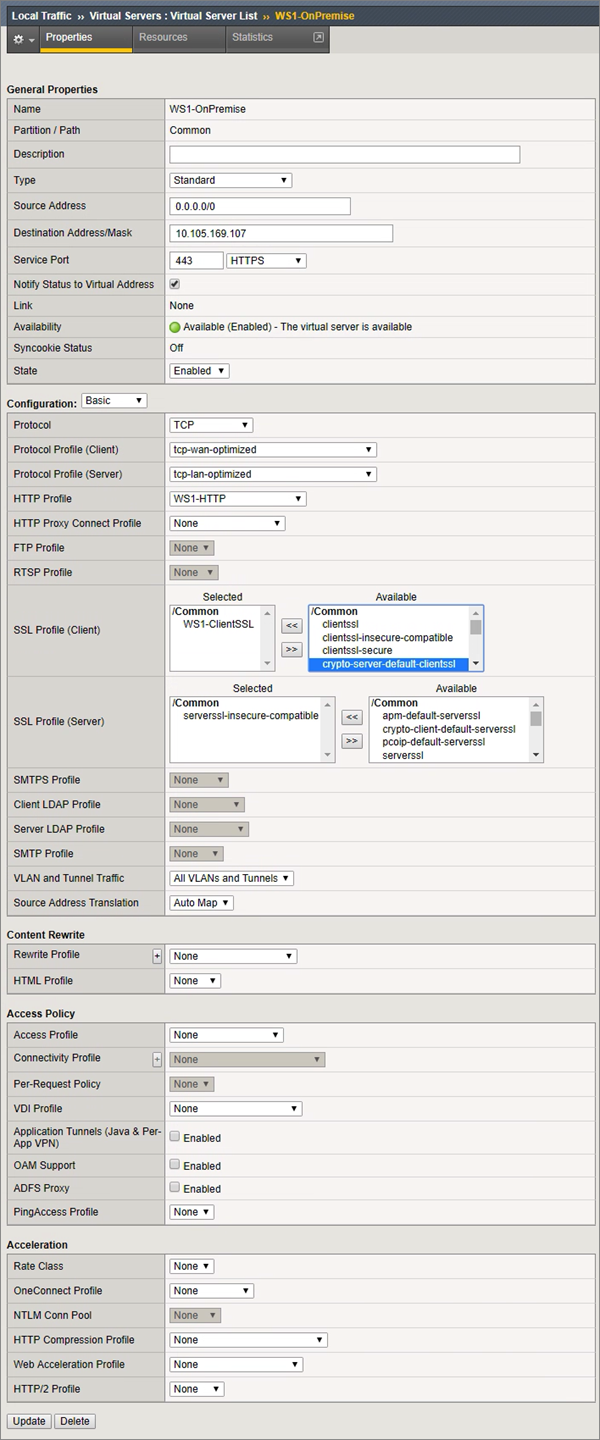
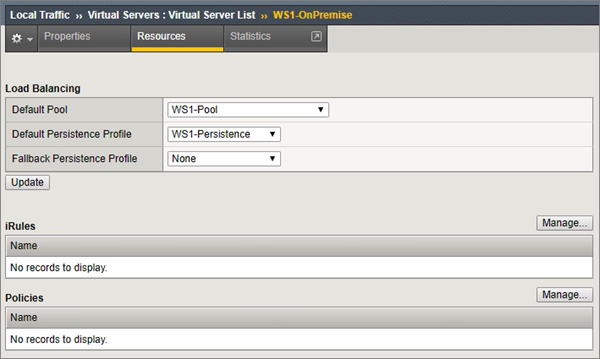
Set up and configure VMware Horizon behind an APM VIP on the BIG-IP system (the VIP can be deployed using the iAPP).
Note: VMware recommends using certificates that support Subject Alternate Names (SANs) defining each of the node FQDNs (public or internal) within the load-balanced VIP FQDN.
Although you can use wildcard certificates, due to wildcard certificate formats, SAN support is not typically available with wildcards from public CAs; public CAs may complain about supplying an internal FQDN as a SAN value even if they do support SAN values. Additionally, some VMware Identity Manager features may not be available with wildcard certificates when SAN support is not defined.
For additional details on VIDM LTM configuration, refer to the F5 integration guide Load Balancing VMware Identity Manager located at https://f5.com/Portals/1/PDF/Partners/f5-big-ip-vmware-workspaceone-integration-guide.pdf.
For additional details on Horizon APM configuration, refer to the F5 Deployment guide Deploying F5 with VMware View and Horizon View located at https://www.f5.com/pdf/deployment-guides/vmware-horizon-view-dg.pdf.
Refer to the screen shots to confirm that the prerequisites for vIDM LTM configuration have been completed.
For additional details on vIDM LTM configuration, refer to the F5 integration guide Load Balancing VMware Identity Manager located at https://f5.com/Portals/1/PDF/Partners/f5-big-ip-vmware-workspaceone-integration-guide.pdf.
Refer to the screen shots to confirm that the prerequisites for Horizon APM configuration have been completed.
For additional details on Horizon APM configuration, refer to the F5 Deployment guide Deploying F5 with VMware View and Horizon View located at https://www.f5.com/pdf/deployment-guides/vmware-horizon-view-dg.pdf.
You need to be sure that either the Workspace One Cloud is deployed and set up with connectors, and that VMware Horizon and/or the VIDM environment is set up behind the load balancer and configured for VMware Horizon.
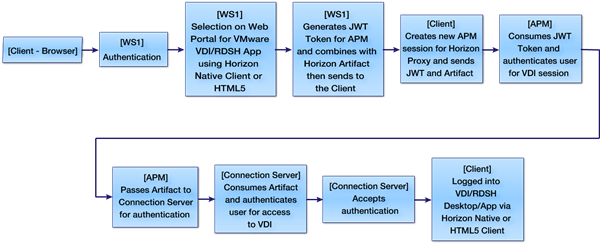
You start by configuring the vIDM/WS1 environment to work with Access Policy Manager (APM).
-
In a browser, log in as an Admin to the VIDM/WS1 FQDN (in this example,
https://myws1-onprem.bd.f5.com).
-
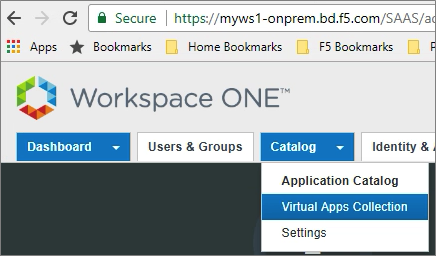
From the Catalog menu, select Virtual Apps Collection.
-
Click Virtual App Configuration.

-
Check that a Horizon environment is set up and configured for the integration.

-
From the Catalog menu, select Virtual Apps Collection.
-
Click Virtual App Settings.

-
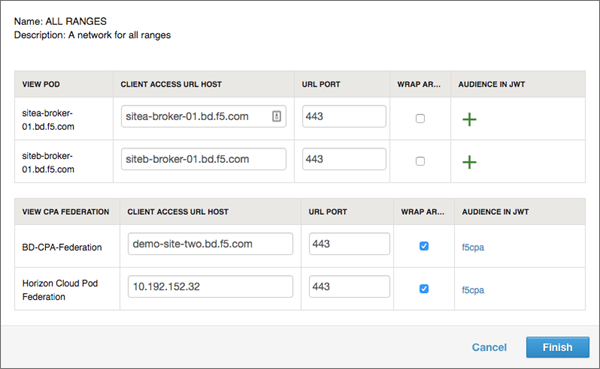
Click the Network Settings tab, and select All Ranges.
-
In the All Ranges Network Setting:
-
Select Wrap Artifact in JWT on the Horizon Environment that was previously configured.
-
Click the + under Audience in JWT next to the checkbox and type a unique name (for example,
f5cpa).Save this name. You will need it when creating OAUTH resources.
-
Click Save.
-
When completed, vIDM/WS1 is set up.
Next, you can configure the required Access Policy Manager settings.
On the BIG-IP system, you need to disable strict updates in the Horizon APM iApp.
-
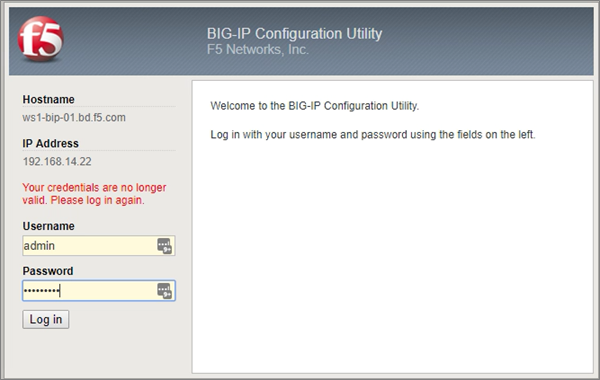
Log on to the BIG-IP system.
-
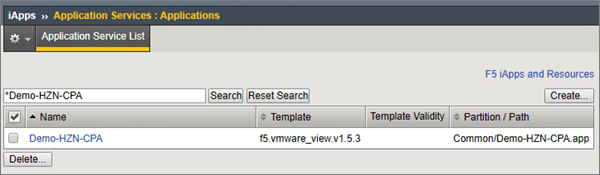
On the Main tab, click iApps > Application Service.
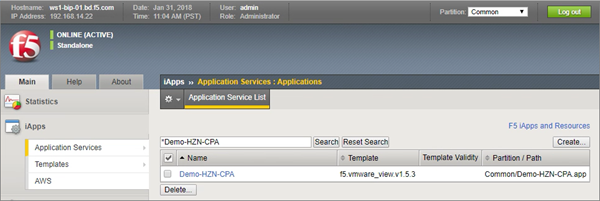
The Application Service List opens.
-
Select the iApp deployed for the Horizon APM configuration.
The iApp opens showing the properties.
-
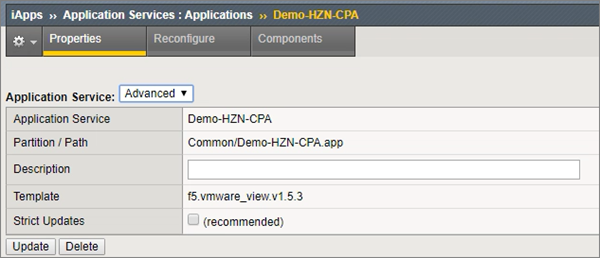
On the Properties tab, by Application Service, select Advanced.
-
Clear the Strict Updates check box.
-
Click Update.
The Horizon APM configuration iApp is updated.
On the BIG-IP system, you need to create OAUTH resources.
-
On the Main tab, click Access > Federation > OAuth Client / Resource Server > Provider

The Provider list screen opens.
-
Click Create.
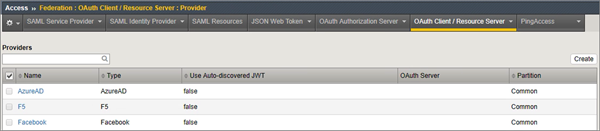
A new provider is created.
-
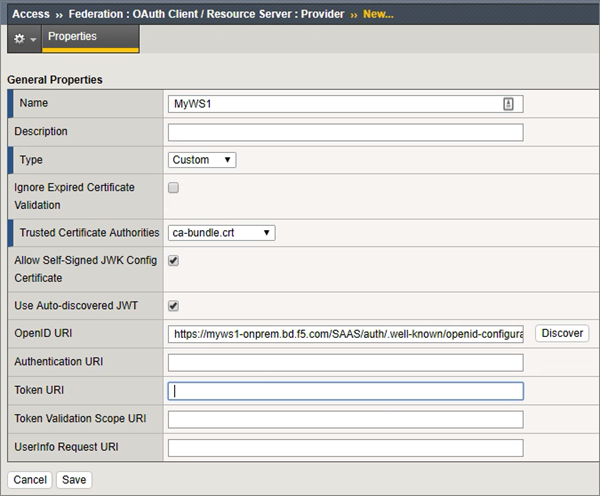
For Name, type a unique name.
-
For Type, select Custom.
-
In the OpenID URI field, type the following (replacing <MyVIDMFQDN> with the name you used).
https://<MyVIDMFQDN>/SAAS/auth/.well-known/openid-configuration -
Click Discover.
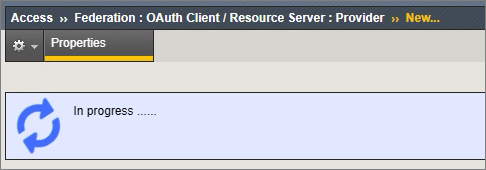
During the discovery process, an
In Progress...message displays. If the discovery is successful, some of the previously empty areas are populated with data, and additional boxes appear.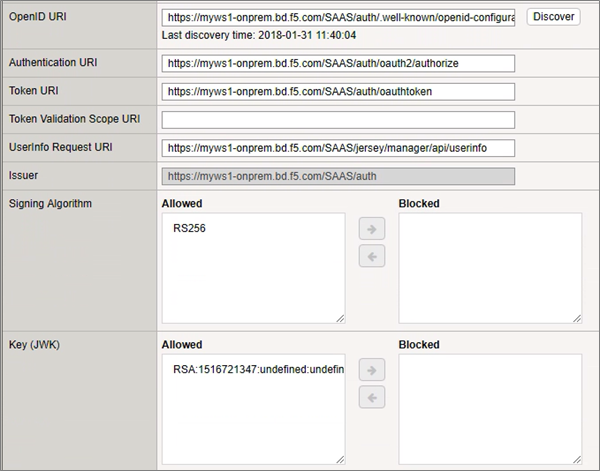
-
Click Save to complete the Provider configuration.
-
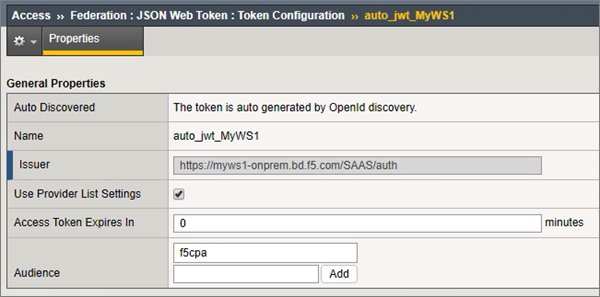
On the Main tab, click Access > Federation > JSON Web Token > Token Configuration.
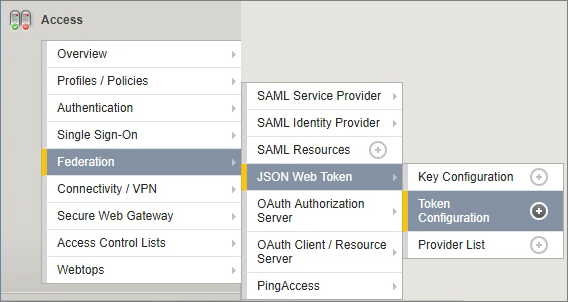
You see the token that was automatically created during the discovery process. Make sure that it contains the correct vIDM FQDN in the Issuer column.

-
Click the name of the automatically created token.
-
Add the audience to the token:
-
In the Audience field, type the name of the audience (created previously in the vIDM/WS1 configuration: Enabling JWT section), and click Add.
-
Click Save.
-
-
On the Main tab, click Access > Federation > JSON Web Token > Provider List.

The Provider List opens.
-
Click Create.
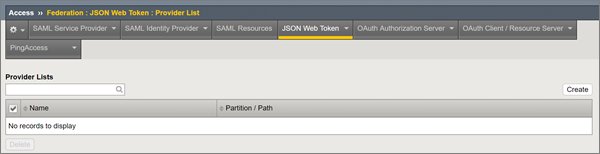
A new JSON Web Token Provider is created.
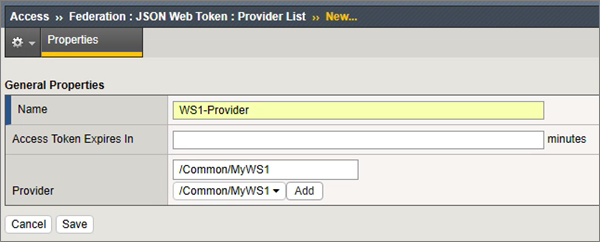
-
For Name, type a unique name.
-
From Provider, select the OAUTH Client / Resource Server Provider previously created, and click Add.
Next, you can modify the Horizon APM access policy.
You need to have previously created a Horizon access policy as part of the prerequisites.
You need to modify the Horizon access policy.
-
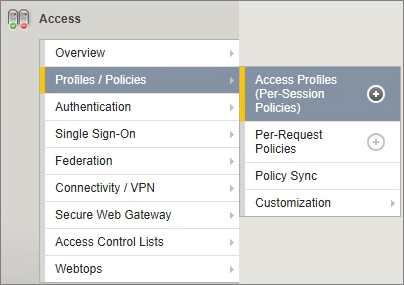
On the Main tab, click Access > Profiles / Polices > Access Profiles (Per Session Policies).
-
In the Horizon APM access policy (previously created), click Edit in the Per-Session Policy column.

The access policy opens in the Visual Policy Editor. It shows a typical Horizon iApp deployment.

-
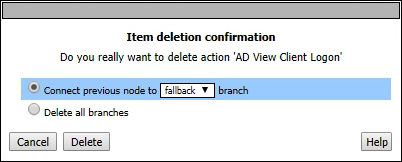
Remove all of the policy items except Client Type, View Client Resource Assign, and Browser Assign.
-
To delete the other items, click the X within the box (usually top right corner).
A confirmation dialog appears.
-
Keep the default option Connect previous node to fallback branch selected.
-
Click Delete.
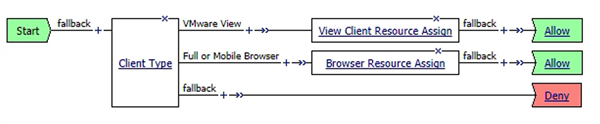
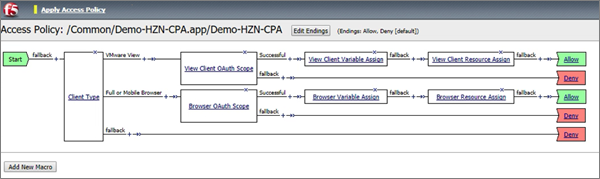
The resulting access policy should look like this.
-
-
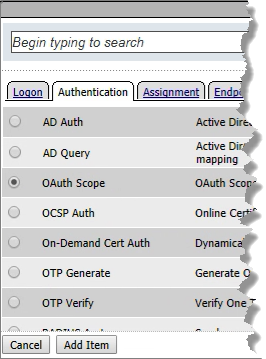
Click the + between the VMware View Client Type and View Client Resource Assign to create an item between the two.
-
On the Authentication tab, select OAUTH Scope, and click Add Item.
-
Define the OAUTH Scope:

-
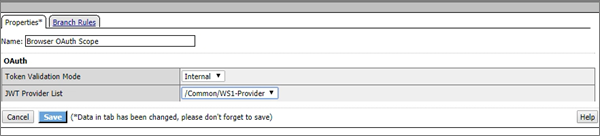
Type a unique name (because the View Client Path specifiesView Client OAuth Scope).
-
From the Token Validation Mode list, select Internal.
-
From the JWT Provider List, select the JWT Provider previously created.
-
Click Save.
The updated access policy should look like this.

-
-
Click the + next to Successful between View Client OAuth Scope and View Client Resource Assign to create an item between the two.
-
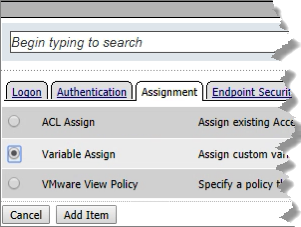
On the Assignment tab, select Variable Assign, and click Add Item.
-
Define the Variable Assign:
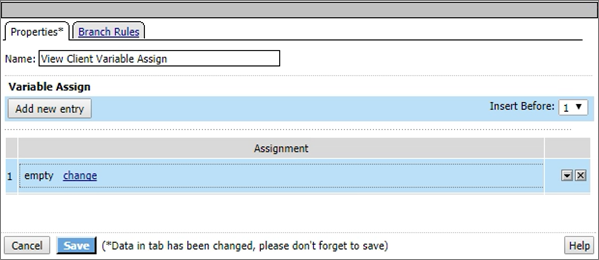
-
Type a unique name (because the View Client Path specifiesView Client Variable).
-
Click Add new entry.
-
Click the change link on line 1.
-
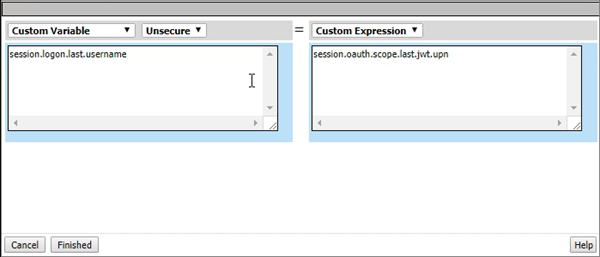
On the left, type
session.logon.last.username. -
On the right, type
session.oauth.scope.last.jwt.upn. -
Click Finished.
-
-
Click Save.
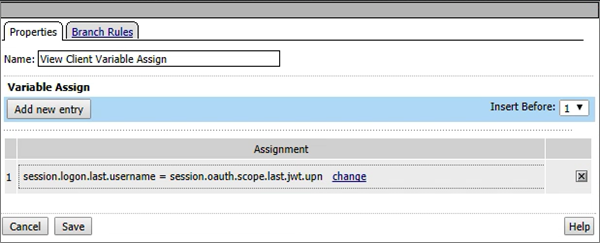
The updated access policy should look like this.

-
Between Client Type and Browser Resource Assign, click the + next to Full or Mobile Browser to create an item.
-
On the Authentication tab, select OAUTH Scope, and click Add Item.
-
Define the OAUTH Scope:
-
Type a unique name (because the View Client Path specifiesView Client OAuth Scope).
-
From the Token Validation Mode list, select Internal.
-
From the JWT Provider List, select the JWT Provider previously created.
-
Click Save.
The updated access policy should look like this.

-
-
Click the + between Browser OAuth Scope and Browser Resource Assign in the Successful line to create an object between the two.
-
Select Variable Assign from the Assignment tab, and click Add Item.
-
Define the Variable Assign:

-
Type a unique name (because the Browser Path specifiesBrowser Variable Assign).
-
Click Add new entry.
-
Click the change link on line 1.
-
On the left, type
session.logon.last.username. -
On the right, type
session.oauth.scope.last.jwt.upn. -
Click Finished.
-
-
Click Save.
The updated access policy should look like this.
-
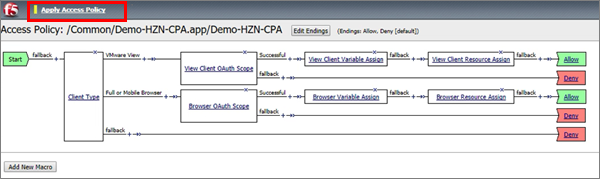
In the top left of the screen, click Apply Access Policy to save all changes and apply them.
It is a good idea to validate that a JWT token is being created and sent to the appropriate site. You perform the validation using the Google Chrome web browser.
-
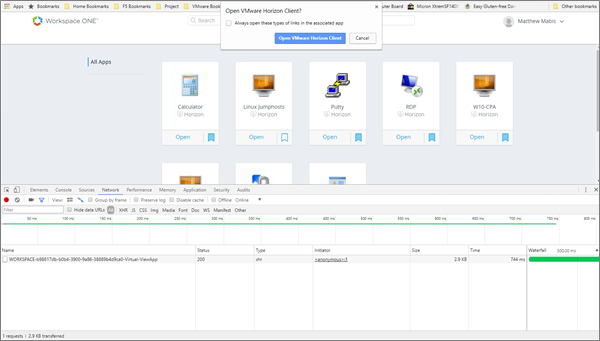
From the vIDM/WS1 portal (opened using Chrome), log in as a user with access to the Horizon resources.
-
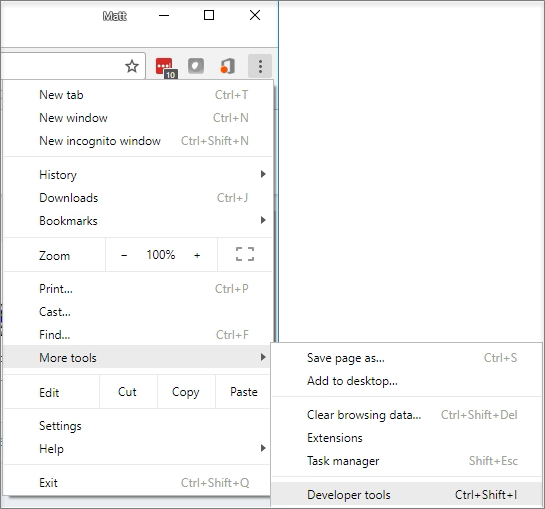
In the upper-right of the browser, click the three dots then More Tools > Developer Tools.
The Developer Tools Console opens.
-
In the Developer Console, select Network.
-
In the catalog section of the Workspace One Portal, select an application or desktop and click Open for the application or desktop that triggers the event to launch either the HTML5 or Native Client.
In the Developer Console, an item typically named Workspace-****** appears.
-
Select the object you just created (Workspace-***<GUID>***).
Note: The URL/URI string includes the FQDN of the Horizon environment.
-
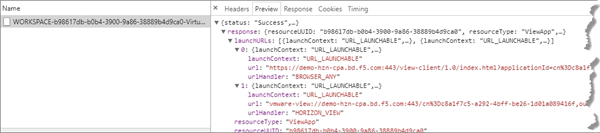
In the Preview tab of the Developer Console, expand Response:.
-
Expand launchURLs:.
-
Expand both the 0: and 1: sections to reveal the launch URLs.
-
-
Review the launch URL strings field called SAMLart=.
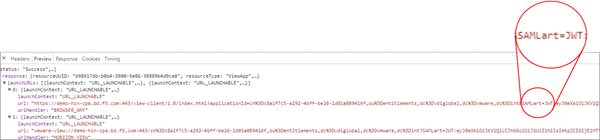
- If the line specifies SAMLart=JWT:, then VMware Identity Manger is wrapping the JWT token within the SAML artifact field for F5 to decrypt.
- If the SAMLart= field does not contain JWT:, then the Horizon Environment that you are trying to access is not configured for JWT wrapping.
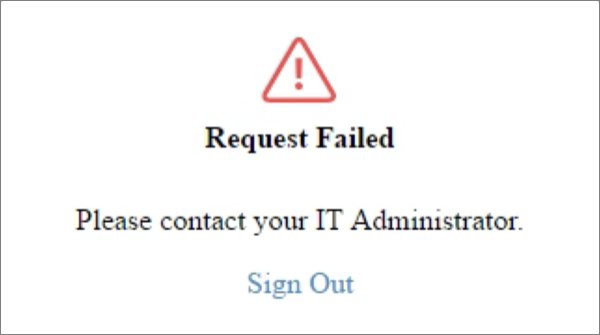
If you see the following error or a similar one, check the DNS settings on your vIDM servers. Make sure they point to the LTM VIP not the APM VIP or you may receive an error.