Updated Date: 07/07/2026
Configuring DNS Caching
You can configure a DNS cache on the BIG-IP® system to allow the system to more quickly respond to repeated DNS queries. You can configure a simple DNS cache or a DNS cache with more advanced resolving and validation functions. There are three types of DNS cache configurations available on the BIG-IP system: a transparent cache, a resolver cache, and a validating resolver cache.
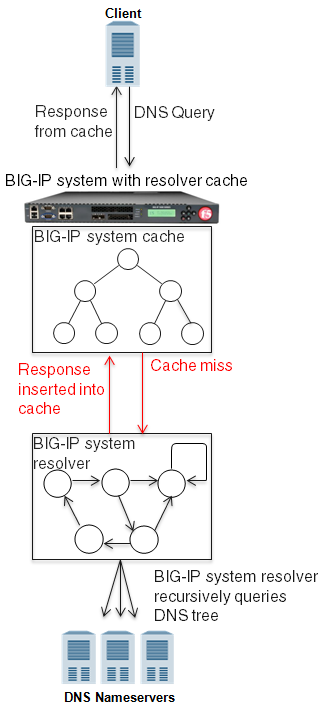
Typically, you configure a resolver cache where the BIG-IP system either acts as the LDNS for clients or is in the LDNS resolver path for clients. By caching DNS responses and answering queries from the cache, the BIG-IP system is able to immediately respond to subsequent client requests for the same resource. This enhances DNS performance in two significant ways. First, answering a DNS query from the cache is faster and has a very short latency, because the sooner a client gets a DNS response, the faster the client can access the Internet resource. Secondly, caching DNS responses reduces the number of queries that have to be resolved. The BIG-IP system uses the cache to resolve the same query from multiple clients handling many more queries per second than a typical DNS resolver.
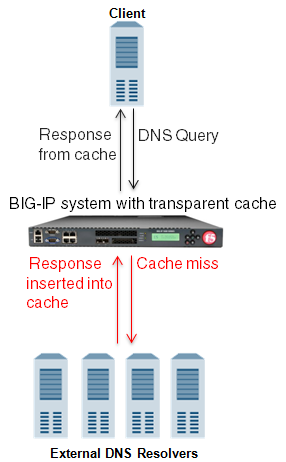
You can configure a transparent cache on the BIG-IP® system to use external DNS resolvers to resolve queries, and then cache the responses from the resolvers. The next time the system receives a query for a response that exists in the cache, the system immediately returns the response from the cache. The transparent cache contains messages and resource records.
A transparent cache in the BIG-IP system consolidates content that would otherwise be cached across multiple external resolvers. When a consolidated cache is in front of external resolvers (each with their own cache), it can produce a much higher cache hit percentage.
F5 Networks recommends that you configure the BIG-IP system to forward queries, which cannot be answered from the cache, to a pool of local DNS servers rather than the local BIND instance because BIND performance is slower than using multiple external resolvers.
Note: For systems using the DNS Express™ feature, the BIG-IP system first processes the requests through DNS Express, and then caches the responses.
Important: The DNS Cache feature is available only when the BIG-IP system is licensed for DNS Services.
You can configure a resolver cache on the BIG-IP® system to resolve DNS queries and cache the responses. The next time the system receives a query for a response that exists in the cache, the system returns the response from the cache. The resolver cache contains messages, resource records, and the nameservers the system queries to resolve DNS queries.
It is important for network architects to note that it is possible to configure the local BIND instance on the BIG-IP® system to act as an external DNS resolver. However, F5 Networks does not recommend this approach, because the performance of BIND is slower than using a resolver cache.
Important: The DNS Cache feature is available only when the BIG-IP system is licensed for DNS Services.
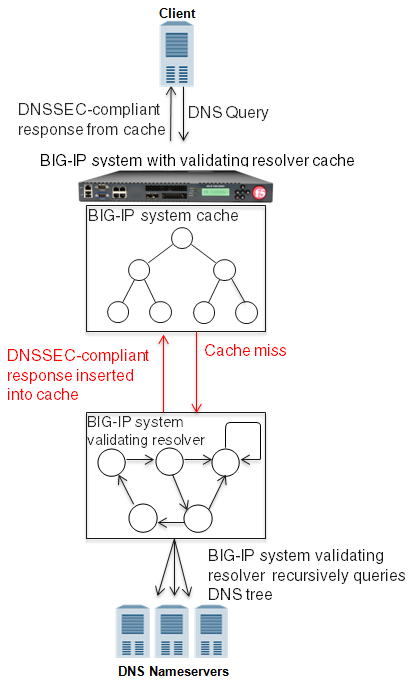
You can configure a validating resolver cache on the BIG-IP® system to recursively query public DNS servers, validate the identity of the DNS server sending the responses, and then cache the responses. The next time the system receives a query for a response that exists in the cache, the system returns the DNSSEC-compliant response from the cache. The validating resolver cache contains messages, resource records, the nameservers the system queries to resolve DNS queries, and DNSSEC keys.
Using the validating resolver cache, the BIG-IP system mitigates cache poisoning by validating DNS responses using DNSSEC validation. This is important, because attackers can attempt to populate a DNS cache with erroneous data that redirects clients to fake web sites, or downloads malware and viruses to client computers. When an authoritative server signs a DNS response, the validating resolver verifies the data before entering the data into the cache. Additionally, the validating resolver cache includes a built-in filter and detection mechanism that rejects unsolicited DNS responses.
Important: The DNS Cache feature is available only when the BIG-IP system is licensed for DNS Services.
The transparent, resolver, and validating resolver DNS caches contain a message cache and a resource record cache. The resolver and validating resolver DNS caches also contain a nameserver cache. Additionally, the validating resolver cache contains a key cache.
- Message cache
- The message cache contains the entire contents of a particular DNS response including the supporting records.
- Resource Record cache
- The resource record cache contains the individual record elements in the DNS response, which may include an SOA record, DNSSEC key records, glue records, and other supporting records.
- Nameserver cache
- The nameserver cache contains information about the public DNS nameservers the resolver has used to fill the cache. Often there is more than one nameserver that is listed as an authority for a zone; therefore, the cache entries track metrics for the nameservers so that the system can send new queries to the best nameserver. The cache entries include metrics, such as time to live (TTL), round trip times (RRT), and properties, such as EDNS support and zone lameness.
- Key cache
- The key cache contains the DNSKEY resource records and tracks the DNSSEC keys for use in DNSSEC validation. This cache also contains information about the validity of the DNSSEC keys.
Configure the global settings on the BIG-IP system to specify how the system manages the DNS caches you create.
-
On the Main tab, click DNS > Settings > Caches.
-
In the Minimum TTL field, type the minimum number of seconds you want the system to cache DNS resource records.
Note: When you configure this setting the system can cache resource records longer than the owner of the records intended.
-
In the Maximum TTL field, type the number of seconds after which you want the system to re-query for resource records.
Warning: With this setting, the system can re-query for resource records sooner than the owner of the records intended.
-
In the EDNS Buffer Size field, type the number of bytes you want the system to advertise as the EDNS buffer size in UDP queries.
The default value for EDNS is
4096bytes. -
Click Update.
After you configure the DNS global settings, create at least one DNS cache.
You can configure a transparent cache on the BIG-IP® system to use external DNS resolvers to resolve queries, and then cache the responses from the resolvers. The next time the BIG-IP system receives a query for a response that exists in the cache, the system immediately returns the response from the cache. The transparent cache contains messages and resource records.
A transparent cache in the BIG-IP system consolidates content that would otherwise be cached across multiple external resolvers. When a consolidated cache is in front of external resolvers (each with their own cache), it can produce a much higher cache hit percentage.
Tip: F5 Networks recommends that you configure the BIG-IP system to forward queries, which cannot be answered from the cache, to a pool of local DNS servers rather than the local BIND instance because BIND performance is slower than using multiple external resolvers.
Note: For systems using the DNS Express™ feature, the BIG-IP system first processes the requests through DNS Express, and then caches the responses.
Important: The DNS Cache feature is available only when the BIG-IP system is licensed for DNS Services.
Create a transparent cache on the BIG-IP system when you want the system to cache DNS responses from external DNS resolvers.
-
On the Main tab, click DNS > Caches > Cache List.
The DNS Cache List screen opens.
-
Click Create.
The New DNS Cache screen opens.
-
In the Name field, type a name for the cache.
-
From the Resolver Type list, select Transparent.
-
Click Finished.
Associate the DNS cache with a custom DNS profile.
Ensure that at least one transparent cache exists on the BIG-IP system.
To enable the BIG-IP system to cache responses to DNS queries, create a custom DNS profile and associate it with a transparent DNS cache.
-
On the Main tab, click DNS > Delivery > Profiles > DNS or Local Traffic > Profiles > Services > DNS.
The DNS profile list screen opens.
-
Click Create.
The New DNS Profile screen opens.
-
In the Name field, type a unique name for the profile.
-
In the General Properties area, from the Parent Profile list, accept the default dns profile.
-
Select the Custom check box.
-
In the DNS Features area, from the Use BIND Server on BIG-IP list, select Disabled.
-
In the DNS Features area, from the DNS Cache list, select Enabled.
When you enable the DNS Cache option, you must also select a DNS cache from the DNS Cache Name list.
-
In the DNS Features area, from the DNS Cache Name list, select the DNS cache that you want to associate with this profile.
You can associate a DNS cache with a profile, even when the DNS Cache option, is Disabled.
-
Click Finished.
Assign the custom DNS profile to the virtual server or listener that handles the DNS traffic from which you want to cache responses.
Ensure that at least one custom DNS profile that is configured for DNS caching exists on the BIG-IP system.
Assign a custom DNS profile to a listener when you want the BIG-IP system to perform DNS caching on traffic that the listener handles.
Note: This task applies only to DNS-provisioned systems.
-
On the Main tab, click DNS > Delivery > Listeners.
The Listeners List screen opens.
-
Click the name of the listener you want to modify.
-
In the Service area, from the DNS Profile list, select a custom DNS profile configured for DNS caching.
-
Click Update.
Create a custom DNS monitor to send DNS queries, generated using the settings you specify, to a pool of DNS servers and validate the DNS responses.
Important: When defining values for custom monitors, make sure you avoid using any values that are on the list of reserved keywords. For more information, see SOL 3653 (for version 9.0 systems and later) on the AskF5 technical support web site at www.askf5.com.
-
On the Main tab, click DNS > Delivery > Load Balancing > Monitors or Local Traffic > Monitors.
The Monitor List screen opens.
-
Click Create.
The New Monitor screen opens.
-
In the Name field, type a name for the monitor.
-
From the Type list, select DNS.
-
In the Query Name field, type the domain name that you want the monitor to query.
For the zone,
siterequest.com, you might want the monitor to query forwww.siterequest.com. -
Configure additional settings based on your network requirements.
-
Click Finished.
Ensure that at least one custom DNS monitor exists on the BIG-IP system. Gather the IP addresses of the DNS servers that you want to include in a pool to which the BIG-IP system load balances DNS traffic.
Create a pool of local DNS servers when you want to load balance DNS queries to other DNS servers.
-
On the Main tab, click the applicable path.
- DNS > Delivery > Load Balancing > Pools
- Local Traffic > Pools The Pool List screen opens.
-
Click Create.
The New Pool screen opens.
-
In the Name field, type a unique name for the pool.
-
For the Health Monitors setting, from the Available list, select the custom DNS monitor you created and move the monitor to the Active list.
-
Using the New Members setting, add each resource that you want to include in the pool:
-
(Optional) In the Node Name field, type a name for the node portion of the pool member.
-
In the Address field, type an IP address.
-
In the Service Port field, type a port number, or select a service name from the list.
-
(Optional) In the Priority field, type a priority number.
-
Click Add.
-
-
Click Finished.
Ensure that you have first created a DNS cache and associated it with a DNS profile, and have assigned the profile to either an LTM virtual server or a BIG-IP DNS listener.
You can view statistics to determine how well a DNS cache on the BIG-IP system is performing.
-
On the Main tab, click Statistics > Module Statistics > DNS > Caches.
The DNS Caches Status Summary screen opens.
-
From the Statistics Type list, select Caches.
Information displays about the DNS caches.
Record type Description Queries Total number of queries handled by the cache. Responses Total number of responses sent from the cache. Answered Locally Number of locally answered queries handled by the cache. Using Nameservers Number of nameservers using queries handled by the cache. -
In the Details column for a cache, click View to display detailed information about the cache.
You can view records in a DNS cache to determine how well a specific cache on the BIG-IP system is performing.
-
Log in to the command-line interface of the BIG-IP system.
-
At the BASH prompt, type the command:
tmsh -
At the
tmshprompt, type the command:show ltm dns cache records rrset cache <cache name>For example, the command:
show ltm dns cache records rrset cache *my\_transparent\_cache*, displays the resource records in the cache named my_transparent_cache.
Ensure that you have created a DNS cache and a DNS profile and have assigned the profile to either an LTM virtual server or a BIG-IP DNS listener.
You can view DNS cache statistics to determine how well a specific cache on the BIG-IP system is performing.
-
On the Main tab, click Statistics > Module Statistics > DNS > Caches.
The DNS Caches Status Summary screen opens.
-
From the Statistics Type list, select Caches.
-
In the Details column for a cache, click View to display detailed information about the cache.
You can view DNS cache statistics to determine how well a specific cache on the BIG-IP system is performing.
-
On the Main tab, click Statistics > Module Statistics > DNS > Caches.
The DNS Caches Status Summary screen opens.
-
From the Statistics Type list, select Caches.
Information displays about the DNS caches.
Record type Description Queries Total number of queries handled by the cache. Responses Total number of responses sent from the cache. Answered Locally Number of locally answered queries handled by the cache. Using Nameservers Number of nameservers using queries handled by the cache.
Determine the amount of memory the BIG-IP system has and how much of that memory you want to commit to DNS caching. View the statistics for a cache to determine how well the cache is working.
You can change the size of a DNS cache to fix cache performance issues.
-
On the Main tab, click DNS > Caches > Cache List.
The DNS Cache List screen opens.
-
Click the name of the cache you want to modify.
The properties screen opens.
-
In the Message Cache Size field, type the maximum size in bytes for the DNS message cache.
The BIG-IP system caches the messages in a DNS response in the message cache. A higher maximum size makes it possible for more DNS responses to be cached and increases the cache hit percentage. A lower maximum size forces earlier eviction of cached content, but can lower the cache hit percentage.
Important: When you change the value of the Message Cache Size, the records in the message cache are automatically removed. If you do not want to clear the message cache, do not change the value of this parameter.
-
In the Resource Record Cache Size field, type the maximum size in bytes for the DNS resource record cache.
The BIG-IP system caches the supporting records in a DNS response in the Resource Record cache. A higher maximum size makes it possible for more DNS responses to be cached and increases the cache hit percentage. A lower maximum size forces earlier eviction of cached content, but can lower the cache hit percentage.
Warning: When you change the value of the Resource Record Cache Size, the records in the resource record cache are automatically removed from the cache. If you do not want to clear the resource record cache, do not change the value of this parameter.
-
In the Nameserver Cache Count field, type the maximum number of DNS nameservers for which the BIG-IP system caches connection and capability data.
Important: When you change the value of the Nameserver Cache Count, the records in the nameserver cache are automatically removed from the cache. If you do not want to clear the nameserver cache, do not change the value of this parameter.
-
Click Finished.
You can clear all records from a specific DNS cache on the BIG-IP system.
-
On the Main tab, click DNS > Caches > Cache List.
The DNS Cache List screen opens.
-
On the menu bar, click Statistics.
The Local Traffic Statistics screen opens.
-
Select the check box next to the cache you want to clear, and then click Clear Cache.
You can clear groups of records of a specific type from a DNS cache by resizing the cache that contains those records.
-
On the Main tab, click DNS > Caches > Cache List.
The DNS Cache List screen opens.
-
Click the name of the cache you want to modify.
The properties screen opens.
-
In the DNS Cache area, to clear specific records from the cache, do one of the following:
|
To clear messages from the cache: |
change the value in the Message Cache Size field. |
|
To clear resource records from the cache: |
change the value in the Resource Record Cache Size field. |
|
To clear nameservers from the cache: |
change the value in the Name Server Cache Count field. |
|
To clear DNSSEC keys from the cache: |
change the value in the DNSSEC Key Cache Size field. |
- Click Update.
The BIG-IP system clears the records in the caches that you resized.
You can clear specific records from a DNS cache using tmsh. For example, you can delete all RRSET records or only the A records in the specified cache.
Tip: In tmsh, you can use the command completion feature to discover the types of records that are available for deletion.
-
Log in to the command-line interface of the BIG-IP system.
-
At the BASH prompt, type the command:
tmsh -
At the
tmshprompt, to navigate to the directory that contains the DNS cache records, type the command:ltm dns cache records -
To delete specific DNS cache records, type a variation of this command:
delete *<cache-type>* type *<record-type>* cache *<cache-name>*For example, the command
delete rrset type a cache *my\_resolver\_cache*, deletes the A records from the resource record cache of the resolver cache named my_resolver_cache.
You can configure the BIG-IP® system to resolve DNS queries and cache the responses by creating a resolver DNS cache. The next time the BIG-IP system receives a query for a response that exists in the cache, the system returns the response from the cache. The resolver cache contains messages, resource records, and the nameservers the system queries to resolve DNS queries.
Important: The DNS Cache feature is available only when the BIG-IP system is licensed for DNS Services.
Create a resolver cache on the BIG-IP system when you want the system to resolve DNS queries and cache responses.
-
On the Main tab, click DNS > Caches > Cache List.
The DNS Cache List screen opens.
-
Click Create.
The New DNS Cache screen opens.
-
In the Name field, type a name for the cache.
-
From the Resolver Type list, select Resolver.
-
Click Finished.
Associate the DNS cache with a custom DNS profile.
Ensure that at least one DNS cache exists on the BIG-IP system.
To enable the BIG-IP system to resolve DNS queries and cache the responses, create a custom DNS profile and associate it with a resolver DNS cache.
-
On the Main tab, click DNS > Delivery > Profiles > DNS or Local Traffic > Profiles > Services > DNS.
The DNS profile list screen opens.
-
Click Create.
The New DNS Profile screen opens.
-
In the Name field, type a unique name for the profile.
-
Select the Custom check box.
-
In the DNS Features area, from the Use BIND Server on BIG-IP list, select Disabled.
-
In the DNS Features area, from the DNS Cache list, select Enabled.
When you enable the DNS Cache option, you must also select a DNS cache from the DNS Cache Name list.
-
In the DNS Features area, from the DNS Cache Name list, select the DNS cache that you want to associate with this profile.
You can associate a DNS cache with a profile, even when the DNS Cache option, is Disabled.
-
Click Finished.
Assign the custom DNS profile to the virtual server or listener that handles the DNS traffic.
Ensure that at least one custom DNS profile that is configured for DNS caching exists on the BIG-IP system.
Assign a custom DNS profile to a listener when you want the BIG-IP system to perform DNS caching on traffic that the listener handles.
Note: This task applies only to DNS-provisioned systems.
-
On the Main tab, click DNS > Delivery > Listeners.
The Listeners List screen opens.
-
Click the name of the listener you want to modify.
-
In the Service area, from the DNS Profile list, select a custom DNS profile configured for DNS caching.
-
Click Update.
Ensure that you have first created a DNS cache and associated it with a DNS profile, and have assigned the profile to either an LTM virtual server or a BIG-IP DNS listener.
You can view statistics to determine how well a DNS cache on the BIG-IP system is performing.
-
On the Main tab, click Statistics > Module Statistics > DNS > Caches.
The DNS Caches Status Summary screen opens.
-
From the Statistics Type list, select Caches.
Information displays about the DNS caches.
Record type Description Queries Total number of queries handled by the cache. Responses Total number of responses sent from the cache. Answered Locally Number of locally answered queries handled by the cache. Using Nameservers Number of nameservers using queries handled by the cache. -
In the Details column for a cache, click View to display detailed information about the cache.
You can view records in a DNS cache to determine how well a specific cache on the BIG-IP system is performing.
-
Log in to the command-line interface of the BIG-IP system.
-
At the BASH prompt, type the command:
tmsh -
At the
tmshprompt, type the command:show ltm dns cache records rrset cache <cache name>For example, the command:
show ltm dns cache records rrset cache *my\_transparent\_cache*, displays the resource records in the cache named my_transparent_cache.
Ensure that you have created a DNS cache and a DNS profile and have assigned the profile to either an LTM virtual server or a BIG-IP DNS listener.
You can view DNS cache statistics to determine how well a specific cache on the BIG-IP system is performing.
-
On the Main tab, click Statistics > Module Statistics > DNS > Caches.
The DNS Caches Status Summary screen opens.
-
From the Statistics Type list, select Caches.
-
In the Details column for a cache, click View to display detailed information about the cache.
You can view DNS cache statistics to determine how well a specific cache on the BIG-IP system is performing.
-
On the Main tab, click Statistics > Module Statistics > DNS > Caches.
The DNS Caches Status Summary screen opens.
-
From the Statistics Type list, select Caches.
Information displays about the DNS caches.
Record type Description Queries Total number of queries handled by the cache. Responses Total number of responses sent from the cache. Answered Locally Number of locally answered queries handled by the cache. Using Nameservers Number of nameservers using queries handled by the cache.
Determine the amount of memory the BIG-IP system has and how much you want to commit to DNS caching. View the statistics for a cache to determine how well the cache is working.
You can change the size of a DNS cache to fix cache performance issues.
-
On the Main tab, click DNS > Caches > Cache List.
The DNS Cache List screen opens.
-
Click the name of the cache you want to modify.
The properties screen opens.
-
In the Message Cache Size field, type the maximum size in bytes for the DNS message cache.
The BIG-IP system caches the messages in a DNS response in the message cache. A higher maximum size makes it possible for more DNS responses to be cached and increases the cache hit percentage. A lower maximum size forces earlier eviction of cached content, but can lower the cache hit percentage.
Important: When you change the value of the Message Cache Size, the records in the message cache are automatically removed. If you do not want to clear the message cache, do not change the value of this parameter.
-
In the Resource Record Cache Size field, type the maximum size in bytes for the DNS resource record cache.
The BIG-IP system caches the supporting records in a DNS response in the Resource Record cache. A higher maximum size makes it possible for more DNS responses to be cached and increases the cache hit percentage. A lower maximum size forces earlier eviction of cached content, but can lower the cache hit percentage.
Warning: When you change the value of the Resource Record Cache Size, the records in the resource record cache are automatically removed from the cache. If you do not want to clear the resource record cache, do not change the value of this parameter.
-
In the Nameserver Cache Count field, type the maximum number of DNS nameservers for which the BIG-IP system caches connection and capability data.
Important: When you change the value of the Nameserver Cache Count, the records in the nameserver cache are automatically removed from the cache. If you do not want to clear the nameserver cache, do not change the value of this parameter.
-
In the Unsolicited Reply Threshold field, change the default value if you are using the BIG-IP system to monitor for unsolicited replies using SNMP.
The system always rejects unsolicited replies. The default value of 0 (off) indicates the system does not generate SNMP traps or log messages when rejecting unsolicited replies. Changing the default value alerts you to a potential security attack, such as cache poisoning or DOS. For example, if you specify 1,000,000 unsolicited replies, each time the system receives 1,000,000 unsolicited replies, it generates an SNMP trap and log message.
-
Click Update.
You can clear all records from a specific DNS cache on the BIG-IP system.
-
On the Main tab, click DNS > Caches > Cache List.
The DNS Cache List screen opens.
-
On the menu bar, click Statistics.
The Local Traffic Statistics screen opens.
-
Select the check box next to the cache you want to clear, and then click Clear Cache.
You can clear groups of records of a specific type from a DNS cache by resizing the cache that contains those records.
-
On the Main tab, click DNS > Caches > Cache List.
The DNS Cache List screen opens.
-
Click the name of the cache you want to modify.
The properties screen opens.
-
In the DNS Cache area, to clear specific records from the cache, do one of the following:
|
To clear messages from the cache: |
change the value in the Message Cache Size field. |
|
To clear resource records from the cache: |
change the value in the Resource Record Cache Size field. |
|
To clear nameservers from the cache: |
change the value in the Name Server Cache Count field. |
|
To clear DNSSEC keys from the cache: |
change the value in the DNSSEC Key Cache Size field. |
- Click Update.
The BIG-IP system clears the records in the caches that you resized.
You can clear specific records from a DNS cache using tmsh. For example, you can delete all RRSET records or only the A records in the specified cache.
Tip: In tmsh, you can use the command completion feature to discover the types of records that are available for deletion.
-
Log in to the command-line interface of the BIG-IP system.
-
At the BASH prompt, type the command:
tmsh -
At the
tmshprompt, to navigate to the directory that contains the DNS cache records, type the command:ltm dns cache records -
To delete specific DNS cache records, type a variation of this command:
delete *<cache-type>* type *<record-type>* cache *<cache-name>*For example, the command
delete rrset type a cache *my\_resolver\_cache*, deletes the A records from the resource record cache of the resolver cache named my_resolver_cache.
You can configure the BIG-IP® system to recursively query public DNS servers, validate the identity of the DNS server sending the responses, and then cache the responses. You do this by configuring a validating resolver cache on the system. The next time the BIG-IP system receives a query for a response that exists in the cache, the system returns the DNSSEC-compliant response from the cache. The validating resolver cache contains messages, resource records, the nameservers the system queries to resolve DNS queries, and DNSSEC keys.
Using the validating resolver cache, the BIG-IP system mitigates cache poisoning by validating DNS responses using DNSSEC validation. This is important, because attackers can attempt to populate a DNS cache with erroneous data that redirects clients to fake web sites, or downloads malware and viruses to client computers. When an authoritative server signs a DNS response, the validating resolver verifies the data before entering the data into the cache. Additionally, the validating resolver cache includes a built-in filter and detection mechanism that rejects unsolicited DNS responses.
Important: The DNS Cache feature is available only when the BIG-IP system is licensed for DNS Services.
Create a validating resolver cache on the BIG-IP system when you want the system to resolve DNS queries, use DNSSEC to validate the responses, and cache the responses.
-
On the Main tab, click DNS > Caches > Cache List.
The DNS Cache List screen opens.
-
Click Create.
The New DNS Cache screen opens.
-
In the Name field, type a name for the cache.
-
From the Resolver Type list, select Validating Resolver.
-
Click Finished.
Associate the DNS cache with a custom DNS profile.
Each DNSSEC zone has a list of read-only Security Entry Point (SEP) records. The BIG-IP® DNS creates these records automatically when you create a zone. These SEP records consist of Delegation Signer (DS) and DNSKEY records.
Determine the signed zones from which you want to obtain a trust or DLV anchor.
If you want the BIG-IP system to cache a validated response for the signed zones, you need to obtain a trust or DLV anchor.
-
On the Main tab, click DNS > Zones > DNSSEC Zones.
The DNSSEC Zone List screen opens.
-
Click the name of the DNSSEC zone for which you want to view or copy SEP records.
-
On the menu bar, click SEP Records.
The SEP records display for each generation of a key. If the SEP record screen is unexpectedly blank, ensure that at least one data center and a server representing the BIG-IP DNS device exist in the BIG-IP system configuration.
-
Copy the trust or DLV anchor from the DNSKEY Record field.
Ensure that you have copied trust anchors for the signed zones that you want to add to the validating resolver.
A validating resolver uses at least one trust anchor to validate DNS responses.
-
On the Main tab, click DNS > Caches > Cache List.
The DNS Cache List screen opens.
-
Click the name of the cache you want to modify.
The properties screen opens.
-
On the menu bar, click Trust Anchors.
The Trust Anchors screen opens.
-
Click the Add button.
-
In the Trust Anchor field, paste the trust anchor that you copied from the signed zone.
Important: The trust anchor must be specified in a string format.
-
Click Finished.
-
For each additional trust anchor that you want to add to the validating resolver, repeat steps 4-6.
The validating resolver can now validate the content of DNS responses from the zones for which you added trust anchors.
Ensure that you have copied a DLV anchor for the signed zones that you want to add to the validating resolver.
A validating resolver needs a DLV anchor to validate DNS responses from outside a zone.
-
On the Main tab, click DNS > Caches > Cache List.
The DNS Cache List screen opens.
-
Click the name of the cache you want to modify.
The properties screen opens.
-
On the menu bar, click DLV Anchors.
The DLV Anchors screen opens.
-
Click the Add button.
-
In the DLV Anchor field, paste the DLV anchor that you want to add to the validating resolver.
Important: The DLV anchor must be specified in a string format.
-
Click Finished.
-
For each additional DLV anchor that you want to add to the validating resolver, repeat steps 4-6.
The validating resolver can now validate the content of DNS responses from the zones for which you added DLV anchors.
Ensure that at least one DNS cache exists on the BIG-IP system.
To enable the BIG-IP system to validate the identity of the DNS servers returning responses and then to cache those responses, create a custom DNS profile and associate it with a validating resolver DNS cache.
-
On the Main tab, click DNS > Delivery > Profiles > DNS or Local Traffic > Profiles > Services > DNS.
The DNS profile list screen opens.
-
Click Create.
The New DNS Profile screen opens.
-
In the Name field, type a unique name for the profile.
-
In the General Properties area, from the Parent Profile list, accept the default dns profile.
-
Select the Custom check box.
-
In the DNS Features area, from the Use BIND Server on BIG-IP list, select Disabled.
-
In the DNS Features area, from the DNS Cache list, select Enabled.
When you enable the DNS Cache option, you must also select a DNS cache from the DNS Cache Name list.
-
In the DNS Features area, from the DNS Cache Name list, select the DNS cache that you want to associate with this profile.
You can associate a DNS cache with a profile, even when the DNS Cache option, is Disabled.
-
Click Finished.
Assign the custom DNS profile to the virtual server that handles the DNS traffic that includes the responses to queries that you want to cache.
Ensure that at least one custom DNS profile that is configured for DNS caching exists on the BIG-IP system.
Assign a custom DNS profile to a listener when you want the BIG-IP system to perform DNS caching on traffic that the listener handles.
Note: This task applies only to DNS-provisioned systems.
-
On the Main tab, click DNS > Delivery > Listeners.
The Listeners List screen opens.
-
Click the name of the listener you want to modify.
-
In the Service area, from the DNS Profile list, select a custom DNS profile configured for DNS caching.
-
Click Update.
Ensure that you have first created a DNS cache and associated it with a DNS profile, and have assigned the profile to either an LTM virtual server or a BIG-IP DNS listener.
You can view statistics to determine how well a DNS cache on the BIG-IP system is performing.
-
On the Main tab, click Statistics > Module Statistics > DNS > Caches.
The DNS Caches Status Summary screen opens.
-
From the Statistics Type list, select Caches.
Information displays about the DNS caches.
Record type Description Queries Total number of queries handled by the cache. Responses Total number of responses sent from the cache. Answered Locally Number of locally answered queries handled by the cache. Using Nameservers Number of nameservers using queries handled by the cache. -
In the Details column for a cache, click View to display detailed information about the cache.
You can view records in a DNS cache to determine how well a specific cache on the BIG-IP system is performing.
-
Log in to the command-line interface of the BIG-IP system.
-
At the BASH prompt, type the command:
tmsh -
At the
tmshprompt, type the command:show ltm dns cache records rrset cache <cache name>For example, the command:
show ltm dns cache records rrset cache *my\_transparent\_cache*, displays the resource records in the cache named my_transparent_cache.
Ensure that you have created a DNS cache and a DNS profile and have assigned the profile to either an LTM virtual server or a BIG-IP DNS listener.
You can view DNS cache statistics to determine how well a specific cache on the BIG-IP system is performing.
-
On the Main tab, click Statistics > Module Statistics > DNS > Caches.
The DNS Caches Status Summary screen opens.
-
From the Statistics Type list, select Caches.
-
In the Details column for a cache, click View to display detailed information about the cache.
You can view DNS cache statistics to determine how well a specific cache on the BIG-IP system is performing.
-
On the Main tab, click Statistics > Module Statistics > DNS > Caches.
The DNS Caches Status Summary screen opens.
-
From the Statistics Type list, select Caches.
Information displays about the DNS caches.
Record type Description Queries Total number of queries handled by the cache. Responses Total number of responses sent from the cache. Answered Locally Number of locally answered queries handled by the cache. Using Nameservers Number of nameservers using queries handled by the cache.
Determine the amount of memory the BIG-IP system has and how much you want to commit to DNS caching. View the statistics for a cache to determine how well the cache is working.
You can change the size of a DNS cache to fix cache performance issues.
-
On the Main tab, click DNS > Caches > Cache List.
The DNS Cache List screen opens.
-
Click the name of the cache you want to modify.
The properties screen opens.
-
In the Message Cache Size field, type the maximum size in bytes for the DNS message cache.
The BIG-IP system caches the messages in a DNS response in the message cache. A higher maximum size makes it possible for more DNS responses to be cached and increases the cache hit percentage. A lower maximum size forces earlier eviction of cached content, but can lower the cache hit percentage.
Important: When you change the value of the Message Cache Size, the records in the message cache are automatically removed. If you do not want to clear the message cache, do not change the value of this parameter.
-
In the Resource Record Cache Size field, type the maximum size in bytes for the DNS resource record cache.
The BIG-IP system caches the supporting records in a DNS response in the Resource Record cache. A higher maximum size makes it possible for more DNS responses to be cached and increases the cache hit percentage. A lower maximum size forces earlier eviction of cached content, but can lower the cache hit percentage.
Warning: When you change the value of the Resource Record Cache Size, the records in the resource record cache are automatically removed from the cache. If you do not want to clear the resource record cache, do not change the value of this parameter.
-
In the Nameserver Cache Count field, type the maximum number of DNS nameservers for which the BIG-IP system caches connection and capability data.
Important: When you change the value of the Nameserver Cache Count, the records in the nameserver cache are automatically removed from the cache. If you do not want to clear the nameserver cache, do not change the value of this parameter.
-
In the Unsolicited Reply Threshold field, change the default value if you are using the BIG-IP system to monitor for unsolicited replies using SNMP.
The system always rejects unsolicited replies. The default value of 0 (off) indicates the system does not generate SNMP traps or log messages when rejecting unsolicited replies. Changing the default value alerts you to a potential security attack, such as cache poisoning or DOS. For example, if you specify 1,000,000 unsolicited replies, each time the system receives 1,000,000 unsolicited replies, it generates an SNMP trap and log message.
-
Click Update.
You can clear all records from a specific DNS cache on the BIG-IP system.
-
On the Main tab, click DNS > Caches > Cache List.
The DNS Cache List screen opens.
-
On the menu bar, click Statistics.
The Local Traffic Statistics screen opens.
-
Select the check box next to the cache you want to clear, and then click Clear Cache.
You can clear groups of records of a specific type from a DNS cache by resizing the cache that contains those records.
-
On the Main tab, click DNS > Caches > Cache List.
The DNS Cache List screen opens.
-
Click the name of the cache you want to modify.
The properties screen opens.
-
In the DNS Cache area, to clear specific records from the cache, do one of the following:
|
To clear messages from the cache: |
change the value in the Message Cache Size field. |
|
To clear resource records from the cache: |
change the value in the Resource Record Cache Size field. |
|
To clear nameservers from the cache: |
change the value in the Name Server Cache Count field. |
|
To clear DNSSEC keys from the cache: |
change the value in the DNSSEC Key Cache Size field. |
- Click Update.
The BIG-IP system clears the records in the caches that you resized.
You can clear specific records from a DNS cache using tmsh. For example, you can delete all RRSET records or only the A records in the specified cache.
Tip: In tmsh, you can use the command completion feature to discover the types of records that are available for deletion.
-
Log in to the command-line interface of the BIG-IP system.
-
At the BASH prompt, type the command:
tmsh -
At the
tmshprompt, to navigate to the directory that contains the DNS cache records, type the command:ltm dns cache records -
To delete specific DNS cache records, type a variation of this command:
delete *<cache-type>* type *<record-type>* cache *<cache-name>*For example, the command
delete rrset type a cache *my\_resolver\_cache*, deletes the A records from the resource record cache of the resolver cache named my_resolver_cache.
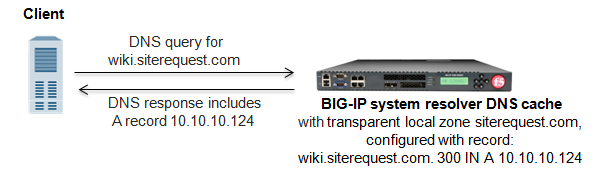
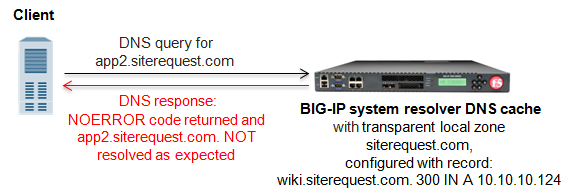
You can configure a transparent, resolver, or validating resolver DNS cache with local zones. Use this configuration when you want the BIG-IP system to resolve queries for small local zones with authoritative responses.
For example, the network administrator at Site Request created a resolver DNS cache to handle DNS traffic for siterequest.com. She configured the cache to provide authoritative DNS responses to all domains on the Internet. Now, she wants to configure the cache to serve authoritative responses to queries for the small local zone wiki.siterequest.com. When resolving DNS queries for wiki.siterequest.com, the local zone effectively supercedes the cache.
A local zone contains resource records that a DNS cache uses to resolve matching DNS queries with authoritative DNS responses. The Type attribute of the local zone determines how the cache handles a DNS query that does not match the local zone.
Ensure that at least one DNS cache is configured on the BIG-IP system.
Determine which local zones and associated resource records you want the BIG-IP system to respond to with authoritative DNS responses.
Add a local zone to a DNS cache only when the zone has a small resource record set.
Tip: If you want the BIG-IP system to respond to DNS queries with authoritative DNS responses for a zone with a large resource record set, instead create a DNS zone and enable DNS Express.
-
On the Main tab, click DNS > Caches > Cache List.
The DNS Cache List screen opens.
-
Click the name of the cache you want to modify.
The properties screen opens.
-
On the menu bar, click Local Zones.
The Local Zones screen opens.
-
Click the Add button.
-
In the Name field, type the domain name of the local zone.
Note: The domain you enter must be at the apex of the zone. For example, you could name a local zone
siterequest.com, and then add resource records for the memberswiki.siterequest.com.anddownload.siterequest.com.. -
From the Type list, select how the cache handles a non-matching query for the local zone.
Tip: The Description column provides a sample response to a query for
wiki.siterequest.com, when the local zone is siterequest.com.
|
Deny |
For a non-matching query, the cache drops the DNS query. This is an example of a response to a non-matching query: |
|
Redirect |
For a non-matching query, when the query is for a subdomain of the local zone, the cache returns the same response that it would for the local zone. For example, if you add the local zone siterequest.com, the cache returns the same response to queries for |
|
Refuse |
For a non-matching query, the cache returns a REFUSED message in the DNS response. This is an example of a response to a non-matching query: |
|
Static |
For a non-matching query, the cache returns a NoData or NXDOMAIN in the DNS response, which also includes the SOA record if the local zone contains one. This is an example of a response to a non-matching query: |
|
Transparent |
Transparent is the default value. For a non-matching query, the cache performs a pass-through or iterative resolution of the DNS query. If the query matches, but no resource records are available, the cache returns a response with a NoData message. This is an example of a response to a non-matching query: |
|
Type Transparent |
For a non-matching query, or a query for a matching domain name, but with a request for a record of a different type, the cache performs a pass-through or iterative resolution of the DNS query; however, if the query matches, but no resource records are available, the cache does not return a response with a NoData message. This is an example of a response to a non-matching query: |
-
In the Records area, in the field, specify a resource record to identify the local zone, including domain name, type, class, TTL, and record data, separated by spaces, and then click Add.
Note: You can add multiple resource records.
This is an example of an A record entry:
wiki.siterequest.com. IN A 10.10.10.124. This is an example of a AAAA record entry:wiki.siterequest.com. IN AAAA 2002:0:1:12:123:c:cd:cdf. -
Click Finished.
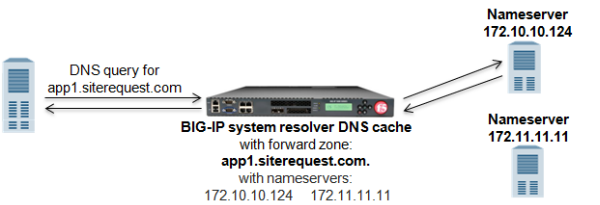
You can configure a resolver or validating resolver DNS cache with forward zones. Do this configuration when you want the BIG-IP® system to forward DNS queries that match the forward zones to specific nameservers, which resolve the query when the cache does not contain a response.
For example, the network administrator for Site Request wants to configure the DNS cache to resolve responses to queries for the zone: app1.siterequest.com. She wants the responses to queries for this zone to be served from specific nameservers, when the cache does not contain a response.
Important: When a DNS cache configured with both local and forward zones receives a DNS query, the system checks the local zones first. If the query does not match a local zone, the system then checks the forward zones for a match.
A DNS cache forward zone resolves matching DNS queries by obtaining answers from one of the recursive nameservers associated with the forward zone. When the BIG-IP system receives a query that cannot be resolved from the cache, the system forwards the query to a nameserver associated with the matching forward zone. When the nameserver returns a response, the BIG-IP system caches the response, and returns the response to the resolver making the query.
The BIG-IP system matches a DNS query with a forward zone based on longest match. For example, the network administrator for Site Request, configures two forward zones. download.siterequest.com. is configured with two nameservers with the IP addresses 172.27.5.1 and 172.27.7.247. app1.siterequest.com. is configured with two nameservers with the IP addresses 10.10.5.5 and 11.11.5.7. A query for product.download.siterequest.com. matches the forward zone download.siterequest.com and a query for ftp.appl1.siterequest.com. matches the forward zone app1.siterequest.com.
When a forward zone is configured with more than one nameserver, the BIG-IP system forwards the first query to a randomly selected nameserver, and records the round trip time (RTT) of a successful response. If the first nameserver does not return a response, the BIG-IP system forwards the query to a different nameserver and records the RTT of a successful response. After that, the system always sends a query to the nameserver with the fastest RTT. If none of the nameservers return a response, or the RTT exceeds 120 seconds, the BIG-IP system returns a SERVFAIL response to the resolver making the query.
Ensure that at least one resolver DNS cache or validating resolver DNS cache exists in the configuration.
Gather the IP addresses of the nameservers that you want to associate with a forward zone.
When you want the BIG-IP system to forward queries to specific nameservers for resolution and the cache does not contain a response to the query, add a forward zone to a DNS cache.
-
On the Main tab, click DNS > Caches > Cache List.
The DNS Cache List screen opens.
-
Click the name of the cache you want to modify.
The properties screen opens.
-
On the menu bar, click Forward Zones.
The Forward Zones screen opens.
-
Click the Add button.
-
In the Name field, type a name for the forward zone.
-
In the Nameservers area, in the Address field, type the IP address of a DNS nameserver that the system considers authoritative for this zone, and then click Add. Based on your network configuration, add IPv4 or IPv6 addresses, or both.
Note: The order of nameservers in the configuration does not impact which nameserver the system selects to forward a query to.
-
Click Finished.
Determine which forward zone you want to delete.
When you no longer want the BIG-IP system to forward queries to a forward zone, you can delete the forward zone.
-
On the Main tab, click DNS > Caches > Cache List.
The DNS Cache List screen opens.
-
Click the name of the cache you want to modify.
The properties screen opens.
-
On the menu bar, click Forward Zones.
The Forward Zones screen opens.
-
Select the check box next to the forward zone you want to delete, and then click Delete.
A dialog box displays asking you to confirm the deletion.
-
Click OK to confirm the deletion.
Determine the forward zone that you want to modify.
Modify the nameservers that are associated with a forward zone when you want the BIG-IP system to forward DNS queries for a matching forward zone to a different set of nameservers.
-
On the Main tab, click Local Traffic > DNS Caches > DNS Cache List.
The DNS Cache List screen opens.
-
Click the name of the cache you want to modify.
The properties screen opens.
-
On the menu bar, click Forward Zones.
The Forward Zones screen opens.
-
Click the name of the forward zone you want to modify.
The properties screen opens.
-
In the Nameservers area, add or remove nameservers.
-
Click Finished.
Ensure that at least one DNS cache exists in the BIG-IP system configuration.
You can view statistics about the queries and responses that a DNS cache forwards. For example, to assess the reliability of a nameserver, you can view data about the number of queries resolved by the nameserver within a specified timeframe.
-
On the Main tab, click Statistics > Module Statistics > DNS > Caches.
The DNS Caches Status Summary screen opens.
-
From the Statistics Type list, select Caches.
-
In the Details column for a cache, click View to display detailed information about the cache.
-
View the statistics in the Forwarder Activity area.
You can configure a resolver or validating resolver DNS cache with a forward zone that is associated with a listener. The listener can load balance specific DNS queries to a pool of DNS servers. For example, the network administrator for SiteRequest wants to configure the DNS cache to resolve DNS queries for the forward zone app2.siterequest.com, and wants the responses to be served from a pool of local DNS servers, when the cache does not contain a response.
Create a custom DNS monitor to send DNS queries, generated using the settings you specify, to a pool of DNS servers and validate the DNS responses.
Important: When defining values for custom monitors, make sure you avoid using any values that are on the list of reserved keywords. For more information, see SOL 3653 (for version 9.0 systems and later) on the AskF5 technical support web site at www.askf5.com.
-
On the Main tab, click DNS > Delivery > Load Balancing > Monitors or Local Traffic > Monitors.
The Monitor List screen opens.
-
Click Create.
The New Monitor screen opens.
-
In the Name field, type a name for the monitor.
-
From the Type list, select DNS.
-
In the Query Name field, type the domain name that you want the monitor to query.
For the zone,
siterequest.com, you might want the monitor to query forwww.siterequest.com. -
Configure additional settings based on your network requirements.
-
Click Finished.
Ensure that at least one custom DNS monitor exists on the BIG-IP system. Gather the IP addresses of the DNS servers that you want to include in a pool to which the BIG-IP system load balances DNS traffic.
Create a pool of local DNS servers when you want to load balance DNS queries to other DNS servers.
-
On the Main tab, click the applicable path.
- DNS > Delivery > Load Balancing > Pools
- Local Traffic > Pools The Pool List screen opens.
-
Click Create.
The New Pool screen opens.
-
In the Name field, type a unique name for the pool.
-
For the Health Monitors setting, from the Available list, select the custom DNS monitor you created and move the monitor to the Active list.
-
Using the New Members setting, add each resource that you want to include in the pool:
-
(Optional) In the Node Name field, type a name for the node portion of the pool member.
-
In the Address field, type an IP address.
-
In the Service Port field, type a port number, or select a service name from the list.
-
(Optional) In the Priority field, type a priority number.
-
Click Add.
-
-
Click Finished.
Create a resolver cache on the BIG-IP system when you want the system to resolve DNS queries and cache responses.
-
On the Main tab, click DNS > Caches > Cache List.
The DNS Cache List screen opens.
-
Click Create.
The New DNS Cache screen opens.
-
In the Name field, type a name for the cache.
-
From the Resolver Type list, select Resolver.
-
Click Finished.
Associate the DNS cache with a custom DNS profile.
Ensure that at least one DNS cache exists on the BIG-IP system.
To enable the BIG-IP system to resolve DNS queries and cache the responses, create a custom DNS profile and associate it with a resolver DNS cache.
-
On the Main tab, click DNS > Delivery > Profiles > DNS or Local Traffic > Profiles > Services > DNS.
The DNS profile list screen opens.
-
Click Create.
The New DNS Profile screen opens.
-
In the Name field, type a unique name for the profile.
-
Select the Custom check box.
-
In the DNS Features area, from the Use BIND Server on BIG-IP list, select Disabled.
-
In the DNS Features area, from the DNS Cache list, select Enabled.
When you enable the DNS Cache option, you must also select a DNS cache from the DNS Cache Name list.
-
In the DNS Features area, from the DNS Cache Name list, select the DNS cache that you want to associate with this profile.
You can associate a DNS cache with a profile, even when the DNS Cache option, is Disabled.
-
Click Finished.
Assign the custom DNS profile to the virtual server or listener that handles the DNS traffic.
Ensure that a pool of DNS servers exists on DNS.
Configure a listener that alerts BIG-IP DNS to DNS queries destined for a pool of DNS servers. The best practice is to create four listeners: one with an IPv4 address that handles UDP traffic, and one with the same IPv4 address that handles TCP traffic; one with an IPv6 address that handles UDP traffic, and one with the same IPv6 address that handles TCP traffic.
Tip: If you have multiple BIG-IP DNS systems in a device group, perform this procedure on only one system.
-
On the Main tab, click DNS > Delivery > Listeners.
The Listeners List screen opens.
-
Click Create.
The Listeners properties screen opens.
-
In the Name field, type a unique name for the listener.
-
For the Destination setting, in the Address field, type an IPv4 address on which BIG-IP DNS listens for network traffic.
-
From the Listener list, select Advanced.
-
For the Address Translation setting, select the Enabled check box.
-
In the Service area, from the Protocol list, select UDP.
-
From the Default Pool list, select the pool to which this listener forwards DNS queries.
-
Click Finished.
Create another listener with the same IPv4 address and configuration, but select TCP from the Protocol list. Then, create two more listeners, configuring both with the same IPv6 address, but one with the UDP protocol and one with the TCP protocol.
Determine the DNS cache to which you want to add a forward zone. Ensure that a listener that is associated with a pool of DNS servers is configured on the system.
When you want the BIG-IP DNS to forward DNS queries to a pool of DNS servers, configure a forward zone with a nameserver that is a listener, which load balances traffic to a pool of DNS servers.
-
On the Main tab, click DNS > Caches > Cache List.
The DNS Cache List screen opens.
-
Click the name of the cache you want to modify.
The properties screen opens.
-
On the menu bar, click Forward Zones.
The Forward Zones screen opens.
-
Click the Add button.
-
In the Name field, type a name for the forward zone.
-
In the Nameservers area, in the Address field, type the IP address of a DNS nameserver that the system considers authoritative for this zone, and then click Add. Based on your network configuration, add IPv4 or IPv6 addresses, or both.
Note: The order of nameservers in the configuration does not impact which nameserver the system selects to forward a query to.
-
Click Finished.
Depending upon your network configuration, add additional listeners to the forward zone. The best practice is to associate four listeners with the forward zone: one with an IPv4 address that handles UDP traffic, and one with the same IPv4 address that handles TCP traffic; one with an IPv6 address that handles UDP traffic, and one with the same IPv6 address that handles TCP traffic.
You can customize a DNS cache on the BIG-IP system to meet specific network needs by changing the default values on the DNS cache settings.
You can configure a DNS cache on the BIG-IP system to answer DNS queries for default local zones.
-
On the Main tab, click DNS > Caches > Cache List.
The DNS Cache List screen opens.
-
Click the name of the cache you want to modify.
The properties screen opens.
-
Select the Enabled check box for the Answer Default Zones setting, when you want the BIG-IP system to answer queries for the default zones: localhost, reverse 127.0.0.1 and ::1, and AS112 zones.
-
Click Update.
You can configure a resolver or validating resolver DNS cache on the BIG-IP system to use a specific server as an authoritative nameserver for the DNS root nameservers.
-
On the Main tab, click DNS > Caches > Cache List.
The DNS Cache List screen opens.
-
Click the name of the cache you want to modify.
The properties screen opens.
-
In the Root Hints area, in the IP address field, type the IP address of a DNS server that the system considers authoritative for the DNS root nameservers, and then click Add.
CAUTION:
By default, the system uses the DNS root nameservers published by InterNIC. When you add DNS root nameservers, the BIG-IP system no longer uses the default nameservers published by InterNIC, but uses the nameservers you add as authoritative for the DNS root nameservers.
Based on your network configuration, add IPv4 or IPv6 addresses or both.
-
Click Update.
You can configure a resolver or validating resolver DNS cache on the BIG-IP system to generate SNMP alerts and log messages when the cache receives unsolicited replies. This is helpful as an alert to a potential security attack, such as cache poisoning or DDoS.
-
On the Main tab, click DNS > Caches > Cache List.
The DNS Cache List screen opens.
-
Click the name of the cache you want to modify.
The properties screen opens.
-
In the Unsolicited Reply Threshold field, change the default value if you are using the BIG-IP system to monitor for unsolicited replies using SNMP.
The system always rejects unsolicited replies. The default value of 0 (off) indicates the system does not generate SNMP traps or log messages when rejecting unsolicited replies. Changing the default value alerts you to a potential security attack, such as cache poisoning or DOS. For example, if you specify 1,000,000 unsolicited replies, each time the system receives 1,000,000 unsolicited replies, it generates an SNMP trap and log message.
-
Click Update.
You can configure the method the DNS cache uses on the BIG-IP system when deciding the order to return resource records within cached responses.
-
On the Main tab, click DNS > Caches > Cache List.
The DNS Cache List screen opens.
-
Click the name of the cache you want to modify.
The properties screen opens.
-
In the DNS Cache area, for the RRSet Rotate field, select one of the following options:
Option Description none (default) Returns resource records in the same order as received. query id Uses the query identification number to decide which resource record to set first. Note: The rotation methodology used is based on picking a random number to select the first entry of the Resource Record Set (RRset). Local zones that are part of a Response Policy Zone are not rotated.
-
Click Update.