Updated Date: 07/07/2026
Configuring DNSSEC
Domain Name System Security Extensions (DNSSEC) is an industry-standard protocol that functions as an extension to the Domain Name System (DNS) protocol. BIG-IP DNS uses DNSSEC to guarantee the authenticity of DNS responses, including zone transfers, and to return Denial of Existence responses thus protecting your network against DNS protocol and DNS server attacks.
BIG-IP DNS, formerly Global Traffic Manager (GTM), uses two types of DNSSEC keys to return DNSSEC-compliant responses: a zone-signing key to sign all of the records in a DNSSEC resource record set, and a key-signing key to sign only the DNSKEY record (that is the zone-signing key) of a DNSSEC record set.
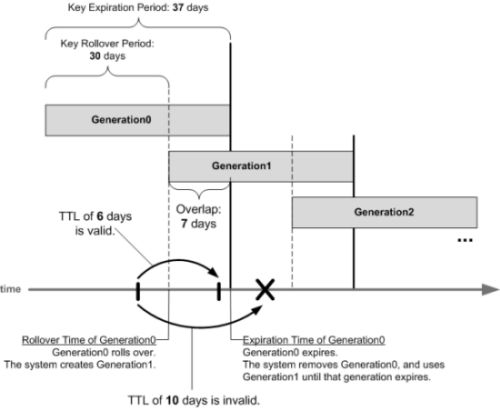
To enhance DNSSEC key security, when automatic key management is configured, BIG-IP DNS uses an automatic key rollover process that uses overlapping generations of a key to ensure that BIG-IP DNS can always respond to queries with DNSSEC-compliant responses. BIG-IP DNS dynamically creates new generations of each key based on the values of the Rollover Period and Expiration Period of the key.
The first generation of a key has an ID of 0 (zero). Each time BIG-IP DNS dynamically creates a new generation of a key, the ID increments by one. Over time, each generation of a key overlaps the previous generation of the key ensuring that BIG-IP DNS can respond to a DNSSEC query even if one generation of a key becomes unavailable. When a generation of a key expires, BIG-IP DNS automatically removes that generation of the key from the configuration. The value of the TTL (time-to-live) of a key specifies how long a client resolver can cache the key.
When you create DNSSEC key-signing keys and DNSSEC zone-signing keys, it is important to create a disabled standby version of each key that has a similar name. When you associate both pairs of keys with the same zone, you can easily perform a manual rollover of the keys, should an enabled key become compromised.
Each DNSSEC zone has a list of read-only Security Entry Point (SEP) records. The BIG-IP® DNS creates these records automatically when you create a zone. These SEP records consist of Delegation Signer (DS) and DNSKEY records.
Determine the signed zones from which you want to obtain a trust or DLV anchor.
If you want the BIG-IP system to cache a validated response for the signed zones, you need to obtain a trust or DLV anchor.
-
On the Main tab, click DNS > Zones > DNSSEC Zones.
The DNSSEC Zone List screen opens.
-
Click the name of the DNSSEC zone for which you want to view or copy SEP records.
-
On the menu bar, click SEP Records.
The SEP records display for each generation of a key. If the SEP record screen is unexpectedly blank, ensure that at least one data center and a server representing the BIG-IP DNS device exist in the BIG-IP system configuration.
-
Copy the trust or DLV anchor from the DNSKEY Record field.
You can use BIG-IP DNS to ensure that all responses to DNS-related traffic comply with the DNSSEC security protocol. To configure DNSSEC compliance, you create DNSSEC key-signing and zone-signing keys and a DNSSEC zone. Then you assign at least one enabled key-signing key and one enabled zone-signing key to the zone.
You can secure the DNS traffic handled by BIG-IP DNS using the DNSSEC protocol.
Important: Before you configure DNSSEC, ensure that at least one data center and a server representing the BIG-IP DNS device exist in the BIG-IP system configuration.
Perform these tasks to configure DNSSEC on BIG-IP DNS.
Create listeners to identify the DNS traffic that BIG-IP DNS handles. The best practice is to create four listeners: one with an IPv4 address that handles UDP traffic, and one with the same IPv4 address that handles TCP traffic; one with an IPv6 address that handles UDP traffic, and one with the same IPv6 address that handles TCP traffic.
Note: DNS zone transfers use TCP port 53. If you do not configure listeners for TCP the client might receive the error: connection refused or TCP RSTs.
If you have multiple BIG-IP DNS systems in a device group, perform these steps on only one system.
-
On the Main tab, click DNS > Delivery > Listeners.
The Listeners List screen opens.
-
Click Create.
The Listeners properties screen opens.
-
In the Name field, type a unique name for the listener.
-
For the Destination setting, in the Address field, type an IPv4 address on which BIG-IP DNS listens for network traffic.
-
In the Service area, from the Protocol list, select UDP.
-
Click Finished.
Create another listener with the same IPv4 address and configuration, but select TCP from the Protocol list. Then, create two more listeners, configuring both with the same IPv6 address, but one with the UDP protocol and one with the TCP protocol.
Ensure that the time setting on BIG-IP DNS is synchronized with the NTP servers on your network. This ensures that each BIG-IP DNS in a synchronization group is referencing the same time when generating keys.
Determine the values you want to configure for the rollover period, expiration period, and TTL of the keys, using the following criteria:
- The amount of time required to send the DS records for the zone to which this key is associated to the organization that manages the parent zone.
- The value of the rollover period must be greater than half the value of the expiration period, as well as less than the value of the expiration period.
- The difference between the values of the rollover and expiration periods must be more than the value of the TTL.
Note: The values recommended in this procedure are based on the values in the NIST Secure Domain Name System (DNS) Deployment Guide.
Create automatically-managed zone-signing keys for BIG-IP DNS to use in the DNSSEC authentication process.
-
On the Main tab, click DNS > Delivery > Keys > DNSSEC Key List.
The DNSSEC Key List screen opens.
-
Click Create.
The New DNSSEC Key screen opens.
-
In the Name field, type a name for the key.
Zone names are limited to
63characters. -
From the Type list, select Zone Signing Key.
-
From the State list, select Enabled.
-
From the Hardware Security Module list, select None.
-
From the Algorithm list, select the digest algorithm the system uses to generate the key signature. Your options are RSA/SHA1, RSA/SHA256, and RSA/SHA512.
-
From the Key Management list, select Automatic.
The Key Settings area displays fields for key configuration.
-
In the Bit Width field, type
1024. -
In the TTL field, accept the default value of
86400(the number of seconds in one day.)This value specifies how long a client resolver can cache the key. This value must be less than the difference between the values of the rollover and expiration periods of the key; otherwise, a client can make a query and the system can send a valid key that the client cannot recognize.
-
For the Rollover Period setting, in the Days field, type
21. -
For the Expiration Period setting, in the Days field, type
30.Zero seconds indicates not set, and thus the key does not expire.
-
For the Signature Validity Period setting, accept the default value of seven days.
This value must be greater than the value of the signature publication period.
Zero seconds indicates not set, and thus the server verifying the signature never succeeds, because the signature is always expired.
-
For the Signature Publication Period setting, accept the default value of four days and 16 hours.
This value must be less than the value of the signature validity period.
Zero seconds indicates not set, and thus the signature is not cached.
-
Click Finished.
-
To create a standby key for emergency rollover purposes, repeat these steps using a similar name, and select Disabled from the State list.
Ensure that the time setting on BIG-IP DNS is synchronized with the NTP servers on your network. This ensures that each BIG-IP DNS in a synchronization group is referencing the same time when generating keys.
When you plan to manually create keys, install the certificate and key pairs on the BIG-IP system, before you attempt to create DNSSEC keys.
Important: Certificate and key file pairs must have the same name, for example, exthsm.crt and exthsm.key.
Create manually-managed zone-signing keys for BIG-IP DNS to use in the DNSSEC authentication process.
-
On the Main tab, click DNS > Delivery > Keys > DNSSEC Key List.
The DNSSEC Key List screen opens.
-
Click Create.
The New DNSSEC Key screen opens.
-
In the Name field, type a name for the key.
Zone names are limited to
63characters. -
From the Type list, select Zone Signing Key.
-
From the State list, select Enabled.
-
From the Hardware Security Module list, select None.
-
From the Algorithm list, select the digest algorithm the system uses to generate the key signature. Your options are RSA/SHA1, RSA/SHA256, and RSA/SHA512.
-
From the Key Management list, select Manual.
The Key Settings area displays Certificate and Private Key lists.
-
In the Key Settings area, select a certificate/key pair:
-
From the Certificate list, select a certificate.
-
From the Private Key list, select the key that matches the certificate you selected.
-
-
Click Finished.
-
To create a standby key for emergency rollover purposes, repeat these steps using a similar name, and select Disabled from the State list.
Ensure that the time setting on BIG-IP DNS is synchronized with the NTP servers on your network. This ensures that each BIG-IP DNS in a synchronization group is referencing the same time when generating keys.
Determine the values you want to configure for the rollover period, expiration period, and TTL of the keys, using the following criteria:
- The amount of time required to send the DS records for the zone to which this key is associated to the organization that manages the parent zone.
- The value of the rollover period must be greater than half the value of the expiration period, as well as less than the value of the expiration period.
- The difference between the values of the rollover and expiration periods must be more than the value of the TTL.
Note: The values recommended in these steps are based on the values in the NIST Secure Domain Name System (DNS) Deployment Guide.
Create key-signing keys for BIG-IP DNS to use in the DNSSEC authentication process.
-
On the Main tab, click DNS > Delivery > Keys > DNSSEC Key List.
The DNSSEC Key List screen opens.
-
Click Create.
The New DNSSEC Key screen opens.
-
In the Name field, type a name for the key.
Zone names are limited to
63characters. -
From the Type list, select Key Signing Key.
-
From the State list, select Enabled.
-
From the Hardware Security Module list, select None.
-
From the Algorithm list, select the digest algorithm the system uses to generate the key signature. Your options are RSA/SHA1, RSA/SHA256, and RSA/SHA512.
-
From the Key Management list, select Automatic.
The Key Settings area displays fields for key configuration.
-
In the Bit Width field, type
2048. -
In the TTL field, accept the default value of
86400(the number of seconds in one day.)This value specifies how long a client resolver can cache the key. This value must be less than the difference between the values of the rollover and expiration periods of the key; otherwise, a client can make a query and the system can send a valid key that the client cannot recognize.
-
For the Rollover Period setting, in the Days field, type
340. -
For the Expiration Period setting, in the Days field, type
365.Zero seconds indicates not set, and thus the key does not expire.
Tip: The National Institute of Standards and Technology (NIST) recommends that a key-signing key expire once a year.
-
For the Signature Validity Period setting, accept the default value of seven days.
This value must be greater than the value of the signature publication period.
Zero seconds indicates not set, and thus the server verifying the signature never succeeds, because the signature is always expired.
-
For the Signature Publication Period setting, accept the default value of four days and 16 hours.
This value must be less than the value of the signature validity period.
Zero seconds indicates not set, and thus the signature is not cached.
-
Click Finished.
-
To create a standby key for emergency rollover purposes, repeat these steps using a similar name, and select Disabled from the State list.
Ensure that the time setting on BIG-IP DNS is synchronized with the NTP servers on your network. This ensures that each BIG-IP DNS in a synchronization group is referencing the same time when generating keys.
When you plan to manually create keys, install the certificate and key pairs on the BIG-IP system, before you attempt to create DNSSEC keys.
Important: Certificate and key file pairs must have the same name, for example, exthsm.crt and exthsm.key.
Create key-signing keys for BIG-IP DNS to use in the DNSSEC authentication process.
-
On the Main tab, click DNS > Delivery > Keys > DNSSEC Key List.
The DNSSEC Key List screen opens.
-
Click Create.
The New DNSSEC Key screen opens.
-
In the Name field, type a name for the key.
Zone names are limited to
63characters. -
From the Type list, select Key Signing Key.
-
From the State list, select Enabled.
-
From the Hardware Security Module list, select None.
-
From the Algorithm list, select the digest algorithm the system uses to generate the key signature. Your options are RSA/SHA1, RSA/SHA256, and RSA/SHA512.
-
From the Key Management list, select Manual.
The Key Settings area displays Certificate and Private Key lists.
-
In the Key Settings area, select a certificate/key pair:
-
From the Certificate list, select a certificate.
-
From the Private Key list, select the key that matches the certificate you selected.
-
-
Click Finished.
-
To create a standby key for emergency rollover purposes, repeat these steps using a similar name, and select Disabled from the State list.
Before you configure DNSSEC, ensure that at least one data center and a server object representing the BIG-IP device exist in the BIG-IP system configuration.
Important: The DNSSEC feature is available only when the BIG-IP system is licensed for BIG-IP DNS.
Before the BIG-IP system can sign DNS requests (including zone transfer requests) for a zone using DNSSEC keys, you must create a DNSSEC zone on the system and assign at least one enabled zone-signing and one enabled key-signing key to the zone.
-
On the Main tab, click DNS > Zones > DNSSEC Zones.
The DNSSEC Zone List screen opens.
-
Click Create.
The New DNSSEC Zone screen opens.
-
In the Name field, type a domain name.
For example, use a zone name of
siterequest.comto handle DNSSEC requests forwww.siterequest.comand*.www.siterequest.com. -
From the State list, select Enabled.
-
For the Zone Signing Key setting, assign at least one enabled zone-signing key to the zone.
You can associate the same zone-signing key with multiple zones.
-
For the Key Signing Key setting, assign at least one enabled key-signing key to the zone.
You can associate the same key-signing key with multiple zones.
-
Click Finished.
Even if you selected Enabled from the State list, if there are not at least one zone-signing and one key-signing key in the Active column, the status of the zone changes to offline.
Upload the DS records for this zone to the organization that manages the parent zone. The administrators of the parent zone sign the DS record with their own key and upload it to their zone. You can find the DS records in the Configuration utility.
After you create DNSSEC zones and zone-signing keys, you can confirm that BIG-IP DNS is signing the DNSSEC records.
-
Log on to the command-line interface of a client.
-
At the prompt, type:
dig @<IP address of BIG-IP DNS listener> +dnssec <name of zone>BIG-IP DNS returns the signed RRSIG records for the zone.
You can configure BIG-IP DNS to use the DNSSEC protocol to secure the DNS traffic handled by BIG-IP DNS in conjunction with an external HSM system.
Important: Before you configure DNSSEC, ensure that at least one data center and a server object representing the BIG-IP DNS device exist in the BIG-IP system configuration.
Perform these tasks to configure DNSSEC on BIG-IP DNS.
Create listeners to identify the DNS traffic that BIG-IP DNS handles. The best practice is to create four listeners: one with an IPv4 address that handles UDP traffic, and one with the same IPv4 address that handles TCP traffic; one with an IPv6 address that handles UDP traffic, and one with the same IPv6 address that handles TCP traffic.
Note: DNS zone transfers use TCP port 53. If you do not configure listeners for TCP the client might receive the error: connection refused or TCP RSTs.
If you have multiple BIG-IP DNS systems in a device group, perform these steps on only one system.
-
On the Main tab, click DNS > Delivery > Listeners.
The Listeners List screen opens.
-
Click Create.
The Listeners properties screen opens.
-
In the Name field, type a unique name for the listener.
-
For the Destination setting, in the Address field, type an IPv4 address on which BIG-IP DNS listens for network traffic.
-
In the Service area, from the Protocol list, select UDP.
-
Click Finished.
Create another listener with the same IPv4 address and configuration, but select TCP from the Protocol list. Then, create two more listeners, configuring both with the same IPv6 address, but one with the UDP protocol and one with the TCP protocol.
Ensure that the time setting on BIG-IP DNS is synchronized with the NTP servers on your network. This ensures that each BIG-IP DNS in a synchronization group is referencing the same time when generating keys.
Determine the values you want to configure for the rollover period, expiration period, and TTL of the keys, using the following criteria:
- The amount of time required to send the DS records for the zone to which this key is associated to the organization that manages the parent zone.
- The value of the rollover period must be greater than half the value of the expiration period, as well as less than the value of the expiration period.
- The difference between the values of the rollover and expiration periods must be more than the value of the TTL.
Note: Only Thales HSM supports automatic key creation. The values recommended in this procedure are based on the values in the NIST Secure Domain Name System (DNS) Deployment Guide.
Create zone-signing keys for BIG-IP DNS to use in the DNSSEC authentication process.
-
On the Main tab, click DNS > Delivery > Keys > DNSSEC Key List.
The DNSSEC Key List screen opens.
-
Click Create.
The New DNSSEC Key screen opens.
-
In the Name field, type a name for the key.
Zone names are limited to
63characters. -
From the Type list, select Zone Signing Key.
-
From the State list, select Enabled.
-
From the Hardware Security Module list, select External, if you use a network HSM.
-
From the Algorithm list, select the digest algorithm the system uses to generate the key signature. Your options are RSA/SHA1, RSA/SHA256, and RSA/SHA512.
-
From the Key Management list, select Automatic.
Note: Only Thales HSM supports automatic key creation.
The Key Settings area displays fields for key configuration.
-
In the Bit Width field, type
1024. -
In the TTL field, accept the default value of
86400(the number of seconds in one day.)This value specifies how long a client resolver can cache the key. This value must be less than the difference between the values of the rollover and expiration periods of the key; otherwise, a client can make a query and the system can send a valid key that the client cannot recognize.
-
For the Rollover Period setting, in the Days field, type
21. -
For the Expiration Period setting, in the Days field, type
30.Zero seconds indicates not set, and thus the key does not expire.
-
For the Signature Validity Period setting, accept the default value of seven days.
This value must be greater than the value of the signature publication period.
Zero seconds indicates not set, and thus the server verifying the signature never succeeds, because the signature is always expired.
-
For the Signature Publication Period setting, accept the default value of four days and 16 hours.
This value must be less than the value of the signature validity period.
Zero seconds indicates not set, and thus the signature is not cached.
-
Click Finished.
-
To create a standby key for emergency rollover purposes, repeat these steps using a similar name, and select Disabled from the State list.
Ensure that the time setting on BIG-IP DNS is synchronized with the NTP servers on your network. This ensures that each BIG-IP DNS in a synchronization group is referencing the same time when generating keys.
When you plan to manually create keys, install the certificate and key pairs on the BIG-IP system, before you attempt to create DNSSEC keys.
Important: Certificate and key file pairs must have the same name, for example, exthsm.crt and exthsm.key.
Create zone-signing keys for BIG-IP DNS to use in the DNSSEC authentication process.
-
On the Main tab, click DNS > Delivery > Keys > DNSSEC Key List.
The DNSSEC Key List screen opens.
-
Click Create.
The New DNSSEC Key screen opens.
-
In the Name field, type a name for the key.
Zone names are limited to
63characters. -
From the Type list, select Zone Signing Key.
-
From the State list, select Enabled.
-
From the Hardware Security Module list, select External, if you use a network HSM.
-
From the Algorithm list, select the digest algorithm the system uses to generate the key signature. Your options are RSA/SHA1, RSA/SHA256, and RSA/SHA512.
-
From the Key Management list, select Manual.
The Key Settings area displays Certificate and Private Key lists.
-
In the Key Settings area, select a certificate/key pair:
-
From the Certificate list, select a certificate.
-
From the Private Key list, select the key that matches the certificate you selected.
-
-
Click Finished.
-
To create a standby key for emergency rollover purposes, repeat these steps using a similar name, and select Disabled from the State list.
Ensure that the time setting on BIG-IP DNS is synchronized with the NTP servers on your network. This ensures that each BIG-IP DNS in a synchronization group is referencing the same time when generating keys.
Determine the values you want to configure for the rollover period, expiration period, and TTL of the keys, using the following criteria:
- The amount of time required to send the DS records for the zone to which this key is associated to the organization that manages the parent zone.
- The value of the rollover period must be greater than half the value of the expiration period, as well as less than the value of the expiration period.
- The difference between the values of the rollover and expiration periods must be more than the value of the TTL.
Note: The values recommended in this procedure are based on the values in the NIST Secure Domain Name System (DNS) Deployment Guide.
Create key-signing keys for BIG-IP DNS to use in the DNSSEC authentication process.
-
On the Main tab, click DNS > Delivery > Keys > DNSSEC Key List.
The DNSSEC Key List screen opens.
-
Click Create.
The New DNSSEC Key screen opens.
-
In the Name field, type a name for the key.
Zone names are limited to
63characters. -
From the Type list, select Key Signing Key.
-
From the State list, select Enabled.
-
From the Hardware Security Module list, select External, if you use a network HSM.
-
From the Algorithm list, select the digest algorithm the system uses to generate the key signature. Your options are RSA/SHA1, RSA/SHA256, and RSA/SHA512.
-
From the Key Management list, select Automatic.
The Key Settings area displays fields for key configuration.
-
In the Bit Width field, type
2048. -
In the TTL field, accept the default value of
86400(the number of seconds in one day.)This value specifies how long a client resolver can cache the key. This value must be less than the difference between the values of the rollover and expiration periods of the key; otherwise, a client can make a query and the system can send a valid key that the client cannot recognize.
-
For the Rollover Period setting, in the Days field, type
340. -
For the Expiration Period setting, in the Days field, type
365.Zero seconds indicates not set, and thus the key does not expire.
Tip: The National Institute of Standards and Technology (NIST) recommends that a key-signing key expire once a year.
-
For the Signature Validity Period setting, accept the default value of seven days.
This value must be greater than the value of the signature publication period.
Zero seconds indicates not set, and thus the server verifying the signature never succeeds, because the signature is always expired.
-
For the Signature Publication Period setting, accept the default value of four days and 16 hours.
This value must be less than the value of the signature validity period.
Zero seconds indicates not set, and thus the signature is not cached.
-
Click Finished.
-
To create a standby key for emergency rollover purposes, repeat these steps using a similar name, and select Disabled from the State list.
Ensure that the time setting on BIG-IP DNS is synchronized with the NTP servers on your network. This ensures that each BIG-IP DNS in a synchronization group is referencing the same time when generating keys.
When you plan to manually create keys, install the certificate and key pairs on the BIG-IP system, before you attempt to create DNSSEC keys.
Important: Certificate and key file pairs must have the same name, for example, exthsm.crt and exthsm.key.
Create key-signing keys for BIG-IP DNS to use in the DNSSEC authentication process.
-
On the Main tab, click DNS > Delivery > Keys > DNSSEC Key List.
The DNSSEC Key List screen opens.
-
Click Create.
The New DNSSEC Key screen opens.
-
In the Name field, type a name for the key.
Zone names are limited to
63characters. -
From the Type list, select Key Signing Key.
-
From the State list, select Enabled.
-
From the Hardware Security Module list, select External, if you use a network HSM.
-
From the Algorithm list, select the digest algorithm the system uses to generate the key signature. Your options are RSA/SHA1, RSA/SHA256, and RSA/SHA512.
-
From the Key Management list, select Manual.
The Key Settings area displays Certificate and Private Key lists.
-
In the Key Settings area, select a certificate/key pair:
-
From the Certificate list, select a certificate.
-
From the Private Key list, select the key that matches the certificate you selected.
-
-
Click Finished.
-
To create a standby key for emergency rollover purposes, repeat these steps using a similar name, and select Disabled from the State list.
Before you configure DNSSEC, ensure that at least one data center and a server object representing the BIG-IP device exist in the BIG-IP system configuration.
Important: The DNSSEC feature is available only when the BIG-IP system is licensed for BIG-IP DNS.
Before the BIG-IP system can sign DNS requests (including zone transfer requests) for a zone using DNSSEC keys, you must create a DNSSEC zone on the system and assign at least one enabled zone-signing and one enabled key-signing key to the zone.
-
On the Main tab, click DNS > Zones > DNSSEC Zones.
The DNSSEC Zone List screen opens.
-
Click Create.
The New DNSSEC Zone screen opens.
-
In the Name field, type a domain name.
For example, use a zone name of
siterequest.comto handle DNSSEC requests forwww.siterequest.comand*.www.siterequest.com. -
From the State list, select Enabled.
-
For the Zone Signing Key setting, assign at least one enabled zone-signing key to the zone.
You can associate the same zone-signing key with multiple zones.
-
For the Key Signing Key setting, assign at least one enabled key-signing key to the zone.
You can associate the same key-signing key with multiple zones.
-
Click Finished.
Even if you selected Enabled from the State list, if there are not at least one zone-signing and one key-signing key in the Active column, the status of the zone changes to offline.
Upload the DS records for this zone to the organization that manages the parent zone. The administrators of the parent zone sign the DS record with their own key and upload it to their zone. You can find the DS records in the Configuration utility.
After you create DNSSEC zones and zone-signing keys, you can confirm that BIG-IP DNS is signing the DNSSEC records.
-
Log on to the command-line interface of a client.
-
At the prompt, type:
dig @<IP address of BIG-IP DNS listener> +dnssec <name of zone>BIG-IP DNS returns the signed RRSIG records for the zone.
You can configure BIG-IP® DNS to use the DNSSEC protocol to secure the DNS traffic handled by BIG-IP DNS in conjunction with an internal HSM system.
Important: Before you configure DNSSEC, ensure that at least one data center and a server representing the BIG-IP DNS device exist in the BIG-IP system configuration.
Perform these tasks to configure DNSSEC on BIG-IP DNS.
Create listeners to identify the DNS traffic that BIG-IP DNS handles. The best practice is to create four listeners: one with an IPv4 address that handles UDP traffic, and one with the same IPv4 address that handles TCP traffic; one with an IPv6 address that handles UDP traffic, and one with the same IPv6 address that handles TCP traffic.
Note: DNS zone transfers use TCP port 53. If you do not configure listeners for TCP the client might receive the error: connection refused or TCP RSTs.
If you have multiple BIG-IP DNS systems in a device group, perform these steps on only one system.
-
On the Main tab, click DNS > Delivery > Listeners.
The Listeners List screen opens.
-
Click Create.
The Listeners properties screen opens.
-
In the Name field, type a unique name for the listener.
-
For the Destination setting, in the Address field, type an IPv4 address on which BIG-IP DNS listens for network traffic.
-
In the Service area, from the Protocol list, select UDP.
-
Click Finished.
Create another listener with the same IPv4 address and configuration, but select TCP from the Protocol list. Then, create two more listeners, configuring both with the same IPv6 address, but one with the UDP protocol and one with the TCP protocol.
Ensure that the time setting on BIG-IP DNS is synchronized with the NTP servers on your network. This ensures that each BIG-IP DNS in a synchronization group is referencing the same time when generating keys.
Determine the values you want to configure for the rollover period, expiration period, and TTL of the keys, using the following criteria:
- The amount of time required to send the DS records for the zone to which this key is associated to the organization that manages the parent zone.
- The value of the rollover period must be greater than half the value of the expiration period, as well as less than the value of the expiration period.
- The difference between the values of the rollover and expiration periods must be more than the value of the TTL.
Note: The values recommended in this procedure are based on the values in the NIST Secure Domain Name System (DNS) Deployment Guide.
Create zone-signing keys for BIG-IP DNS to use in the DNSSEC authentication process in conjunction with an internal HSM.
-
On the Main tab, click DNS > Delivery > Keys > DNSSEC Key List.
The DNSSEC Key List screen opens.
-
Click Create.
The New DNSSEC Key screen opens.
-
In the Name field, type a name for the key.
Zone names are limited to
63characters. -
From the Type list, select Zone Signing Key.
-
From the State list, select Enabled.
-
From the Hardware Security Module list, select Internal, if you use a FIPs internal HSM card.
-
From the Algorithm list, select the digest algorithm the system uses to generate the key signature. Your options are RSA/SHA1, RSA/SHA256, and RSA/SHA512.
-
From the Key Management list, select Automatic.
The Key Settings area displays fields for key configuration.
-
In the Bit Width field, type
1024. -
In the TTL field, accept the default value of
86400(the number of seconds in one day.)This value specifies how long a client resolver can cache the key. This value must be less than the difference between the values of the rollover and expiration periods of the key; otherwise, a client can make a query and the system can send a valid key that the client cannot recognize.
-
For the Rollover Period setting, in the Days field, type
21. -
For the Expiration Period setting, in the Days field, type
30.Zero seconds indicates not set, and thus the key does not expire.
-
For the Signature Validity Period setting, accept the default value of seven days.
This value must be greater than the value of the signature publication period.
Zero seconds indicates not set, and thus the server verifying the signature never succeeds, because the signature is always expired.
-
For the Signature Publication Period setting, accept the default value of four days and 16 hours.
This value must be less than the value of the signature validity period.
Zero seconds indicates not set, and thus the signature is not cached.
-
Click Finished.
-
To create a standby key for emergency rollover purposes, repeat these steps using a similar name, and select Disabled from the State list.
Ensure that the time setting on BIG-IP DNS is synchronized with the NTP servers on your network. This ensures that each BIG-IP DNS in a synchronization group is referencing the same time when generating keys.
Determine the values you want to configure for the rollover period, expiration period, and TTL of the keys, using the following criteria:
- The amount of time required to send the DS records for the zone to which this key is associated to the organization that manages the parent zone.
- The value of the rollover period must be greater than half the value of the expiration period, as well as less than the value of the expiration period.
- The difference between the values of the rollover and expiration periods must be more than the value of the TTL.
Note: The values recommended in this procedure are based on the values in the NIST Secure Domain Name System (DNS) Deployment Guide.
Create key-signing keys for BIG-IP DNS to use in the DNSSEC authentication process in conjunction with an internal HSM.
-
On the Main tab, click DNS > Delivery > Keys > DNSSEC Key List.
The DNSSEC Key List screen opens.
-
Click Create.
The New DNSSEC Key screen opens.
-
In the Name field, type a name for the key.
Zone names are limited to
63characters. -
From the Type list, select Key Signing Key.
-
From the State list, select Enabled.
-
From the Hardware Security Module list, select Internal, if you use a FIPs internal HSM card.
-
From the Algorithm list, select the digest algorithm the system uses to generate the key signature. Your options are RSA/SHA1, RSA/SHA256, and RSA/SHA512.
-
From the Key Management list, select Automatic.
The Key Settings area displays fields for key configuration.
-
In the Bit Width field, type
2048. -
In the TTL field, accept the default value of
86400(the number of seconds in one day.)This value specifies how long a client resolver can cache the key. This value must be less than the difference between the values of the rollover and expiration periods of the key; otherwise, a client can make a query and the system can send a valid key that the client cannot recognize.
-
For the Rollover Period setting, in the Days field, type
340. -
For the Expiration Period setting, in the Days field, type
365.Zero seconds indicates not set, and thus the key does not expire.
Tip: The National Institute of Standards and Technology (NIST) recommends that a key-signing key expire once a year.
-
For the Signature Validity Period setting, accept the default value of seven days.
This value must be greater than the value of the signature publication period.
Zero seconds indicates not set, and thus the server verifying the signature never succeeds, because the signature is always expired.
-
For the Signature Publication Period setting, accept the default value of four days and 16 hours.
This value must be less than the value of the signature validity period.
Zero seconds indicates not set, and thus the signature is not cached.
-
Click Finished.
-
To create a standby key for emergency rollover purposes, repeat these steps using a similar name, and select Disabled from the State list.
Before you configure DNSSEC, ensure that at least one data center and a server object representing the BIG-IP device exist in the BIG-IP system configuration.
Important: The DNSSEC feature is available only when the BIG-IP system is licensed for BIG-IP DNS.
Before the BIG-IP system can sign DNS requests (including zone transfer requests) for a zone using DNSSEC keys, you must create a DNSSEC zone on the system and assign at least one enabled zone-signing and one enabled key-signing key to the zone.
-
On the Main tab, click DNS > Zones > DNSSEC Zones.
The DNSSEC Zone List screen opens.
-
Click Create.
The New DNSSEC Zone screen opens.
-
In the Name field, type a domain name.
For example, use a zone name of
siterequest.comto handle DNSSEC requests forwww.siterequest.comand*.www.siterequest.com. -
From the State list, select Enabled.
-
For the Zone Signing Key setting, assign at least one enabled zone-signing key to the zone.
You can associate the same zone-signing key with multiple zones.
-
For the Key Signing Key setting, assign at least one enabled key-signing key to the zone.
You can associate the same key-signing key with multiple zones.
-
Click Finished.
Even if you selected Enabled from the State list, if there are not at least one zone-signing and one key-signing key in the Active column, the status of the zone changes to offline.
Upload the DS records for this zone to the organization that manages the parent zone. The administrators of the parent zone sign the DS record with their own key and upload it to their zone. You can find the DS records in the Configuration utility.
After you create DNSSEC zones and zone-signing keys, you can confirm that BIG-IP DNS is signing the DNSSEC records.
-
Log on to the command-line interface of a client.
-
At the prompt, type:
dig @<IP address of BIG-IP DNS listener> +dnssec <name of zone>BIG-IP DNS returns the signed RRSIG records for the zone.
You can configure the BIG-IP system to sign zone transfers using DNSSEC keys. With this configuration, the DNS nameservers (clients) requesting zone transfers can serve DNSSEC-signed responses to DNS queries.
The BIG-IP system manages the DNSSEC keys and signs the zone transfers even when external HSMs or FIPS cards are used in the configuration. With this configuration, the BIG-IP system must contain a DNSSEC zone with DNSSEC keys and a DNS zone with a list of DNS nameservers (clients) that can request zone transfers for the zone.
Important: The DNSSEC feature is available only when a BIG-IP system is licensed for BIG-IP DNS (formerly GTM).
In this figure, a zone is hosted on an authoritative DNS server, that is not secured with DNSSEC keys. An administrator at Site Request creates a DNS zone with a DNS Express™ server and a DNSSEC zone with DNSSEC keys. The name of both zones on the BIG-IP system match the name of the zone on the authoritative DNS server. The creation of the DNS zone initiates an unsigned zone transfer request from DNS Express to the authoritative DNS server that hosts the zone. The server responds with an unsigned zone transfer and the zone is loaded into DNS Express as an unsigned zone.
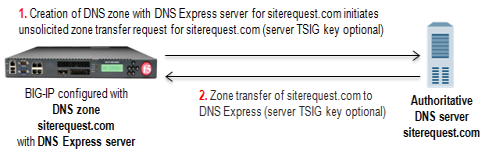
- Creation of DNS zone with DNS Express server initiates unsolicited zone transfer request from DNS Express to authoritative DNS server.
- DNS server responds with unsigned zone transfer to DNS Express, which loads the zone, and stores it as an unsigned zone.
In this figure, when the zone is updated, the zone transfer from the server to DNS Express is unsigned. The zone is stored in DNS Express as an unsigned zone. However, when the BIG-IP system receives a zone transfer request, the system signs the zone transfer using DNSSEC keys and sends the signed zone transfer to a DNS nameserver (client).
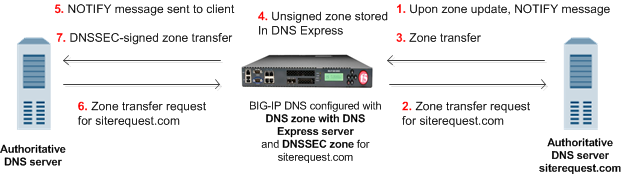
- When a zone update occurs, DNS server sends NOTIFY message to DNS Express.
- DNS Express sends zone transfer request to DNS server.
- DNS server responds with zone transfer to DNS Express
- DNS Express stores unsigned zone.
- DNS Express sends NOTIFY to DNS nameserver client.
- Client sends zone transfer request to DNS Express.
- DNS Express responds with DNSSEC-signed zone transfer.
Important: The DNSSEC feature is available only when the BIG-IP system is licensed for BIG-IP DNS.
In this figure, a zone is hosted on an authoritative DNS server, that is not secured with DNSSEC. The BIG-IP® system is configured with both a DNS zone and a DNSSEC zone that match the zone name on the server. The system can forward zone transfer requests to the DNS server, and then sign the response with DNSSEC keys, before sending the response to the client (authoritative DNS nameservers (clients) and cloud providers). This allows the clients and cloud providers to serve DNSSEC-signed DNS queries and responses.
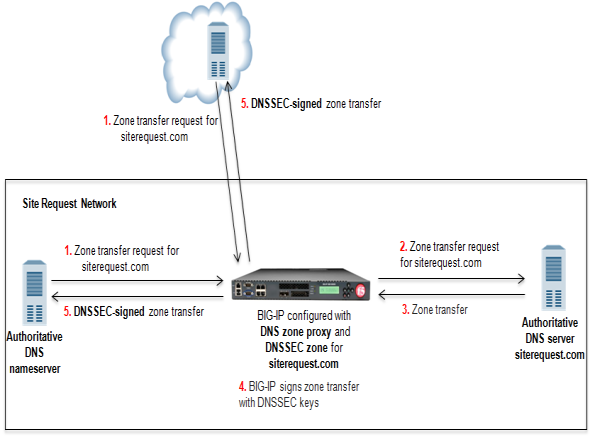
- DNS nameserver (client) sends zone transfer request for a DNS zone.
- The BIG-IP system forwards the request to the authoritative DNS server.
- DNS server answers with zone transfer.
- The BIG-IP system signs the zone transfer with DNSSEC keys.
- The BIG-IP system sends the DNSSEC-signed zone transfer to the client that made the request.
Important: The DNSSEC feature is available only when the BIG-IP system is licensed for BIG-IP DNS.
In this figure, a zone is hosted on a pool of authoritative DNS servers. The servers are not secured with DNSSEC. The BIG-IP® system is configured with both a DNS zone and a DNSSEC zone that match the zone name on the servers. The BIG-IP system can forward zone transfer requests to a pool member, and then sign the response with DNSSEC keys, before sending the DNSSEC-signed zone transfer to the client (authoritative DNS nameserver or cloud provider). This allows the clients and cloud providers to serve DNSSEC-signed DNS queries and responses.
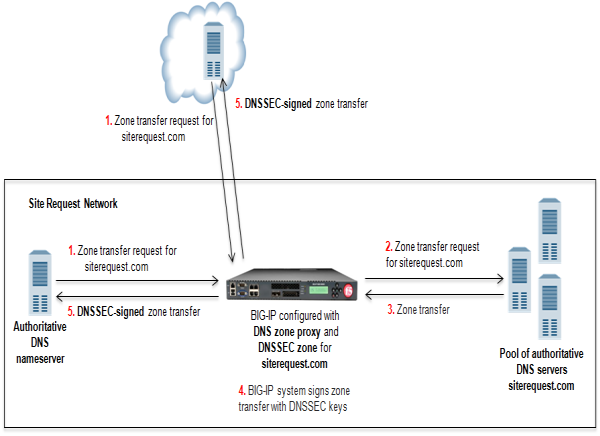
- DNS nameserver (client) or cloud provider sends zone transfer request for a DNS zone.
- BIG-IP forwards the request to a member of the pool of authoritative DNS servers that host the zone.
- The pool member responds with a zone transfer.
- BIG-IP signs the zone transfer with DNSSEC keys.
- BIG-IP sends the DNSSEC-signed zone transfer to the client that made the request.
Important: The DNSSEC feature is available only when the BIG-IP system is licensed for BIG-IP DNS.
To configure the BIG-IP® system to sign zone transfers using DNSSEC keys, perform these tasks:
To enable the BIG-IP system to sign zone transfers, create a custom DNS profile, and then assign the profile to a listener.
-
On the Main tab, click DNS > Delivery > Profiles > DNS.
The DNS profile list screen opens.
-
Click Create.
The New DNS Profile screen opens.
-
In the Name field, type a unique name for the profile.
-
Select the Custom check box.
-
In the DNS Traffic area, from the Zone Transfer list, select Enabled.
-
In the DNS Features area, from the Use BIND Server on BIG-IP list, select Disabled.
-
Click Finished.
Assign the profile to a listener.
Important: DNS zone transfers use TCP port 53. Ensure that you use at least one listener configured for TCP.
Ensure that a custom DNS profile is present in the configuration with Zone Transfer enabled and Use BIND server on BIG-IP disabled.
When you implement DNSSEC zone transfer signing, you must modify the listeners that identify the DNSSEC traffic that the BIG-IP system handles by adding a custom DNS profile enabled for DNSSEC and zone transfers. If you created four listeners to handle your IPv4 and IPv6, UDP and TCP traffic, add the custom DNS profile to all four listeners.
Important: DNS zone transfers use TCP port 53. Ensure that you use at least one listener configured for TCP.
Note: If you have multiple BIG-IP DNS systems in a device group, perform this procedure on only one BIG-IP DNS system.
-
On the Main tab, click DNS > Delivery > Listeners.
The Listeners List screen opens.
-
Click the name of the listener you want to modify.
-
In the Service area, from the DNS Profile list, select the custom DNS profile with Zone Transfer enabled, and Use BIND server on BIG-IP disabled.
-
Click Finished.
-
Perform steps 2 - 4 to modify each of the other listeners.
Ensure that the time setting on BIG-IP DNS is synchronized with the NTP servers on your network. This ensures that each BIG-IP DNS in a synchronization group is referencing the same time when generating keys.
Determine the values you want to configure for the rollover period, expiration period, and TTL of the keys, using the following criteria:
- The amount of time required to send the DS records for the zone to which this key is associated to the organization that manages the parent zone.
- The value of the rollover period must be greater than half the value of the expiration period, as well as less than the value of the expiration period.
- The difference between the values of the rollover and expiration periods must be more than the value of the TTL.
Note: The values recommended in this procedure are based on the values in the NIST Secure Domain Name System (DNS) Deployment Guide.
Create automatically-managed zone-signing keys for BIG-IP DNS to use in the DNSSEC authentication process.
-
On the Main tab, click DNS > Delivery > Keys > DNSSEC Key List.
The DNSSEC Key List screen opens.
-
Click Create.
The New DNSSEC Key screen opens.
-
In the Name field, type a name for the key.
Zone names are limited to
63characters. -
From the Type list, select Zone Signing Key.
-
From the State list, select Enabled.
-
From the Hardware Security Module list, select None.
-
From the Algorithm list, select the digest algorithm the system uses to generate the key signature. Your options are RSA/SHA1, RSA/SHA256, and RSA/SHA512.
-
From the Key Management list, select Automatic.
The Key Settings area displays fields for key configuration.
-
In the Bit Width field, type
1024. -
In the TTL field, accept the default value of
86400(the number of seconds in one day.)This value specifies how long a client resolver can cache the key. This value must be less than the difference between the values of the rollover and expiration periods of the key; otherwise, a client can make a query and the system can send a valid key that the client cannot recognize.
-
For the Rollover Period setting, in the Days field, type
21. -
For the Expiration Period setting, in the Days field, type
30.Zero seconds indicates not set, and thus the key does not expire.
-
For the Signature Validity Period setting, accept the default value of seven days.
This value must be greater than the value of the signature publication period.
Zero seconds indicates not set, and thus the server verifying the signature never succeeds, because the signature is always expired.
-
For the Signature Publication Period setting, accept the default value of four days and 16 hours.
This value must be less than the value of the signature validity period.
Zero seconds indicates not set, and thus the signature is not cached.
-
Click Finished.
-
To create a standby key for emergency rollover purposes, repeat these steps using a similar name, and select Disabled from the State list.
Ensure that the time setting on BIG-IP DNS is synchronized with the NTP servers on your network. This ensures that each BIG-IP DNS in a synchronization group is referencing the same time when generating keys.
When you plan to manually create keys, install the certificate and key pairs on the BIG-IP system, before you attempt to create DNSSEC keys.
Important: Certificate and key file pairs must have the same name, for example, exthsm.crt and exthsm.key.
Create manually-managed zone-signing keys for BIG-IP DNS to use in the DNSSEC authentication process.
-
On the Main tab, click DNS > Delivery > Keys > DNSSEC Key List.
The DNSSEC Key List screen opens.
-
Click Create.
The New DNSSEC Key screen opens.
-
In the Name field, type a name for the key.
Zone names are limited to
63characters. -
From the Type list, select Zone Signing Key.
-
From the State list, select Enabled.
-
From the Hardware Security Module list, select None.
-
From the Algorithm list, select the digest algorithm the system uses to generate the key signature. Your options are RSA/SHA1, RSA/SHA256, and RSA/SHA512.
-
From the Key Management list, select Manual.
The Key Settings area displays Certificate and Private Key lists.
-
In the Key Settings area, select a certificate/key pair:
-
From the Certificate list, select a certificate.
-
From the Private Key list, select the key that matches the certificate you selected.
-
-
Click Finished.
-
To create a standby key for emergency rollover purposes, repeat these steps using a similar name, and select Disabled from the State list.
Ensure that the time setting on BIG-IP DNS is synchronized with the NTP servers on your network. This ensures that each BIG-IP DNS in a synchronization group is referencing the same time when generating keys.
Determine the values you want to configure for the rollover period, expiration period, and TTL of the keys, using the following criteria:
- The amount of time required to send the DS records for the zone to which this key is associated to the organization that manages the parent zone.
- The value of the rollover period must be greater than half the value of the expiration period, as well as less than the value of the expiration period.
- The difference between the values of the rollover and expiration periods must be more than the value of the TTL.
Note: The values recommended in these steps are based on the values in the NIST Secure Domain Name System (DNS) Deployment Guide.
Create key-signing keys for BIG-IP DNS to use in the DNSSEC authentication process.
-
On the Main tab, click DNS > Delivery > Keys > DNSSEC Key List.
The DNSSEC Key List screen opens.
-
Click Create.
The New DNSSEC Key screen opens.
-
In the Name field, type a name for the key.
Zone names are limited to
63characters. -
From the Type list, select Key Signing Key.
-
From the State list, select Enabled.
-
From the Hardware Security Module list, select None.
-
From the Algorithm list, select the digest algorithm the system uses to generate the key signature. Your options are RSA/SHA1, RSA/SHA256, and RSA/SHA512.
-
From the Key Management list, select Automatic.
The Key Settings area displays fields for key configuration.
-
In the Bit Width field, type
2048. -
In the TTL field, accept the default value of
86400(the number of seconds in one day.)This value specifies how long a client resolver can cache the key. This value must be less than the difference between the values of the rollover and expiration periods of the key; otherwise, a client can make a query and the system can send a valid key that the client cannot recognize.
-
For the Rollover Period setting, in the Days field, type
340. -
For the Expiration Period setting, in the Days field, type
365.Zero seconds indicates not set, and thus the key does not expire.
Tip: The National Institute of Standards and Technology (NIST) recommends that a key-signing key expire once a year.
-
For the Signature Validity Period setting, accept the default value of seven days.
This value must be greater than the value of the signature publication period.
Zero seconds indicates not set, and thus the server verifying the signature never succeeds, because the signature is always expired.
-
For the Signature Publication Period setting, accept the default value of four days and 16 hours.
This value must be less than the value of the signature validity period.
Zero seconds indicates not set, and thus the signature is not cached.
-
Click Finished.
-
To create a standby key for emergency rollover purposes, repeat these steps using a similar name, and select Disabled from the State list.
Ensure that the time setting on BIG-IP DNS is synchronized with the NTP servers on your network. This ensures that each BIG-IP DNS in a synchronization group is referencing the same time when generating keys.
When you plan to manually create keys, install the certificate and key pairs on the BIG-IP system, before you attempt to create DNSSEC keys.
Important: Certificate and key file pairs must have the same name, for example, exthsm.crt and exthsm.key.
Create key-signing keys for BIG-IP DNS to use in the DNSSEC authentication process.
-
On the Main tab, click DNS > Delivery > Keys > DNSSEC Key List.
The DNSSEC Key List screen opens.
-
Click Create.
The New DNSSEC Key screen opens.
-
In the Name field, type a name for the key.
Zone names are limited to
63characters. -
From the Type list, select Key Signing Key.
-
From the State list, select Enabled.
-
From the Hardware Security Module list, select None.
-
From the Algorithm list, select the digest algorithm the system uses to generate the key signature. Your options are RSA/SHA1, RSA/SHA256, and RSA/SHA512.
-
From the Key Management list, select Manual.
The Key Settings area displays Certificate and Private Key lists.
-
In the Key Settings area, select a certificate/key pair:
-
From the Certificate list, select a certificate.
-
From the Private Key list, select the key that matches the certificate you selected.
-
-
Click Finished.
-
To create a standby key for emergency rollover purposes, repeat these steps using a similar name, and select Disabled from the State list.
Before you configure DNSSEC, ensure that at least one data center and a server object representing the BIG-IP device exist in the BIG-IP system configuration.
Important: The DNSSEC feature is available only when the BIG-IP system is licensed for BIG-IP DNS.
Before the BIG-IP system can sign DNS requests (including zone transfer requests) for a zone using DNSSEC keys, you must create a DNSSEC zone on the system and assign at least one enabled zone-signing and one enabled key-signing key to the zone.
-
On the Main tab, click DNS > Zones > DNSSEC Zones.
The DNSSEC Zone List screen opens.
-
Click Create.
The New DNSSEC Zone screen opens.
-
In the Name field, type a domain name.
For example, use a zone name of
siterequest.comto handle DNSSEC requests forwww.siterequest.comand*.www.siterequest.com. -
From the State list, select Enabled.
-
For the Zone Signing Key setting, assign at least one enabled zone-signing key to the zone.
You can associate the same zone-signing key with multiple zones.
-
For the Key Signing Key setting, assign at least one enabled key-signing key to the zone.
You can associate the same key-signing key with multiple zones.
-
Click Finished.
Even if you selected Enabled from the State list, if there are not at least one zone-signing and one key-signing key in the Active column, the status of the zone changes to offline.
Upload the DS records for this zone to the organization that manages the parent zone. The administrators of the parent zone sign the DS record with their own key and upload it to their zone. You can find the DS records in the Configuration utility.
Obtain the IP address of the authoritative DNS server that hosts the DNS zone. Optional: Ensure that the server TSIG key is available on the BIG-IP system.
When you want to transfer a zone from an authoritative DNS server into the DNS Express engine and have DNS Express respond to DNS queries for the zone, add a nameserver object that represents the server that hosts the zone.
-
On the Main tab, click DNS > Delivery > Nameservers.
The Nameservers List screen opens.
-
Click Create.
The New Nameserver screen opens.
-
In the Name field, type a name for the authoritative DNS server.
-
In the Address field, type the IP address on which the DNS server listens for DNS messages.
-
Optional: From the Server Key list, select the TSIG key that matches the TSIG key on the DNS server.
The BIG-IP system uses this TSIG key to sign DNS zone transfer requests sent to the DNS server that hosts this zone, and then to verify a zone transfer returned from the DNS server.
Create a DNS zone and add a DNS Express server object to the zone.
Gather the IP addresses of the DNS nameservers (clients) from which the DNS Express engine accepts zone transfer requests for a DNS zone. Optional: Ensure that the client TSIG key is available on the BIG-IP system.
To allow DNS nameservers (clients) to request zone transfers for a zone, add a nameserver object that represents each client. Optionally, you can add a client TSIG key that the BIG-IP system uses to authenticate the identity of the client during zone transfer communications.
-
On the Main tab, click DNS > Delivery > Nameservers.
The Nameservers List screen opens.
-
Click Create.
The New Nameserver screen opens.
-
In the Name field, type a name for the DNS nameserver (client).
-
In the Address field, type the IP address on which the DNS nameserver (client) listens for DNS messages.
-
Optional: From the TSIG Key list, select the TSIG key you want the BIG-IP system to use to validate zone transfer traffic.
-
Click Finished.
-
Add nameserver objects to represent other DNS nameservers (clients).
Add the DNS nameservers (clients) objects to the Zone Transfer Client list of the DNS zone on the BIG-IP system.
Ensure that at least one nameserver object that represents a DNS nameserver (client) exists in the BIG-IP system configuration:
Modify a DNS zone to answer zone transfer requests from specific DNS nameservers (clients).
-
On the Main tab, click DNS > Zones.
The Zone List screen opens.
-
Click the name of the zone you want to modify.
-
In the Zone Transfer Clients area, move the nameservers that can initiate zone transfers from the Available list to the Active list.
-
Click Finished.
You can view information about the zones that are protected by DNS Express.
-
On the Main tab, click Statistics > Module Statistics > DNS > Zones.
The Zones statistics screen opens.
-
From the Statistics Type list, select Zones.
Information displays about the traffic handled by the DNSSEC zones in the list.
-
In the Details column for a zone, click View.
Read the online help for an explanation of the statistics.
On BIG-IP® DNS, you can view DNSSEC records in ZoneRunner™, access and view DNSSEC SEP Records, and modify generations of a DNSSEC key.
When you want to troubleshoot the DNSSEC configuration on BIG-IP DNS, perform these tasks.