Updated Date: 07/07/2026
Configuring MQTT Functionality
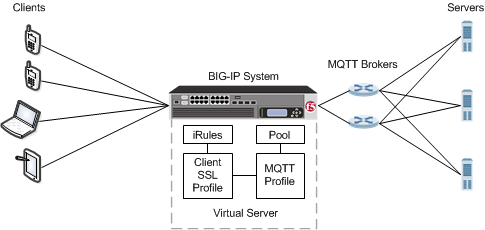
You can use a Message Queuing Telemetry Transport (MQTT) configuration to optimize the performance and bandwidth of mobile environments. Because the MQTT protocol is designed for lightweight publish-and-subscribe messaging, it reduces or eliminates the disadvantages of the commonly used HTTP request-response protocol, especially in mobile environments. For example, you will want to use an MQTT configuration when devices use intermittent connectivity, when bandwidth is at a premium, when an enterprise application interacts with multiple mobile device applications, or when mobile device applications send data reliably without requiring retries.
In an MQTT configuration, clients publish messages, and the BIG-IP system validates and manages those messages through a pool of message brokers, which then transport and route the messages to subscribing servers. You can examine statistics specific to MQTT parameters through the Profiles Summary.
A typical BIG-IP MQTT configuration includes:
- MQTT pool of message brokers
- iRules for MQTT
- Client SSL profile
- MQTT profile (configured in TMSH)
- Virtual server configured to use MQTT functionality
Complete these tasks to configure the BIG-IP system to use MQTT functionality.
Create an MQTT monitor
Create a pool
Create an iRule for MQTT publishing
Create a Client SSL profile
Create a virtual server for MQTT
View MQTT statistics
The Message Queuing Telemetry Transport (MQTT) profile supports MQTT protocol functionality, enabling you to configure a publish-and-subscribe environment to manage devices in an Internet of Things (IoT) context. The BIG-IP system includes a default MQTT profile, configured in TMSH, that you assign to a virtual server.
This example iRule shows how to log MQTT messages.
ltm rule mqtt_rule {
    when MQTT_CLIENT_INGRESS {
        log local0. "Client message type [MQTT::type]"
        switch [MQTT::type] {
            CONNECT {
                log local0. "   protocol-name    [MQTT::protocol_name]"
                log local0. "   protocol-version [MQTT::protocol_version]"
                log local0. "   client-id        [MQTT::client_id]"
                log local0. "   keep-alive       [MQTT::keep_alive]"
                log local0. "   username         [MQTT::username]"
                log local0. "   password         [MQTT::password]"
            }
            PUBLISH {
                log local0. "   qos              [MQTT::qos]"
                log local0. "   message-id       [MQTT::message_id]"
                log local0. "   topic            [MQTT::topic]"
            }
            PUBREL {
                log local0. "   message-id       [MQTT::message_id]"
            }
            SUBSCRIBE {
                log local0. "   message-id       [MQTT::message_id]"
                set count [MQTT::topic count]
                for {set i 0} {$i < $count} {incr i} {
                    set topic [MQTT::topic index $i]
                    log local0. "   topics index $i      $topic"
                    log local0. "   topics index $i qos  [MQTT::message topics qos $topic]"
                }
            }
            UNSUBSCRIBE {
                log local0. "   message-id       [MQTT::message_id]"
                set count [MQTT::topic count]
                for {set i 0} {$i < $count} {incr i} {
                    log local0. "   topics index $i   [MQTT::topic index $i]"
                }
            }
        }
    }
    when MQTT_SERVER_INGRESS {
        log local0. "Server message type [MQTT::type]"
        switch [MQTT::type] {
            CONNACK {
                log local0. "   return-code      [MQTT::return_code]"
            }
            PUBLISH {
                log local0. "   message-id       [MQTT::message_id]"
                log local0. "   topic            [MQTT::topic]"
            }
            PUBACK {
                log local0. "   message-id       [MQTT::message_id]"
            }
            PUBREC {
                log local0. "   message-id       [MQTT::message_id]"
            }
            PUBCOMP {
                log local0. "   message-id       [MQTT::message_id]"
            }
            SUBACK {
                log local0. "   message-id       [MQTT::message_id]"
            }
            UNSUBACK {
                log local0. "   message-id       [MQTT::message_id]"
            }
        }
    }
}This example iRule shows how to pass the common name for a client certificate to an MQTT server through the username field in the CONNECT message.
when CLIENT_ACCEPTED {
    set cn ""
}

when CLIENTSSL_CLIENTCERT {
    set cn [ lindex [ split [lindex [ split [X509::subject [SSL::cert 0]] "," ] 0 ] "=" ] 1 ]
    log local0. "Client Cert Common Name : $cn"
}

when MQTT_CLIENT_INGRESS {
    if {[MQTT::type] == "CONNECT"} {
        if {$cn == ""} {
            # if we didn't see a client cert, return an authentication error

            MQTT::drop                                    # drop current message
            MQTT::respond type CONNACK return-code 5      # send a CONNACK
            MQTT::disconnect                              # and disconnect
        } else {
            MQTT::username $cn                    # fill-in username field
        }
    }
}You can create an MQTT monitor to monitor MQTT brokers that are configured as pool members in an LTM pool.
-
On the Main tab, click Local Traffic > Monitors.
The Monitors List screen opens.
-
Click Create.
The New Monitor screen opens.
-
In the Name field, type a name for the monitor.
-
From the Type list, select MQTT.
The screen refreshes, and displays the configuration options for the MQTT monitor type.
-
From the Configuration list, select Advanced.
This selection makes it possible for you to modify additional default settings.
-
In the Interval field, type a number that indicates, in seconds, how frequently the system issues the monitor check.
The default is
5seconds. -
To specify a different interval for health checking, from the Up Interval list, select Enabled, and, in the Up Interval field, type the number of seconds for the interval.
The default is Disabled.
-
In the Time Until Up field, type the number of seconds to wait after a resource first responds correctly to the monitor before setting the resource to up.
The default is
0seconds. -
In the Timeout field, type the number of seconds that the target has in which to respond to the monitor request.
The default is
16seconds. -
To specify that you must manually re-enable the resource after an unsuccessful monitor check, for Manual Resume, select Yes.
The default is No.
-
From the MQTT Version list, select the protocol version that the monitor will use to communicate with the monitoring object.
The default is 3.1.1.
-
In the Client ID field, type the Client ID that the monitor will send to communicate with the monitoring object.
-
If the monitored object requires authentication, type a User Name.
-
If the monitored target requires authentication, type a Password.
-
In the Alias Address field, type an alias IP address for the monitor to check, on behalf of the pools or pool members with which the monitor is associated.
The default is
* All Addresses. -
In the Alias Service Port field, type an alias port or, from the Alias Service Port list, select a service for the monitor to check, on behalf of the pools or pool members with which the monitor is associated.
The default is
* All Ports. -
Click Finished.
Before you can assign an MQTT health monitor to a pool, you need to create the MQTT monitor.
You can create a pool of servers that you can group together to receive and process traffic. After the pool is created, you can associate the pool with a virtual server.
-
On the Main tab, click Local Traffic > Pools.
The Pool List screen opens.
-
Click Create.
The New Pool screen opens.
-
In the Name field, type a unique name for the pool.
-
For the Health Monitors setting, select an MQTT health monitor from the Available field, and move it to the Active field.
-
For each pool member, in the New Members setting, select one of the options, and then follow the steps to configure the applicable settings.
|
Option |
Steps | ||||||
|---|---|---|---|---|---|---|---|
|
New Node |
| ||||||
|
New FQDN Node |
Note: To use FQDNs instead of IP addresses, you should still type at least one IP address. Typing one IP address ensures that the system can find a pool member if a DNS server is not available.
|
-
Click Finished.
The screen refreshes, and you see the new pool in the Pool list.
You can create iRules for MQTT functionality, for example to log the messages that the BIG-IP system passes, or to pass the client certificate’s common name in the CONNECT message.
-
On the Main tab, click Local Traffic > iRules.
The iRule List screen opens, displaying any existing iRules.
-
Click Create.
The New iRule screen opens.
-
In the Name field, type a unique name for the iRule.
The full path name of the iRule cannot exceed 255 characters.
-
In the Definition field, type an iRule.
-
Click Finished.
The new iRule appears in the list of iRules on the system.
The BIG-IP system includes the iRules for MQTT functionality that you’ve created.
You create a Client SSL profile when you want the BIG-IP system to authenticate and decrypt/encrypt client-side application traffic.
-
On the Main tab, click Local Traffic > Profiles > SSL > Client.
The Client SSL profile list screen opens.
-
Click Create.
The New Client SSL Profile screen opens.
-
Configure all profile settings as needed.
-
Click Finished.
After creating the Client SSL profile and assigning the profile to a virtual server, the BIG-IP system can apply SSL security to the type of application traffic for which the virtual server is configured to listen.
Before creating a virtual server, verify that you have created the pool to which you want this virtual server to send traffic.
When you create a virtual server, you specify a destination IP address and service port. All other settings on the virtual server have default values. You can change the default values of any settings to suit your needs.
-
On the Main tab, click Local Traffic > Virtual Servers.
The Virtual Server List screen opens.
-
Click Create.
The New Virtual Server screen opens.
-
In the Name field, type a unique name for the virtual server.
-
From the Type list, for the virtual type, select Message Routing.
-
In the Destination Address/Mask field:
- If you want to specify a single IP address, confirm that the Host button is selected, and type the IP address in CIDR format.
- If you want to specify multiple IP addresses, select the Address List button, and confirm that the address list that you previously created appears in the box.
The supported format is address/prefix, where the prefix length is in bits. For example, an IPv4 address/prefix is
10.0.0.1or10.0.0.0/24, and an IPv6 address/prefix isffe1::0020/64or2001:ed8:77b5:2:10:10:100:42/64. When you use an IPv4 address without specifying a prefix, the BIG-IP system automatically uses a/32prefix.
Note: The IP address or addresses for this field must be on the same subnet as the external self-IP address.
-
In the Service Port field, type one of these two port numbers, or select one of the two services from the list.
Port Number Service Name 1883MQTT. The Internet Assigned Numbers Authority (IANA) registered port for MQTT service. 8883MQTT-TLS. The IANA registered port for secure MQTT service over a Transport Layer Security (TLS) network. -
In the Configuration list, retain the default, Basic.
-
For the SSL Profile (Client) setting, from the Available list, select the name of the Client SSL profile you previously created and move the name to the Selected list.
-
From the Application Protocol list, select MQTT.
-
From the Session Profile list, select the name of a MQTT Session profile that you created previously.
-
From the Router Profile list, select the name of a MQTT Router profile that you created previously.
-
Configure any other settings that you need.
-
In the Resources area, for the iRules setting, from the Available list, select the name of the iRule that you want to assign, and move the name into the Enabled list.
-
Click Finished.
You now have a virtual server that listens for application traffic and acts according to the values configured within the virtual server.
Ensure that an MQTT profile is assigned to at least one virtual server.
You can see how the BIG-IP system is handling MQTT messages by viewing statistics per MQTT profile.
-
On the Main tab, click Statistics > Module Statistics > Local Traffic.
The Local Traffic statistics screen opens.
-
From the Statistics Type list, select Profiles Summary.
-
In the Details column for the MQTT profile, click View to display detailed statistics about MQTT messages.