Updated Date: 07/07/2026
Configuring an SSL Intercept Explicit Proxy Mode
A typical SSL intercept explicity proxy mode configuration includes two BIG-IP devices, one configured to manage half-proxy client traffic and one configured to manage half-proxy server traffic. When the ingress BIG-IP system receives a client request, SSL decrypts the request. The ingress BIG-IP system then sends metadata to the egress BIG-IP system by means of the out-of-band TCP connection and sends the request data to the inspection device. When the egress BIG-IP system receives the metadata through the out-of-band connection and the request from the inspection device, it uses the information in the metadata, re-encrypts the request, and forwards it to the destination server.
The following illustration depicts an example configuration.
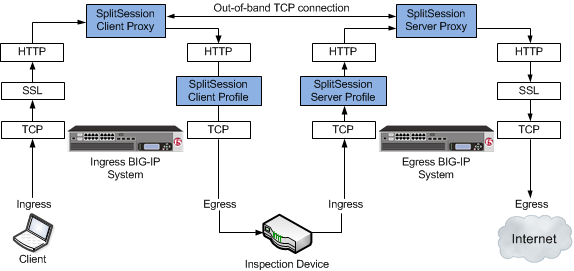
The SplitSession Client profile defines the client parameters in an SSL intercept explicit proxy mode configuration. This profile enables you to configure a Peer Port, which specifies the port for the SplitSession peer that is connected to the out-of-band connection, and the Peer IP address, which specifies the IP address for the SplitSession peer that is connected to the out-of-band connection.
The SplitSession Server profile defines the server parameters in an SSL intercept explicit proxy mode configuration. This profile enables you to configure a Listen Port, which specifies the port that the SplitSession server listens on for the out-of-band connection, and the Listen IP address, which specifies the IP address that the SplitSession server listens on for the out-of-band connection.
Complete these tasks to configure an SSL intercept explicit proxy configuration.
You can create a pool that includes an inspection device to process HTTP requests.
-
On the Main tab, click Local Traffic > Pools.
The Pool List screen opens.
-
Click Create.
The New Pool screen opens.
-
In the Name field, type a unique name for the pool.
-
Using the New Members setting, add each resource that you want to include in the pool:
-
Type an IP address in the Address field.
-
Type
80in the Service Port field, or select HTTP from the list. -
(Optional) Type a priority number in the Priority field.
-
Click Add.
-
-
Click Finished.
The new pool appears in the Pools list.
Before you configure an ingress explicit proxy virtual server, you need to configure a SplitSession Client profile and pool to assign to the virtual server.
You can configure an ingress explicit proxy virtual server to manage the client split-session half-proxy traffic from a client to the inspection device.
-
On the Main tab, click Local Traffic > Virtual Servers.
The Virtual Server List screen opens.
-
Click Create.
The New Virtual Server screen opens.
-
In the Name field, type a unique name for the virtual server.
-
In the Description field, type a description of the virtual server.
-
In the Source Address field, type
0.0.0.0/0for the source address and prefix length. -
In the Destination Address/Mask field, type an IP address in CIDR format.
The supported format is address/prefix, where the prefix length is in bits. For example, to select all IP addresses, an IPv4 address/prefix is
0.0.0.0/0, and an IPv6 address/prefix is::/0. To specify a network, an IPv4 address/prefix is10.07.0.0or10.07.0.0/24, and an IPv6 address/prefix isffe1::/64or2001:ed8:77b5::/64. When you use an IPv4 address without specifying a prefix, the BIG-IP system automatically uses a/32prefix.Note: For best results, F5 recommends that you enter the subnet that matches your destination server network.
-
In the Service Port field, type
443or select HTTPS from the list. -
From the HTTP Profile list, select http.
-
For the SSL Profile (Client) setting, select a client SSL profile.
-
From the Protocol list, select TCP.
-
From the SplitSession Client Profile list, select splitsessionclient or a custom SplitSession Client profile.
-
From the Default Pool list, select the name of the HTTP server pool that you previously created.
-
Click Finished.
An ingress explicit proxy virtual server is configured to manage the client split-session half-proxy traffic from a client to the inspection device.
You can create a SplitSession Server profile to define the server parameters in an SSL intercept explicit proxy mode configuration.
-
On the Main tab, click Local Traffic > Profiles > Other > SplitSession Server.
The SplitSession Server profile list screen opens.
-
Click Create.
The New SplitSession Server Profile screen opens.
-
In the Name field, type a unique name for the profile.
-
From the Parent Profile list, retain the default value or select another existing profile of the same type.
-
In the Listen Port field, type a value for the the port of the SplitSession server listens on for the out-of-band connection.
-
In the Listen IP field, type the IP address of the SplitSession server listens on for the out-of-band connection.
-
Click Finished.
A SplitSession Server profile to define the server parameters in an SSL intercept explicit proxy mode configuration is available to assign to a virtual server.
Create a custom server SSL profile to support SSL forward proxy.
-
On the Main tab, click Local Traffic > Profiles > SSL > Server.
The Server SSL profile list screen opens.
-
Click Create.
The New Server SSL Profile screen opens.
-
In the Name field, type a unique name for the profile.
-
For Parent Profile, retain the default selection, serverssl.
-
Select the Proxy SSL check box (the rest of the UI will collapse following this setting).
-
Optionally, select the Proxy SSL Passthrough check box.
Note: This option is often not needed. Review the Knowledge Center article K13385: Overview of the Proxy SSL feature for guidelines on when to enable this setting and its implications.
-
Configure the Certificate and Key using the identical Certificate and Key details configured on the server.
Note: Import the details to the BIG-IP system prior to configuring Proxy SSL.
-
Click Finished.
The custom Server SSL profile is now listed in the SSL Server profile list.
You can create a pool (a logical set of devices, such as web servers, that you group together to receive and process HTTPS traffic) to efficiently distribute the load on your server resources.
-
On the Main tab, click Local Traffic > Pools.
The Pool List screen opens.
-
Click Create.
The New Pool screen opens.
-
In the Name field, type a unique name for the pool.
-
For the Health Monitors setting, assign https or https_443 by moving it from the Available list to the Active list.
-
From the Load Balancing Method list, select how the system distributes traffic to members of this pool.
The default is Round Robin.
-
For the Priority Group Activation setting, specify how to handle priority groups:
- Select Disabled to disable priority groups. This is the default option.
- Select Less than, and in the Available Members field type the minimum number of members that must remain available in each priority group in order for traffic to remain confined to that group.
-
Use the New Members setting to add each resource that you want to include in the pool:
-
In the Address field, type an IP address.
-
In the Service Port field type
443, or select HTTPS from the list. -
(Optional) Type a priority number in the Priority field.
-
Click Add.
-
-
Click Finished.
The HTTPS load balancing pool appears in the Pool List screen.
Before you configure an egress explicit proxy virtual server, you need to configure a SplitSession Server profile and pool to assign to the virtual server.
You can configure an egress explicit proxy virtual server to manage the server split-session half-proxy traffic from an inspection device to a server.
-
On the Main tab, click Local Traffic > Virtual Servers.
The Virtual Server List screen opens.
-
Click Create.
The New Virtual Server screen opens.
-
In the Name field, type a unique name for the virtual server.
-
In the Description field, type a description of the virtual server.
-
In the Source Address field, type
0.0.0.0/0for the source address and prefix length. -
In the Destination Address/Mask field, type an IP address in CIDR format.
The supported format is address/prefix, where the prefix length is in bits. For example, to select all IP addresses, an IPv4 address/prefix is
0.0.0.0/0, and an IPv6 address/prefix is::/0. To specify a network, an IPv4 address/prefix is10.07.0.0or10.07.0.0/24, and an IPv6 address/prefix isffe1::/64or2001:ed8:77b5::/64. When you use an IPv4 address without specifying a prefix, the BIG-IP system automatically uses a/32prefix.Note: For best results, F5 recommends that you enter the subnet that matches your destination server network.
-
In the Service Port field, type
443or select HTTPS from the list. -
For the SSL Profile (Server) setting, select a server SSL profile.
-
From the Protocol list, select TCP.
-
From the SplitSession Server Profile list, select splitsessionserver or a custom SplitSession Server profile.
-
From the Default Pool list, select the name of the HTTP server pool that you previously created.
-
Click Finished.
An egress explicit proxy virtual server is configured to manage the server split-session half-proxy traffic from an inspection device to a server.
You can create a SplitSession Client profile to define the client parameters in an SSL intercept explicit proxy mode configuration.
-
On the Main tab, click Local Traffic > Profiles > Other > SplitSession Client.
The SplitSession Client profile list screen opens.
-
Click Create.
The New SplitSession Client Profile screen opens.
-
In the Name field, type a unique name for the profile.
-
From the Parent Profile list, retain the default value or select another existing profile of the same type.
-
In the Peer Port field, type a value for the the port of the SplitSession peer assigned to the out-of-band connection.
-
In the Peer IP field, type the IP address of the SplitSession peer assigned to the out-of-band connection.
-
Click Finished.
A SplitSession Client profile to define the client parameters in an SSL intercept explicit proxy mode configuration is available to assign to a virtual server.
You create a custom Client SSL profile when you want the BIG-IP system to terminate client-side SSL traffic for the purpose of:
- Authenticating and decrypting ingress client-side SSL traffic
- Re-encrypting egress client-side traffic
By terminating client-side SSL traffic, the BIG-IP system offloads these authentication and decryption/encryption functions from the destination server.
-
On the Main tab, click Local Traffic > Profiles > SSL > Client.
The Client SSL profile list screen opens.
-
Click Create.
The New Client SSL Profile screen opens.
-
In the Name field, type a unique name for the profile.
-
Select clientssl in the Parent Profile list.
-
Select the Proxy SSL check box (the rest of the UI will collapse following this setting).
-
Optionally, select the Proxy SSL Passthrough check box.
Note: This option is often not needed. Review the Knowledge Center article K13385: Overview of the Proxy SSL feature for guidelines on when to enable this setting and its implications.
-
Configure the Certificate Key Chain.
Note: The Certificate and Key under ClientSSL profile are not used in Proxy SSL (since the client and the server will eventually verify each other). F5 recommends leaving the default F5 cert/key pair.
-
Click Finished.