Updated Date: 07/07/2026
Customizing IPFIX Logging with iRules
You can configure iRules® to parse incoming packets and create IPFIX logs for them.
The BIG-IP® system supports logging of any network events over the IPFIX protocol. An iRule matches any network event that you choose and creates a customized IPFIX log from the given event.
The IPFIX logs use the information model described in RFC 5102. IPFIX logs are raw, binary-encoded strings with their fields and field lengths defined by IPFIX templates. IPFIX collectors are external devices that can receive IPFIX templates and logs.
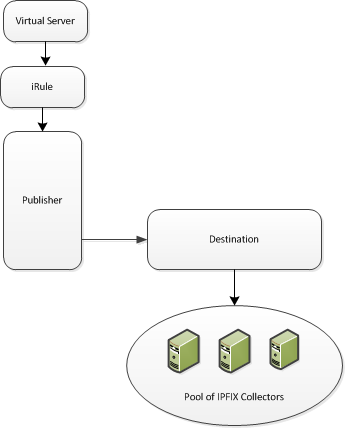
This illustration shows the association of the configuration objects for IPFIX logging through iRules.
Perform these tasks to configure iRules for IPFIX logging.
Note: Enabling IPFIX logging impacts BIG-IP system performance.
The configuration process involves creating and connecting the following configuration objects.
| Object | Reason | Applies to |
|---|---|---|
| Pool of IPFIX collectors | Create a pool of IPFIX collectors to which the BIG-IP system can send IPFIX log messages. | Assembling a pool of IPFIX collectors |
| Destination | Create a log destination to format the logs in IPFIX templates, and forward the logs to the IPFIX collectors. | Creating an IPFIX log destination |
| Publisher | Create a log publisher to send logs to a set of specified log destinations. | Creating a publisher |
| iRule | Create an iRule that matches a network event, creates an IPFIX log to record the event, and sends the IPFIX log to the above publisher. | Writing an iRule for custom IPFIX logging |
| Virtual Server | Create a virtual server to process network traffic, or edit an existing virtual server. Add the iRule to the virtual-server configuration so that the iRule parses all of the virtual server’s network traffic. | Adding the iRule to a virtual server |
Before creating a pool of IPFIX collectors, gather the IP addresses of the collectors that you want to include in the pool. Ensure that the remote IPFIX collectors are configured to listen to and receive log messages from the BIG-IP system.
You can create a pool of IPFIX collectors to which the system can send IPFIX log messages.
-
On the Main tab, click Local Traffic > Pools.
The Pool List screen opens.
-
Click Create.
The New Pool screen opens.
-
In the Name field, type a unique name for the pool.
-
Using the New Members setting, add the IP address for each IPFIX collector that you want to include in the pool:
-
Type the collector’s IP address in the Address field, or select a node address from the Node List.
-
Type a port number in the Service Port field.
By default, IPFIX collectors listen on UDP or TCP port
4739and Netflow V9 devices listen on port2055, though the port is configurable at each collector. -
Click Add.
-
-
Click Finished.
A log destination of the IPFIX type specifies that log messages are sent to a pool of IPFIX collectors. Use these steps to create a log destination for IPFIX collectors.
-
On the Main tab, click System > Logs > Configuration > Log Destinations.
The Log Destinations screen opens.
-
Click Create.
-
In the Name field, type a unique, identifiable name for this destination.
-
From the Type list, select IPFIX.
-
From the Protocol list, select IPFIX or Netflow V9, depending on the type of collectors you have in the pool.
-
From the Pool Name list, select an LTM pool of IPFIX collectors.
-
From the Transport Profile list, select TCP, UDP, or any customized profile derived from TCP or UDP.
-
The Template Retransmit Interval is the time between transmissions of IPFIX templates to the pool of collectors. The BIG-IP system only retransmits its templates if the Transport Profile is a UDP profile.
An IPFIX template defines the field types and byte lengths of the binary IPFIX log messages. The logging destination sends the template for a given log type (for example, NAT44 logs or customized logs from an iRule) before sending any of those logs, so that the IPFIX collector can read the logs of that type. The logging destination assigns a template ID to each template, and places the template ID into each log that uses that template.
The log destination periodically retransmits all of its IPFIX templates over a UDP connection. The retransmissions are helpful for UDP connections, which are lossy.
-
The Template Delete Delay is the time that the BIG-IP device should pause between deleting an obsolete template and re-using its template ID. This feature is helpful for systems that can create custom IPFIX templates with iRules.
-
The Server SSL Profile applies Secure Socket Layer (SSL) or Transport Layer Security (TLS) to TCP connections. You can only choose an SSL profile if the Transport Profile is a TCP profile. Choose an SSL profile that is appropriate for the IPFIX collectors’ SSL/TLS configuration.
SSL or TLS requires extra processing and therefore slows the connection, so we only recommend this for sites where the connections to the IPFIX collectors have a potential security risk.
-
Click Finished.
Ensure that at least one destination associated with a pool of remote log servers exists on the BIG-IP system.
Create a publisher to specify where the BIG-IP system sends log messages for specific resources.
-
On the Main tab, click System > Logs > Configuration > Log Publishers.
The Log Publishers screen opens.
-
Click Create.
-
In the Name field, type a unique, identifiable name for this publisher.
-
For the Destinations setting, select a destination from the Available list, and move the destination to the Selected list.
Note: If you are using a formatted destination, select the destination that matches your log servers, such as Remote Syslog, Splunk, or IPFIX.
Important: If you configure a log publisher to use multiple logging destinations, then, by default, all logging destinations must be available in order to log to each destination. Unless all logging destinations are available, no logging can occur. If you want to log to the available logging destinations when one or more destinations become unavailable, you must set the
logpublisher.atomicdb key to false. If all the remote high-speed log (HSL) destinations are down (unavailable), setting thelogpublisher.atomicdb key to false will not work to allow the logs to be written to local-syslog. Thelogpublisher.atomicdb key has no effect on local-syslog. -
Click Finished.
The BIG-IP® software is shipped with the latest Information Elements (IEs) published by IANA. Each standard element is built into the system. You can use a standard element in your iRules® by using its name and a ":base" extension (for example, "deltaFlowCount:base" or "observationTimeSeconds:base").
You can use this tmsh command to identify the available base IEs on the system:
list sys ipfix element
If an element is defined by IANA after the BIG-IP software is built, the element is not available in the system software. You can use a similar tmsh command, create sys ipfix element ..., to create such an element and use it in your iRules.
Before you begin, you must have a log destination that leads to a pool of IPFIX collectors.
You can create an iRule that reads network packets and logs information about them to your IPFIX collectors. Each iRule must take the following steps:
- Open an IPFIX::destination.
- Create an IPFIX::template.
- Create an IPFIX::msg (using the IPFIX::template).
- Set values for the IPFIX elements in the IPFIX::msg.
- Send the IPFIX::msg to the IPFIX::destination.
Follow these steps to create all of these components.
-
On the Main tab, click Local Traffic > iRules.
The iRule List screen displays a list of existing iRules.
-
Click the Create button.
The New iRule screen opens.
-
In the Name field, type a unique name for the iRule.
-
In the Definition field, type an iRule to match IP fields and log an IPFIX message based on their settings. You can use standard IPFIX elements.
These sub-steps explain how to create all of the necessary iRule components.
-
Open a new IPFIX::destination, which is a pre-created log publisher, with the following syntax:
<ipfix_dest_handle> = IPFIX::destination open -publisher <logging_publisher>This returns a destination handle to be used later. The
<logging_publisher>is required; this must already exist and include a pool of IPFIX collectors. This is a partition path to the publisher configuration, such as/Common/myPublisher.Note: Use a unique name for the variable that holds this handle. If two or more iRules in the same virtual server reference a variable with the same name, the results at run-time are unpredictable. Use the rule name in all of this rule’s variables; do this once per destination in the iRule, and store all destinations in static variables. Every message that goes to a particular destination can reference the same static destination handle. Create this and initialize it to empty ("") in the RULE_INIT event.
-
Create a new IPFIX::template with the following syntax:
<ipfix_template_handle> = IPFIX::template create "<element_name> <element_name> ... <element_name>"This returns a template handle to be used in later
IPFIX::msgcommands. At least one<element_name>is required, and each element name must be defined through IANA or throughtmshcommands. The element order you use here is the order of the IPFIX template. You can use the same element multiple times.Note: As with destination variables, template variables must have unique names across all iRules.
Do this once per template in the iRule, and store all templates in static variables. Every message that uses the template can reference the same static template handle. Create this an initialize it to empty ("") in the RULE_INIT event.
-
When you match an interesting event, create a new IPFIX::msg with the following syntax:
<ipfix_message_handle> = IPFIX::msg create <ipfix_template_handle>This returns a message handle to be used in later IPFIX::msg commands. Use an <ipfix_template_handle> you created with an earlier IPFIX::template command. This starts the creation of an IPFIX message using the given IPFIX template.
Note: Choose a unique name for the message across all iRules.
-
Later in the same IP event, add interesting data the IPFIX::msg with the following syntax:
IPFIX::msg set <ipfix_message_handle> <element_name> [-pos <position>] <value>- <ipfix_message_handle> is an IPFIX::msg you created earlier.
- <element_name> is the name of an element in the message’s IPFIX::template.
- -pos <position> (optional) only applies to an element that appears more than once in the template. The first instance of an element is element zero. If you omit this, the system applies the value to the first instance of the element (instance zero).
- <value> sets the value of the element. If you use this command on the same element position more than once, the final setting overwrites the previous settings.
-
Send the finished IPFIX::msg to an IPFIX::destination, using the following syntax:
IPFIX::destination send <ipfix_dest_handle> <ipfix_message_handle>
For example, this iRule matches an HTTP exchange and sends a log about its basic parameters to IPFIX collectors:
# This rule captures HTTP traffic and sends logs to IPFIX collectors. when RULE_INIT { set static::http_rule1_dest "" set static::http_rule1_tmplt "" } when CLIENT_ACCEPTED { if { $static::http_rule1_dest == ""} { # open the logging destination if it has not been opened yet set static::http_rule1_dest [IPFIX::destination open -publisher /Common/ipfix_publisher] } if { $static::http_rule1_tmplt == ""} { # if the template has not been created yet, create the template set static::http_rule1_tmplt [IPFIX::template create "flowStartSeconds sourceIPv4Address tcpSourcePort flowDurationMilliseconds"] } } when HTTP_REQUEST { # create a new message for this request set rule1_msg1 [IPFIX::msg create $static::http_rule1_tmplt] # compose the IPFIX log message IPFIX::msg set $rule1_msg1 flowStartSeconds [clock seconds] IPFIX::msg set $rule1_msg1 sourceIPv4Address [IP::client_addr] IPFIX::msg set $rule1_msg1 tcpSourcePort [TCP::client_port] # record the start time in milliseconds set start [clock clicks -milliseconds] } when HTTP_RESPONSE_RELEASE { # figure out the final duration and add it to the IPFIX log set stop [expr {[clock click -milliseconds] - $start}] IPFIX::msg set $rule1_msg1 flowDurationMilliseconds $stop # send the IPFIX log IPFIX::destination send $static::http_rule1_dest $rule1_msg1 } } -
-
Click Finished.
The iRule is now available. You can use this iRule in a virtual server that serves HTTP clients.
After you create a pool of collectors, logging components, IPFIX elements (optionally), and an iRule, you need to create a virtual server that references those components.
-
On the Main tab, click Local Traffic > Virtual Servers.
The Virtual Server List screen opens.
-
Click the name of the virtual server you want to modify.
-
On the menu bar, click Resources.
-
For the iRules setting, from the Available list, select the name of the iRule that creates custom IPFIX logs. Move the name into the Enabled list.
-
Click Finished.
The virtual server is configured to use the iRule for IPFIX logging. The server now sends customized IPFIX logs for every connection it makes.
Use these tmsh commands to show IPFIX statistics.
-
Access the
tmshcommand-line utility. -
To show IPFIX usage per IPFIX::destination, use the
showcommand on thesys ipfix destinationstmshcomponent:show sys ipfix destination [<destination-name>]Note: The optional <destination-name> narrows the focus to a single IPFIX::destination. If you omit this, the output shows statistics for all active IPFIX destinations.
For example, this shows statistics for two IPFIX destinations:
root@(localhost)(cfg-sync Standalone)(Active)(/Common)(tmos)# show sys ipfix destination -------------------------------------------- Sys::IPFIX Destination: ipfix_dest_tcp_14279 -------------------------------------------- Templates Registered 4 Failed 0 Withdrawn 2 Timed Out 2 Expired 2 PDUs Sent 0 PDUs Rejected 0 Data Records Added 15 Records Failed 0 PDUs Queued 2 PDUs Rejected 13 PDUs Sequenced 0 Connections Setup 0 Connections Closed 0 Queue High-Water Mark 0 -------------------------------------------- Sys::IPFIX Destination: ipfix_dest_udp_14279 -------------------------------------------- Templates Registered 0 Failed 0 Withdrawn 0 Timed Out 0 Expired 0 PDUs Sent 0 PDUs Rejected 0 Data Records Added 0 Records Failed 0 PDUs Queued 0 PDUs Rejected 0 PDUs Sequenced 0 Connections Setup 0 Connections Closed 0 Queue High-Water Mark 0 root@(localhost)(cfg-sync Standalone)(Active)(/Common)(tmos)# -
To show IPFIX-iRule usage on various TMM cores, use the
showcommand on thesys ipfix rulestmshcomponent:show sys ipfix rulesEach TMM core appears in its own table. The columns indicate the numbers of iRule objects created:
- The Template column shows the number of times that an iRule invoked the
IPFIX::template createcommand. - The Message column corresponds to the
IPFIX::message createcommand. - The Destination column corresponds to the
IPFIX::destination createcommand. The Total Sends field shows the total number ofIPFIX:message sendcommands invoked on this core, and the Send Failures field shows how many of them failed.
For example:
root@(localhost)(cfg-sync Standalone)(Active)(/Common)(tmos)# show sys ipfix irules --------------------------------------------- Sys::TMM IPFIX iRules: 0.0 --------------------------------------------- Memory Template Message Destination Allocation 1 7 1 Outstanding 1 0 1 Total Sends 7 Send Failures 0 --------------------------------------------- Sys::TMM IPFIX iRules: 0.1 --------------------------------------------- Memory Template Message Destination Allocation 1 8 1 Outstanding 1 0 1 Total Sends 8 Send Failures 0 root@(localhost)(cfg-sync Standalone)(Active)(/Common)(tmos)# - The Template column shows the number of times that an iRule invoked the
IPFIX is a logging protocol that defines templates for each log message. Each template contains one or more IPFIX elements (also known as Information Elements [IEs]) in a specific order. Many IPFIX elements are defined by IANA; you can use the following steps to define your own.
-
Access the
tmshcommand-line utility. -
Use the
createcommand on the sys ipfix element tmsh component:create sys ipfix element <name> id <number> data-type <type> [size <bytes>] enterprise-id <number>- element <name> can be a unique name or the name of an existing IANA element. If it is an IANA-defined name, it currently exists with a “:base” extension at the end of its name; you can redefine it by entering the same name without the “:base” at the end, and entering an enterprise-id of zero. Your definition takes precedence over the “base” definition from IANA.
- id <number> must be in the range 1-32767.
- data-type <type> is a data-type defined by IANA. Type <Tab> for a complete list of valid choices.
- size <bytes> is only valid with a data-type of string or octarray. A size of zero (the default) indicates a variable, unbounded length. Variable length fields cannot function with NetFlow v9 collectors.
- enterprise-id <number> identifies the company that owns this IPFIX element. If you enter zero, you are defining or redefining an IANA element; the definition you enter takes precedence over the base definition from IANA. For example, these commands create elements for an HTTP request:
create sys ipfix element flowStartSeconds id 1 data-type dateTimeSeconds enterprise-id 65 create sys ipfix element httpPath id 2 data-type string size 128 enterprise-id 65 create sys ipfix element httpMethod id 3 data-type string size 128 enterprise-id 65 create sys ipfix element httpUserAgent id 4 data-type string enterprise-id 65 -
To edit an IPFIX element, use the
modifycommand on the sys ipfix elementtmshcomponent:modify sys ipfix element <name> [id <number>] [data-type <type>] [size <bytes>] [enterprise-id <number>]The element name is required, but you only need to enter the options that you are modifying after that. The options details are the same as for the
createcommand.Note: You cannot modify a base IANA element, with
":base"at the end of its name.For example, this command modifies the
httpPath elementto have a variable length (a zero setting makes the length variable):modify sys ipfix element httpPath size 0 -
To delete an IPFIX element, use the
deletecommand on thesys ipfix elementtmshcomponent:delete sys ipfix element <name>+At least one element name is required, and you can enter multiple element names.
Note: You cannot delete a base IANA element, with
":base"at the end of its name.For example, this command removes the
httpUserAgent element:delete sys ipfix element httpUserAgent -
To list all IPFIX elements, including IANA-defined elements and elements created this way, use the
listcommand on thesys ipfix elementtmshcomponent:list sys ipfix element <name>The element name is only required if you want to list a single element. Without this option, the command lists all of them.
For example, this command lists the
httpPathcomponent:root@(localhost)(cfg-sync Standalone)(Active)(/Common)(tmos.sys)# list sys ipfix element httpPath sys ipfix element httpPath { data-type string enterprise-id 65 id 2 } root@(localhost)(cfg-sync Standalone)(Active)(/Common)(tmos.sys)#The element name has a
":base"extension for elements that are defined by IANA. If you redefined an IANA element, it appears separately without the":base"extension.This example shows the IPFIX elements whose names start with
flowStartSeconds. The result displays the user-defined version of that element together with the base version:root@(localhost)(cfg-sync Standalone)(Active)(/Common)(tmos)# list sys ipfix element flowStartSeconds* sys ipfix element flowStartSeconds { data-type dateTimeSeconds enterprise-id 65 id 1 size 128 } sys ipfix element flowStartSeconds:base { data-type dateTimeSeconds enterprise-id 0 id 150 } root@(localhost)(cfg-sync Standalone)(Active)(/Common)(tmos)
You can use these custom elements in any iRule that creates IPFIX logs.
You can create an iRule that reads IP packets and logs information about them to your IPFIX collectors. You can also use certain iRules commands to clean up memory reserved for unused IPFIX components. These cleanup commands are rarely necessary, since memory cleanup occurs after each iRule finishes processing on a given connection. They are designed for long-running iRules with multiple messages, templates, and destinations.
-
On the Main tab, click Local Traffic > iRules.
The iRule List screen displays a list of existing iRules.
-
Click on the name of any existing iRule that you would like to edit.
The iRule screen opens.
-
In the Definition field, edit the iRule with any of the following memory-cleanup commands, as needed:
-
To free up memory after an IPFIX message is sent, or to delete the message before sending it, use the following syntax:
IPFIX::msg delete <ipfix_message_handle> -
After you have finished using an IPFIX::template, you can remove it with the following syntax:
IPFIX::template delete <ipfix_dest_handle> <ipfix_template_handle>The <ipfix_dest_handle> is required so that the BIG-IP system can send IPFIX template-withdrawal messages to the destination’s IPFIX collectors. The system then deletes the <ipfix_template_handle> from memory.
This prevents sending any further IPFIX logs that use this template.
-
After you have finished using an IPFIX::destination, you can close it with the following syntax:
IPFIX::destination close <ipfix_dest_handle>This prevents sending any further IPFIX logs to the destination. Use
IPFIX::destination opento reopen the same log publisher as an IPFIX destination.
-
-
Click Finished.
Now you have an implementation in which the BIG-IP® system logs messages about network events and sends the log messages to a pool of IPFIX collectors.