Updated Date: 07/07/2026
Integrating ASM and APM with Database Security Products
You can deploy Application Security Manager™ (ASM) and Access Policy Manager(APM) with database security products, such as IBM® InfoSphere® Guardium® to increase security visibility, receive alerts about suspicious activity, and prevent attacks. When integrated with database security, ASM™ can provide information about each HTTP request and database query. This allows the database security system to correlate the web transaction with the database query to make a security assessment of the transaction. ASM also provides application level details to improve the database security system’s logging and reporting.
For you to integrate ASM with a database security product, the database security server itself must have been configured and accessible on the network. On the BIG-IP system, you specify the host name or IP address of the database security server. Then, you enable database security integration for one or more security policies that are set up to protect web application resources.
When using database security, Application Security Manager monitors web application traffic and sends information about the users, the requests, and reporting events to the database security server. The following figure shows an example of how ASM can integrate with the IBM InfoSphere Guardium Database Activity Monitoring Appliance.
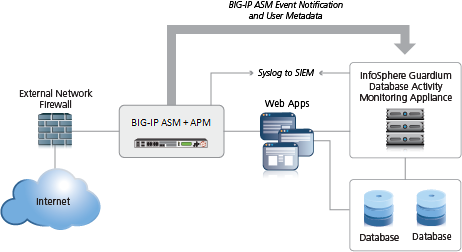
The security policy can get user names from requests using login pages configured from within ASM, or the policy can retrieve the user names from Access Policy Manager(APM). This implementation describes how to integrate ASM and APM™ with an external database security server. APM handles user authentication in this case and provides the information that is sent to the database security server.
In order to integrate a database security server from within Application Security Manager™ (ASM™) so that the security policy retrieves the user names from Access Policy Manager ®(APM), you need to perform basic these system configuration tasks according to the needs of your networking configuration:
- Run the setup utility and create a management IP address.
- License and provision ASM, APM, and Local Traffic Manager (LTM).
- Configure a DNS address (System > Configuration > Device > DNS).
- Configure an NTP server (System > Configuration > Device > NTP).
- Restart ASM (at the command line, type
tmsh restart /sys service asm).
VLANs represent a logical collection of hosts that can share network resources, regardless of their physical location on the network. You create a VLAN to associate physical interfaces with that VLAN.
-
On the Main tab, click Network > VLANs.
The VLAN List screen opens.
-
Click Create.
The New VLAN screen opens.
-
In the Name field, type a unique name for the VLAN.
-
In the Tag field, type a numeric tag, between 1-4094, for the VLAN, or leave the field blank if you want the BIG-IP system to automatically assign a VLAN tag.
The VLAN tag identifies the traffic from hosts in the associated VLAN.
-
If you want to use Q-in-Q (double) tagging, use the Customer Tag setting to perform the following two steps. If you do not see the Customer Tag setting, your hardware platform does not support Q-in-Q tagging and you can skip this step.
-
From the Customer Tag list, select Specify.
-
Type a numeric tag, from 1-4094, for the VLAN.
The customer tag specifies the inner tag of any frame passing through the VLAN.
-
-
For the Interfaces setting,
-
From the Interface list, select an interface number.
-
From the Tagging list, select Untagged.
-
Click Add.
-
-
For the Hardware SYN Cookie setting, select or clear the check box.
When you enable this setting, the BIG-IP system triggers hardware SYN cookie protection for this VLAN.
Enabling this setting causes additional settings to appear. These settings appear on specific BIG-IP platforms only.
-
For the Syncache Threshold setting, retain the default value or change it to suit your needs.
The Syncache Threshold value represents the number of outstanding SYN flood packets on the VLAN that will trigger the hardware SYN cookie protection feature.
When the Hardware SYN Cookie setting is enabled, the BIG-IP system triggers SYN cookie protection in either of these cases, whichever occurs first:
- The number of TCP half-open connections defined in the LTM setting Global SYN Check Threshold is reached.
- The number of SYN flood packets defined in this Syncache Threshold setting is reached.
-
For the SYN Flood Rate Limit setting, retain the default value or change it to suit your needs.
The SYN Flood Rate Limit value represents the maximum number of SYN flood packets per second received on this VLAN before the BIG-IP system triggers hardware SYN cookie protection for the VLAN.
-
Click Finished.
The screen refreshes, and it displays the new VLAN in the list.
Ensure that you have at least one VLAN configured before you create a self IP address.
Self IP addresses enable the BIG-IP system, and other devices on the network, to route application traffic through the associated VLAN.
-
On the Main tab, click Network > Self IPs.
-
Click Create.
The New Self IP screen opens.
-
In the Name field, type a unique name for the self IP address.
-
In the IP Address field, type an IPv4 or IPv6 address.
This IP address should represent the address space of the VLAN that you specify with the VLAN/Tunnel setting.
-
In the Netmask field, type the network mask for the specified IP address.
For example, you can type
255.255.255.0. -
From the VLAN/Tunnel list, select the VLAN to associate with this self IP address.
- On the internal network, select the internal or high availability VLAN that is associated with an internal interface or trunk.
- On the external network, select the external VLAN that is associated with an external interface or trunk.
-
Use the default values for all remaining settings.
-
Click Finished.
The screen refreshes, and displays the new self IP address.
The BIG-IP system can now send and receive TCP/IP traffic through the specified VLAN.
You can use a local traffic pool with Application Security Manager system to forward traffic to the appropriate resources.
Note: Instead of doing it now, you can optionally create a pool if creating a virtual server during security policy creation.
-
On the Main tab, click Local Traffic > Pools.
The Pool List screen opens.
-
Click Create.
The New Pool screen opens.
-
In the Name field, type a unique name for the pool.
-
In the Resources area, for the New Members setting, add to the pool the application servers that host the web application:
-
Type an IP address in the Address field.
-
In the Service Port field, type a port number (for example, type
80for the HTTP service), or select a service name from the list. -
Click Add.
-
-
Click Finished.
The BIG-IP system configuration now includes a local traffic pool containing the resources that you want to protect using Application Security Manager.
You can create a virtual server to manage HTTPS traffic.
-
On the Main tab, click Local Traffic > Virtual Servers.
The Virtual Server List screen opens.
-
Click Create.
The New Virtual Server screen opens.
-
In the Name field, type a unique name for the virtual server.
-
In the Service Port field, type
443or select HTTPS from the list. -
From the Configuration list, select Advanced.
-
From the HTTP Profile list, select http.
-
For the SSL Profile (Client) setting, from the Available list, select clientssl, and using the Move button, move the name to the Selected list.
-
From the SSL Profile (Server) list, select serverssl.
Note: This setting ensures that there is an SSL connection between the HTTP virtual server and the external HTTPS server.
-
From the Source Address Translation list, select Auto Map.
-
From the Default Pool list, select the pool that is configured for application security.
-
Click Finished.
The HTTPS virtual server appears in the Virtual Server List screen.
Before you can create a security policy, you must perform the minimal system configuration tasks required according to the needs of your networking environment.
You can use Application Security Manager to create a robust, yet simple, security policy that is tailored to protect your web application. This is the easiest way to create a security policy.
-
On the Main tab, click Security > Application Security > Security Policies > Policies List.
The Policies List screen opens.
-
Click Create New Policy.
You only see this button when no policy is selected.
-
In the Policy Name field, type a name for the policy.
-
Leave Policy Type, set to Security.
-
For Policy Template, select Fundamental.
-
For Virtual Server, click Configure new virtual server to specify where to direct application requests.
-
For What type of protocol does your application use?, select HTTP, HTTPS, or both.
-
In the Virtual Server Name field, type a unique name.
-
In the HTTP/HTTPS Virtual Server Destination field, type the address in IPv4 (
10.0.0.1) or IPv6 (2001:ed8:77b5:2:10:10:100:42/64) format, and specify the service port.Tip: If you want multiple IP addresses to be directed here, use the Network setting.
-
In the HTTP/HTTPS Pool Member setting, specify the addresses of the back-end application servers.
-
If you have chosen HTTPS protocol, in the SSL Profile (Client) field, select clientssl to enable the HTTP/2 Profile (Client) field.
-
If you have chose HTTPS protocol, in the SSL Profile (Server) field, select serverssl to enable the HTTP/2 Profile (Server) field.
-
From the Logging Profile list, select a profile such as Log illegal requests to determine which events are logged on the system.
-
-
In the upper right corner, click Advanced.
You can use default values for the Advanced settings but it’s a good idea to take a look at them.
-
If you selected Fundamental or Comprehensive for the Policy Template, Learning Mode is set to Automatic and Enforcement Mode is set to Blocking.
Tip: If you need to change these values, set application language to a value other than Auto detect.
-
If you know the Application Language, select it or use Unicode (utf-8).
-
To add specific protections (enforcing additional attack signatures) to the policy, for Server Technologies, select the technologies that apply to the back-end application servers.
-
You can configure trusted IP addresses that you want the security policy to consider safe.
-
-
Click Create Policy to create the security policy.
ASM creates a security policy that immediately starts protecting your application. The enforcement mode of the security policy is set to Blocking. Traffic that is considered to be an attack such as traffic that is not compliant with HTTP protocol, has malformed payloads, uses evasion techniques, performs web scraping, contains sensitive information or illegal values is blocked. Other potential violations are reported but not blocked.
The system examines the traffic to the web application making suggestions for more specifically building the security policy. The Policy Builder selectively learns new entities like file types, parameters, and cookies used in requests to the application. When ASM processes sufficient traffic, it automatically adds the entities to the security policy, and enforces them.
The system applies a basic set of attack signatures to the security policy and puts them in staging (by default, for 7 days). If you specified server technologies, additional attack signatures are included. ASM reports common attacks discovered by comparison to the signatures but does not block these attacks until the staging period is over and they are enforced. That gives you a chance to be sure that these are actual attacks and not legitimate requests.
Tip: This is a good point at which send some traffic to test that you can access the application being protected by the security policy and check that traffic is being processed correctly by the BIG-IP system. Send the traffic to the virtual server destination address.
You create an access profile to provide the access policy configuration for a virtual server that establishes a secured session.
-
On the Main tab, click Access > Profiles / Policies.
The Access Profiles (Per-Session Policies) screen opens.
-
Click Create.
The New Profile screen opens.
-
In the Name field, type a name for the access profile.
Note: A access profile name must be unique among all access profile and any per-request policy names.
-
From the Profile Type list, select SSL-VPN.
Additional settings display.
-
From the Profile Scope list, retain the default value or select another.
- Profile: Gives a user access only to resources that are behind the same access profile. This is the default value.
- Virtual Server: Gives a user access only to resources that are behind the same virtual server.
- Global: Gives a user access to resources behind any access profile that has global scope.
-
To configure timeout and session settings, select the Custom check box.
-
In the Inactivity Timeout field, type the number of seconds that should pass before the access policy times out. Type
0to set no timeout.If there is no activity (defined by the Session Update Threshold and Session Update Window settings in the Network Access configuration) between the client and server within the specified threshold time, the system closes the current session.
-
In the Access Policy Timeout field, type the number of seconds that should pass before the access profile times out because of inactivity.
Type
0to set no timeout. -
In the Maximum Session Timeout field, type the maximum number of seconds the session can exist.
Type
0to set no timeout. -
In the Max Concurrent Users field, type the maximum number of users that can use this access profile at the same time.
Type
0to set no maximum. -
In the Max Sessions Per User field, type the maximum number of concurrent sessions that one user can start.
Type
0to set no maximum.Note: Only a user in the administrator, application editor, manager, or resource administrator role has access to this field.
-
In the Max In Progress Sessions Per Client IP field, type the maximum number of concurrent sessions that can be in progress for a client IP address.
When setting this value, take into account whether users will come from a NAT-ed or proxied client address and, if so, consider increasing the value accordingly. The default value is 128.
Note: Only a user in the administrator, application editor, manager, or resource administrator role has access to this field.
Note: F5 does not recommend setting this value to
0(unlimited). -
Select the Restrict to Single Client IP check box to restrict the current session to a single IP address.
This setting associates the session ID with the IP address.
Note: Only a user in the administrator, application editor, manager, or resource administrator role has access to this field.
Upon a request to the session, if the IP address has changed the request is redirected to a logout page, the session ID is deleted, and a log entry is written to indicate that a session hijacking attempt was detected. If such a redirect is not possible, the request is denied and the same events occur.
-
To configure logout URIs, in the Configurations area, type each logout URI in the URI field, and then click Add.
-
In the Logout URI Timeout field, type the delay in seconds before logout occurs for the customized logout URIs defined in the Logout URI Include list.
-
To configure SSO:
- For users to log in to multiple domains using one SSO configuration, skip the settings in the SSO Across Authentication Domains (Single Domain mode) area. You can configure SSO for multiple domains only after you finish the initial access profile configuration.
- For users to log in to a single domain using an SSO configuration, configure settings in the SSO Across Authentication Domains (Single Domain mode) area, or you can configure SSO settings after you finish the initial access profile configuration.
-
In the Domain Cookie field, specify a domain cookie, if the application access control connection uses a cookie.
-
In the Cookie Options setting, specify whether to use a secure cookie.
- If the policy requires a secure cookie, select the Secure check box to add the secure keyword to the session cookie.
- If you are configuring an LTM access scenario that uses an HTTPS virtual server to authenticate the user and then sends the user to an existing HTTP virtual server to use applications, clear this check box.
-
If the access policy requires a persistent cookie, in the Cookie Options setting, select the Persistent check box.
This sets cookies if the session does not have a webtop. When the session is first established, session cookies are not marked as persistent; but when the first response is sent to the client after the access policy completes successfully, the cookies are marked persistent. Persistent cookies are updated for the expiration timeout every 60 seconds. The timeout is equal to session inactivity timeout. If the session inactivity timeout is overwritten in the access policy, the overwritten value will be used to set the persistent cookie expiration.
-
From the SSO Configurations list, select an SSO configuration.
-
In the Language Settings area, add and remove accepted languages, and set the default language.
A browser uses the highest priority accepted language. If no browser language matches the accepted languages list, the browser uses the default language.
-
Click Finished.
The access profile displays in the Access Profiles List. Default-log-setting is assigned to the access profile.
To add an SSO configuration for multiple domains, click SSO / Auth Domains on the menu bar. To provide functionality with an access profile, you must configure the access policy. The default access policy for a profile denies all traffic and contains no actions. Click Edit in the Access Policy column to edit the access policy.
You configure an access policy to provide authentication, endpoint checks, and resources for an access profile. This procedure configures a simple access policy that adds a logon page, gets user credentials, submits them to an authentication type of your choice, then allows authenticated users, and denies others.
-
On the Main tab, click Access > Profiles / Policies.
The Access Profiles (Per-Session Policies) screen opens.
-
Click the name of the access profile you want to edit.
-
On the menu bar, click Access Policy.
-
For the Visual Policy Editor setting, click the Edit access policy for Profile policy_name link.
The visual policy editor opens the access policy in a separate window or tab.
-
Click the (+) icon anywhere in the access policy to add a new item.
Note: Only an applicable subset of access policy items is available for selection in the visual policy editor for any access profile type.
A popup screen opens, listing predefined actions on tabs such as General Purpose, Authentication, and so on.
-
On the Logon tab, select Logon Page and click the Add Item button.
The Logon Page Agent properties screen opens.
-
Click Save.
The Access Policy screen reopens.
-
On the rule branch, click the plus sign (+) between Logon Page and Deny.
-
Set up the appropriate authentication and client-side checks required for application access at your company, and click Add Item.
-
Change the Successful rule branch from Deny to Allow and click the Save button.
-
If needed, configure further actions on the successful and fallback rule branches of this access policy item, and save the changes.
-
At the top of the screen, click the Apply Access Policy link to apply and activate your changes to this access policy.
-
Click the Close button to close the visual policy editor.
To apply this access policy to network traffic, add the access profile to a virtual server.
Note: To ensure that logging is configured to meet your requirements, verify the log settings for the access profile.
-
On the Main tab, click Local Traffic > Virtual Servers.
The Virtual Server List screen opens.
-
Click the name of the virtual server you want to modify.
-
In the Access Policy area, from the Access Profile list, select the access profile that you configured earlier.
-
Click Update to save the changes.
To integrate Application Security Manager (ASM) with a third-party database security product, you need to configure the database security server on ASM. You can configure one database security server per system.
-
On the Main tab, click Security > Options > Application Security > Integrated Services > Database Security.
The Database Security Configuration screen opens.
-
In the Server Host Name/IP Address field, type the host name or IP address of the database security server.
Note: If using SSL to establish a secured session between the BIG-IP system and the database security server, type the IP address of a virtual server configured for the secure connection. The virtual server uses any open IP address for the destination, the IBM Guardium port (16016, by default) for the service port,
serversslor a customized profile for the SSL Profile (Server) setting, and specifies a default pool (containing one member, the database security server, using its IP address and service port, typically, 16016). -
For Server Port Number, type the port number of the database server.
The default value is 16016, the port used by IBM InfoSphere Guardium.
-
If you want the system to wait for an ACK response from the database security server before sending the request to the application server, from the Request Hold Timeout list, select Enabled and type the number of milliseconds to wait for the response.
The default value is 5 milliseconds.
When this setting is enabled, the system forwards the request to the application server as soon as the database security server sends an ACK, or when the timeout has passed. If you leave this setting disabled, the system forwards the request to the application server immediately.
-
Click Save.
The system saves the configuration settings.
The Application Security Manager is now configured to connect to the database security server.
For ASM to forward request data to the database security server, you next need to enable database security integration in one or more security policies.
Before you can enable database security integration, you need to have created a security policy to protect your web application. For the policy to retrieve the user names of those making requests, you need to have set up Access Policy Manager(APM) on the BIG-IP system.
You enable database security integration in a security policy so that Application Security Manager (ASM) forwards request information to a third-party database server.
-
On the Main tab, click Security > Application Security > Integrated Services > Database Security.
The Database Security screen opens.
-
In the Current edited security policy list near the top of the screen, verify that the security policy shown is the one you want to work on.
-
Select the Database Security Integration check box.
-
For User Source, select Use APM Usernames and Session ID.
The system uses Access Policy Manager (APM) user names and session ID to determine the user source. You can choose this option only if you have APM licensed and provisioned.
-
Click Save.
The system saves the configuration settings.
The Application Security Manager connects to the database security server and can forward request data to it.
You have set up a BIG-IP system to use Application Security Manager™ (ASM) to secure application traffic, and Access Policy Manager™ (APM) to check user credentials.
Client traffic is routed to the virtual server for the web application. At first, traffic is handled by the APM module. APM® verifies user credentials and allows those with valid credentials to use web application. APM also sends user names and session IDs of valid users to ASM™. After that, ASM checks for security violations and forwards traffic that meets the security policy requirements to the backend server.
The database security server includes the application and user information provided by ASM and APM, so it can be viewed in logs and reports on that system. The database security server can perform a more in depth security assessment of the web request.
If you want to review reports and event logs that associate the user name with the session information on the BIG-IP system, you can set up session tracking (by enabling session awareness). When session awareness is enabled, you can see the user names on the Event Logs: Application: Requests screen in the General Details section of specific requests. IN addition, the Reporting: Application: Charts screen displays the users who sent the illegal requests.