Updated Date: 07/07/2026
Configuring BIG-IP to Load Balance Zone Transfer Requests to a Pool of DNS Servers
Within your network, the BIG-IP system can act as a proxy for a pool of DNS servers hosting a zone. In this case, when a DNS nameserver (client) in a specified list of servers sends a zone transfer request, the BIG-IP system load balances the request to a pool of DNS servers that host the zone. A pool member responds with a zone transfer, and the BIG-IP system sends the zone transfer to the client that made the zone transfer request. Optionally, the BIG-IP system can use transaction signature (TSIG) keys to validate the identity of the pool member sending a zone transfer and the DNS nameservers (clients) sending zone transfer requests.
In this figure, an administrator at Site Request configures the BIG-IP system to load balance zone transfer requests for siterequest.com to a pool of DNS servers and uses TSIG key authentication only on the client-side.
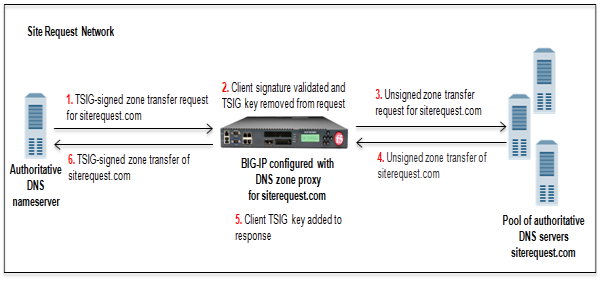
- DNS nameserver (client) sends TSIG-signed zone transfer request.
- BIG-IP system validates the signature and removes the client TSIG key from the request.
- BIG-IP system sends unsigned zone transfer request to a member of a pool of DNS servers that host the zone.
- Pool member answers with an unsigned zone transfer to the BIG-IP system.
- BIG-IP system signs the response with the client TSIG key.
- BIG-IP system sends the TSIG-signed zone transfer to the DNS nameserver (client).
In this figure, an administrator at Site Request configures the BIG-IP system to load balance zone transfer requests for siterequest.com to a pool of DNS servers, and uses TSIG key authentication on both the client- and server-sides.
- DNS nameserver (client) sends TSIG-signed zone transfer request.
- BIG-IP system validates the signature, removes the client TSIG key from the request, and then adds the server TSIG key to the request.
- BIG-IP system sends the TSIG-signed request to a member of the pool of DNS servers that host the zone.
- Pool member answers with a TSIG-signed zone transfer to the BIG-IP system.
- BIG-IP system validates the signature, removes the server TSIG key from the response, and signs the response with the client TSIG key.
- BIG-IP system sends the TSIG-signed zone transfer to the DNS nameserver (client).
The BIG-IP system can use transaction signature (TSIG) keys to authenticate communications about zone transfers between the BIG-IP system and authoritative DNS servers, and between the BIG-IP system and DNS name servers (clients). TSIG keys are generated by a third party tool such as BIND’s keygen utility. Using TSIG keys is optional.
- TSIG key configured on authoritative DNS server
- You can add a TSIG key to a name server object that represents an authoritative DNS server. With this configuration, when the DNS server sends a NOTIFY message to the BIG-IP system, DNS Express responds with a TSIG-signed zone transfer request. Then the DNS server returns a TSIG-signed zone transfer. If required, you can disable the Verify Notify TSIG option on the DNS zone. With this configuration, DNS Express can process a NOTIFY message without a TSIG key, even when a subsequent zone transfer requires a TSIG key.
- TSIG key configured on DNS name server (client)
- You can add a TSIG key to a name server object that represents a DNS name server (client). When the client sends a TSIG-signed zone transfer request, DNS Express returns a TSIG-signed zone transfer.
- TSIG key configured on DNS zone
- You can add a server TSIG key to a DNS zone on the BIG-IP system. With this configuration, the system uses this TSIG key when the zone on the BIG-IP system is a proxy for the zone on the server. There are two possible scenarios:
-
Client sends TSIG-signed zone transfer request
When the BIG-IP system receives a TSIG-signed zone transfer request from a client for a DNS zone for which it is a proxy, the system validates the client TSIG key and removes the key from the request. The system then adds the server TSIG key to the request and forwards the TSIG-signed request to the DNS server or load balances the TSIG-signed request to a pool of DNS servers. The DNS server responds with a TSIG-signed zone transfer. The BIG-IP system validates the server TSIG key and removes the key. Then the system adds the client TSIG key and returns a TSIG-signed signed zone transfer to the client.
-
Client sends unsigned zone transfer request
When the BIG-IP system receives an unsigned zone transfer request from a client for a DNS zone for which it is a proxy, the system adds the server TSIG key to the request. The system then forwards the TSIG-signed request to the DNS server or load balances the TSIG-signed request to a pool of DNS servers. The DNS server responds with a TSIG-signed zone transfer. The BIG-IP system validates the server TSIG key and removes the key. Then the system returns an unsigned zone transfer to the client.
-
A listener is a specialized virtual server that passively checks for DNS packets on port 53 and the IP address you assign to the listener. When a DNS request is sent to the IP address of the listener, the BIG-IP system either handles the request or forwards the request to the appropriate resource.
Perform these tasks to configure a DNS zone on the BIG-IP system that is a proxy for a pool of DNS servers hosting a DNS zone in your network:
If you are unfamiliar with how to modify BIND server files, review the fifth edition of DNS and BIND, available from O’Reilly Media.
Typically, BIND servers allow zone transfers to any DNS name server requesting a zone transfer. That is, named.conf on a typical BIND server does not contain an allow-transfer statement. However, the BIND server on the BIG-IP system is configured to allow zone transfers to only the localhost. Thus, named.conf on the BIG-IP system contains this allow-transfer statement: allow-transfer { localhost; } ;.
When you want to improve the speed of responses to DNS queries you can configure a BIND server to allow zone transfers only to the DNS Express engine on the BIG-IP system. You do this by adding an allow-transfer statement to named.conf on the BIND server.
Note: Adding an allow-transfer statement to a BIND server actually restricts zone transfers to a specified list of DNS name servers.
-
Add to the BIND server an allow-transfer statement that specifies a self IP address on the BIG-IP system.
You can modify the following allow-transfer statement to use a self IP address on the BIG-IP system:
allow-transfer { localhost; <self IP address from which zone transfer request is sent to the server>; };allow-transfer { localhost; 10.10.10.1 ; };
Obtain the TSIG key that the DNS servers in the pool that hosts the zone use to authenticate zone transfer requests. Optionally, obtain the TSIG key for the DNS nameserver (client) that you want to add to the BIG-IP system configuration.
Note: TSIG keys are created by a third party tool such as BIND’s keygen utility. The configuration of each DNS server in the pool must contain the same TSIG key.
When you want the BIG-IP system to validate zone transfers from a pool DNS servers, add the server TSIG key to the BIG-IP system configuration. Optionally, if you want the BIG-IP system to validate the DNS nameservers (clients) sending zone transfer requests, add the client TSIG keys.
-
On the Main tab, click DNS > Delivery > Keys > TSIG Key List.
The TSIG Key List screen opens.
-
Click Create.
The New TSIG Key screen opens.
-
In the Name field, type the name of the TSIG key.
-
From the Algorithm list, select the algorithm that was used to generate the key.
-
In the Secret field, type the TSIG key secret.
-
Click Finished.
-
If the DNS nameservers (clients) requesting zone transfers contain a TSIG key, repeat steps 2-7 to add each client TSIG key.
Add the server TSIG key to a DNS zone configured on the BIG-IP system. Optionally, add TSIG keys to DNS nameservers (clients) configured on the BIG-IP system.
Gather the IP addresses of the DNS name servers (clients) from which the BIG-IP system accepts zone transfer requests for a DNS zone. Optional: Ensure that the client TSIG key is available on the BIG-IP system.
To allow DNS name servers (clients) to request zone transfers for a zone, add a name server object that represents each client. Optionally, you can add a client TSIG key that the BIG-IP system uses to authenticate the identity of the client during zone transfer communications.
-
On the Main tab, click DNS > Delivery > Nameservers.
The Nameservers List screen opens.
-
Click Create.
The New Nameserver screen opens.
-
In the Name field, type a name for the DNS name server (client).
-
In the Address field, type the IP address on which the DNS name server (client) listens for DNS messages.
-
Optional: From the TSIG Key list, select the TSIG key that matches the TSIG key on the DNS name server (client).
The BIG-IP system uses this TSIG key to authenticate zone transfer communications as coming from this client and to sign communications sent to this client.
-
Click Finished.
-
Add name server objects to represent other DNS name servers (clients).
Add the DNS name servers (clients) objects to the Zone Transfer Client list of the DNS zone on the BIG-IP system.
To enable the BIG-IP system to handle zone transfers, create a custom DNS profile.
-
On the Main tab, click DNS > Delivery > Profiles > DNS or Local Traffic > Profiles > Services > DNS.
The DNS profile list screen opens.
-
Click Create.
The New DNS Profile screen opens.
-
In the General Properties area, name the profile
dns_zxfr. -
Select the Custom check box.
-
In the DNS Features area, from the DNS Express list, select Disabled.
-
In the DNS Traffic area, from the Zone Transfer list, select Enabled.
-
In the DNS Features area, from the Unhandled Query Actions list, select Allow.
The BIG-IP system forwards zone transfer requests to a DNS server or a member of a pool of DNS servers.
-
In the DNS Features area, from the Use BIND Server on BIG-IP list, select Disabled.
-
Click Finished.
Assign the profile to listeners.
Create a custom DNS monitor to send DNS queries, generated using the settings you specify, to a pool of DNS servers and validate the DNS responses.
Important: When defining values for custom monitors, make sure you avoid using any values that are on the list of reserved keywords. For more information, see SOL 3653 (for version 9.0 systems and later) on the AskF5 technical support web site at www.askf5.com.
-
On the Main tab, click DNS > Delivery > Load Balancing > Monitors or Local Traffic > Monitors.
The Monitor List screen opens.
-
Click Create.
The New Monitor screen opens.
-
In the Name field, type a name for the monitor.
-
From the Type list, select DNS.
-
In the Query Name field, type the domain name that you want the monitor to query.
For the zone,
siterequest.com, you might want the monitor to query forwww.siterequest.com. -
Configure additional settings based on your network requirements.
-
Click Finished.
Ensure that at least one custom DNS monitor exists on the BIG-IP system. Gather the IP addresses of the DNS servers that you want to include in a pool to which the BIG-IP system load balances DNS zone transfer requests.
Create a pool of local DNS servers when you want the BIG-IP system to load balance DNS zone transfer requests to members of the pool.
-
On the Main tab, click the applicable path.
- DNS > Delivery > Load Balancing > Pools
- Local Traffic > Pools The Pool List screen opens.
-
Click Create.
The New Pool screen opens.
-
In the Name field, type a unique name for the pool.
-
For the Health Monitors setting, from the Available list, select the custom DNS monitor you created and move the monitor to the Active list.
-
Add each DNS server that you want to include in the pool using the New Members setting:
-
In the Address field, type the IP address of the DNS server.
-
Type
53in the Service Port field. -
(Optional) Type a priority number in the Priority field.
-
Click Add.
-
-
Click Finished.
Before you create a DNS zone to serve as a proxy for a zone hosted on a pool of DNS servers on your network, do the following:
-
Ensure that the TSIG key on the DNS server is available on the BIG-IP system.
-
Optionally, ensure that TSIG keys on the DNS nameservers (clients) that can request zone transfers are available on the BIG-IP system.
-
Determine the name you want to use for the DNS zone. The name must exactly match the name of the zone on the members of the pool of DNS servers that host the zone.
Note: Zone names are case insensitive.
When you want the BIG-IP system to act as a proxy for a zone hosted on a pool of DNS servers on your network, create a DNS zone and associate the server TSIG key on the DNS servers with the zone on the BIG-IP system. Optionally, you can add the dNS nameservers (clients) that can request zone transfers for the zone.
-
On the Main tab, click DNS > Zones.
The Zone List screen opens.
-
Click Create.
The New Zone screen opens.
-
In the Name field, type the name of the DNS zone.
The name must begin and end with a letter and contain only letters, numbers, and the period and hyphen (-) characters.
-
In the Zone Transfer Clients area, move the name servers that can initiate zone transfers from the Available list to the Active list.
-
Optional: From the Server Key list, select the TSIG key that matches the TSIG key on the members of the pool of DNS servers that host this zone.
The BIG-IP system uses this TSIG key to sign DNS zone transfer requests, before forwarding the requests to a member of the pool of DNS servers that host this zone, and then to verify a zone transfer returned from a member of the pool.
Determine to which DNS servers you want the listeners to load balance DNS zone transfer requests.
Create listeners to alert the BIG-IP system to zone transfer requests destined for a pool of DNS servers that host the zone. Create two listeners that use the TCP protocol, one each for an IPv4 address and IPv6 address.
Note: DNS zone transfers use TCP port 53.
Note: This task applies only to BIG-IP DNS-provisioned systems.
-
On the Main tab, click DNS > Delivery > Listeners.
The Listeners List screen opens.
-
Click Create.
The Listeners properties screen opens.
-
In the Name field, type a unique name for the listener.
-
For the Destination setting, in the Address field, type the IPv4 address on which the BIG-IP system listens for DNS zone transfer requests for a zone hosted on pool of DNS servers.
-
From the Listener list, select Advanced.
-
From the VLAN Traffic list, select All VLANs.
-
If you are using SNATs on your network, from the Source Address Translation list, select SNAT.
-
Optional: If you are using NATs on your network, for the Address Translation setting, select the Enabled check box.
-
Optional: If you are using port translation on your network, for the Port Translation setting, select the Enabled check box.
-
In the Service area, from the Protocol list, select TCP.
-
In the Service area, from the DNS Profile list, select dns_zxfr (the custom profile you created to enable the BIG-IP system to process zone transfer requests).
-
On the menu bar, click Load Balancing.
-
From the Default Pool list, select the pool to which this listener forwards DNS zone transfer requests.
-
Click Repeat.
-
Create another listener with the same settings, except using a different name and an IPv6 address.
-
Click Finished.
Determine to which DNS servers you want the virtual servers to load balance DNS zone transfer requests.
Create virtual servers to alert the BIG-IP system to zone transfer requests destined for a pool of DNS servers that host the zone. Create two virtual servers that use the TCP protocol, one each for an IPv4 address and IPv6 address.
Note: DNS zone transfers use TCP port 53.
Note: This task applies only to LTM-provisioned systems.
-
On the Main tab, click Local Traffic > Virtual Servers.
The Virtual Server List screen opens.
-
Click Create.
The New Virtual Server screen opens.
-
In the Name field, type a unique name for the virtual server.
-
In the Destination Address/Mask field, type the IP address in CIDR format.
The supported format is address/prefix, where the prefix length is in bits. For example, an IPv4 address/prefix is
10.0.0.1or10.0.0.0/24, and an IPv6 address/prefix isffe1::0020/64or2001:ed8:77b5:2:10:10:100:42/64. When you use an IPv4 address without specifying a prefix, the BIG-IP system automatically uses a/32prefix.Note: The IP address for this field needs to be on the same subnet as the external self-IP.
-
In the Service Port field, type 53.
-
From the Protocol list, select UDP.
-
Optional: If you are using SNATs on your network, from the Source Address Translation list, select SNAT.
-
Optional: From the SNAT pool list, select the name of an existing SNAT pool.
-
From the Configuration list, select Advanced.
-
From the DNS Profile list, select the custom DNS profile you created.
-
Click Finished.
Create another virtual server with the TCP protocol, but use an IPv6 address and configuration.