Updated Date: 07/07/2026
Configuring DNS Express
DNS Express is an engine that provides the ability for the BIG-IP system to act as a high-speed, authoritative DNS server. With DNS Express configured, the BIG-IP system can answer DNS queries for a DNS zone and respond to zone transfer requests from specified DNS nameservers (clients). Additionally, zone transfer communications can be secured with TSIG keys.
You can configure the BIG-IP system to use the DNS Express engine to answer queries for a DNS zone. This involves a zone transfer from the authoritative DNS server into DNS Express and then DNS Express can answer DNS queries for the zone. For this configuration you create the following objects in the order described.
- TSIG key (optional)
- Obtain the TSIG key data from the authoritative DNS server that hosts the zone and create a TSIG key object.
- Nameserver object
- Create a nameserver object to represent the authoritative DNS server. Optionally, add the TSIG key.
- DNS zone
- Create a zone object and in the DNS Express area, select the nameserver object that represents the authoritative DNS server that hosts the zone.
- Custom DNS profile (optional)
- Create a custom DNS profile based on your network architecture.
- DNS listener or LTM virtual server
- Create a DNS listener or LTM virtual server and select a DNS profile. You can use either the default DNS profile or the custom DNS profile.
Additionally, you can configure the BIG-IP system to use the DNS Express engine to answer zone transfer requests for a DNS zone from a DNS nameserver that answers DNS queries. For this configuration you create or modify the following objects in the order described.
- TSIG key (optional)
- Obtain the TSIG key data from the DNS nameserver client that you want to allow to send zone transfer requests for the DNS zone and create a TSIG key object.
- Nameserver object
- Create a nameserver object to represent the DNS nameserver that will make the zone transfer request. Optionally, add the TSIG key.
- DNS zone
- Modify the zone object to add zone transfer clients to the zone. In the Zone Transfer Clients area, select the nameserver object you created.
- Custom DNS profile (optional)
- Modify the DNS profile to allow zone transfers from the BIG-IP system to the client.
DNS Express can answer DNS queries for a DNS zone configured on and transferred to the BIG-IP system. Optionally, DNS Express can use TSIG keys to validate zone transfer communications between the BIG-IP system and the authoritative DNS server hosting the zone.
In this figure, an administrator at Site Request creates a DNS zone with a DNS Express server. The name of the DNS zone on the BIG-IP system matches the name of the zone on the authoritative DNS server. The creation of the zone initiates a zone transfer request from DNS Express to the authoritative DNS server that hosts the zone. The server responds with a zone transfer and the zone is loaded into the DNS Express engine.
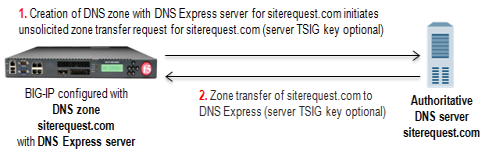
- Creation of siterequest.com DNS zone with a DNS Express server on the BIG-IP system initiates an unsolicited zone transfer request.
- Authoritative DNS server responds with zone transfer and DNS Express loads the zone.
In this figure, as the zone is updated, the authoritative DNS server sends a NOTIFY to DNS Express, which responds with a zone transfer request. The server responds with a zone transfer and the zone is updated in DNS Express. When the LDNS sends a query for the zone, DNS Express can answer the query faster than the authoritative DNS server.
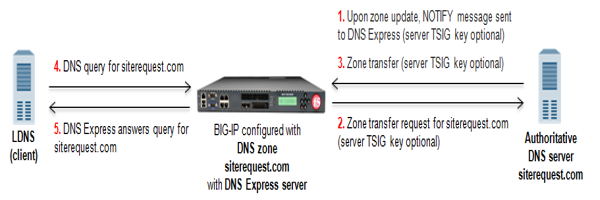
- When zone update occurs, DNS server sends NOTIFY message to DNS Express.
- DNS Express sends zone transfer request in response.
- DNS server answers with zone transfer and DNS Express updates the zone.
- LDNS sends DNS query for the zone.
- DNS Express answers with authoritative response. The response is faster than the authoritative DNS server.
The BIG-IP system can use transaction signature (TSIG) keys to authenticate communications about zone transfers between the BIG-IP system and authoritative DNS servers, and between the BIG-IP system and DNS name servers (clients). TSIG keys are generated by a third party tool such as BIND’s keygen utility. Using TSIG keys is optional.
- TSIG key configured on authoritative DNS server
- You can add a TSIG key to a name server object that represents an authoritative DNS server. With this configuration, when the DNS server sends a NOTIFY message to the BIG-IP system, DNS Express responds with a TSIG-signed zone transfer request. Then the DNS server returns a TSIG-signed zone transfer. If required, you can disable the Verify Notify TSIG option on the DNS zone. With this configuration, DNS Express can process a NOTIFY message without a TSIG key, even when a subsequent zone transfer requires a TSIG key.
- TSIG key configured on DNS name server (client)
- You can add a TSIG key to a name server object that represents a DNS name server (client). When the client sends a TSIG-signed zone transfer request, DNS Express returns a TSIG-signed zone transfer.
- TSIG key configured on DNS zone
- You can add a server TSIG key to a DNS zone on the BIG-IP system. With this configuration, the system uses this TSIG key when the zone on the BIG-IP system is a proxy for the zone on the server. There are two possible scenarios:
-
Client sends TSIG-signed zone transfer request
When the BIG-IP system receives a TSIG-signed zone transfer request from a client for a DNS zone for which it is a proxy, the system validates the client TSIG key and removes the key from the request. The system then adds the server TSIG key to the request and forwards the TSIG-signed request to the DNS server or load balances the TSIG-signed request to a pool of DNS servers. The DNS server responds with a TSIG-signed zone transfer. The BIG-IP system validates the server TSIG key and removes the key. Then the system adds the client TSIG key and returns a TSIG-signed signed zone transfer to the client.
-
Client sends unsigned zone transfer request
When the BIG-IP system receives an unsigned zone transfer request from a client for a DNS zone for which it is a proxy, the system adds the server TSIG key to the request. The system then forwards the TSIG-signed request to the DNS server or load balances the TSIG-signed request to a pool of DNS servers. The DNS server responds with a TSIG-signed zone transfer. The BIG-IP system validates the server TSIG key and removes the key. Then the system returns an unsigned zone transfer to the client.
-
A listener is a specialized virtual server that passively checks for DNS packets on port 53 and the IP address you assign to the listener. When a DNS request is sent to the IP address of the listener, the BIG-IP system either handles the request or forwards the request to the appropriate resource.
If you are unfamiliar with how to modify BIND server files, review the fifth edition of DNS and BIND, available from O’Reilly Media.
Typically, BIND servers allow zone transfers to any DNS name server requesting a zone transfer. That is, named.conf on a typical BIND server does not contain an allow-transfer statement. However, the BIND server on the BIG-IP system is configured to allow zone transfers to only the localhost. Thus, named.conf on the BIG-IP system contains this allow-transfer statement: allow-transfer { localhost; } ;.
When you want to improve the speed of responses to DNS queries you can configure a BIND server to allow zone transfers only to the DNS Express engine on the BIG-IP system. You do this by adding an allow-transfer statement to named.conf on the BIND server.
Note: Adding an allow-transfer statement to a BIND server actually restricts zone transfers to a specified list of DNS name servers.
-
Add to the BIND server an allow-transfer statement that specifies a self IP address on the BIG-IP system.
You can modify the following allow-transfer statement to use a self IP address on the BIG-IP system:
allow-transfer { localhost; <self IP address from which zone transfer request is sent to the server>; };allow-transfer { localhost; 10.10.10.1 ; };
When you configure an allow-transfer statement in named.conf on the local BIND server on the BIG-IP system to allow zone transfers only to DNS Express, you must include an also-notify statement that directs NOTIFY messages from local BIND to DNS Express.
-
Add to
named.confon the local BIND, analso-notifystatement that specifies the BIG-IP system use this loopback address and port:::1 port 5353globally.Note: If you prefer, you can configure the
also-notifystatement on a per-zone or per view basis.also-notify { ::1 port 5353; };
Obtain the TSIG key that the DNS servers in the pool that hosts the zone use to authenticate zone transfer requests. Optionally, obtain the TSIG key for the DNS nameserver (client) that you want to add to the BIG-IP system configuration.
Note: TSIG keys are created by a third party tool such as BIND’s keygen utility. The configuration of each DNS server in the pool must contain the same TSIG key.
When you want the BIG-IP system to validate zone transfers from a pool DNS servers, add the server TSIG key to the BIG-IP system configuration. Optionally, if you want the BIG-IP system to validate the DNS nameservers (clients) sending zone transfer requests, add the client TSIG keys.
-
On the Main tab, click DNS > Delivery > Keys > TSIG Key List.
The TSIG Key List screen opens.
-
Click Create.
The New TSIG Key screen opens.
-
In the Name field, type the name of the TSIG key.
-
From the Algorithm list, select the algorithm that was used to generate the key.
-
In the Secret field, type the TSIG key secret.
-
Click Finished.
-
If the DNS nameservers (clients) requesting zone transfers contain a TSIG key, repeat steps 2-7 to add each client TSIG key.
Add the server TSIG key to a DNS zone configured on the BIG-IP system. Optionally, add TSIG keys to DNS nameservers (clients) configured on the BIG-IP system.
Obtain the IP address of the authoritative DNS server that hosts the DNS zone. Optional: Ensure that the server TSIG key is available on the BIG-IP system.
When you want to transfer a zone from an authoritative DNS server into the DNS Express engine and have DNS Express respond to DNS queries for the zone, add a name server object that represents the server that hosts the zone.
-
On the Main tab, click DNS > Delivery > Nameservers.
The Nameservers List screen opens.
-
Click Create.
The New Nameserver screen opens.
-
In the Name field, type a name for the authoritative DNS server.
-
In the Address field, type the IP address on which the DNS server listens for DNS messages.
-
Optional: From the Server Key list, select the TSIG key that matches the TSIG key on the DNS server.
The BIG-IP system uses this TSIG key to sign DNS zone transfer requests sent to the DNS server that hosts this zone, and then to verify a zone transfer returned from the DNS server.
Create a DNS zone and add a DNS Express server object to the zone.
Before you create a DNS zone, you must:
-
Ensure that the authoritative DNS server that currently hosts the zone is configured to allow zone transfers to the BIG-IP system.
-
Ensure that a nameserver object that represents the authoritative DNS server exists in the BIG-IP system configuration.
-
Determine the name you want to use for the zone. The zone name must match the zone name on the authoritative DNS server exactly.
Note: Zone names are not case-sensitive.
You create a DNS zone on the BIG-IP system when you want the DNS Express engine to answer DNS queries for the zone.
-
On the Main tab, click DNS > Zones.
The Zone List screen opens.
-
Click Create.
The New Zone screen opens.
-
In the Name field, type the name of the DNS zone.
The name must begin and end with a letter and contain only letters, numbers, and the period and hyphen (-) characters.
-
In the DNS Express area, from the Server list, select the authoritative primary DNS server that currently hosts the zone.
Note: The DNS Express engine requests zone transfers from this server.
-
From the Notify Action list, select one of the options to specify the action the DNS Express engine takes after receiving a NOTIFY message for this zone.
Action Description Consume NOTIFY messages go to the DNS Express engine. This is the default value. Bypass NOTIFY messages do not go to the DNS Express engine, but instead go to a DNS server (subject to DNS profile unhandled-query-action). Repeat NOTIFY messages go to both the DNS Express engine and a DNS server. Tip: If the nameserver object for the DNS server is configured with a TSIG Key, the signature is validated only for Consume and Repeat actions. Additionally, NOTIFY responses are assumed to be sent by the DNS server, except when the action is Consume and the DNS Express engine generates the response.
-
For the Allow NOTIFY From setting, in the Address field, type an IP address from which the BIG-IP system will accept NOTIFY messages for the DNS Express zone.
Note: The IP address of the authoritative primary DNS Server selected in step 4 is allowed by default, and does not need to be entered.
-
Click Finished.
The BIG-IP system might need to accept a zone transfer for a DNS Express zone from an authoritative DNS server, even if the NOTIFY message does not contain a TSIG key. To configure the system for this scenario, you can disable TSIG verification for NOTIFY messages, as an option.
-
On the Main tab, click DNS > Zones.
The Zone List screen opens.
-
Click the name of the zone you want to modify.
-
From the DNS Express list, select Advanced.
-
Clear the Verify Notify TSIG check box.
-
Click Update.
The BIG-IP system contains a default DNS profile on which DNS Express is enabled. However, you can create a custom DNS profile to work with your network architecture.
Note: If you plan to use the BIND server on a BIG-IP DNS system, use the default dns profile.
-
On the Main tab, click DNS > Delivery > Profiles > DNS or Local Traffic > Profiles > Services > DNS.
The DNS profile list screen opens.
-
Click Create.
The New DNS Profile screen opens.
-
In the General Properties area, name the profile
dns_express. -
In the General Properties area, from the Parent Profile list, accept the default dns profile.
-
Select the Custom check box.
-
In the DNS Features area, from the GSLB list, select Disabled.
-
In the DNS Features area, from the DNS Express list, retain the default value Enabled.
-
In the DNS Features area, from the Unhandled Query Actions list, select how you want the BIG-IP system to handle a query that is not for a wide IP or DNS Express zone.
Option Description Allow The BIG-IP system forwards the query to a DNS server or a member of a pool of DNS servers. Note that if the pool is not associated with a listener and the Use BIND Server on BIG-IP option is set to enabled, queries are forwarded to the local BIND server. (Allow is the default value.) Drop The BIG-IP system does not respond to the query. Reject The BIG-IP system returns the query with the REFUSED return code. Hint The BIG-IP system returns the query with a list of root name servers. No Error The BIG-IP system returns the query with the NOERROR return code. -
In the DNS Features area, from the Use BIND Server on BIG-IP list, select Disabled.
-
Click Finished.
Assign the profile to virtual servers or listeners.
Create listeners to identify the DNS queries that DNS Express handles. When DNS Express is only answering DNS queries, only two listeners are required: one with an IPv4 address that handles UDP traffic and one with an IPv6 address that handles UDP traffic.
However, the best practice is to create four listeners, which allows DNS Express to handle zone transfers, should you decide to use this feature. DNS zone transfers use TCP port 53. With this configuration, you create one listener with an IPv4 address that handles UDP traffic, and one with the same IPv4 address that handles TCP traffic. You also create one listener with an IPv6 address that handles UDP traffic, and one with the same IPv6 address that handles TCP traffic.
Tip: If you have multiple BIG-IP DNS systems in a device group, perform these steps on only one system.
Note: These steps apply only to BIG-IP DNS-provisioned systems.
-
On the Main tab, click DNS > Delivery > Listeners.
The Listeners List screen opens.
-
Click Create.
The Listeners properties screen opens.
-
In the Name field, type a unique name for the listener.
-
For the Destination setting, in the Address field, type an IPv4 address on which the BIG-IP system listens for DNS queries.
-
From the Listener list, select Advanced.
-
If you are using SNATs on your network, from the Source Address Translation list, select SNAT.
-
Optional: If you are using NATs on your network, for the Address Translation setting, select the Enabled check box.
-
Optional: If you are using port translation on your network, for the Port Translation setting, select the Enabled check box.
-
In the Service area, from the Protocol list, select UDP.
-
In the Service area, from the DNS Profile list, select either dns or a custom DNS profile configured for DNS Express.
-
Click Finished.
Create another listener with the same IPv4 address and configuration, but select TCP from the Protocol list. Then, create two more listeners, configuring both with the same IPv6 address, but one with the UDP protocol and one with the TCP protocol.
Create virtual servers to process the DNS queries that DNS Express handles. When DNS Express is only answering DNS queries, only two virtual servers are required: one with an IPv4 address that handles UDP traffic and one with an IPv6 address that handles UDP traffic.
However, the best practice is to create four listeners, which allows DNS Express to handle zone transfers, should you decide to use this feature. DNS zone transfers use TCP port 53. With this configuration, you create one virtual server with an IPv4 address that handles UDP traffic, and one with the same IPv4 address that handles TCP traffic. You also create one virtual server with an IPv6 address that handles UDP traffic, and one with the same IPv6 address that handles TCP traffic.
Note: These steps apply only to LTM-provisioned systems.
-
On the Main tab, click Local Traffic > Virtual Servers.
The Virtual Server List screen opens.
-
Click Create.
The New Virtual Server screen opens.
-
In the Name field, type a unique name for the virtual server.
-
In the Destination Address/Mask field, type the IP address in CIDR format.
The supported format is address/prefix, where the prefix length is in bits. For example, an IPv4 address/prefix is
10.0.0.1or10.0.0.0/24, and an IPv6 address/prefix isffe1::0020/64or2001:ed8:77b5:2:10:10:100:42/64. When you use an IPv4 address without specifying a prefix, the BIG-IP system automatically uses a/32prefix.Note: The IP address for this field needs to be on the same subnet as the external self-IP.
-
In the Service Port field, type 53.
-
From the Protocol list, select UDP.
-
Optional: If you are using SNATs on your network, from the Source Address Translation list, select SNAT.
-
Optional: From the SNAT pool list, select the name of an existing SNAT pool.
-
From the Configuration list, select Advanced.
-
From the DNS Profile list, select either dns or the custom DNS profile you created for DNS Express.
-
Click Finished.
Create another virtual server with the same IPv4 address and configuration, but select TCP from the Protocol list. Then, create two more virtual servers, configuring both with the same IPv6 address, but one with the UDP protocol and one with the TCP protocol.
You can view information about DNS zones.
-
On the Main tab, click Statistics > Module Statistics > DNS > Zones.
The Zones statistics screen opens.
-
From the Statistics Type list, select Zones.
Information displays about the traffic handled by the zones in the list.
-
In the Details column for a zone, click View.
Read the online help for an explanation of the statistics.
DNS Express can respond to zone transfer requests for a DNS zone from specified DNS nameservers (clients). Optionally, DNS Express can use TSIG keys to validate the identity of the client making the zone transfer request.
In this figure, as the zone is updated, the authoritative DNS server sends a NOTIFY to DNS Express, which responds with a zone transfer request. The server responds with a zone transfer and the zone is updated in DNS Express. DNS Express sends a NOTIFY to the client, and the client responds with a zone transfer request for the zone. DNS Express responds with a zone transfer and the client updates the zone.
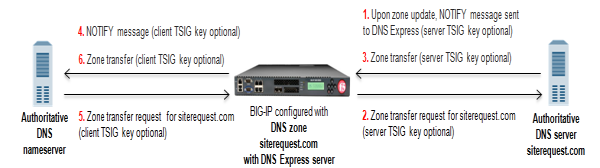
- When zone update occurs, the DNS server sends NOTIFY message to DNS Express.
- DNS Express sends zone transfer request as a result of the NOTIFY query.
- DNS server answers with zone transfer and DNS Express updates the zone.
- DNS Express sends NOTIFY to authoritative DNS nameserver client.
- Client sends zone transfer request as a result of the NOTIFY query.
- DNS Express answers with zone transfer of siterequest.com, and client updates the zone.
Gather the IP addresses of the DNS name servers (clients) from which the DNS Express engine accepts zone transfer requests for a DNS zone. Optional: Ensure that the client TSIG key is available on the BIG-IP system.
To allow DNS name servers (clients) to request zone transfers for a zone, add a name server object that represents each client. Optionally, you can add a client TSIG key that the BIG-IP system uses to authenticate the identity of the client during zone transfer communications.
-
On the Main tab, click DNS > Delivery > Nameservers.
The Nameservers List screen opens.
-
Click Create.
The New Nameserver screen opens.
-
In the Name field, type a name for the DNS name server (client).
-
In the Address field, type the IP address on which the DNS name server (client) listens for DNS messages.
-
Optional: From the TSIG Key list, select the TSIG key you want the BIG-IP system to use to validate zone transfer traffic.
-
Click Finished.
-
Add name server objects to represent other DNS name servers (clients).
Add the DNS name server (client) objects to the Zone Transfer Client list of the DNS zone on the BIG-IP system.
Ensure that nameserver objects exist in the BIG-IP system configuration that represent the DNS server that hosts the zone and the DNS nameservers (clients) that are permitted to request zone transfers.
You can configure DNS Express to respond to zone transfer requests for a specific zone by adding nameservers to the Zone Transfer Clients list for the zone.
-
On the Main tab, click DNS > Zones.
The Zone List screen opens.
-
Click the name of the zone you want to modify.
-
In the Zone Transfer Clients area, move the nameservers that can initiate zone transfers from the Available list to the Active list.
-
Click Finished.
The nameservers in the Active list can initiate zone transfer requests for this zone.
DNS zone transfers use TCP port 53. Ensure that a listener configured for TCP exists in the configuration.
To enable DNS Express to answer zone transfers for a zone, modify the DNS profile assigned to the listener.
-
On the Main tab, click DNS > Delivery > Profiles > DNS or Local Traffic > Profiles > Services > DNS.
The DNS profile list screen opens.
-
In the Name column, click the name of the profile you want to modify.
-
Select the Custom check box.
-
In the DNS Traffic area, from the Zone Transfer list, select Enabled.
-
Click Finished.