Updated Date: 07/07/2026
Deploying a VXLAN Multipoint Tunnel over an IPv6 Network
You can deploy a VXLAN multipoint tunnel that specifies IPv6 addresses as local VXLAN tunnel endpoints (VTEPs). This capability is especially important for interoperability with other VTEPs and controller vendors.
This illustration shows a sample configuration with three BIG-IP systems, where the systems function as local VTEPs, in IPv6 format.
Each BIG-IP system in the configuration includes a VLAN, two self IP addresses, and a VXLAN tunnel object that references a VXLAN multipoint profile.

To configure a VXLAN multipoint tunnel that supports IPv6 addressing, you can use the BIG-IP Configuration utility. But first, confirm that you have already created these objects on each system in the configuration:
- A VLAN that’s associated with an interface
- An IPv6 self IP address that’s associated with the above VLAN. This self IP address will serve as the local VXLAN tunnel endpoint (VTEP).
This illustration shows the tasks that you must perform to deploy a VXLAN multipoint tunnel over an IPv6 network, after you’ve satisfied the prerequisites.
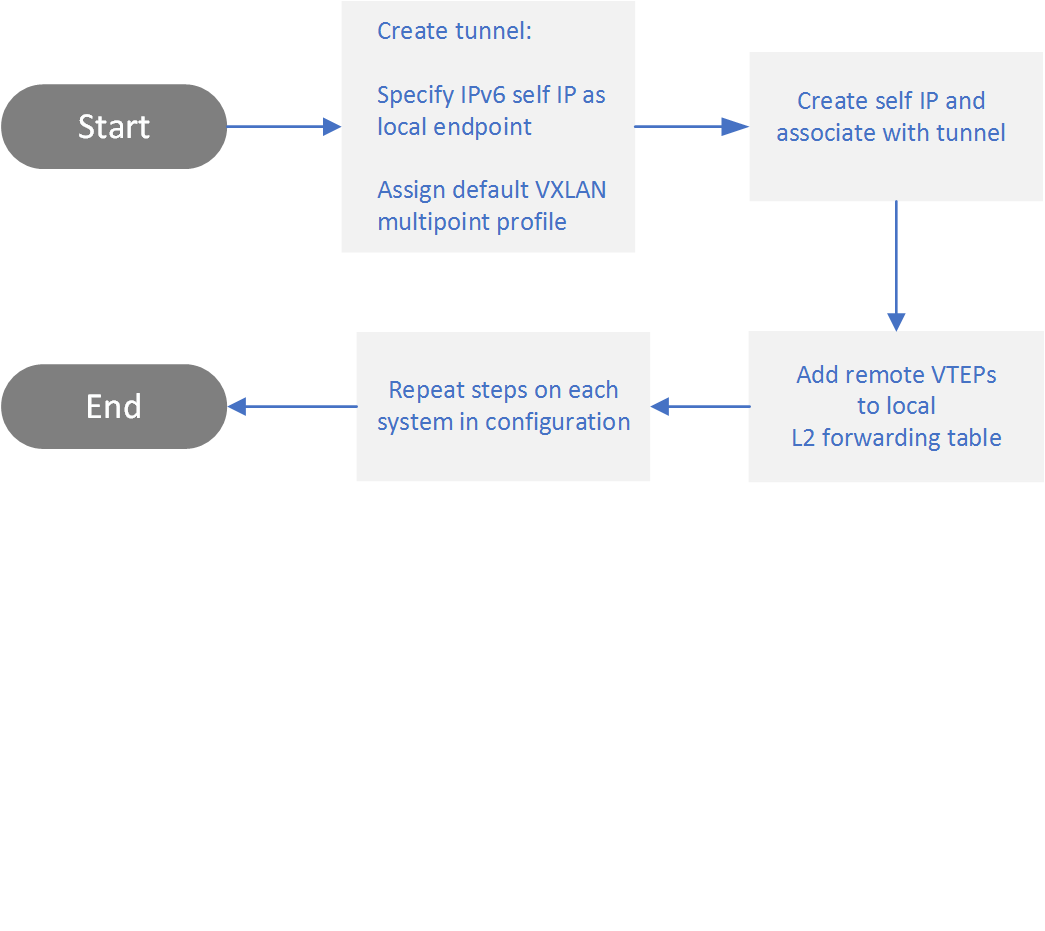
Using this procedure, you create a VXLAN multipoint tunnel object on each BIG-IP system. The tunnel object references the IPv6 local endpoint that you previously created on the system.
In our sample configuration, the tunnels on all three BIG-IP systems are assigned the same name, but this is not required.
-
On the Main tab, click Network > Tunnels > Tunnel List > Create.
The New Tunnel screen opens.
-
Type a Name for the tunnel.
In our sample configuration, this name is
tunnel_1. -
From the Profile list, select vxlan-multipoint.
-
In the Local Address field, type the IPv6 self IP address that represents the local endpoint for the system you are configuring.
In our sample configuration, this address is either
2001:30:1,2001:30:2, or2001:30:3. -
In the Remote Address field, retain the default setting (Any).
-
For the Mode list, retain the default selection, Bidirectional.
-
In the MTU field, type the maximum transmission unit of the tunnel.
The default value is 0. The valid range is from 0 to 65515.
-
For the Use PMTU (Path MTU) setting, select or clear the check box.
- If enabled and the tunnel MTU is set to 0, the tunnel will use the PMTU information.
- If enabled and the tunnel MTU is fixed to a non-zero value, the tunnel will use the minimum of PMTU and MTU.
- If disabled, the tunnel will use fixed MTU or calculate its MTU using tunnel encapsulation configurations .
-
From the TOS list, select Preserve, or select Specify and type a Type of Service (TOS) value.
The valid range is from 0 to 255.
-
From the Auto-Last Hop list, select a value.
- Choose Default if you want the system to use the global Auto Last Hop setting (if enabled).
- Choose Enabled if you want this setting to take precedence over the global Auto Last Hop setting, for this tunnel only.
- Choose Disabled if you want to disable auto last hop behavior for this tunnel only.
-
From the Traffic Group list, select the traffic group that includes the local IP address for the tunnel.
-
Click Repeat, and perform these steps on the other BIG-IP systems in the configuration.
-
Click Finished.
After you perform this task, each BIG-IP system configuration contains a tunnel object that references an IPv6 local endpoint.
On each BIG-IP system in the configuration, you must create a unique self IP address and assign the VXLAN tunnel to the address.
-
On the Main tab, click Network > Self IPs.
-
Click Create.
-
Type a Name for the self IP address, such as
selfip_ipv4_bigip1. -
Type the IP Address that you want to associate with the VXLAN tunnel.
In our sample configuration, this address is either
10.9.0.1,10.9.0.2, or10.9.0.3. -
For the Netmask setting, type or select a netmask for the IP address.
-
From the VLAN/Tunnel list, select the name of the tunnel you created previously.
In our sample configuration, this name is
tunnel_1. -
For the Port Lockdown list, select an option that makes sense for your configuration.
-
For the Traffic Group setting, retain the default setting or select another traffic group from the list.
-
Click Repeat, and perform these steps on the other BIG-IP systems in your configuration.
-
Click Finished.
After you complete this task, each BIG-IP system configuration contains a self IP address associated with a VXLAN tunnel.
On each BIG-IP system in the configuration, you must update the tunnel forwarding database (FDB) records to add the local endpoints of the other BIG-IP systems in the configuration.
-
Using an SSH console access program like PuTTY, log in to the BIG-IP system.
-
Type this command, replacing the sample endpoint addresses with your own IPv6 addresses:
tmsh modify net fdb tunnel *tunnel\_name* records add { ff:ff:ff:ff:ff:ff { endpoints add { 2001:10::2 2001:10::3 } } }Following our sample configuration, we can see that the endpoints shown here are the addresses on
BIG-IP System 2andBIG-IP System 3that you specify when you are configuring the FDB records onBIG-IP System 1. -
Type
tmsh save sys config. -
Repeat these steps on the other BIG-IP systems in your configuration.
This syntax shows how to use the TMSH command-line interface on the BIG-IP system to create the sample VXLAN multipoint configuration that includes IPv6 local VXLAN tunnel endpoints (VTEPs).
BIG-IP System 1
		create net vlan vlan921 interfaces add { 7.0 { untagged } }

		create net self 2001:30::1/64 vlan vlan921 traffic-group traffic-group-local-only allow-service all

		create net tunnels tunnel tunnel_1 local-address 2001:30::1 profile vxlan-multipoint key 1

		create net self 10.9.0.1/24 vlan tunnel_1

		modify net fdb tunnel tunnel_1 records add { ff:ff:ff:ff:ff:ff { endpoints add { 2001:30::2 2001:30::3 } } }
BIG-IP System 2
		create net vlan vlan921 interfaces add { 7.0 { untagged } }

		create net self 2001:30::2/64 vlan vlan921 traffic-group traffic-group-local-only allow-service all

		create net tunnels tunnel tunnel_1 local-address 2001:30::2 profile vxlan-multipoint key 1

		create net self 10.9.0.2/24 vlan tunnel_1

		modify net fdb tunnel tunnel_1 records add { ff:ff:ff:ff:ff:ff { endpoints add { 2001:30::1 2001:30::3 } } }
BIG-IP System 3
		create net vlan vlan921 interfaces add { 7.0 { untagged } }

		create net self 2001:30::3/64 vlan vlan921 traffic-group traffic-group-local-only allow-service all

		create net tunnels tunnel tunnel_1 local-address 2001:30::3 profile vxlan-multipoint key 1

		create net self 10.9.0.3/24 vlan tunnel_1

		modify net fdb tunnel tunnel_1 records add { ff:ff:ff:ff:ff:ff { endpoints add { 2001:30::1 2001:30::2 } } }
You can use the tcpdump command to verify that the VLAN and tunnel are receiving the expected packets, and you can use the TMSH command-line interface to view statistics about the VXLAN tunnel endpoints (VTEPs).
Note: For you to use the tcpdump command, your BIG-IP user account must grant you access to the advanced shell.
This syntax shows how to use the tcpdump command to troubleshoot VXLAN tunnels. For the sample configuration, the tcpdump output shows that VLAN vlan921 and tunnel tunnel_1 are receiving the expected packets.
			# tcpdump -ni vlan921
			14:58:18.355464 IP6 2001:30::1.33702 > 2001:30::2.4789: VXLAN, flags [I] (0x08), vni 1

			IP 10.9.0.1 > 10.9.0.2: ICMP echo request, id 31956, seq 9, length 64 in slot1/tmm3 lis=

			14:58:18.355703 IP6 2001:30::2.32110 > 2001:30::1.4789: VXLAN, flags [I] (0x08), vni 1

			IP 10.9.0.2 > 10.9.0.1: ICMP echo reply, id 31956, seq 9, length 64 out slot1/tmm4 lis=_wcard_tunnel_/Common/tunnel_1

			# tcpdump -ni tunnel_1
			14:58:55.354826 IP 10.9.0.1 > 10.9.0.2: ICMP echo request, id 31956, seq 46, length 64 in slot1/tmm4 lis=

			14:58:55.354832 IP 10.9.0.2 > 10.9.0.1: ICMP echo reply, id 31956, seq 46, length 64 out slot1/tmm4 lis=
This TMSH command shows VXLAN tunnel endpoint (VTEP) statistics for a BIG-IP system in the sample configuration. The command shows how to view statistics for all remote addresses or for a specific remote address.
# show net tunnels endpoint tunnel-name tunnel_1
---------------------------------------------------------------------------------
Tunnel Name: tunnel_1
---------------------------------------------------------------------------------
Remote Address   TX Bytes  RX Bytes  TX Packets  RX Packets  TX Errors  RX Errors
2001:30::2          31.2K     31.7K         211         215          0          0
2001:30::3           3.3K      3.7K          24          27          0          0

# show net tunnels endpoint tunnel-name tunnel_1 remote-address 2001:30::2
---------------------------------------------------------------------------------
Tunnel Name: tunnel_1
---------------------------------------------------------------------------------
Remote Address   TX Bytes  RX Bytes  TX Packets  RX Packets  TX Errors  RX Errors
2001:30::2          31.2K     31.7K         211         215          0          0