Updated Date: 07/07/2026
Integrating ASM with Database Security Products
You can deploy Application Security Manager™ (ASM) with database security products, such as IBM® InfoSphere® Guardium® to increase security visibility, receive alerts about suspicious activity, and prevent attacks. When integrated with database security, ASM™ provides information about each HTTP request and database query to the database security product’s logging and reporting system. This allows the database security system to correlate the web transaction with the database query to make a security assessment of the transaction.
Before you can integrate ASM with a database security product, the database security server itself must have been configured, and be accessible from ASM. On the BIG-IP ®system, you specify the host name or IP address of the database security server. Then, you enable database security integration for one or more security policies that are set up to protect web application resources.
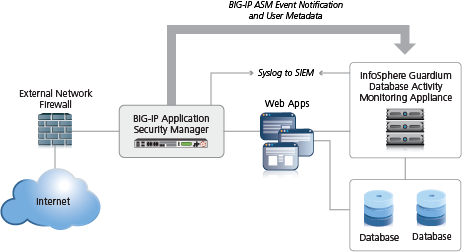
When using database security, Application Security Manager monitors web application traffic and sends information about the users, the requests, and the reporting events to the database security server. The following figure shows an example of how ASM can integrate with the IBM InfoSphere Guardium Database Activity Monitoring Appliance.
The security policy can get user names from requests using login pages configured from within ASM, or the policy can retrieve the user names from Access Policy Manager (APM). This implementation describes how to integrate with an external database security server using login pages.
When using login pages for the application, you define the URLs, parameters, and validation criteria required for users to log in to the application. User and session information is included in the system logs so you can track a particular session or user. The system can log activity, or block a user or session if either generates too many violations.
Before you can create a security policy, you must perform the minimal system configuration tasks required according to the needs of your networking environment.
You can use Application Security Manager to create a robust, yet simple, security policy that is tailored to protect your web application. This is the easiest way to create a security policy.
-
On the Main tab, click Security > Application Security > Security Policies > Policies List.
The Policies List screen opens.
-
Click Create New Policy.
You only see this button when no policy is selected.
-
In the Policy Name field, type a name for the policy.
-
Leave Policy Type set to Security.
-
For Policy Template, select Fundamental.
-
For Virtual Server, click Configure new virtual server to specify where to direct application requests.
-
For What type of protocol does your application use?, select HTTP, HTTPS, or both.
-
In the Virtual Server Name field, type a unique name.
-
In the HTTP Virtual Server Destination field, type the address in IPv4 (
10.0.0.1) or IPv6 (2001:ed8:77b5:2:10:10:100:42/64) format, and specify the service port.Tip: If you want multiple IP addresses to be directed here, use the Network setting.
-
In the HTTP Pool Member setting, specify the addresses of the back-end application servers.
-
In the HTTPS Virtual Server Destination field, type the address in IPv4 (
10.0.0.1) or IPv6 (2001:ed8:77b5:2:10:10:100:42/64) format, and specify the service port. -
In the HTTPS Pool Member setting, specify the addresses of the back-end application servers.
-
For HTTPS, in the SSL Profile (Client) setting, select an SSL profile.
If an SSL profile is selected, the HTTP/2 Profile (Client) setting opens.
-
For HTTPS, in the SSL Profile (Server) setting, select an SSL profile
If an SSL profile is selected, the HTTP/2 Profile (Server) setting opens.
-
From the Logging Profiles list, select a profile such as Log illegal requests to determine which events are logged on the system.
-
-
In the upper right corner, click Advanced.
You can use default values for the Advanced settings but it’s a good idea to take a look at them.
-
If you selected Fundamental or Comprehensive for the Policy Template, Learning Mode is set to Automatic and Enforcement Mode is set to Blocking.
Tip: If you need to change these values, set application language to a value other than Auto detect.
-
If you know the Application Language, select it or use Unicode (utf-8).
-
To add specific protections (enforcing additional attack signatures) to the policy, for Server Technologies, select the technologies that apply to the back-end application servers.
-
You can configure trusted IP addresses that you want the security policy to consider safe.
-
-
Click Create Policy to create the security policy.
ASM creates a security policy that immediately starts protecting your application. The enforcement mode of the security policy is set to Blocking. Traffic that is considered to be an attack such as traffic that is not compliant with HTTP protocol, has malformed payloads, uses evasion techniques, performs web scraping, contains sensitive information or illegal values is blocked. Other potential violations are reported but not blocked.
The system examines the traffic to the web application making suggestions for more specifically building the security policy. The Policy Builder selectively learns new entities like file types, parameters, and cookies used in requests to the application. When ASM processes sufficient traffic, it automatically adds the entities to the security policy, and enforces them.
The system applies a basic set of attack signatures to the security policy and puts them in staging (by default, for 7 days). If you specified server technologies, additional attack signatures are included. ASM reports common attacks discovered by comparison to the signatures but does not block these attacks until the staging period is over and they are enforced. That gives you a chance to be sure that these are actual attacks and not legitimate requests.
Tip: This is a good point at which send some traffic to test that you can access the application being protected by the security policy and check that traffic is being processed correctly by the BIG-IP system. Send the traffic to the virtual server destination address.
Before you can create a login page manually, you need to be familiar with the login URL or URLs the application the security policy is protecting.
In your security policy, you can create a login page manually to specify a login URL that presents a site that users must pass through to gain access to the web application. The login URL commonly leads to the login page of the web application.
Note: You can also have the system create login pages automatically by selecting Detect login pages on the Learning and Blocking Settings screen.
-
On the Main tab, click Security > Application Security > Sessions and Logins.
The Login Pages List screen opens.
-
In the Current edited security policy list near the top of the screen, verify that the security policy shown is the one you want to work on.
-
Click Create.
The New Login Page screen opens.
-
For the Login URL setting, specify a URL that users must pass through to get to the application.
-
From the list, select the type of URL: Explicit or Wildcard.
-
Select either HTTP or HTTPS based on the type of traffic the web application accepts.
-
Type an explicit URL or wildcard expression in the field.
When you click in the field, the system lists URLs that it has seen, and you can select a URL from the list. Or, you can type explicit URLs in the format
/login, and wildcard URLs without the slash, such as*.php.Wildcard syntax is based on shell-style wildcard characters. This table lists the wildcard characters that you can use so that the entity name can match multiple objects.
Wildcard Character Matches * All characters ? Any single character. [abcde] Exactly one of the characters listed. [!abcde] Any character not listed. [a-e] Exactly one character in the range. [!a-e} Any character not in the range. Note that wildcards do not match regular expressions.
-
-
From the Authentication Type list, select the method the web server uses to authenticate the login URL’s credentials with a web user.
Option Description None The web server does not authenticate users trying to access the web application through the login URL. This is the default setting. HTML Form The web application uses a form to collect and authenticate user credentials. If using this option, you also need to type the user name and password parameters written in the code of the HTML form. HTTP Basic Authentication The user name and password are transmitted in Base64 and stored on the server in plain text. HTTP Digest Authentication The web server performs the authentication; user names and passwords are not transmitted over the network, nor are they stored in plain text. NTLM Microsoft LAN Manager authentication (also called Integrated Windows Authentication) does not transmit credentials in plain text, but requires a continuous TCP connection between the server and client. JSON/AJAX Request The web server uses JSON and AJAX requests to authenticate users trying to access the web application through the login URL. For this option, you also need to type the name of the JSON element containing the user name and password. -
In the Access Validation area, define at least one validation criteria for the login page response.
If you define more than one validation criteria, the response must meet all the criteria before the system allows the user to access the application login URL.
Note: The system checks the access validation criteria on the response according to the content-type of the login URL. Supported content-types are text/*, application/x-javascript, application/sgml, application/xml, application/x-asp, application/x-aspx, application/xhtml+xml, application/json, application/x-shockwave-flash. You can use the internal parameter
user_defined_accum_typeto add supported content-types. -
Click Create to add the login page to the security policy.
The new login page is added to the login pages list.
-
Add as many login pages as needed for your web application.
-
In the editing context area, click Apply Policy to put the changes into effect.
The security policy now has one or more login pages associated with it. They are included in the Login Pages List.
You can use the login pages you created for login enforcement, brute force protection, or session awareness.
Login enforcement settings prevent forceful browsing attacks where attackers gain access to restricted parts of the web application by supplying a URL directly. You can use login enforcement to force users to pass through one URL (known as the login URL) before being allowed to display a different URL (known as the target URL) where they can access restricted pages and resources.
Login enforcement indicates how the security policy implements login pages including an optional expiration time, a list of URLs that require authentication to get to, and a list of URLs used to log out of the application. You can also use authenticated URLs to enforce idle time-outs on applications that are missing this functionality.
-
On the Main tab, click Security > Application Security > Sessions and Logins > Login Enforcement.
The Login Enforcement screen opens.
-
If you want the login URL to be valid for a limited time, set Expiration Time to Enabled, and type a value, in seconds (1-99999) that indicates how long the session will last.
If enabled, the login session ends after the number of seconds has passed.
-
For the Authenticated URLs setting, specify the target URLs that users can access only by way of the login URL:
-
In the Authenticated URLs (Wildcards supported) field, type the target URL name in the format
/private.php(wildcards are allowed). -
Click Add to add the URL to the list of authenticated URLs.
-
Repeat to add as many authenticated URLs as needed.
-
-
Click Save to save your settings.
-
To put the security policy changes into effect immediately, click Apply Policy.
If you specify authenticated URLs and a user tries to access them, bypassing the login URL (specified in a Login Page), the system issues the Login URL bypassed violation. If a user session is idle and exceeds the expiration time, the system issues the Login URL expired violation, logs the user out, and as a result, the user can no longer reach the authenticated URLs. For both login violations, if the enforcement mode is blocking, the system now sends the Login Page Response to the client (see Application Security > Policy > Response Pages).
To integrate Application Security Manager (ASM) with a third-party database security product, you need to configure the database security server on ASM. You can configure one database security server per system.
-
On the Main tab, click Security > Options > Application Security > Integrated Services > Database Security.
The Database Security Configuration screen opens.
-
In the Server Host Name/IP Address field, type the host name or IP address of the database security server.
Note: If using SSL to establish a secured session between the BIG-IP system and the database security server, type the IP address of a virtual server configured for the secure connection. The virtual server uses any open IP address for the destination, the IBM Guardium port (16016, by default) for the service port,
serversslor a customized profile for the SSL Profile (Server) setting, and specifies a default pool (containing one member, the database security server, using its IP address and service port, typically, 16016). -
For Server Port Number, type the port number of the database server.
The default value is 16016, the port used by IBM InfoSphere Guardium.
-
If you want the system to wait for an ACK response from the database security server before sending the request to the application server, from the Request Hold Timeout list, select Enabled and type the number of milliseconds to wait for the response.
The default value is 5 milliseconds.
When this setting is enabled, the system forwards the request to the application server as soon as the database security server sends an ACK, or when the timeout has passed. If you leave this setting disabled, the system forwards the request to the application server immediately.
-
Click Save.
The system saves the configuration settings.
The Application Security Manager is now configured to connect to the database security server.
For ASM to forward request data to the database security server, you next need to enable database security integration in one or more security policies.
Before you can enable database security integration, you need to have created a security policy to protect your web application. For the policy to retrieve the user names of those making requests, you need to create login pages in Application Security Manager (ASM).
You enable database security integration in a security policy so that ASM forwards request information to a third-party database server.
-
On the Main tab, click Security > Application Security > Integrated Services > Database Security.
The Database Security screen opens.
-
In the Current edited security policy list near the top of the screen, verify that the security policy shown is the one you want to work on.
-
If you haven’t configured your database security server, click the link in the message and do that now.
-
Select the Database Security Integration check box.
-
For User Source, select Use Login Pages to have the system use an ASM login page to determine the user source.
If there is no login page configured in the security policy, click the login pages link to open a popup screen where you can add one.
-
Click Save.
The system saves the configuration settings.
The Application Security Manager connects to the database security server and can forward request data about traffic to it.
You have set up a BIG-IP system to use Application Security Manager™ (ASM) to secure application traffic and use login pages to check user credentials.
Client traffic is routed to the virtual server for the web application. ASM™ analyzes the request and checks for security violations. ASM also verifies user credentials on the login page and sends the database security server a request notification. When ASM receives an acknowledgment from the database security server or the request hold timeout is over, ASM forwards traffic that meets the security policy requirements to the application.
The database security server includes the application and user information provided by ASM, so it can be viewed in logs and reports on that system. The database security server can perform a more in-depth security assessment of the web request.
If you want to review reports and event logs that associate the user name with the session information on the BIG-IP system, you can set up session tracking (by enabling session awareness). When session awareness is enabled, you can see the user names on the Event Logs: Application: Requests screen in the General Details section of specific requests. In addition, the Reporting: Application: Charts screen displays the users who sent the illegal requests.