Updated Date: 07/07/2026
Create a virtual server to manage HTTP/2 traffic with session persistence
You can use this procedure to create a virtual server to listen for HTTP/2 traffic, apply profiles and policies, and send the traffic to a pool of application servers that are HTTP/2-enabled.
Important: Do not use the HTTP/2 protocol with NTLM protocols, as they are incompatible.
Important: The BIG-IP does not support Virtual Desktop Infrastructure (VDI) in HTTP/2 environment. Do not attach both HTTP/2 profile and VDI profile together in the virtual server, a virtual server configured with both HTTP/2 profile and VDI profile can result in ERR_HTTP2_PROTOCOL_ERROR.
-
On the Main tab, click Local Traffic > Virtual Servers.
The Virtual Server List screen opens.
-
Click Create.
The New Virtual Server screen opens.
-
In the Name field, type a unique name for the virtual server.
-
For the Destination Address/Mask setting, confirm that the Host button is selected, and type the IP address in CIDR format.
The supported format is address/prefix, where the prefix length is in bits. For example, an IPv4 address/prefix is
10.0.0.1or10.0.0.0/24, and an IPv6 address/prefix isffe1::0020/64or2001:ed8:77b5:2:10:10:100:42/64. When you use an IPv4 address without specifying a prefix, the BIG-IP system automatically uses a/32prefix.Note: The IP address you type must be available and not in the loopback network.
-
In the Service Port field, type
443or select HTTPS from the list. -
From the HTTP Profile (Client) list, select a previously-created HTTP profile.
-
From the HTTP Profile (Server) list, select (Use Client Profile).
Note: Alternatively, if you created a separate HTTP profile for managing server-side traffic, select the profile from the list.
-
For the SSL Profile (Client) setting, from the Available list, select
clientssl-secure, and move it to the Selected list.Tip: This profile disables mid-stream SSL renegotiation by default. Disabling SSL renegotiation is a requirement for an HTTP/2 full-proxy deployment.
-
For the SSL Profile (Server) setting, from the Available list, select
serverssl-secure, and move the profile to the Selected list.Tip: This profile disables mid-stream SSL renegotiation by default. Disabling SSL renegotiation is a requirement for an HTTP/2 full-proxy deployment.
-
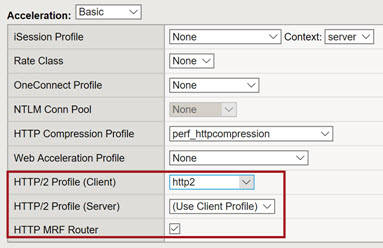
From the Acceleration list, select Advanced.
-
From the HTTP/2 Profile (Client) list, select the HTTP/2 profile that you previously created.
-
From the HTTP/2 Profile (Server) list, select (Use Client Profile), or if you created a separate HTTP/2 profile for server-side traffic, select the profile from the list.
-
For the HTTP MRF Router setting, select the check box. For example:
-
From the Default Pool list, select a pool that is configured to serve HTTP/2 traffic.
-
From the Default Persistence Profile setting, select the persistence profile that you previously created.
-
Click Finished.
The HTTP/2 virtual server is now ready to listen for HTTP/2 traffic and send the traffic to the assigned server pool.