


Updated Date: 07/07/2026
Configuring HTTP/2 Full-proxy Support
When your application server infrastructure is composed of HTTP/2-enabled servers, you can take advantage of the HTTP/2 acceleration features that the BIG-IP system provides. Most importantly, the BIG-IP system includes full-proxy support for the HTTP/2 protocol. This means that the BIG-IP system can process HTTP/2 requests and responses on both the client and server sides of the BIG-IP system.
The HTTP/2 full-proxy architecture provides greater network efficiency by allowing the BIG-IP system to transport multiple simultaneous, bi-directional streams of messages between the client and server. This is accomplished through the use of the BIG-IP system’s message-routing proxy, instead of the traditional connection-oriented TCP proxy.
Note: This deployment does not support the Hash and SSL persistence types.
This figure shows an example of the Acceleration area of the New Virtual Server screen, where you configure some key settings for successful HTTP/2 full-proxy operation.
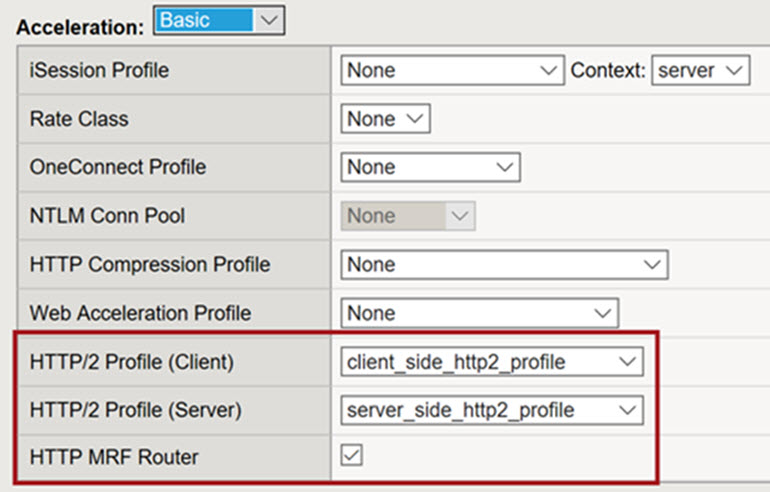
To configure HTTP/2 full-proxy support on the BIG-IP system, you can use the BIG-IP Configuration utility.
Important: When you create the virtual server, make sure that you select the HTTP MRF Router option. You must also assign two existing SSL profiles to the virtual server, clientssl-secure and serverssl-secure. These profiles disable SSL mid-stream renegotiation, a requirement for successful HTTP/2 full-proxy deployment.
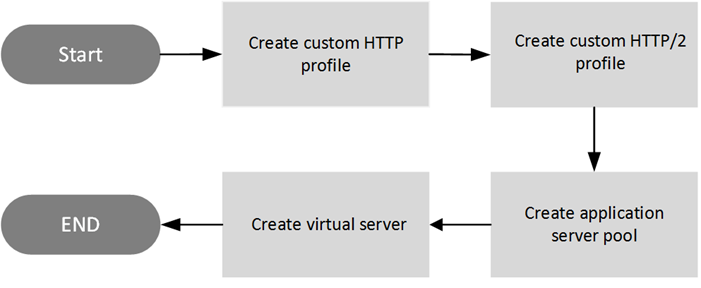
This illustration shows the tasks required to deploy a secure HTTP/2 full-proxy configuration with session.
These BIG-IP features are not supported for an HTTP/2 full-proxy deployment:
- OneConnect
- The session persistence types Hash and SSL.
- Connection mirroring in high-availability configurations.
- The Virtual Desktop Infrastructure (VDI) is not supported in HTTP/2 environment. Do not attach both HTTP/2 profile and VDI profile together in the virtual server.
Note: The HTTP/2 protocol is not compatible with NTLM protocols.
Part of configuring an HTTP/2 full-proxy configuration on the BIG-IP system is to first create a standard HTTP profile. An HTTP profile defines the way that you want the BIG-IP system to manage HTTP traffic.
Note: For the most expedient HTTP/2 full-proxy configuration, you can create a single HTTP profile that the BIG-IP system will apply to both client-side and server-side HTTP traffic. Alternatively, if you want the BIG-IP system to manage client-side and server-side traffic in different ways, you can create two separate HTTP profiles and configure the settings differently in each profile.
-
On the Main tab, click Local Traffic > Profiles > Services > HTTP.
The HTTP profile list screen opens.
-
Click Create.
The New HTTP Profile screen opens.
-
Type a unique Name for the profile.
-
From the Parent Profile list, select
http. -
Select the Custom check box.
-
From the Request Chunking list:
- Select Rechunk if you always want the BIG-IP system to send a request to the server as chunked.
- Select Sustain if you want the BIG-IP system to decide whether to send a request to the server as chunked or unchunked.
-
From the Response Chunking list:
- Select Unchunk if you always want the BIG-IP system to send a response to the client as unchunked. Note that if the content length is undefined because an HTTP payload handler modified the content, the system closes the connection.
- Select Rechunk if you always want the BIG-IP system to send a response to the client as chunked.
- Select Sustain if you want the BIG-IP system to decide whether to send a response to the client as chunked or unchunked.
-
Modify the other settings as required for your configuration.
-
If you want the BIG-IP system to manage server-side traffic differently from client-side traffic, click Repeat and create another HTTP profile.
-
Click Finished.
Any custom HTTP profile that you have created now appears on the HTTP profile list screen and is ready for you to assign to a virtual server.
Part of creating an HTTP/2 full-proxy configuration is to create an HTTP/2 profile that you can use for both client-side and server-side application traffic. When you assign the profile to a virtual server, the BIG-IP system applies the settings in the profile to the traffic.
Note: For the most expedient HTTP/2 full-proxy configuration, you can create a single HTTP/2 profile that the BIG-IP system will apply to both client-side and server-side HTTP/2 traffic. Alternatively, if you want the BIG-IP system to manage client-side and server-side traffic in different ways, you can create two separate HTTP/2 profiles and configure the settings differently in each profile.
-
On the Main tab, click Local Traffic > Profiles > Services > HTTP/2.
-
Click Create.
-
Type a Name for the profile, such as
my_http2_profile. -
For the Parent Profile setting, retain the default value
http2, or select a different profile.This setting specifies the profile that you want to use as the parent profile. Your new profile inherits all settings and values from the parent profile that you select.
-
From the Settings list, you can select Advanced to view the advanced settings.
This setting is optional, depending on the settings you want to configure.
-
On the far-right side of the screen, select the Custom check box.
-
In the Concurrent Streams Per Connection field, retain or change the numeric value.
This setting specifies how many concurrent requests are allowed to be outstanding on a single HTTP/2 connection.
-
In the Connection Idle Timeout field, retain or change the numeric value.
This setting specifies the number of seconds that a connection is idle before the connection is eligible for deletion.
-
From the Insert Header list, retain the default value of Disabled, or select Enabled.
This setting specifies whether the BIG-IP system should add an HTTP header to the HTTP request to show that the request was received over HTTP/2.
-
In the Insert Header Name field, retain the default value or, if the Insert Header setting is enabled, change the header name.
This setting specifies the name of the header that the BIG-IP system will add to the HTTP request when the Insert Header is enabled.
-
From the Enforce TLS Requirements list, ensure that Enabled. is selected.
Important: Enforcing TLS requirements is required for successful HTTP/2 full-proxy deployment.
-
Forthe Activation Modes setting, retain the default value of ALPN (Application Layer Protocol Negotiation) or select Always.
This setting specifies the condition that will cause the BIG-IP system to handle an incoming connection as an HTTP/2 connection.
-
In the Frame Size field, retain the default value of 2048, or change the value.
This setting specifies the size, in bytes, of the data frames that HTTP/2 will produce.
-
In the Receive Window field, retain the default numeric value of 32, or change the numeric value.
This setting specifies, in kilobytes, the size of the receive window for HTTP/2 flow-control.
-
In the Write Size field, retain the default numeric value of 16384, or change the numeric value.
This setting specifies the size, in bytes, of the SSL records that HTTP/2 will produce.
-
In the Header Table Size field, retain the default numeric value of 4096, or change the numeric value.
This setting specifies the table size that the BIG-IP system will use for the compression of headers (unused).
-
If you want the BIG-IP system to manage server-side traffic differently from client-side traffic, click Repeat and create another HTTP/2 profile.
-
Click Finished.
Any custom HTTP/2 profile that you have created now appears on the HTTP/2 profile list screen and is ready for you to assign to a virtual server.
You can create a pool of application servers enabled for processing HTTP/2 traffic. After creating the server pool, you must assign the pool to a virtual server.
Note: Each pool member should be an HTTP/2-capable web server.
-
On the Main tab, click Local Traffic > Pools.
The Pools list screen opens.
-
Click Create.
The New Pool screen opens.
-
In the Name field, type a name for the pool.
Names must begin with a letter, and can contain only letters, numbers, and the underscore (_) character.
Important: The pool name is limited to 63 characters.
-
Type a Description field, type a description of the pool.
-
For the Health Monitors setting, from the Available box, select a health monitor and move it to the Active box.
There are no HTTP/2-specific health monitors available on the BIG-IP system.
-
In the Resources area of the screen, from the Load Balancing Method list, retain the default, or select a load balancing method.
-
From the Priority Group Activation list, retain the default value (Disabled) or select Less than and type a numeric value.
-
Using the New Members setting, add each resource that you want to include in the pool:
-
In the Node Name field, type a name for the node portion of the pool member.
-
In the Address field, type an IP address.
-
In the Service Port field, type a port number, or select a service name from the list.
-
If you enabled priority group activation, then in the Priority field, type a priority number.
-
Click Add.
-
-
Click Finished.
You can use this procedure to create a virtual server to listen for HTTP/2 traffic, apply profiles and policies, and send the traffic to a pool of application servers that are HTTP/2-enabled.
Important: Do not use the HTTP/2 protocol with NTLM protocols, as they are incompatible.
Important: The BIG-IP does not support Virtual Desktop Infrastructure (VDI) in HTTP/2 environment. Do not attach both HTTP/2 profile and VDI profile together in the virtual server, a virtual server configured with both HTTP/2 profile and VDI profile can result in ERR_HTTP2_PROTOCOL_ERROR.
-
On the Main tab, click Local Traffic > Virtual Servers.
The Virtual Server List screen opens.
-
Click Create.
The New Virtual Server screen opens.
-
In the Name field, type a unique name for the virtual server.
-
For the Destination Address/Mask setting, confirm that the Host button is selected, and type the IP address in CIDR format.
The supported format is address/prefix, where the prefix length is in bits. For example, an IPv4 address/prefix is
10.0.0.1or10.0.0.0/24, and an IPv6 address/prefix isffe1::0020/64or2001:ed8:77b5:2:10:10:100:42/64. When you use an IPv4 address without specifying a prefix, the BIG-IP system automatically uses a/32prefix.Note: The IP address you type must be available and not in the loopback network.
-
In the Service Port field, type
443or select HTTPS from the list. -
From the HTTP Profile (Client) list, select a previously-created HTTP profile.
-
From the HTTP Profile (Server) list, select (Use Client Profile).
Note: Alternatively, if you created a separate HTTP profile for managing server-side traffic, select the profile from the list.
-
For the SSL Profile (Client) setting, from the Available list, select
clientssl-secure, and move it to the Selected list.Tip: This profile disables mid-stream SSL renegotiation by default. Disabling SSL renegotiation is a requirement for an HTTP/2 full-proxy deployment.
-
For the SSL Profile (Server) setting, from the Available list, select
serverssl-secure, and move the profile to the Selected list.Tip: This profile disables mid-stream SSL renegotiation by default. Disabling SSL renegotiation is a requirement for an HTTP/2 full-proxy deployment.
-
From the Acceleration list, select Advanced.
-
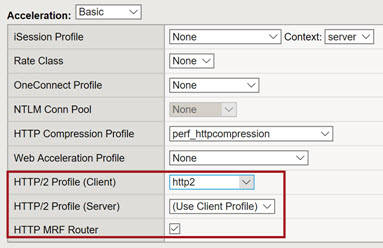
From the HTTP/2 Profile (Client) list, select the HTTP/2 profile that you previously created.
-
From the HTTP/2 Profile (Server) list, select (Use Client Profile), or if you created a separate HTTP/2 profile for server-side traffic, select the profile from the list.
-
For the HTTP MRF Router setting, select the check box. For example:
-
From the Default Pool list, select a pool that is configured to serve HTTP/2 traffic.
-
Click Finished.
The HTTP/2 virtual server is now ready to listen for HTTP/2 traffic and send the traffic to the assigned server pool.
You can view statistics for either client-side or server-side HTTP/2 traffic.
-
On the Main tab, click Statistics > Module Statistics > Local Traffic
-
From the Statstics Type list, select Virtual Servers.
By default, this displays the list of virtual servers on the BIG-IP system.
-
In the Virtual Server column, click the relevant virtual server name.
-
Along the top of the screen, click the Statistics menu.
-
In the Profiles area of the screen, from the Select Profile list, select an HTTP/2 profile.
After you perform this task, the BIG-IP system displays statistics pertaining to the traffic associated with the HTTP/2 profile you selected.