Updated Date: 07/07/2026
Configuring the BIG-IP System to Auto-Populate Pools
You create nodes on the BIG-IP system to represent the backend servers on your network. In turn, you create pool members to represent the backend servers on your network when you create a pool and want to load balance traffic to multiple backend servers.
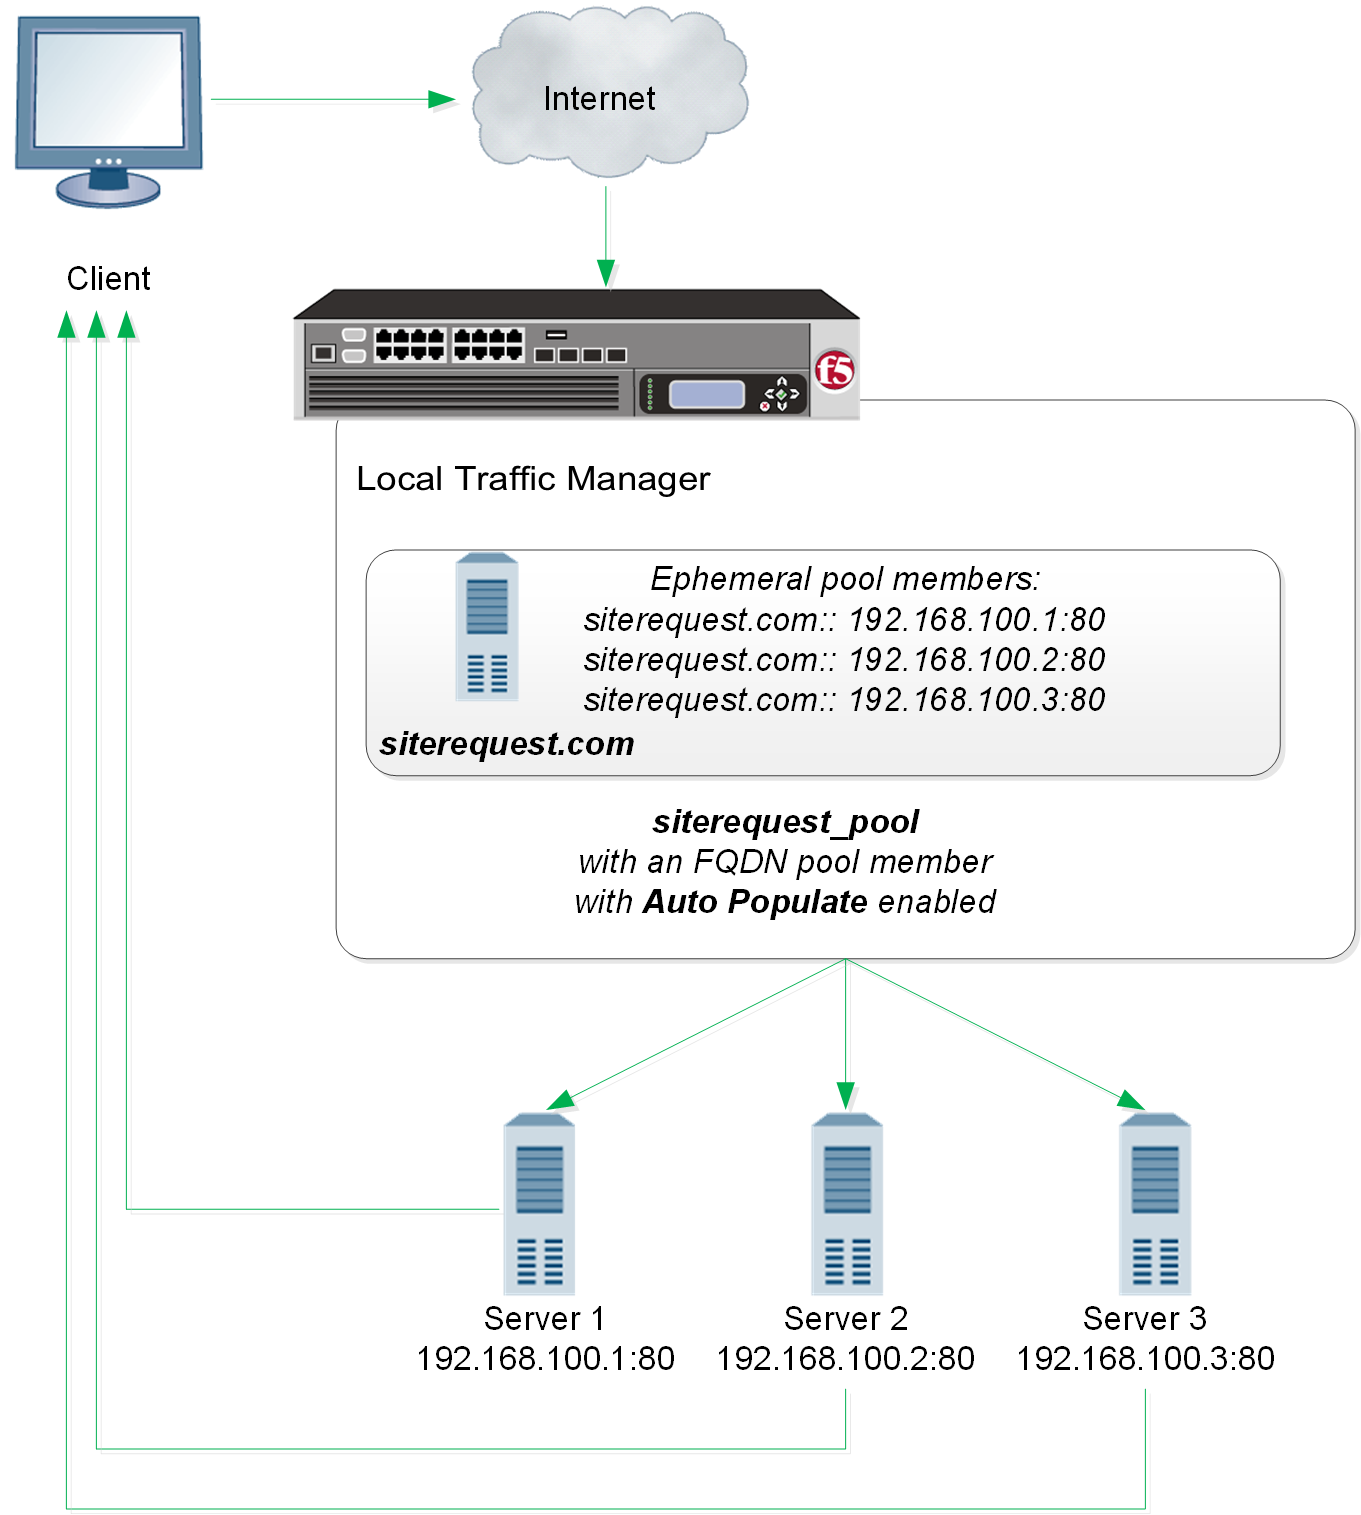
You can configure a BIG-IP system with nodes and pool members that are identified with fully-qualified domain names (FQDNs). When you configure pool members with FQDN, addresses will dynamically follow DNS changes. Fully dynamic DNS-managed pools may even be created. In the following illustration, the BIG-IP Local Traffic Manager creates an ephemeral pool member for each IP address returned in the DNS response.
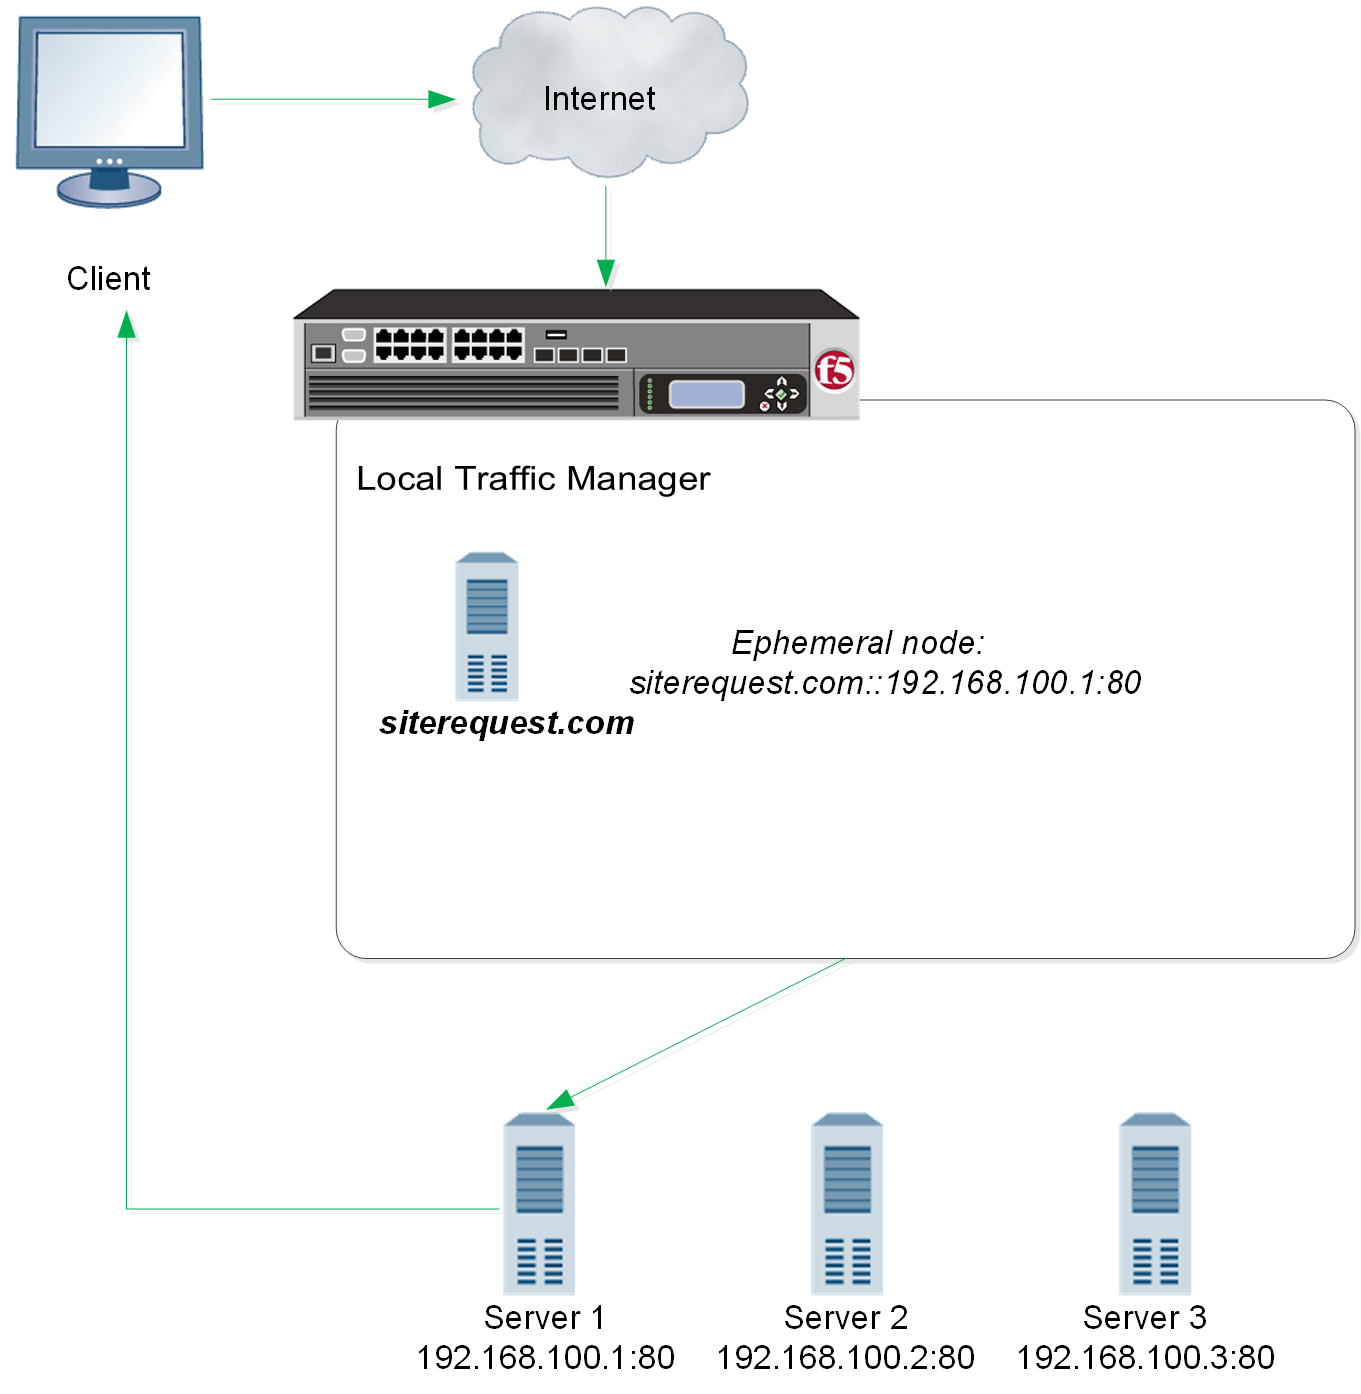
This next illustration shows another option. With this configuration, the system sends a DNS query for the FQDN, and then creates only one ephemeral node or pool member using the first IP address returned in the DNS response. An advantage to this configuration is that you can change the IP addresses of the backend servers that host the domain without reconfiguring the BIG-IP system. If your DNS servers are configured to round robin the DNS responses, be sure that the DNS servers return all available.
If a node or pool member that is identified by a fully-qualified domain name (FQDN) is down for a specified amount of time, the BIG-IP system marks the node or pool member down. Failure to resolve a FQDN will not cause the marking down of nodes or pool members currently in service. While the status of the FQDN node or pool member for DNS is reflected in the status of the FQDN node, since the FQDN node or pool member does not itself monitor any servers, its status does not contribute to the status of the pool in any way.
Failure of a monitored ephemeral to respond to monitor probes results in the marking down of a specific node. Niether the FQDN or any of the related ephemeals are directly affected. Because ephemeral objects monitor servers, the status of the epemeral node or pool member affects the pool status in the same way as any other pool member or node.
Perform these tasks to configure the system to auto-populate pools.
Create a default gateway pool for the system to use to forward traffic.
-
On the Main tab, click Local Traffic > Pools.
The Pool List screen opens.
-
Click Create.
The New Pool screen opens.
-
In the Name field, type a unique name for the pool.
-
For the Health Monitors setting, from the Available list, select the gateway_icmp monitor and move the monitor to the Active list.
-
Using the New Members setting, add each router that you want to include in the default gateway pool:
-
Type the IP address of a router in the Address field.
-
Type an asterisk (
*) in the Service Port field, or select *All Services from the list. -
Click Add.
-
-
Click Finished.
Configure how the BIG-IP system handles DNS lookups when you want to use fully-qualified domain names (FQDNs) to identify nodes and pool members.
-
On the Main tab, click System > Configuration > Device > DNS.
The DNS Device configuration screen opens.
-
In the DNS Lookup Server List area, in the Address field, type the IP address of the DNS server(s) you want to add.
The system uses these DNS servers to validate DNS lookups and resolve host names. Then, click Add.
Note: If you did not disable DHCP before the first boot of the system, and if the DHCP server provides the information about your local DNS servers, then this field is automatically populated.
-
Click Update.
Determine the fully-qualified domain name (FQDN) that you want to use to identify a node.
You can create nodes identified by FQDNs and then create a pool and add pool members from a list of nodes.
-
On the Main tab, expand Local Traffic, and click Nodes.
The Node List screen opens.
-
Click the Create button.
The New Node screen opens.
-
In the Name field, type a descriptive label for the node.
Names are case-sensitive.
-
For the Address setting, select FQDN, and then type the host name in the field.
-
In the Configuration area, from the Health Monitors list, select the way that you want the system to apply monitors to the node.
The default setting is Node Default.
|
Node Default |
Specifies that the system uses the defined default monitors for nodes. The default monitors are defined on the Default Monitors screen of the BIG-IP Configuration utility. |
|
Node Specific |
Specifies that the system monitors this node with the monitors that you configure in the Select Monitors setting. Note: When you select the Node Specific option, the screen refreshes to display the Select Monitors setting. |
|
None |
Specifies that the system does not monitor this node. |
-
In the Ratio field, type a number for the ratio weight of the node.
-
In the Connection Limit field, type a number for the maximum established connection limit for the node.
-
In the Connection Rate Limit field, type a number that specifies the number of new connections accepted per second for the node.
-
From the Address Type list, select whether the node resolves to an IPv4 or IPv6 address. The default is IPv4.
-
From the Auto Populate list, select Enabled. The options are:
|
Enabled |
The system automatically creates ephemeral nodes using the IP addresses returned by the resolution of a DNS query for the FQDN, that is, for each DNS entry of the resolved FQDN. |
|
Disabled |
The system automatically creates a node that corresponds to the IP address of only the first DNS entry of the resolved FQDN. |
-
In the Interval field, choose one of the following options:
-
Type the number of seconds the system should wait before the system creates new ephemeral nodes or deletes expired ephemeral nodes based on the IP addresses returned in response to a DNS query for the FQDN of the node.
-
Check the ****Use TTL checkbox to use the TTL of the IP address in the DNS response.
-
-
In the Down Interval field, type the number of seconds the system waits to mark an FQDN node down following a DNS query failure.
-
Click Finished.
The screen refreshes, and the new node appears in the node list.
Before creating a pool, determine the servers that you want to add to the pool using a fully-qualified domain name (FQDN).
Ensure that your DNS servers return all available IP addresses, instead of just one IP address.
When you want the BIG-IP system to automatically update pool members as you make changes to the IP addresses of servers in your network, you can create a pool of servers that are identified by FQDNs.
-
On the Main tab, click Local Traffic > Pools.
The Pool List screen opens.
-
Click Create.
The New Pool screen opens.
-
In the Name field, type a unique name for the pool.
-
For the Health Monitors setting, from the Available list, select a monitor and move the monitor to the Active list.
Note: A pool containing nodes represented by FQDNs cannot be monitored by
inbandorsaspmonitors. -
From the Load Balancing Method list, select how the system distributes traffic to members of this pool.
The default is Round Robin.
-
In the New Members setting, add at least one node with a static IP address. This node serves as a fallback if a DNS query returns no records for the nodes identified by FQDNs.
-
Select Node List.
-
From the Address list, select a node identified by a static IP address.
-
From the Service Port list, make a selection.
-
Click Add.
-
-
In the New Members setting, add the members that you want to include in the pool using FQDNs.
-
Select FQDN Node List.
-
From the Address list, select a node identified by an FQDN.
-
Make a selection from the Service Port list.
-
-
In the Auto Populate setting, select Enabled. The options are:
|
Enabled |
The system generates an ephemeral node for each IP address returned in response to a DNS query for the FQDN of the node. Additionally, when a DNS response indicates the IP address of an ephemeral node no longer exists, the system deletes the ephemeral node. |
|
Disabled |
The system selects the first address and generates an ephemeral for that address. |
-
Click Add.
-
Repeat steps 7-9 to add additional members to the pool.
-
Click Finished.
The screen refreshes, and you see the new pool in the Pool list.
When you change the configuration of a fully-qualified domain name (FQDN) pool member or node, any ephemeral pool members or nodes that the BIG-IP system created based on the IP addresses returned in a DNS response for that FQDN are automatically modified, as well. For example, if you change the monitor on an FQDN node, the system automatically changes the monitor assigned to the ephemeral nodes associated with that node.
When you want to modify an FQDN pool member or node, but you want persistent and active connections to be completed before the BIG-IP system marks the pool member or node as down, disable the pool member or node first, and then make modifications.
Determine the node that you want to disable.
You can disable a node when you want to make changes to your network, but you want persistent and active connections to be completed before the BIG-IP system marks the node as down.
-
On the Main tab, click Local Traffic > Nodes.
The Node List screen opens.
-
In the Name column, click a node name.
-
In the State area, click Disabled (Only persistent or active connections allowed).
Note: You can only disable the parent FQDN node or pool member. After disabling, the ephemeral dependents are then disabled, but you cannot directly disable an ephemeral node.
-
Click Update.
The screen refreshes, and the status in the Availability area changes.
Determine the pool member that you want to disable. You can only disable a parent fully-qualified domain name (FQDN) node or pool member. The ephemeral dependents are then disabled. You cannot directly disable the ephemerals.
Disable a pool member when you want to make changes to your network, but you want persistent and active connections to be completed before the BIG-IP system marks the pool member as down.
-
On the Main tab, click Local Traffic > Pools.
The Pool List screen opens.
-
Click a pool name in the Pool List.
-
On the menu bar, click Members.
-
In the Member list, select the relevant pool member.
-
In the State area, click Disabled (Only persistent or active connections allowed).
-
Click Update.
The screen refreshes, and the status in the Availability area changes.
You can view statistics about pool members and nodes identified by host names.
Ensure that at least one LTM node exists on the BIG-IP system.
You can view statistics for an LTM node when you want to analyze BIG-IP system traffic.
-
On the Main tab, click Statistics > Module Statistics > Local Traffic.
The Local Traffic statistics screen opens.
-
From the Statistics Type list, select Nodes.
Information displays about the node.
Ensure that at least one LTM node exists on the BIG-IP system.
When you want to analyze how the BIG-IP system is handling traffic, you can view statistics for pools and pool members, including the ephemeral pools created when the pool member is identified by a fully-qualified domain name (FQDN) and Auto Populate is enabled for the pool member.
-
On the Main tab, click Statistics > Module Statistics > Local Traffic.
The Local Traffic statistics screen opens.
-
From the Statistics Type list, select Pools.
Information displays about the pools configured on the BIG-IP system. The ephemeral pool members are shown indented below their parent pool member and with two dashes preceding the pool member name.