Updated Date: 07/07/2026
Creating a Basic Web Site and E-commerce Configuration
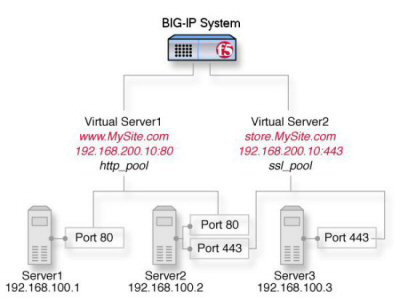
The most common use for the BIG-IP system is distributing traffic across an array of web servers that host standard web traffic, including eCommerce traffic. The following illustration shows a configuration where a BIG-IP system load balances two sites: www.siterequest.com and store.siterequest.com. The www.siterequest.com site provides standard web content, and the store.siterequest.com site is the e-commerce site that sells items to www.siterequest.com customers.
You can implement a basic configuration for load balancing application traffic to a web site, as well as load balancing secure traffic to an eCommerce site.
Before you use this implementation:
- Verify that you have created two VLANs on the BIG-IP system. One VLAN should reside on the external network and another on the internal network.
- Verify that you have created a self IP address for each VLAN.
You can create a pool of web servers to process HTTP requests.
-
On the Main tab, click Local Traffic > Pools.
The Pool List screen opens.
-
Click Create.
The New Pool screen opens.
-
In the Name field, type a unique name for the pool.
-
For the Health Monitors setting, from the Available list, select the http monitor and move the monitor to the Active list.
-
From the Load Balancing Method list, select how the system distributes traffic to members of this pool.
The default is Round Robin.
-
For the Priority Group Activation setting, specify how to handle priority groups:
- Select Disabled to disable priority groups. This is the default option.
- Select Less than, and in the Available Members field type the minimum number of members that must remain available in each priority group in order for traffic to remain confined to that group.
-
Using the New Members setting, add each resource that you want to include in the pool:
-
Type an IP address in the Address field.
-
Type
80in the Service Port field, or select HTTP from the list. -
(Optional) Type a priority number in the Priority field.
-
Click Add.
-
-
Click Finished.
The new pool appears in the Pools list.
You can create a pool (a logical set of devices, such as web servers, that you group together to receive and process HTTPS traffic) to efficiently distribute the load on your server resources.
-
On the Main tab, click Local Traffic > Pools.
The Pool List screen opens.
-
Click Create.
The New Pool screen opens.
-
In the Name field, type a unique name for the pool.
-
For the Health Monitors setting, assign https or https_443 by moving it from the Available list to the Active list.
-
From the Load Balancing Method list, select how the system distributes traffic to members of this pool.
The default is Round Robin.
-
For the Priority Group Activation setting, specify how to handle priority groups:
- Select Disabled to disable priority groups. This is the default option.
- Select Less than, and in the Available Members field type the minimum number of members that must remain available in each priority group in order for traffic to remain confined to that group.
-
Use the New Members setting to add each resource that you want to include in the pool:
-
In the Address field, type an IP address.
-
In the Service Port field type
443, or select HTTPS from the list. -
(Optional) Type a priority number in the Priority field.
-
Click Add.
-
-
Click Finished.
The HTTPS load balancing pool appears in the Pool List screen.
You can create a virtual server to manage HTTP traffic as either a host virtual server or a network virtual server.
-
On the Main tab, click Local Traffic > Virtual Servers.
The Virtual Server List screen opens.
-
Click Create.
The New Virtual Server screen opens.
-
In the Name field, type a unique name for the virtual server.
-
For the Destination Address/Mask setting, confirm that the Host button is selected, and type the IP address in CIDR format.
The supported format is address/prefix, where the prefix length is in bits. For example, an IPv4 address/prefix is
10.0.0.1or10.0.0.0/24, and an IPv6 address/prefix isffe1::0020/64or2001:ed8:77b5:2:10:10:100:42/64. When you use an IPv4 address without specifying a prefix, the BIG-IP system automatically uses a/32prefix.Note: The IP address you type must be available and not in the loopback network.
-
In the Service Port field, type
80, or select HTTP from the list. -
From the HTTP Profile list, select http.
-
From the HTTP Compression Profile list, select one of the following profiles:
- httpcompression
- wan-optimized-compression
- A customized profile
-
From the Web Acceleration Profile list, select one of the following profiles:
- optimized-acceleration
- optimized-caching
- webacceleration
- A customized profile
-
In the Resources area of the screen, from the Default Pool list, select the relevant pool name.
-
Click Finished.
The HTTP virtual server appears in the list of existing virtual servers on the Virtual Server List screen.
You can specify a virtual server to be either a host virtual server or a network virtual server to manage HTTPS traffic.
-
On the Main tab, click Local Traffic > Virtual Servers.
The Virtual Server List screen opens.
-
Click Create.
The New Virtual Server screen opens.
-
In the Name field, type a unique name for the virtual server.
-
For the Destination Address/Mask setting, confirm that the Host button is selected, and type the IP address in CIDR format.
The supported format is address/prefix, where the prefix length is in bits. For example, an IPv4 address/prefix is
10.0.0.1or10.0.0.0/24, and an IPv6 address/prefix isffe1::0020/64or2001:ed8:77b5:2:10:10:100:42/64. When you use an IPv4 address without specifying a prefix, the BIG-IP system automatically uses a/32prefix.Note: The IP address you type must be available and not in the loopback network.
-
Type
443in the Service Port field, or select HTTPS in the list. -
Select http in the HTTP Profile list.
-
From the HTTP Compression Profile list, select one of the following profiles:
- httpcompression
- wan-optimized-compression
- A customized profile
-
From the Web Acceleration Profile list, select one of the following profiles:
- optimized-acceleration
- optimized-caching
- webacceleration
- A customized profile
-
For the SSL Profile (Client) setting, from the Available list, select clientssl, and using the Move button, move the name to the Selected list.
-
Click Finished.
The HTTPS virtual server appears in the Virtual Server List screen.