Updated Date: 07/07/2026
Implementing External Cryptographic Server Offload with BIG-IP Systems
You can offload cryptographic operations to an external BIG-IP system. For example, you can set up an LTM VE instance (the crypto client) to offload cryptographic operations, such as an RSA decryption operation for an SSL handshake, to an external BIG-IP system (the crypto server) that supports crypographic hardware acceleration.
In general, the setup process includes configuring a client BIG-IP system as a crypto client and a server BIG-IP system as a crypto server, and ensures secure communication between the end user, the crypto client, and the crypto server.
Important: Both the crypto client and crypto server must be running BIG-IP software version 11.6.0 or later.
Important: Before you perform the tasks in this implementation, verify that each BIG-IP system has the default device certificate, default.crt, installed on it. For more information about device certificates, see BIG-IP Digital Certificates: Administration.
This illustration depicts an external cryptographic offload configuration.
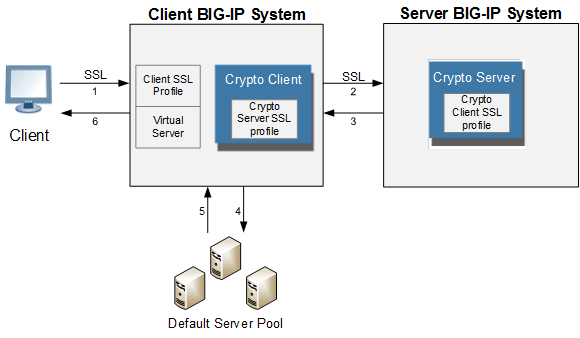
The illustration shows the BIG-IP configuration objects that are required for implementing the external cryptographic server offload feature, as well as the flow of client traffic that occurs. In the illustration, one BIG-IP system includes a virtual server configured with the destination IP address for application traffic coming from a client system. Because the client traffic uses SSL, the BIG-IP system with the virtual server must include a standard Client SSL profile, which causes cryptographic functions to be offloaded from the selected destination server (pool member) to that BIG-IP system.
Once this BIG-IP system has assumed cryptographic functions from the destination server, the BIG-IP system can offload these functions to another BIG-IP system to handle the actual cryptographic processing. To enable the BIG-IP system to offload the cryptographic processing to another BIG-IP system, you must designate the two BIG-IP systems as a crypto client and crypto server, and you must create an SSL profile on each system that is optimized for BIG-IP-to-BIG-IP cryptographic processing (a crypto-optimized Server SSL profile for the BIG-IP crypto client and crypto-optimized Client SSL profile for the BIG-IP crypto server).
You create a Client SSL profile on a client BIG-IP system to authenticate and decrypt/encrypt client-side application traffic.
-
On the Main tab, click Local Traffic > Profiles > SSL > Client.
The Client SSL profile list screen opens.
-
Click Create.
The New Client SSL Profile screen opens.
-
Configure all profile settings as needed.
-
Click Finished.
After you create the Client SSL profile, you assign the profile to a virtual server. The BIG-IP system can apply SSL security to the type of application traffic for which the virtual server is configured to listen.
You can create a pool of servers on a client BIG-IP system that you can group together to receive and process traffic.
-
On the Main tab, click Local Traffic > Pools.
The Pool List screen opens.
-
Click Create.
The New Pool screen opens.
-
In the Name field, type a unique name for the pool.
-
Using the New Members setting, add each resource that you want to include in the pool:
-
(Optional) In the Node Name field, type a name for the node portion of the pool member.
-
In the Address field, type an IP address.
-
In the Service Port field, type a port number, or select a service name from the list.
-
(Optional) In the Priority field, type a priority number.
-
Click Add.
-
-
Click Finished.
A virtual server represents a destination IP address for application traffic on a client BIG-IP system.
-
On the Main tab, click Local Traffic > Virtual Servers.
The Virtual Server List screen opens.
-
Click Create.
The New Virtual Server screen opens.
-
In the Name field, type a unique name for the virtual server.
-
In the Destination Address/Mask field:
- If you want to specify a single IP address, confirm that the Host button is selected, and type the IP address in CIDR format.
- If you want to specify multiple IP addresses, select the Address List button, and confirm that the address list that you previously created appears in the box.
The supported format is address/prefix, where the prefix length is in bits. For example, an IPv4 address/prefix is
10.0.0.1or10.0.0.0/24, and an IPv6 address/prefix isffe1::0020/64or2001:ed8:77b5:2:10:10:100:42/64. When you use an IPv4 address without specifying a prefix, the BIG-IP system automatically uses a/32prefix.
Note: The IP address or addresses for this field must be on the same subnet as the external self-IP address.
-
In the Service Port field:
- If you want to specify a single service port or all ports, confirm that the Port button is selected, and type or select a service port.
- If you want to specify multiple ports other than all ports, select the Port List button, and confirm that the port list that you previously created appears in the box.
-
In the Resources area of the screen, from the Default Pool list, select the relevant pool name.
-
For the SSL Profile (Client) setting, from the Available list, select the name of the Client SSL profile you previously created and move the name to the Selected list.
With a Server SSL profile, a client BIG-IP system can perform decryption and encryption for server-side SSL traffic.
-
On the Main tab, click Local Traffic > Profiles > SSL > Server.
The Server SSL profile list screen opens.
-
Click Create.
The New Server SSL Profile screen opens.
-
In the Name field, type a unique name for the profile.
-
Select crypto-client-default-serverssl in the Parent Profile list.
-
Modify the settings, as required.
-
Click Finished.
You can create a crypto client object to enable a BIG-IP system to act as a crypto client for external cryptographic server offload.
-
On the Main tab, click System > Crypto Offloading > Crypto Client.
The Crypto Client screen displays a list of crypto clients configured on the system.
-
Click Create.
-
In the Name field, type a unique name for the crypto client object.
-
In the Address field, type the IP address of the crypto server that you want to use for the crypto server object.
-
In the Service Port field, type a port number, or select a service name from the list.
-
In the TCP Profiles field, select tcp.
-
For the SSL Profiles setting, select the Server SSL profile that you previously created.
You create a Client SSL profile on a server BIG-IP system to authenticate and decrypt/encrypt application traffic from the client BIG-IP system.
-
On the Main tab, click Local Traffic > Profiles > SSL > Client.
The Client SSL profile list screen opens.
-
Click Create.
The New Client SSL Profile screen opens.
-
Select crypto-server-default-clientssl in the Parent Profile list.
-
Configure all profile settings as needed.
-
Click Finished.
You can create a crypto server object to enable your BIG-IP system to act as a crypto server for external cryptographic server offload.
-
On the Main tab, click System > Crypto Offloading > Crypto Server.
The Crypto Server screen displays a list of crypto servers configured on the system.
-
Click Create.
-
In the Name field, type a unique name for the crypto server object.
-
In the Address field, type the IP address you want to use for the crypto server object.
-
In the Service Port field, type a port number, or select a service name from the list.
-
In the TCP Profiles field, select tcp.
-
For the SSL Profiles setting, select the Client SSL profile that you previously created.
-
Using the Crypto Client List setting, add the crypto clients that can access the crypto server:
-
In the Address field, type a crypto client self IP address.
-
Click Add.
-
After the client and server BIG-IP systems have processed traffic, you can use tmsh to verify that the crypto client and crypto server systems are functioning properly.
-
Open the TMOS Shell (
tmsh).tmsh -
Verify that the crypto client is functioning.
show sys crypto client <crypto_client_name>
A summary similar to this example displays:
`-------------------------- Sys::Crypto Client: crypto_client_name -------------------------- Received Packets 2 Received Bytes 48 Transmitted Packets 2 Transmitted Bytes 40` -
Verify that the crypto server is functioning.
show sys crypto server <crypto_server_name>
A summary similar to this example displays:
`--------------------------
Sys::Crypto Server: crypto_server_name
--------------------------
  Received Packets      2
  Received Bytes       40
  Transmitted Packets   2
  Transmitted Bytes    48`