Updated Date: 07/07/2026
Configuring Geo-Redundancy on a BIG-IP system
You can configure Geo-Redundancy on a BIG-IP system to provide session DB replication between different device service clusters irrespective of amount of physical or virtual devices in each data center. For the replication infrastructure, F5 uses open source Apache Kafka.
There is a limit to the replication of only Diameter persistence entries and rule tables created on the session DB. There is no support for a VIPRION chassis and multi-blade virtual clustered multiprocessing (vCMP) guests.
Support is limited to the Diameter protocol on the message routing framework (MRF).
There is no support for:
-
Multi-blade chassis. There is support for all other platforms: single blade appliance, virtual application delivery controllers (vADC), and virtual clustered multiprocessing (vCMP).
-
Active-active high availablity (HA). There is only support for an active-standby HA configuration.
-
IPv6 for management/Geo-Redundancy network.
-
Failback replication. Example: Entry X is created on site 1, gets replicated to site 2, and continues to get the updates from site 2. Upon failover, the entry X continues to be used and updated. When site 1 comes back up, entry X is replicated to site 1, but will not get any updates from site 2.
-
Only the session database entries have the eligible data allowed for synchronization between sites.
-
All entries need to be globally unique.
-
Only one owner per entry at any given time.
-
Some entries may be lost during the initialization, termination, or transition period.
When using high availability (HA), there is no concrete method to tell if the standby machine is configured correctly without any network issues. Do the following to confirm the setup is correct:
-
Verify the cm device name and hostname are the same for the iAppLX/HA setup.
-
Manually cycle all devices into an active state within a HA traffic group and verify that the watchdog state reports alive:
geodb -wWhen using iRule replication, each traffic group (example: site 1 clients and servers) uses its own unique prefix.
Order is not guaranteed between sites; a race condition is present if both sites are actively attempting to modify a given entry.
Recommendation: create tables on a per session and/or connection basis. Tables can contain information for multiple sessions, only if it is guaranteed by the end user that all session and/or connection with entries contained within the table failover and failback simultaneously. Otherwise, there is a high risk of data loss due to race conditions between sites.
table set -georedundancy [-notouch] [-mustexist|-excl] <key> <value> [<timeout> [<lifetime>]]

table add -georedundancy [-notouch] <key> <value> [<timeout> [<lifetime>]]

table replace -georedundancy [-notouch] <key> <value> [<timeout> [<lifetime>]]

table lookup -georedundancy [-notouch] <key>

table incr -georedundancy [-notouch] [-mustexist] <key> [<delta>]

table append -georedundancy [-notouch] [-mustexist] <key> <string>

table delete -georedundancy <key>|-all

table timeout -georedundancy [-remaining] <key>

table timeout -georedundancy <key> [<value>]

table lifetime -georedundancy [-remaining] <key>

table lifetime -georedundancy <key> [<value>] Geo-Redundancy does not replicate connection information. After failover or failback events, all nodes have to reestablish connections with the appropriate BIG-IP.
Geo-Redundancy guarantees via persistence mirroring that two nodes that have previously established a session will be reestablished. In critical environments, do not deploy Geo-Redundancy on its own; instead, to minimize interruptions, use to supplement F5’s high availability (HA) offering.
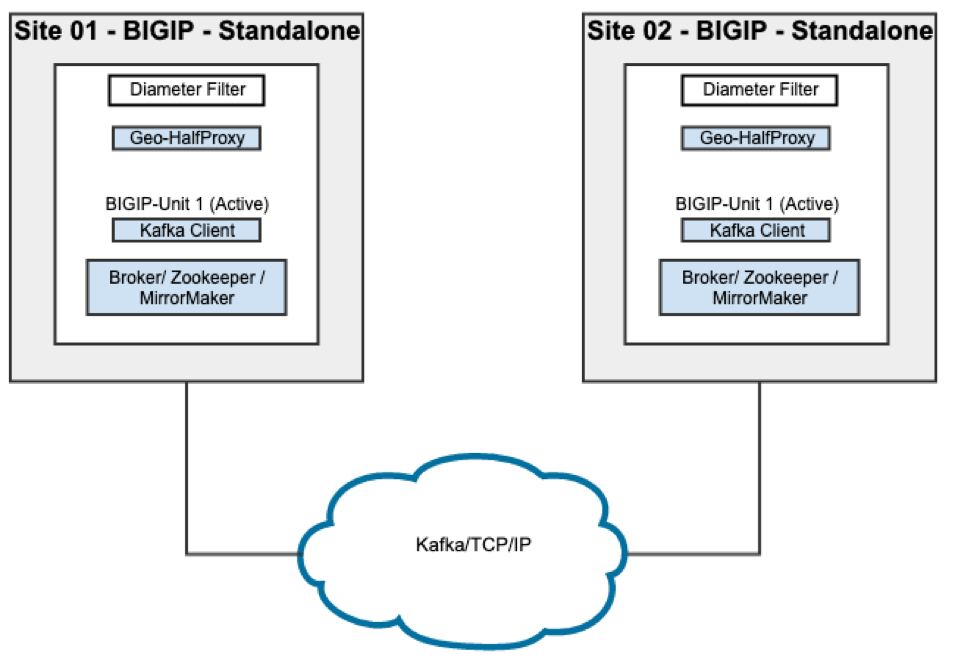
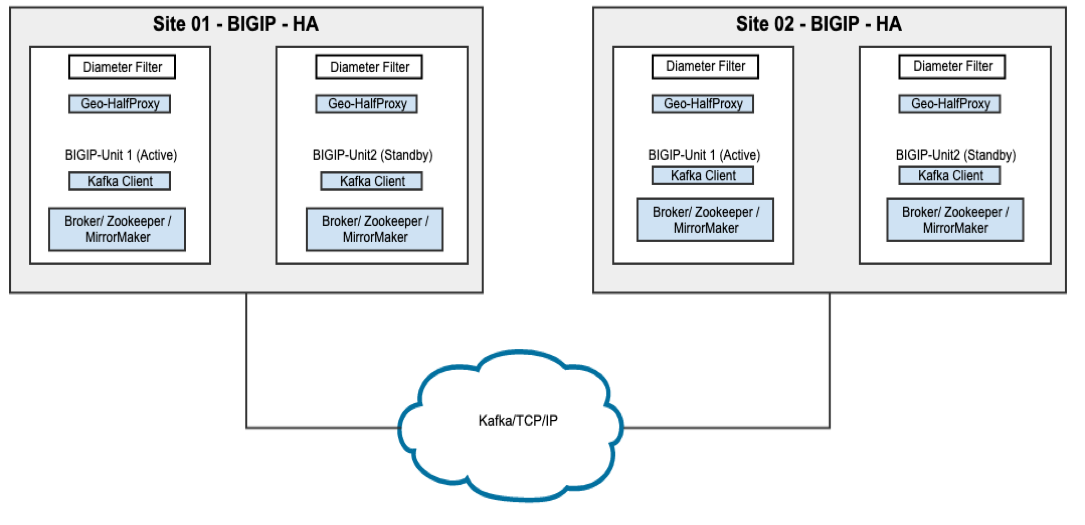
There are two configurations – (1) standalone site redundancy (Standalone) and (2) high availability (HA) redundancy – that support replication between two data centers.
Standalone consists of a single BIG-IP virtual edition (VE), iSeries appliance, or vCMP guest at each data center. Both devices are the same type and if configurable, have the same number of CPU cores dedicated to the instance.
In this example deployment, session DB persistence and iRule tables (with a specified prefix) are replicated between sites:
High availability (HA) consists of a pair of BIG-IP virtual edition (VE), iSeries appliance, or vCMP guest at each data center. Both devices are the same type and if configurable, have the same number of CPU cores dedicated to the instance.
There is a special consideration when using HA with vCMP guests: within a data center, mirroring is used to replicate all stateful connection contexts between active and next active. Session DB persistence and iRule tables are replicated by Geo-Redundancy functionality between the pair of HA pairs:
Create a dedicated VLAN and self IPs (also known as Geosync IPs) to use only for Geo-Redundancy traffic.
-
Create a dedicated VLAN and self IPs to use only for Geo-Redundancy traffic.
-
A floating IP at each site, shared between the traffic group of the HA members.
-
The device name of all instances must match the host name.
-
Set Sync Type to Automatic with Incremental Sync.
-
Confirm mirroring is enabled for virtual servers and routing profiles.
Important: Set Port Lockdown to Allow All for the floating IP used for Geo-Redundancy traffic.
Before installing iAppLX, create, configure, and add a Geo-Redundancy profile to virtual servers.
Important: There is support for only one Geo-Redundancy profile in addition to the default profile.
If not using iRule table replication between sites, ignore the prefix. Read and write broker lists are swapped between sites.
-
Site 01
ltm profile georedundancy geo { prefix { sea_, bel_ } read-broker-list seattle:127.0.0.1:9192 remote-site-id bellevue transport-name tcp write-broker-list seattle:127.0.0.1:9192 } -
Site 02
ltm profile georedundancy geo { prefix { sea_, bel_ } read-broker-list bellevue:127.0.0.1:9192 remote-site-id seattle transport-name tcp write-broker-list bellevue:127.0.0.1:9192 } -
Confirm the Geo-Redundancy profile is added to the virtual server along with the Diameter and TCP profiles.
-
Site 0x
Example profile names: dia_vip, dia_router, dia_session, and geo.

ltm virtual dia_vip {
    destination 10.xxx.xxx.xxx:diameter
    ip-protocol tcp
    mask 255.255.255.255
    profiles {
        dia_router { }
        dia_session { }
        geo { }
        tcp { }
     }
source 0.0.0.0/0
source-address-translation {
     type automap
     }
     translate-address enabled
     translate-port enabled
     vs-index 2
}
Important: Perform steps 2-11 (below) on both BIG-IP systems.
-
Download the most recent rpm file:
https://downloads.f5.com/esd/product.jsp?sw=BIG-IP&pro=iAppLX_Templates
-
Log in to the first BIG-IP.
-
Type your Username and Password.
-
On the Main tab, click iApps > Package Management LX
The Package Management LX list opens.
-
Click Import.
-
For the File Name setting, click Browse.
-
Navigate to the rpm file (downloaded above in step 1).
-
Click Open.
-
In the Import Package area, click Upload.
-
On the Main tab, click iApps > Application Services > Applications LX.
The Application Services List opens.
-
Click Geo-Redundancy Configuration Wizard.
The Geo-Redundancy screen opens.
-
For the first BIG-IP, type a unique Site Name (Example: seattle), and a Geosync IP address on the VLAN previously created for the Geo-Redundancy.
-
Click Apply Changes.
-
For the second BIG-IP, type a unique Site Name (Example: bellevue), and a Geosync IP address on the VLAN previously created for the Geo-Redundancy.
-
Click Apply Changes.
-
On the first BIG-IP (Example: seattle), click Add.
-
For the second BIG-IP (Example: bellevue), type the Management IP, Management Port, Username, and Password.
-
Click Add. The spinner starts.
-
After the spinner finishes, confirm there are four red status indicators for Daemons and Connection, two for each BIG-IP.
-
Complete Prerequisites for Standalone and High Availability - both sections. After 1-3 minutes, confirm all four of the status indicators are green.
Note: If the status indicators are not green, verify the installation and configuration are correct. You may also want to refer to one of the Verify sections: Verify the system state - Standalone and Verify the configuration - High availability.
Example configuration:
- Four BIG-IPs in two HA pairs: bigip1, bigip2, bigip3, and bigip4.
- bigip3 is the standby for active bigip1.
- bigip4 is the standby for active bigip2.
- Confirm the high availability (HA) connection using the REST API call:
restcurl shared/resolver/device-groups/tm-shared-all-big-ips/devices | grep managementAddress
A successful execution of the command line results in two management addresses that are part of the device group in a HA setup.
-
On the active machine (Example: bigip1), configure iAppLX. Refer to the steps above for Configure iAppLX – Standalone.
-
After completion of the configuration of iAppLX on the active machine, confirm iAppLX is automatically deployed to the standby BIG-IPs:
- On the Main tab, click: iApps > Application Services. The Application Service List Screen opens.
- Geo-Redundancy is the first name in the in the list and the Status is Green.
-
On the active machine, on the Main tab, click iApps > Application Services > Applications LX.
The Application LX list opens.
-
Click Geo-Redundancy Configuration Wizard..
The Geo-Redundancy screen opens.
-
Type a Site Name and Geosync IP.
For the Virtual IP, use the floating address of the VLAN dedicated to Geo-Redundancy.
Note: Only type the address of the first BIG-IP, the one below will mirror it.
-
Confirm the standby machine has the correct settings for the Site Name and Geosync IP.
-
Add a Geo-Redundancy profile to the configuration on each active BIG-IP:
Create georedundancy profile on seattle active
tmsh create ltm profile georedundancy georedundancy_iAppLX {   app-service
none    description "Updated by Georedundancy Application"   group-id
anything    ocal-site-id seattle    read-broker-list seattle:127.0.0.1:9192
remote-site-id bellevue    write-broker-list seattle:127.0.0.1:9192 }
Create georedundancy profile on bellevue active
tmsh create ltm profile georedundancy georedundancy_iAppLX { app-service none description "Updated by Georedundancy Application" group- id anything local-site-id bellevue read-broker-list bellevue:127.0.0.1:9192 remote-site-id seattle write-broker-list bellevue:127.0.0.1:9192 } -
Confirm the Geo-Redundancy profile is synched to the standby machines.
Example output for all four BIG-IPs (may vary - example only):
# tmsh list ltm profile georedundancy all-properties ltm profile georedundancy georedundancy { app-service none defaults-from none description none group-id none local-site-id local_site message-send-max-retries 10 message-timeout-ms 30000 metadata-refresh-interval-ms 50 partition Common prefix none read-broker-list none remote-site-id remote_site transport-name tcp write-broker-list none } ltm profile georedundancy georedundancy_iAppLX { app-service none defaults-from georedundancy description "Updated by Georedundancy Application" group-id anything local-site-id seattle message-send-max-retries 10 message-timeout-ms 30000 metadata-refresh-interval-ms 50 partition Common prefix none read-broker-list seattle:127.0.0.1:9192 remote-site-id bellevue transport-name tcp write-broker-list seattle:127.0.0.1:9192 } -
Add a node, pool, peer, route, router, and session to each active BIG-IP. This will have the address of the test client/server.
Run the code on both active BIG-IPs:
Run on actives: tmsh create ltm node /Common/cs { address 10.126.2.11 } tmsh create ltm pool /Common/dia_pool { members replace-all-with { /Common/cs:3868 { address 10.126.2.11 } } } tmsh create ltm message-routing diameter peer /Common/dia_peer { pool /Common/dia_pool } tmsh create ltm message-routing diameter route /Common/dia_route { peers { /Common/dia_peer } } tmsh create ltm message-routing diameter profile router /Common/dia_router app-service none defaults- from /Common/diameterrouter ignore-peer-port disabled mirror enabled routes replace-all-with { /Common/dia_route } tmsh create ltm message-routing diameter profile session /Common/dia_session { app-service none defaults- from /Common/diametersession watchdog-timeout 0 } Verify on all: tmsh list ltm node tmsh list ltm pool tmsh list ltm message-routing diameter Output: [root@bigip1:Active:In Sync] config # tmsh list ltm node ltm node cs { address 10.126.2.11 } [root@bigip1:Active:In Sync] config # tmsh list ltm pool ltm pool dia_pool { members { cs:diameter { address 10.126.2.11 } } } [root@bigip1:Active:In Sync] config # tmsh list ltm message-routing diameter ltm message-routing diameter peer dia_peer { pool dia_pool } ltm message-routing diameter profile router dia_router { app-service none defaults-from diameterrouter ignore-peer-port disabled mirror enabled routes { dia_route } } ltm message-routing diameter profile session dia_session { app-service none defaults-from diametersession watchdog-timeout 0 } ltm message-routing diameter route dia_route { peers { dia_peer } } -
Create a virtual address on each active machine on the external network:
On seattle active: # tmsh create ltm virtual-address /Common/10.126.1.100 { address 10.126.1.100 arp enabled mask 255.255.255.255 traffic-group /Common/traffic-group-1 } From seattle standby: # tmsh list ltm virtual-address ltm virtual-address 10.126.1.100 { address 10.126.1.100 mask 255.255.255.255 traffic-group traffic-group-1 } On bellevue active: # tmsh create ltm virtual-address /Common/10.126.1.101 { address 10.126.1.101 arp enabled mask 255.255.255.255 traffic-group /Common/traffic-group-1 } from bellevue standby: # tmsh list ltm virtual-address ltm virtual-address 10.126.1.101 { address 10.126.1.101 mask 255.255.255.255 traffic-group traffic-group-1 } -
Create a virtual server on each active BIG-IP:
On seattle active: tmsh create ltm virtual /Common/dia_vip { destination /Common/10.126.1.100:3868 ip-protocol tcp mask 255.255.255.255 mirror enabled profiles replace-all-with { /Common/dia_router { } /Common/dia_session { } /Common/georedundancy_iAppLX { } /Common/tcp { } } source 0.0.0.0/0 source-address-translation { type automap } translate- address enabled translate-port enabled } From seattle standby: tmsh list ltm virtual ltm virtual dia_vip { creation-time 2019-11-14:10:57:12 destination 10.126.1.100:diameter ip-protocol tcp last-modified-time 2019-11-14:10:57:12 mask 255.255.255.255 mirror enabled profiles { dia_router { } dia_session { } georedundancy_iAppLX { } tcp { } } serverssl-use-sni disabled source 0.0.0.0/0 source-address-translation { type automap } translate-address enabled translate-port enabled vs-index 2 } On bellevue active: tmsh create ltm virtual /Common/dia_vip { destination /Common/10.126.1.101:3868 ip-protocol tcp mask 255.255.255.255 mirror enabled profiles replace-all-with { /Common/dia_router { } /Common/dia_session { } /Common/georedundancy_iAppLX { } /Common/tcp { } } source 0.0.0.0/0 source-address-translation { type automap } translate- address enabled translate-port enabled } From bellevue standby: tmsh list ltm virtual ltm virtual dia_vip { creation-time 2019-11-14:10:59:10 destination 10.126.1.101:diameter ip-protocol tcp last-modified-time 2019-11-14:10:59:10 mask 255.255.255.255 mirror enabled profiles { dia_router { } dia_session { } georedundancy_iAppLX { } tcp { } } serverssl-use-sni disabled source 0.0.0.0/0 source-address-translation { type automap } translate-address enabled translate-port enabled vs-index 2 } -
Add the Active machine from Site 02 (Example: bellevue) to the Active machine of Site 01 (Example: seattle).
-
Confirm all four machines are now visible from all four machines.
For help to get to the correct location to confirm, refer to: Configure iAppLX: Standalone, complete steps 10-19.
-
Copy the rpm to the packageFilePath.
-
Install the iApp package:
POST /mgmt/shared/iapp/package-management-tasks/ Payload {"operation": "INSTALL", "packageFilePath": /var/config/rest/downloads/geoRedundancy-xxx.el6.noarch.rpm} -
Check status until FINISHED. Run a query and grab the package ID:
POST /mgmt/shared/iapp/package-management-tasks/ {"operation": "QUERY", "packageName":"geoRedundancy-xxx.el6.noarch.rpm"} -
Periodically poll the installation status: The initial status is CREATED, then it is STARTED, and finally FINISHED. It will take some time to see the FINISHED status.
GET /mgmt/shared/iapp/package-management-tasks/<packageid> Response: { "endTime": "2019-03-15T09:57:40.334-0700", "generation": 3, "id": "d4ce4ae1-cd25-4f4c-9b15-750fb8aa54b1", "identityReferences": [ { "link": "https://localhost/mgmt/shared/authz/users/admin" } ], "kind": "shared:iapp:package-management- tasks:iapppackagemanagementtaskstate", "lastUpdateMicros": "1552669060334102L", "operation": "INSTALL", "ownerMachineId": "a9635f6c-57e7-4d2f-8aab-fb876f59a448", "packageFilePath": "/var/config/rest/downloads/geoRedundancy- xxx.el6.noarch.rpm", "packageManifest": { "tags": [ "IAPP" ] }, "packageName": "geoRedundancy-xxx.el6.noarch", "selfLink": "https://localhost/mgmt/shared/iapp/package-management- tasks/d4ce4ae1-cd25-4f4c-9b15-750fb8aa54b1", "startTime": "2019-03-15T09:57:38.714-0700", "status": "FINISHED", "userReference": { "link": "https://localhost/mgmt/shared/authz/users/admin" } } -
Get the Geo app block:
Important: There are two types of blocks: (1) Template (state TEMPLATE) and (2) Geo App block (state UNBOUND). The relevant one is the second block (2). After installation finishes, both blocks may not instantly display, so it is necessary to poll the block for a few seconds.
GET /mgmt/shared/iapp/blocks/ Response: { "generation": "355", "items": [ { "audit": { "intervalSeconds": "0", "policy": "ENFORCE_CONFIGURED" }, "configProcessorAffinity": { "affinityProcessorReference": { "link": "https://localhost/mgmt/shared/iapp/processors/affinity/load-balanced" }, "processorPolicy": "LOAD_BALANCED" }, "configProcessorTimeoutSeconds": "30", "configurationProcessorReference": { "link": "https://localhost/mgmt/shared/iapp/geoRedundancy" }, "dataProperties": [], "generation": "82", "id": "35a3ef16-ad5f-3ffe-b373-fd6833a1cab8", "inputProperties": [], "kind": "shared:iapp:blocks:blockstate", "lastUpdateMicros": "1552669060210739L", "name": "Geo Redundancy", "presentationHtmlReference": { "link": "https://localhost/iapps/geoRedundancy/index.html" }, "selfLink": "https://localhost/mgmt/shared/iapp/blocks/35a3ef16-ad5f-3ffe-b373-fd6833a1cab8", "sourcePackage": { "packageName": "geoRedundancy-xxx.el6.noarch" }, "state": "TEMPLATE", "statsProcessorTimeoutSeconds": "15" }, { "audit": { "intervalSeconds": "0", "policy": "ENFORCE_CONFIGURED" }, "baseReference": { "link": "https://localhost/mgmt/shared/iapp/blocks/35a3ef16-ad5f-3ffe-b373-fd6833a1cab8" }, "configProcessorAffinity": { "affinityProcessorReference": { "link": "https://localhost/mgmt/shared/iapp/processors/affinity/load-balanced" }, "processorPolicy": "LOAD_BALANCED" }, "configProcessorTimeoutSeconds": "30", "configurationProcessorReference": { "link": "https://localhost/mgmt/shared/iapp/geoRedundancy" }, "dataProperties": [], "generation": "1", "id": "427bf981-b20d-42f2-8ebc-fc00afc42c13", "inputProperties": [], "kind": "shared:iapp:blocks:blockstate", "lastUpdateMicros": "1552669064156058L", "name": "Geo Redundancy", "presentationHtmlReference": "link": "https://localhost/iapps/geoRedundancy/index.html" }, "selfLink": "https://localhost/mgmt/shared/iapp/blocks/427bf981-b20d-42f2-8ebc-fc00afc42c13", "state": "UNBOUND", "statsProcessorTimeoutSeconds": "15" } ], "kind": "shared:iapp:blocks:blockcollectionstate", "lastUpdateMicros": "1552669064157492L", "selfLink": "https://localhost/mgmt/shared/iapp/blocks" } -
Deploy the iApp:
PATCH /mgmt/shared/iapp/blocks/<blockid> Payload {"state": "BINDING"} -
Check status until BOUND:
Important: It may take a few seconds to get into the BOUND state from BINDING. Keep polling the state.
GET /mgmt/shared/iapp/blocks/<blockid>The iApp is up and running. Next step: update the virtual and sitename for the local DeviceGroup in both BIG-IPs. Also get DeviceGroup Id from the DeviceGroupList.
-
Get DeviceGroupList:
GET /mgmt/shared/iapp/geoRedundancy/DeviceGroupList Response: { "generalConfig": { "deviceGroupList": [ { "deviceList": [ { "mgmtPort": "443", "virtualIpStatus": "", "mgmtIp": "10.xxx.xxx.xxx", "name": "bigip1", "currentSiteName": "", "local": true, "virtualPort": "9192", "virtualIp": "", "siteName": "", "currentVirtualPort": "", "changesPending": false, "managementStatus": "ok", "currentVirtualIp": "", "slotId": 0 } ], "username": "", "password": "", "id": 780098941, "type": "StandAlone" } ] }, "licensed": true, "updateSource": 780098941 } -
Update virtual and sitename.
After updating virtual and sitenames for both BIGIPs, add bigip2 from bigip1.
PUT /mgmt/shared/iapp/geoRedundancy/updateAndDistributeDeviceGroup/<DeviceGroupId> Payload: { "virtualIp": "10.xxx.xxx.xxx", "virtualPort": "9192" "siteName": "seattle" } Response: { "Status": "Success" } -
Add another BIG-IP:
GET
/mgmt/shared/iapp/geoRedundancy/remoteMachineInfo/10.144.xxx.xxx/443/<username>/<password>
Response:
{
    "deviceGroupList": [
	  {
	    "deviceList": [
		  {
		    "mgmtIp": "10.xxx.xxx.xxx",
			"mgmtPort": "443",
			"virtualIp": "10.xxx.xxx.xxx",
		    "currentVirtualIp": "10.xxx.xxx.xxx",
			"virtualPort": "9192",
			"currentVirtualPort": "9192",
			"name": "bigip1",
			"siteName": "seattle",
			"currentSiteName": "seattle",
			"local": true,
			"managementStatus": "ok",
			"virtualIpStatus": "",
			"slotId": 0
			}
		],
		"username": "",
		"password": "",
		"id": 412344416,
		"type": "StandAlone"
	  },
	  {
		"deviceList": [
		  {
		    "mgmtPort": "443",
			"virtualIpStatus": "",
			"mgmtIp": "10.yyy.yyy.yyy",
			"name": "bigip2",
			"currentSiteName": "bellevue",
			"local": false,
			"virtualPort": "9192",
			"virtualIp": "10.yyy.yyy.yyy",
		    "siteName": "bellevue",
			"currentVirtualPort": "9192",
			"changesPending": false,
			"managementStatus": "ok",
			"currentVirtualIp": "10.yyy.yyy.yyy",
			"slotId": 0
		   }
		 ],
		 "id": 780098941,
		 "type": "StandAlone"
		}
	  ]
       }
Both BIG-IPs are ready to receive traffic and replicate the session database.
-
To remove the Geo-Redundancy setup from the system, delete bigip2 from bigip1. Use step 12. (Delete the BIG-IP).
Then uninstall the iApp package from both BIG-IPs by following steps 13-15 (Undeploy the iApp, Delete the iApp, and Uninstall the iApp package).
-
Delete the BIG-IP:
PUT /mgmt/shared/iapp/geoRedundancy/deleteDeviceGroup/<DeviceGroupId>/client Payload: {"body": "empty"} -
Undeploy the iApp:
PATCH /mgmt/shared/iapp/blocks/<blockid>
		Payload: {"state": "UNBINDING"}
Important: Keep checking the state until it is UNBOUND.
-
Delete the iApp:
DELETE /mgmt/shared/iapp/blocks/<blockid> -
Uninstall the iApp package:
POST /mgmt/shared/iapp/package-management-tasks/
Payload: {"operation": "UNINSTALL", "packageName": geoRedundancy-
xxx.el6.noarch} //notice no .rpm at the end