


Updated Date: 07/07/2026
Configuring Credential Protection
You can use Access Policy Manager (APM) together with a DataSafe profile to protect logon credentials from potential man-in-the-middle attacks.
When you configure credential protection, credentials that users type on the login page are not visible in browser developer tools.
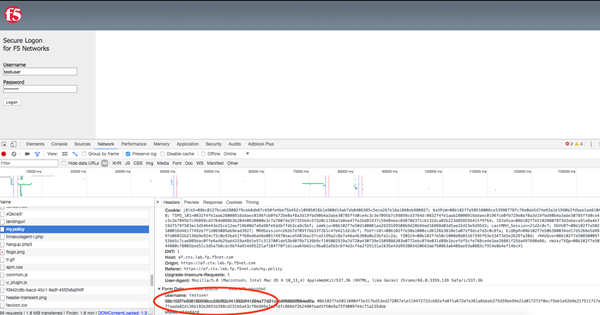
In the example shown here, the password variable name is obfuscated, and the password value is encrypted within the browser itself.
Here we describe how to add credential protection manually to a system that has an access policy with a logon page specified.
For a simpler, automated setup procedure, you can instead follow the steps in the Guided Configuration template for Credential Protection (Access > Guided Configuration). You can still customize the components when you use Guided Configuration.
To configure advanced credential protection on BIG-IP Access Policy Manager, you need to have Fraud Protection (FPS) provisioned.
You also need to have a system with
- A working access policy
- An access profile with a logon page for the policy
- An external virtual server with the access profile associated with it
For details on creating access policies, refer to the BIG-IP APM documentation on AskF5 at support.f5.com.
You create a service profile to connect Access Policy Manager with another F5 Module, in this case, to allow for credential protection using DataSafe in access policies.
-
On the Main tab, click Local Traffic > Profiles > Other > Service.
The Service profile list screen opens.
-
Click Create.
-
In the Name field, type
fps-service. -
For Parent Profile, leave it set to the default unless you want to inherit settings from another service profile. Then select the parent profile.
-
Click the Custom check box to enable settings.
-
From the Type list, select F5 Module to connect to another F5 service, in this case, Credential Protection.
-
Click Finished.
The fps-service profile is created. Later, you specify this service profile on the internal virtual server.
Next, you create a DataSafe profile.
To ensure proper application layer protection of logon credentials for Access Policy Manager, you need a DataSafe profile with a URL called /my.policy, and the profile cannot allow login if encryption fails.
To simplify your work, Access Policy Manager includes a default profile called access-logonpage-protection-datasafe that protects all Access logon pages. You can skip this task and just use the default. Here we show you where to find the profile, describe its contents, and mention settings that you can optionally edit.
-
On the Main tab, click Security > Data Protection > BIG-IP DataSafe.
The BIG-IP DataSafe screen opens.
-
In the list, click access-logonpage-protection-datasafe.
The DataSafe Profile Properties screen opens.
-
You can review and edit the properties, however, you can use this profile as is to protect logon credentials.
-
Optional: Click the Customize All check box to make the settings editable.
-
Optional: If you previously created a Log Publisher for a remote Syslog server, select it from the Log Publisher list.
-
Optional: If you previously created a Log Publisher for the local Syslog server, select it from the Local Log Publisher list.
-
You do not need to change any of the Advanced settings on the General Settings screen.
The paths in the Advanced settings are automatically generated and only need to be changed if they conflict with paths used by your application (which is highly unlikely).
Note: The default DataSafe profile does not treat URLs as case-sensitive, and the Advanced setting that controls this cannot be changed after the policy is created. If you want to make URLs case-sensitive, you need to create a new DataSafe profile. In the Advanced settings, select URLs are case sensitive.
-
Click URL List.
Important: The one URL listed
/my.policy*is required for logon protection in Access policies. Do not change it. -
Click /my.policy* to see how it is configured.
Values for username, password, _F5_challenge, and _F5_verify_password parameters are set to be encrypted and obfuscated.
-
In the my.policy URL, for the Parameters section, disable the Obfuscate for all paramaters.
-
On the left, click Advanced > Application Layer Encryption.
- Ensure the Advanced > Application Layer Encryption > Real-Time Encryption is enabled.
- Ensure the Advanced > Application Layer Encryption > HTML Field Obfuscation is disabled.
-
Copy the following function to General Settings > Advanced > Additional function to be run before JavaScript load:
function(C){
var org_submit = HTMLFormElement.prototype.submit;
HTMLFormElement.prototype.submit = function(){
var pass = this.elements.password;
var oldFormPass = document.forms[0].elements.__password;
if(pass && oldFormPass){
pass.setAttribute(’name’, ‘__’ + pass.name);
pass.value = oldFormPass.value;
}
return org_submit.apply(this, arguments)
}
}
-
Ensure that Allow Login on Encryption Failure is not selected.
Note: Clearing this option sets the DataSafe profile to fail-close. This means that if, during the submit operation, DataSafe is unable to encrypt or decrypt the protected fields, credential protection remains in effect for the current user session. Also, all subsequent operations of sending credentials will be encrypted.
Important: When this option is disabled as it is for credential protection, it increases the risk of user account lockout in case of encryption/decryption failure of user credentials.
-
If you changed any settings, click Save.
The DataSafe profile is saved.
You have viewed and optionally edited the default DataSafe profile that you can use for credential protection in Access policies. For more details on creating DataSafe profiles, refer to BIG-IP DataSafe Configuration.
Next, create an internal virtual server with which you associate the DataSafe profile and other profiles required for credential protection.
Before you can perform this task, you need to have created a service profile of type F5 Module.
An internal virtual server provides a method for sending a request to another service. On the BIG-IP system, you create an internal virtual server and assign the TCP, HTTP, and service profiles to set up credential protection.
-
On the Main tab, click Local Traffic > Virtual Servers.
The Virtual Server List screen opens.
-
Click Create.
The New Virtual Server screen opens.
-
In the Name field, type a name for the virtual server, such as
fps-service-vs. -
From the Type list, select Internal.
-
Next to Configuration, select Advanced to display additional options.
-
From the Protocol list, select TCP.
-
From the Protocol Profile (Client) list, select tcp.
-
From the HTTP Profile (client) list, select http.
-
From the Service Profile list, select fps-service, the service profile of type F5 Module created previously.
-
For Source Address Translation, select Automap.
-
Clear the Address Translation check box to disable it.
-
Clear the Port Translation check box to disable it.
-
Click Finished.
The internal virtual server for credential protection is created.
Next, you associate the DataSafe profile with the internal virtual server.
Part of configuring credential protection on Access Policy Manager requires that you associate a DataSafe profile with the internal virtual server you created. Here we associate the default DataSafe profile included with the system.
-
On the Main tab, click Local Traffic > Virtual Servers.
The Virtual Server List screen opens.
-
Click the internal virtual server created for credential protection, such as fps-service-vs.
-
On the menu bar, from the Security menu, choose Policies.
-
From the Anti-Fraud Profile list, select Enabled, and then from the Profile list, select access-logonpage-protection-datasafe, the default DataSafe profile (or one you created for credential protection).
-
Click Update to save the changes.
The DataSafe profile is associated with the internal virtual server.
Next, you create a connector profile to which you can associate the internal virtual server.
You create a connector profile to connect credential protection to both the internal and external virtual servers.
-
On the Main tab, click Local Traffic > Profiles > Other > Connector.
The New Connector Profile screen opens.
-
In the Name field, specify a unique name for the connector profile, such as
fps-connector. -
From the , or select another existing profile of the same type.
-
Click the Custom check box.
-
From the Entry Virtual Server list, select fps-service-vs, or the internal virtual server created for credential protection.
-
Use defaults for the other settings.
-
Click Finished.
The connector profile is created.
Next, you associate this connector profile with the standard (external) virtual server associated with the access profile.
You need to have a virtual server set up with an access profile associated with it. The access profile needs to have a logon page for an access policy.
You associate a connector profile with the standard (external) virtual server that requires credential protection.
-
On the Main tab, click Local Traffic > Virtual Servers.
The Virtual Server List screen opens.
-
Click the standard access policy virtual server that needs credential protection.
-
In the Configuration area, select Advanced.
-
From the Connector Profile list, select the profile you created for credential protection, such as fps-connector.
-
Click Update to save the changes.
The connector profile is associated with the external virtual server that is protected by an access policy. The logon page in the policy now has credential protection. The application is protected from man-in-the-middle attacks.
You can test whether the credentials are protected by inspecting the logon page while it is displayed in the browser. The credentials that users type on the login page are not visible in browser inspection tools.