Updated Date: 07/07/2026
Configuring Dynamic ACLs
You can apply ACLs by using the dynamic ACL action in an APM access policy. Sources of dynamic ACL entries are session variables that can contain data from external servers, such as Active Directory, RADIUS, or LDAP, or internal sources.
After you configure ACLs in a supported format, you can configure a dynamic ACL action to extract and use the ACLs.
A dynamic ACL is an ACL whose ACL entries are defined during access policy execution time, and the entries are stored and enforced for that particular Access session. The source of ACL entries is a session variable having content that can be sourced from external sources such as ActiveDirectory, LDAP, RADIUS, or internal sources such as iRules, data groups, or any combination of the above.
Note: Access Policy Manager supports dynamic ACLs in F5 ACL format, and in a subset of the Cisco ACL format.
A dynamic ACL action includes these configuration elements and options:
- Source
- Specifies a type of session variable (Custom or CiscoAV-PairVSA) and the source session variable from which the dynamic ACL is derived. For Custom dynamic ACL entries, this is any session variable that is populated with an F5 format ACL. For CiscoAV-PairVSA dynamic ACL entries, this is predefined as session.radius.last.attr.vendor-specific.1.9.1.
- ACL
- Specifies the dynamic ACL container configured on the BIG-IP system. Dynamic ACL objects are empty container ACLs that you define on the system.
- Format
- Specifies the format (F5 or Cisco) used to define the ACL.
Note: To succeed, a dynamic ACL action must follow actions that populate the session variables with ACLs.
A dynamic ACL container provides an unconfigured ACL that you select when you specify a dynamic ACL action in an access policy.
-
On the Main tab, click Access > Access Control Lists.
The ACLs screen opens.
-
Click Create.
The New ACL screen opens.
-
In the Name field, type a name for the access control list.
-
From the Type list, select Dynamic.
-
In the Description field, add a description of the access control list.
-
From the ACL Order list, specify the order in which to add the new ACL relative to other ACLs:
- Select After to add the ACL after a specific ACL and select the ACL from the list.
- Select Specify to type the specific number of the ACL in the field.
- Select Last to add the ACL at the last position in the list.
-
From the Match Case for Paths list, select Yes to match case for paths, or No to ignore path case.
This setting specifies whether alphabetic case is considered when matching paths in an access control entry.
-
Click the Create button.
The ACL Properties screen opens; it displays the newly configured dynamic ACL container.
Before you start this task, configure an access profile and a dynamic ACL container. Add an authentication action to the access policy before the dynamic ACL action so that Access Policy Manager can first capture authentication variables that contain the dynamic ACL specification.
Configure a dynamic ACL action to extract and apply an ACL from an AAA server (Active Directory, LDAP, or RADIUS).
Note: Because a dynamic ACL is associated with a user directory, you can use one to assign ACLs specifically per the user session.
-
On the Main tab, click Access > Profiles / Policies.
The Access Profiles (Per-Session Policies) screen opens.
-
In the Per-Session Policy column, click the Edit link for the access profile you want to configure.
The visual policy editor opens the access policy in a separate screen.
-
Click the (+) icon anywhere in the access policy to add a new item.
Note: Only an applicable subset of access policy items is available for selection in the visual policy editor for any access profile type.
A popup screen opens, listing predefined actions on tabs such as General Purpose, Authentication, and so on.
-
From the Assignment tab, select Dynamic ACL, and click Add Item.
A properties screen opens.
-
To add an ACL, click the Add new entry button.
A new row opens in the table.
-
Select one of these from the list:
- Custom Select to use a custom ACL. The ACL source can be an attribute from an AD, RADIUS, or LDAP directory, or any properly formatted session variable.
- Cisco AV-Pair VSA Select to use a Cisco AV-Pair ACL from a RADIUS directory.
-
In the Source field, type the attribute from which the Dynamic ACL action extracts ACLs.
If you are using Cisco AV-Pair VSA from a RADIUS server, the field is prepopulated with
session.radius.last.attr.vendor-specific.1.9.1. -
From the ACL list, select the dynamic ACL container that you configured previously.
-
From the Format list, select the format in which the ACL is specified.
-
To configure another ACL, click the Add new entry button and repeat the configuration steps.
-
Select Save to save any changes and return to the policy.
-
Complete the policy:
-
Add any additional policy items you require.
-
Change the ending from Deny to Allow on any access policy branch on which you want to grant access.
-
-
Click the Apply Access Policy link to apply and activate the changes to the policy.
The access policy is configured to extract an ACL from an AAA server and apply it when processing occurs on the access policy branch.
To apply this access policy to network traffic, add the access profile to a virtual server.
Note: To ensure that logging is configured to meet your requirements, verify the log settings for the access profile.
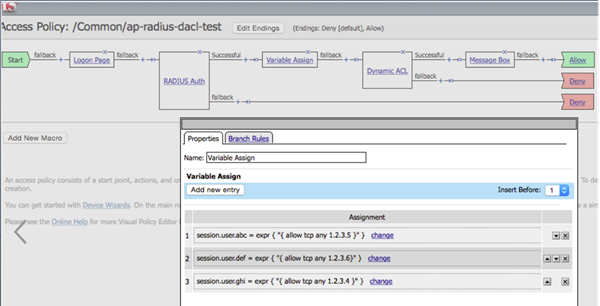
In an access policy, you can use the Variable Assign agent before a Dynamic ACL agent having multiple dynamic ACL objects. This allows you to combine multiple objects in a dynamic ACL. Here an example shows the general steps to do this. The policy you are working with needs to have a Variable Assign agent.
-
On the Main tab, click Access > Profiles / Policies.
The Access Profiles (Per-Session Policies) screen opens.
-
In the Per-Session Policy column, click the Edit link for the access profile you want to configure.
The visual policy editor opens the access policy in a separate screen.
-
In the visual policy editor, create entries for session variables with the required ACL values in the Variable Assign agent. For example:
-
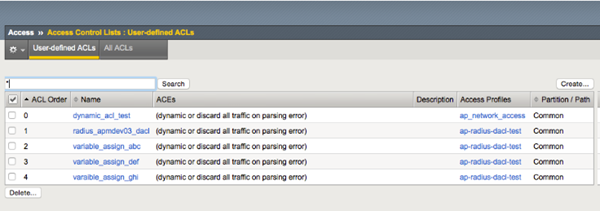
On the Main tab, click Access > Access Control Lists.
-
Create the corresponding dynamic ACL objects in Access Control Lists. For example:
-
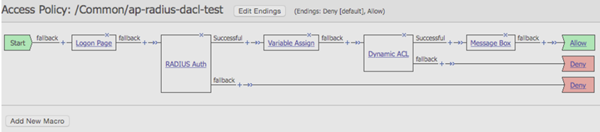
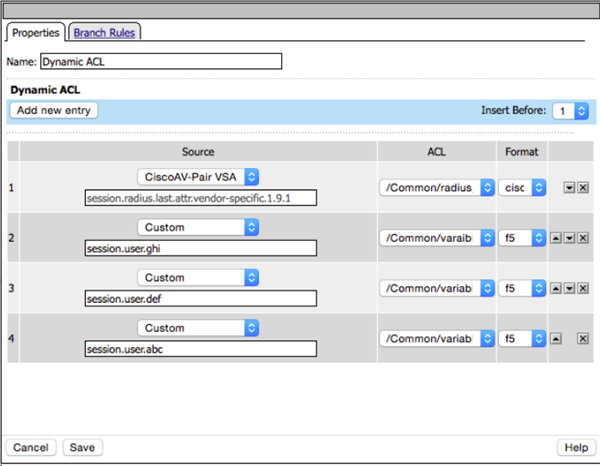
In the visual policy editor, add the assigned session variable dynamic ACL values to the Dynamic ACL agent selecting the corresponding ACL in the appropriate format (Cisco or F5). For example:
-
Add the ACL entries to the RADIUS server (here named
apm03) for the corresponding user to be applied as shown in the example.In this example, for the host to be allowed, you need to specify the virtual server IP address and not the pool IP address, and the log indicates the logging for the corresponding log message to appear in
/var/log/pktfilter:test Cleartext-Password := "click123" Service-Type = Framed-User, Framed-Protocol = PPP, Framed-Filter-Id = "std.ppp", Framed-MTU = 1500, Framed-Compression = Van-Jacobsen-TCP-IP, Cisco-AVPair = "ip:inacl#1=permit tcp any host 10.192.152.109 log", Cisco-AVPair += "ip:inacl#2=deny tcp any any log" -
Access the virtual IP address (for example, http://10.192.152.109) and upon entering the credentials
test/click123, a message box displayingDynamic ACL is assignedappears. -
On the BIG-IP system 10.192.34.121 command line, typing
sessiondump –allkeysshows the following values forsession.assigned.dacls:cdc9d4e5.session.assigned.dacl./Common/radius_apm03_dacl 65 { allow log tcp any 10.192.152.109 } { discard log tcp any any } cdc9d4e5.session.assigned.dacl./Common/variable_assign_ghi 26 { allow tcp any 1.2.3.4 } cdc9d4e5.session.assigned.dacl./Common/variable_assign_abc 26 { allow tcp any 1.2.3.5 } cdc9d4e5.session.assigned.dacl./Common/variable_assign_def 26 { allow tcp any 1.2.3.6 } cdc9d4e5.session.assigned.dacls 112 /Common/radius_apm03_dacl /Common/variable_assign_ghi /Common/variable_assign_abc /Common/variable_assign_def cdc9d4e5.session.radius. /Common/ap-radius-dacl-test_act_radius_auth_ag.attr. vendor-specific.1.9.1 83 ip:inacl#1=permit tcp any host 10.192.152.109 log | ip:inacl#2=deny tcp any any log -
When you click Continue in the
Dynamic ACL is assignedmessage box, the pool IP address (10.192.254.11:80) with the test php page opens. The following log entry in/var/log/pktfiltershows the allowed ACL:Nov 9 10:17:40 bigip4002mgmt notice tmm[32697]: 01580005:5: /Common/ap-radius-dacl-test:Common:cdc9d4e5: allow ACL: /Common/radius_apmdev03_dacl@cdc9d4e5:0 packet:http://10.192.152.109/ tcp 192.168.85.53:59888 -> 10.192.152.109:80
Specifies F5 ACL syntax and provides examples. This syntax applies to both static and dynamic ACLs.
Specify an F5 ACL using this syntax.
comment { action [logging_options] context } comment { action [logging_options] context }…
The syntax allows multiple ACLs in a single string along with comments.
Any characters before an open curly brace ({) or after a closed curly brace (}) are treated as comments. Comments are optional. They have no effect on the ACLs. These examples show identical ACLs with different comments; APM interprets them as being the same.
This is my HTTP server ACL { allow tcp any 1.2.3.4:80 } This is my default ACL { reject ip any any }
{ allow tcp any 1.2.3.4:80 } { reject ip any any }
{ allow tcp any 1.2.3.4:80 }\n
{ reject ip any any }\n
| { allow tcp any 1.2.3.4:80 } | { reject ip any any } |
This is an action that the ACL takes on traffic that matches the ACL context.
|
allow |
Allows the specified traffic. |
|
reject |
Rejects the specified traffic and sends a TCP RST code to the initiator. |
|
discard |
Silently drops the packets. |
|
continue |
Skips checking against the remaining access control entries in this ACL, and continues evaluation at the next ACL. |
Specifying a logging option is optional.
|
log |
Enables default logging for the ACL |
|
log-packet |
Writes packet-level logs to the packet filter log file |
|
log-verbose |
Writes verbose logs |
|
log-summary |
Writes summary logs |
|
log-config |
Writes configuration logs to the configuration log file |
Context specifies a protocol followed by addresses, networks, and ports for the ACL action.
|
http |
HTTP protocol traffic. Requires that you specify an HTTP or HTTPS URL in the ACL definition |
|
udp |
UDP traffic only |
|
tcp |
TCP traffic only |
|
ip |
IP protocol traffic |
Note: F5 ACL format treats IP protocol number zero (0) as a wildcard, meaning that it applies to all IPv4 and IPv6 traffic.
For example, { reject ip 0 any any } is the equivalent of { reject ip any any }.
Specify addresses in a pair separated by a space. The first address in the pair should match the host, and the second address in the pair should match the destination. This syntax:
any[/mask][:port]
matches any host or IP address with an optional subnet mask or a port. For example,
{ allow tcp any 1.2.3.4 }
allows TCP traffic between any host and the destination IP address 1.2.3.4.
{ allow tcp any/8 1.2.3.4 }
allows TCP traffic between any host within the subnet 255.0.0.0 and the destination IP address 1.2.3.4.
{ allow tcp any/8:8000 1.2.3.4 }
allows TCP traffic between any host within the subnet 255.0.0.0 on port 8000 and the destination IP address 1.2.3.4.
This syntax:
IP address[/mask][:port]
matches a specific IP address with an optional subnet mask or a port. For example,
{ allow tcp 1.1.1.1 1.2.3.4 }
allows TCP traffic between the host IP address 1.1.1.1 and the destination IP address 1.2.3.4.
{ allow tcp 1.1.1.1:22 1.2.3.4 }
allows TCP traffic between the host IP address 1.1.1.1 on port 22 and the destination IP address 1.2.3.4.
This example shows how to specify an IP protocol address in F5 ACL format. An IP protocol number, 51, and an address pair specification follow the context word ip.
{ allow ip 51 any 1.2.3.4 }This example shows how to specify a TCP or UDP protocol address in F5 ACL format. An address pair specification follows the context word (tcp or udp).
{ allow tcp any 1.2.3.4 }
{ allow udp any 1.2.3.4 }These examples show how to specify an HTTP protocol address in F5 ACL format. A host address, destination address, and URL follow the context word http. The URL specification supports wildcards with glob matching.
{ allow http any 1.2.3.4 https://www.siterequest.com/* }
{ allow http any 1.2.3.0/24 http://*.siterequest.com/* }
{ allow http any 1.2.3.0/24 http://*.siterequest.???/* }Specifies the subset of Cisco ACL syntax that Access Policy Manager supports and provides examples.
On a RADIUS server, Access Policy Manager supports dynamic ACLs that use the subset of the Cisco ACL format described here.
You must specify a prefix. For IPv4, use ip:inacl#X= where X is an integer used as a rule identifier. For IPv6, use ipv6:inacl#X=.
These keywords are mapped with the F5 log-packet format: log and log-input.
These keywords are not supported: tos, established, time-range, dynamic, and precedence.
 {`ip`|`ipv6`}`:inacl#`*X*={`deny`|`permit`}
      {`ip`|`ipv6`} *source* *source-wildcard* *destination* *destination-wildcard*
      [log|log-input]
For example:
ipv6:inacl#10=permit ipv6 any any log
{`ip`|`ipv6`}`:inacl#`*X*={`deny`|`permit`}
      tcp* source* *source-wildcard* \[operator \[port\]\] *destination* *destination-wildcard*
     \[operator \[port\]\] [log|log-input]
For example:
ip:inacl#10=permit tcp any host 10.168.12.100 log
{`ip`|`ipv6`}`:inacl#`*X*={`deny`|`permit`}
      udp* source* *source-wildcard* \[operator \[port\]\] *destination* *destination-wildcard*
     \[operator \[port\]\] [log|log-input]
For example:
ip:inacl#2=deny udp any any log