Updated Date: 07/07/2026
OAuth Client and Resource Server
Access Policy Manager (APM) supports OAuth 2.0 only. When configured as an OAuth client and resource server, APM has been tested with these OAuth authorization servers:
- AzureAD - Azure Active Directory
- F5 - APM configured as an OAuth authorization server
- Okta* - See considerations below
- Ping Identity - PingFederate
For compatibility information, see release notes for APM on the AskF5™ web site located at support.f5.com.
APM also supports the configuration of custom providers, that is, external OAuth 2.0 authorization servers that F5 has not tested. Custom providers should comply with RFC 6749.
The Okta default authorization server does not publish the access token signing key. Instead, you need to use a custom authorization server that will publish the access token signing key on the respective jwks_uri. You can identify a custom authorization server by looking at the issuer value.
For example, if the issuer is:
https://f5test1.oktapreview.com
then the issuer is the built-in OIDC authorization server, and the access token cannot be validated locally.
If the issuer is:
https://partnerpoc.oktapreview.com/oauth2/ausce8ii5wBzd0zvQ0h7
then you know that it is an API Access Management authorization server, and the tokens can be validated locally.
OpenID Connect adds an identity layer on top of OAuth 2.0. When configured as an OAuth client / resource server, Access Policy Manager (APM) can interact with an OpenID Connect provider to get this data:
- UserInfo requests
- APM can make UserInfo requests to an endpoint that is specified for that purpose on an OAuth provider. APM supports UserInfo requests from the OAuth Scope and OAuth Client agents in an access policy or a per-request policy subroutine.
- ID Token
- As defined in the OpenID Connect core 1.0 spec, an ID Token contains claims by an authorization server about the authenticated user when using a client. APM obtains an ID Token from an OAuth provider when OpenID Connect is enabled in the OAuth Client agent in an access policy or a per-request policy. (The OAuth provider must support OpenID Connect.)
When configured as an OAuth client, Access Policy Manager (APM®) supports authorization code and resource owner password credentials grant types.
To configure Access Policy Manager (APM®) as an OAuth client and resource server, first you must create these objects: OAuth providers, OAuth servers, and OAuth requests. Then, you must configure APM policies with agents that reference the objects to get tokens, get permission for scopes, and retrieve scopes.
An OAuth provider configuration object specifies an external OAuth authorization server type and settings to support opaque access tokens, JSON web tokens, and ID Tokens and OpenID Connect UserInfo requests for those providers that support OpenID Connect.
An OAuth server specifies an OAuth provider and the OAuth role that Access Policy Manager (APM®) plays with that provider. It also specifies the IDs, secrets, and SSL certificates that APM requires to communicate with the OAuth provider.
In Access Policy Manager (APM®), the request object enables configuration of requests to meet the requirements of your OAuth providers. The object supports requests for scope permission, scope data, authorization redirect, tokens, and OpenID Connect UserInfo. It specifies the HTTP method, parameters, and headers to use for the specific type of request.
An OAuth Client agent is a policy item that requests authorization and tokens from an OAuth server. An OAuth Client can also get scope data on a per-request basis. The OAuth Client agent provides these configuration elements and options:
- Server
- Specifies the OAuth server to which this OAuth client directs requests.
- Grant Type
- Specifies the type of grant that the OAuth client uses.
- Authorization code - The client redirects the resource owner to the OAuth server to request an authorization code.
- Password - The client uses resource owner password credentials to request an access token from the OAuth server.
- OpenID Connect
- Specifies whether the agent uses OpenID Connect for authorization. Displays when Grant Type is set to Authorization code.
Note: To function correctly when enabled, the OAuth provider (associated with the selected Server) must be configured to support JSON web tokens.
- OpenID Connect Flow Type
- Specifies the OpenID Connect flow type to use: Authorization code or Hybrid.
- OpenID Connect Hybrid Response Type
- Specifies the response type to use for an OpenID Connect hybrid flow: code-idtoken, code-token, or code-idtoken-token.
- Authentication Redirect Request
- Specifies an auth-redirect-request type request, which redirects a user to an OAuth server. Displays when Grant Type is set to Authorization code.
- Token Request
- Specifies a token-request type of request.
- Refresh Token Request
- Specifies a token-refresh-request type of request. APM uses this request on a per-request basis.
- OpenID Connect UserInfo Request
- Specifies an openid-userinfo-request type of request. Displays when OpenID Connect is set to Enabled. JWT access tokens can be submitted for an OpenID Connect UserInfo request; however, issuing id_tokens alongside an opaque token is not supported.
- Redirection URI
- Specifies the URI for the OAuth server to redirect a user back to the OAuth client. Displays when Grant Type is set to Authorization code.
- Scope
- Specifies one or more strings separated by spaces; for example
contacts photo email. The strings are defined by the OAuth authorization server. Your best source of information for the strings that a particular OAuth authorization server defines could be APIs for OAuth 2.0 scopes on developer sites for OAuth providers.For the Authorization code grant type, an OAuth authorization server prompts the user to grant or deny access to the scopes. For the Password grant type, an OAuth authorization server grants permission to the requested scopes based on the user providing resource owner password credentials.
Note: Requests are configured in the Access > Federation > OAuth Client / Resource Server > Requests area of the product.
The OAuth Scope agent validates JSON web tokens (JWT) or validates scopes for opaque tokens. The OAuth Scope item provides these elements and options:
- Token Validation Mode
- Internal - In this mode, the agent validates JSON web tokens (JWT).
- External - In this mode, the agent makes requests to an OAuth authorization server to get scopes associated with a token and to get scope data, such as a user’s email address or contact list.
- JWT Provider List
- Specifies a list of OAuth providers that support JWT. The agent validates JWT from any of these providers when configured. For Internal mode.
- Server
- Specifies an OAuth server. OAuth servers in resource server, or client and resource server modes are available for selection. For External mode.
- Scopes Request
- Specifies a validation-scopes-request type request. This request type retrieves a list of scopes associated with the token. For External mode.
- OpenID Connect UserInfo Request
- Specifies an openid-userinfo-request type request where the client sends the request using either GET or POST. For External mode.
In External mode, you can add multiple scope data requests to the agent. Click Add New Entry and specify:
- Scope Name
- Specifies the name of a scope for which you are requesting data. (The external OAuth provider specifies the names of the scopes that it supports.)
- Request
- Specifies a scope-data-request type request. This is optional. If the provider does not require this type of request to obtain additional information from an authorization server, you do not need to fill in this field.
Note: You can configure requests here: Access > Federation > OAuth Client / Resource Server > Requests.
Register Access Policy Manager® (APM®) as a client to an external OAuth authorization server and get information from the external server about the scopes that it supports. Then configure the OAuth providers, servers, and requests to use from Access Policy Manager® (APM®) policies to interact with external OAuth authorization servers.
For users to access resources that Access Policy Manager (APM) protects through social media accounts, you must add APM as a client application to an external server that provides OAuth authorization services.
Note: Perform this step whether you plan to use APM in the OAuth client role, the OAuth resource server role, or in both the OAuth client and OAuth resource server roles.
-
Create a developer account with the provider.
Go to Google or Facebook developer sites or go to another OAuth provider site.
-
Log in to your developer account and add APM as a client application.
Part of configuring APM as a client application should be to supply the provider with a redirect URI. The OAuth server uses it to redirect users back to APM OAuth client after they complete authorization. Type a URI that includes the FQDN for the virtual server you will configure on the BIG-IP system plus
/oauth/client/redirect.Here is an example redirect URI:
https://siterequest.com/oauth/client/redirect. -
Copy the IDs and secrets from the configuration and keep them handy.
To configure APM as an OAuth client, you need to provide a client ID and client secret when you configure an OAuth server in APM.
To configure APM as an OAuth resource server, you need to provide a resource server ID and resource server secret when you configure an OAuth server in APM.
Note: Social media account providers supply only a client ID and client secret; you must use them for the client and resource server IDs and the client and resource server secrets in APM.
To register Access Policy Manager (APM) as a client application of an enterprise provider, you must consult the enterprise provider documentation. For example, if F5 provides OAuth authorization services on another BIG-IP system, you must register APM as a client or as a resource server on that BIG-IP system. F5 provides the necessary instructions in BIG-IP Access Policy Manager: Single Sign-On Concepts and Configuration on the AskF5 web site located at support.f5.com.
For users to access resources that Access Policy Manager (APM) protects through enterprise accounts, you must add APM as a client application to an external server that provides OAuth authorization services.
Note: Perform this step whether you plan to use APM in the OAuth client role, the OAuth resource server role, or in both the OAuth client and OAuth resource server roles.
-
Add APM as a client application of the enterprise OAuth authorization server following instructions from the enterprise provider.
Part of configuring APM as a client application should be to supply the provider with a redirect URI. The OAuth server uses it to redirect users back to APM OAuth client after they complete authorization. Type a URI that includes the FQDN for the virtual server you will configure on the BIG-IP system plus
/oauth/client/redirect.Here is an example redirect URI:
https://siterequest.com/oauth/client/redirect. -
Copy the IDs and secrets from the configuration and keep them handy.
To configure APM as an OAuth client, you need to provide a client ID and client secret when you configure an OAuth server in APM.
To configure APM as an OAuth resource server, you need to provide a resource server ID and resource server secret when you configure an OAuth server in APM.
You can configure an OAuth provider to enable APM to obtain opaque tokens or JSON web tokens (JWTs) from an OAuth authorization server that supports them. You can automatically add JWT settings to Access Policy Manager (APM) if your OAuth provider supports OpenID Connect discovery.
Note: OAuth Discover uses the global system DNS (not DNS resolvers) so you need to have configured a DNS remote lookup server using System > Configuration > Device > DNS to use discovery.
-
On the Main tab, click Access > Federation > OAuth Client / Resource Server > Provider.
The Provider screen opens.
-
Click Create.
-
In the Name field, type a name for the object.
-
From Type, select a type.
You can configure auto-discovery for any provider type except Facebook.
The fields that display and default values might change based on your choice.
-
For Ignore Expired Certificate Validation, select the check box if you want to ignore enforcement for an expired authorization server certificate.
Important: For this to work as intended, the OAuth authorization server must include an X5C (X.509 Certificate Chain) parameter in its JWK endpoint response.
-
Select Allow Self-Signed JWK Config Certificate to allow APM to create a JWK with a self-signed certificate if one is discovered on the provider.
-
Keep Use Auto JWT selected to use auto-discovery.
-
In OpenID URI, type a string that appends
.well-known/openid-configurationto the URL of the issuer, and click Discover.Note: This only works if you have configured a system DNS server using System > Configuration > Device > DNS.
Discovery updates the URIs in the remaining fields on the screen.
-
In the Authentication URI field, type the URI to use to request authentication from the provider to get an authorization code.
-
In the Token URI field, type the URI to use to retrieve an access token from the provider.
-
If any of the URIs contains a fragment or the
#character, remove it before you save the configuration. -
From the Frequency list, select None or the frequency to perform auto-discovery.
-
Click Save.
When Access Policy Manager (APM) is configured to act as an OAuth client or resource server, it uses JSON web keys (JWKs) to validate the JSON web tokens it receives. You can use APM to auto-discover JWKs from OAuth providers that support it. Otherwise, you can configure JWKs using this procedure.
-
On the Main tab, select Access > Federation > JSON Web Token > Key Configuration.
The Key Configuration screen opens.
-
Click Create.
-
In the Name field, type a name.
-
In ID, type an ID.
This parameter is used to identity a specific JSON web key.
-
For Type, select RSA, Octet, or Elliptic Curve.
Additional parameters display for the type that you select.
-
For Signing Algorithm, select any one.
-
For the Octet type, you only need to configure one additional setting:
-
In Shared Secret, type a secret.
Important: To maximize the security of the algorithm, type enough characters so that the resulting key size matches the block size for the signing algorithm: for HS256, 32 characters; for HS384, 48 characters; for HS512, 64 characters.
-
Click Save.
The newly created JWK displays on the list.
-
-
To support an RSA or an Elliptic Curve key type, you must either configure settings in the Certificates area or in the Parameters area. To get the necessary parameters from a certificate, go to the Certificates area and configure these settings:
-
For Certificate File, select a certificate.
Important: When the BIG-IP system is on a chassis platform or is included in an HA pair, do not select the default certificate. F5 strongly discourages the use of the default certificate in a JWK in any configuration.
Note: The Include X5C, Certificate Key, and Key Passphrase settings apply only for a JWK for use with APM as an OAuth authorization server.
-
For Certificate Chain, select one.
-
Click Save.
The newly created JWK displays on the list.
-
-
For the RSA type, in the absence of a certificate, go to the Parameters area and complete these substeps:
-
For Modulus, type the modulus of the RSA public key.
-
For Public Exponent, type the public exponent of the RSA public key.
-
Supply values for the SHA-1 Thumbprint, and SHA-256 Thumbprint fields.
-
Click Save.
The newly created JWK displays on the list.
-
-
For the Elliptic Curve type, in the absence of a certificate, go to the Parameters area and complete these substeps:
-
For X Coordinate, type an X coordinate for the elliptic curve.
-
For Y Coordinate, type an Y coordinate for the elliptic curve.
-
For Curve, specify an elliptic curve.
For example, type
P-256. -
Supply values for the SHA-1 Thumbprint, and SHA-256 Thumbprint fields.
-
Click Save.
The newly created JWK displays on the list.
-
If you’re configuring Access Policy Manager (APM) as an OAuth Client or OAuth Resource Server and your external OAuth provider supports OpenID Connect, you can auto-discover the token configuration from the provider instead of using this procedure to configure it. Before you use this procedure, configure JSON web key settings in APM.
You create token configurations for APM to use as an OAuth client/resource server.
-
On the Main tab, select Access > Federation > JSON Web Token > Token Configuration.
The Token Configuration screen opens.
-
Open the properties for a token configuration:
- To edit an existing token configuration, click its name.
- To add a new token configuration, click Create, then on the screen that opens, type a name.
-
In Issuer field, type the URL of the token issuer, starting with
https.Note: You cannot modify the issuer if this JWT was auto-discovered.
-
To use the value of Access Token Expires In from the provider list, retain the selection of the Use Provider List Settings check box. Otherwise, clear the check box and type the number of minutes the access token should live in the Access Token Expires In field.
-
For Audience, add all audiences that the provider supports. For each one, type a case-sensitive string and click Add
Audience settings apply to the access token and not to the ID token.
Interpretation of audience is application-specific.
-
In the Signing Algorithms area, select from the Available list and populate the Allowed and Blocked lists.
-
In the Keys (JWK) area, select from the Available list and populate the Allowed and Blocked lists.
-
In the Access Tokens area, for Blacklist, to reject a valid JWT access token that contains one of the configured claim names paired with one of the configured claim values, add names and values:
-
In the Access Tokens area click (+).
-
In the Name field, type a claim name.
-
In the Values field, type a claim value to be blacklisted for that claim and click Add. (Repeat this step if necessary.)
-
-
Click Save.
The new token displays on the Token Configuration list.
If you want to use JSON web tokens (JWTs) and the OAuth provider supports them, then configure JWTs in Access Policy Manager (APM) before you start this task.
You specify the URIs on an external server where APM gets OAuth authorization services when configured as an OAuth client and resource server.
Note: APM provides preconfigured providers named AzureAD (Azure Active Directory from Microsoft), F5 (APM), Facebook, Google, Okta, and Ping (PingFederate from Ping Identity).
-
On the Main tab, click Access > Federation > OAuth Client / Resource Server > Provider.
The Provider screen opens.
-
Click Create.
-
In the Name field, type a name for the object.
-
From the Type field, select a predefined type of provider, or select Custom.
Based on the type that you select, the fields that display might change
If you select a predefined type, additional fields fill with default values where possible.
-
If the Use Auto-discovered JWT setting displays, clear the check box.
The Token Configuration (JWT) field displays and is set to None.
-
If these fields display and you want to support JWTs, configure them as follows:
-
For Token Configuration (JWT), select a configuration from the list.
-
To specify that the OAuth provider ignore the certificate expiry check during token verification for a resource server, enable the Ignore Expired Certificate Validation check box.
Important: For this to work as intended, the OAuth authorization server must include an X5C (X.509 Certificate Chain) parameter in its JWKS endpoint response.
-
-
In the Authentication URI field, type the URI on the provider where APM should redirect the user for authentication.
-
In the Token URI field, type the URI on the provider where APM can get a token.
-
In the Token Validation Scope URI field, type the URI on the provider where APM can get information about a specific token.
-
If the provider supports OpenID Connect and you want to request identity information about a subject, for UserInfo Request URI type the URI at which to make the request.
-
Click Finished.
The new provider displays on the Provider screen.
A Mode setting in the OAuth server configuration specifies the OAuth roles that you intend Access Policy Manager (APM®) to play: OAuth client, OAuth resource server, or OAuth client and resource server. You can configure OAuth servers for each or any of the modes on one BIG-IP system.
You might need to perform some SSL administration tasks to support communication between Access Policy Manager (APM®) as an OAuth client and an OAuth resource server, and external OAuth authorization servers. OAuth server objects on APM require a server SSL profile for an OAuth client and for an OAuth resource server.
SSL certificates are configured in the System > Certificate Management > Traffic Certificate Management area of the product.
Server SSL profiles are configured in the Local Traffic > Profiles > SSL > Server area of the product.
For more information, refer to BIG-IP System: SSL Administration on the AskF5™ web site located at support.f5.com.
You configure the OAuth servers that process requests from Access Policy Manager (APM).
Note: For APM to play the role of an OAuth client and an OAuth resource server, configure OAuth servers with Mode set to Client + Resource Server.
-
On the Main tab, click Access > Federation > OAuth Client / Resource Server > OAuth Server.
The OAuth Server screen opens.
-
Click Create.
-
In the Name field, type a name for the object.
-
From the Mode list, select Client + Resource Server.
APM can use this OAuth server to request access tokens and scope details, such as an email address for the user.
The Client Settings and Resource Server Settings areas display.
-
From the Type list, to get OAuth authorization services from another BIG-IP system, retain the default selection F5; otherwise select another type.
If any providers of the selected type exist, the OAuth Provider field displays one.
-
From the OAuth Provider list, retain the default selection or select another provider.
-
From the DNS Resolver list, select a DNS resolver (or click the plus (+) icon, create a DNS resolver, and then select it).
-
In the Token Validation Interval field, type a number.
If you configure a per-request policy subroutine to validate the token, the subroutine repeats at this interval, or the expiry time of the access token, whichever is shorter.
-
In the Client Settings area, fill in these fields:
You should have gotten a client ID and client secret when you registered APM as a client of the OAuth authorization server.
-
In the Client ID field, type or paste the client ID.
-
In the Client Secret field, type or paste the secret.
-
From the Client’s ServerSSL Profile Name, select a server SSL profile.
-
-
In the Resource Server Settings area, fill in these fields.
You should have gotten an ID and secret from the OAuth authorization server when you registered APM with it.
Note: Social account providers supply only client ID and client secret. For social account providers, use the client ID and client secret for the client and the resource server IDs and secrets.
-
In the Resource Server ID field, type or paste the resource server ID (for an enterprise provider).
For a social provider, type or paste the client ID instead.
-
In the Resource Server Secret field, type or paste the resource server secret (for an enterprise provider).
For a social provider, type or paste the client secret instead.
-
From the Resource Server’s ServerSSL Profile Name, select a server SSL profile.
-
-
Click Finished.
The server displays on the OAuth Servers screen.
The OAuth servers that you have configured are available for selection from the OAuth Client and OAuth Scope agents when you configure an access policy or a per-request policy.
You configure the OAuth servers that process requests from Access Policy Manager (APM).
Note: For APM to play the role of an OAuth client only, configure OAuth servers with Mode set to Client.
-
On the Main tab, click Access > Federation > OAuth Client / Resource Server > OAuth Server.
The OAuth Server screen opens.
-
Click Create.
-
In the Name field, type a name for the object.
-
From the Mode list, select Client.
In this mode, APM can request access tokens from this OAuth server; APM can also refresh an existing access token when expired on a per-request basis.
The Client Settings area displays.
-
From the Type list, to get OAuth authorization services from another BIG-IP system, retain the default selection F5; otherwise select another type.
If any providers of the selected type exist, the OAuth Provider field displays one.
-
From the OAuth Provider list, retain the default selection or select another provider.
-
From the DNS Resolver list, select a DNS resolver (or click the plus (+) icon, create a DNS resolver, and then select it).
-
If you have iRules to use, in the iRules setting move them to the Selected list.
For detailed information on iRules, see the F5 Networks DevCentral web site,
devcentral.f5.com. -
In the Token Validation Interval field, type a number.
If you configure a per-request policy subroutine to validate the token, the subroutine repeats at this interval, or the expiry time of the access token, whichever is shorter.
-
In the Client Settings area, fill in these fields:
You should have gotten a client ID and client secret when you registered APM as a client of the OAuth authorization server.
-
In the Client ID field, type or paste the client ID.
-
In the Client Secret field, type or paste the secret.
-
From the Client’s ServerSSL Profile Name, select a server SSL profile.
-
-
Click Finished.
The server displays on the OAuth Servers screen.
The OAuth servers that you have configured are available for selection from the OAuth Client agent when you configure an access policy or a per-request policy.
You configure the OAuth servers that process requests from Access Policy Manager (APM).
Note: For APM to play the role of an OAuth resource server only, configure OAuth servers with Mode set to Resource Server.
-
On the Main tab, click Access > Federation > OAuth Client / Resource Server > OAuth Server.
The OAuth Server screen opens.
-
Click Create.
-
In the Name field, type a name for the object.
-
From the Mode list, select Resource Server.
APM can use this OAuth server to request a list of scopes associated with the access token , request details for a particular scope, such as an email address for the user, or to make both types of requests.
The Resource Server Settings area displays.
-
From the Type list, to get OAuth authorization services from another BIG-IP system, retain the default selection F5; otherwise select another type.
If any providers of the selected type exist, the OAuth Provider field displays one.
-
From the OAuth Provider list, retain the default selection or select another provider.
-
From the DNS Resolver list, select a DNS resolver (or click the plus (+) icon, create a DNS resolver, and then select it).
-
If you have iRules to use, in the iRules setting move them to the Selected list.
For detailed information on iRules, see the F5 Networks DevCentral web site,
devcentral.f5.com. -
In the Token Validation Interval field, type a number.
If you configure a per-request policy subroutine to validate the token, the subroutine repeats at this interval, or the expiry time of the access token, whichever is shorter.
-
In the Resource Server Settings area, fill in these fields.
You should have gotten an ID and secret from the OAuth authorization server when you registered APM with it.
Note: Social account providers supply only client ID and client secret. For social account providers, use the client ID and client secret for the client and the resource server IDs and secrets.
-
In the Resource Server ID field, type or paste the resource server ID (for an enterprise provider).
For a social provider, type or paste the client ID instead.
-
In the Resource Server Secret field, type or paste the resource server secret (for an enterprise provider).
For a social provider, type or paste the client secret instead.
-
From the Resource Server’s ServerSSL Profile Name, select a server SSL profile.
-
-
Click Finished.
The server displays on the OAuth Servers screen.
The OAuth servers that you have configured are available for selection from the OAuth Scope agent when you configure an access policy or a per-request policy.
Configure requests for token validation, getting scopes and scope details, authorization redirect, access token, or refresh token to meet the specifications of the provider.
-
On the Main tab, click Access > Federation > OAuth Client / Resource Server > Request.
APM supplies several preconfigured requests for these providers: AzureAD (Azure Active Directory), F5 (APM), Facebook, Google, Okta, and Ping (PingFederate from Ping Identity).
-
To copy a request:
Note: You cannot delete or update preconfigured requests. However, you can copy preconfigured requests and edit the copies. You can also create new requests.
-
In the Copy column of the request, click the Copy link.
-
In the New Request Name field, type a name.
-
Click Copy.
The Properties screen for the new request displays.
-
-
For the HTTP Method and Type settings, retain the existing values or select new ones.
-
To edit existing request parameters:
-
From Request Parameters, select an entry and click Edit.
The entry populates the Parameter Type and Parameter Name fields, and, for a custom parameter type, the Parameter Value field.
-
Edit the Request Parameters as needed.
Important: Do not configure a CODE, REFRESH_TOKEN, or STATE parameter. APM adds these parameters automatically when needed.
-
Click Add.
The edited request parameters display in the list.
-
-
Add or delete any request parameters as needed.
-
If you need to add a request header:
-
In the Header Name field, type a name.
-
In the Header Value field, type a value.
-
Click Add.
The entry displays in the Request Headers field.
-
-
Click Update.
If using Okta preconfigured requests, Okta provides a refresh token only when offline_access is requested. Therefore, offline_access is used as the scope in default requests.
Note: If you need to make the user consent prompt visible, you must create a new request that does not specify offline_access as the scope. In addition, in the Okta setup, make sure that you have the API Access Management and User Consent features enabled. When both features are enabled, clients see a user consent prompt when connecting to their resources. Refer to Okta documentation for how to add user consent dialogs to the authentication flow.
Requests are available for selection in the OAuth Client and OAuth Scope agents when you configure an access policy or a per-request policy subroutine.
To perform this task, you need to understand the request parameters, request values, request headers, and HTTP method that the external OAuth authorization server supports for the type of request you plan to specify.
You configure a request for token validation, getting scopes and scope details, authorization redirect, access token, or refresh token that meets the specifications of the custom provider.
Note: APM provides preconfigured providers, AzureAD (Azure Active Directory), F5 (APM), Facebook, Google, Okta, and Ping (PingFederate from Ping Identity), and supports configuration of custom providers.
-
On the Main tab, click Access > Federation > OAuth Client / Resource Server > Requests.
-
Click Create.
-
In the Name field, type a name.
-
For HTTP Method, retain POST or select GET.
-
From the Type list, select a request type.
-
If you selected the scope-data-request type, type a URI in the URI field.
-
Specify request parameters:
-
From Parameter Type, select an option.
If you select custom, the Parameter Value field displays.
-
In the Parameter Name field, type a name as specified by your provider.
Important: Do not configure a
CODE,REFRESH_TOKEN, orSTATEparameter. APM adds these parameters automatically when needed. -
In the Parameter Value field, type a value.
-
Click Add.
The entry displays in the Request Parameters field.
-
-
Add request headers if needed:
-
In the Header Name field, type a name.
-
In the Header Value field, type a value.
-
Click Add.
The entry displays in the Request Headers field.
-
-
Click Finished.
The request displays in the list on the screen.
Requests are available for selection in the OAuth Client and OAuth Scope agents when you configure an access policy or a per-request policy subroutine.
To perform this task, you need to understand the request parameters, request values, request headers, and HTTP method that the external OAuth authorization server supports for an OpenID Connect UserInfo request.
Access Policy Manager (APM) provides preconfigured requests for acquiring UserInfo through OpenID Connect for the Ping (PingFederate from Ping Identity), Okta, and Google OAuth provider types. To get UserInfo from custom providers that support OpenID Connect, you create requests that meet the specifications of the custom provider.
-
On the Main tab, click Access > Federation > OAuth Client / Resource Server > Request.
-
Click Create.
-
In the Name field, type a name.
-
For HTTP Method, retain POST or select GET.
-
From the Type list, select openid-userinfo-request.
-
Specify the options in the Request Parameters setting:
-
From Parameter Type, select an option.
If you select custom, the Parameter Value field displays.
-
In the Parameter Name field, type a name as specified by your provider.
Important: Do not configure a
CODE,REFRESH_TOKEN, orSTATEparameter. APM adds these parameters automatically when needed. -
In the Parameter Value field, type a value.
-
Click Add.
The entry displays in the Request Parameters field.
-
-
Add Request Headers if needed:
-
In the Header Name field, type a name.
-
In the Header Value field, type a value.
-
Click Add.
The entry displays in the Request Headers field.
-
-
Click Finished.
Requests are available for selection in the OAuth Client and OAuth Scope agents when you configure an access policy or a per-request policy subroutine.
Access Policy Manager (APM) provides a number of preconfigured OAuth providers. To add custom OAuth providers to a provider list, first configure them in the Access > Federation > OAuth Client / Resource Server > Provider area.
You configure a provider list for use with APM configured as an OAuth resource server. A provider listenables a single OAuth Scope agent in an access policy to validate tokens issued by multiple OAuth providers.
-
On the Main tab, select Access > Federation > JSON Web Token > Provider List.
-
Click Create.
-
In Name, type a name for the configuration.
-
In Access Token Expires In, type the number of minutes that access token should live.
-
From the Provider list, select a provider and click Add. Repeat this step to add additional providers to the list.
The table lists OAuth request types, and specifies the agents that use them and the policies where they are used.
| Request type | Description | Agents and policies where used |
|---|---|---|
| auth-redirect-request | Redirects a user to an authorization server. | An OAuth Client agent uses this request at the start of a session (from the access policy) and can also use it from a per-request policy subroutine. This request is applicable when the OAuth Client is configured with the authorization code grant. This request can only use the GET parameter. |
| token-request | Accesses an authorization server to obtain an access token or exchange an authorization code for an access token. | An OAuth Client agent uses this request at the start of a session (from the access policy) and can also use it from a per-request policy subroutine. |
| token-refresh-request | Refreshes an expired access token. | An OAuth Client agent can make token refresh requests from a per-request policy subroutine. |
| validation-scopes-request | Accesses an authorization server to get a list of scopes associated with an access token and to get scope data for those scopes. | An OAuth Scope agent uses this request at the start of a session (from the access policy) and can also use it from a per-request policy subroutine. The preconfiguredF5ScopesRequest request is designed for use when APM is the OAuth server. |
| scope-data-request | Accesses an authorization server to get scope data. | An OAuth Scope agent can use this request type from an access policy and can also use it from a per-request policy subroutine. |
| openid-userinfo-request | Accesses a well-known endpoint for OpenID Connect to get UserInfo | An OAuth Scope and OAuth Client agent can use this request to get information. |
The OAuth provider, server, and request objects are ready for use in OAuth Client and OAuth Scope agents in access policies and per-request policy subroutines.
When Access Policy Manager® (APM®) acts as an OAuth client, an OAuth Client policy item can obtain an access token (and a refresh token if configured to do so) at the start of a session through the access policy. The OAuth client can also make OpenID Connect UserInfo requests following one of the OpenID Connect-defined flows (Authorization code flow or hybrid flow).
Throughout the session, an OAuth Client policy item can run periodically from a per-request policy subroutine to make OpenID Connect UserInfo requests, and, when the token expires, make an attempt to refresh the access token (if a refresh token exists) or authenticate the user anew.
When APM acts as an OAuth resource server, an OAuth Scope policy item can be used to validate a token and make scope data and UserInfo requests from the access policy and, periodically, from a per-request policy subroutine.
-
Creating an access profile for OAuth client and resource server
-
Configuring OAuth Scope for opaque tokens in an access policy
-
Adding access profile and per-request policy to the virtual server
To obtain an access token one time only for the session, you need to configure an access policy. The OAuth Client agent can request a token.
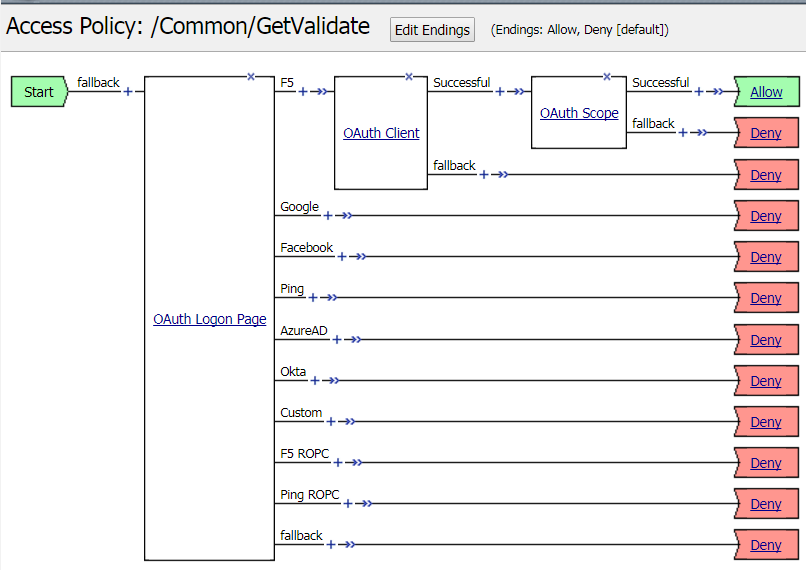
With this access policy, the user logs on through a BIG-IP system. The OAuth Client agent obtains an access token, and an OAuth Scope agent tries to retrieve the list of scopes associated with the token from the OAuth provider. The session starts. When the token expires, the system makes no attempt to refresh it.
To obtain an access token and to validate it for each request, first you need an access policy to obtain the token.
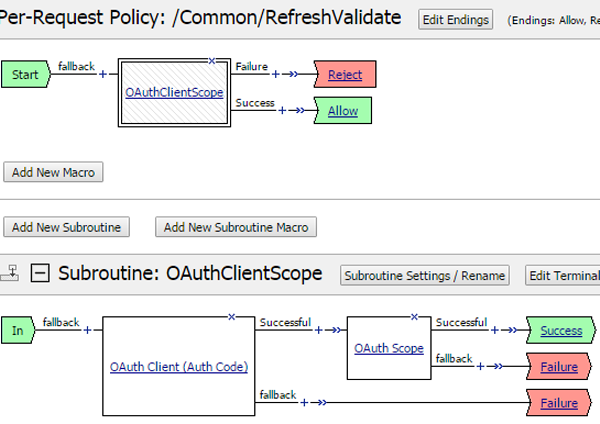
To periodically validate and refresh the token, you need a per-request policy subroutine.
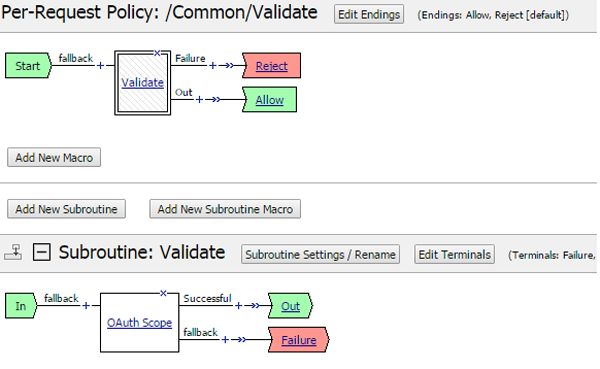
When Access Policy Manager (APM) acts as an OAuth resource server, an OAuth Scope agent validates tokens obtained from the incoming request.

You create an access profile to provide the access policy configuration for a virtual server that establishes a secured session.
-
On the Main tab, click Access > Profiles / Policies.
The Access Profiles (Per-Session Policies) screen opens.
-
Click Create.
The New Profile screen opens.
-
In the Name field, type a name for the access profile.
Note: A access profile name must be unique among all access profile and any per-request policy names.
-
From the Profile Type list, select one these options:
- LTM-APM: Select for a web access management configuration.
- SSL-VPN: Select to configure network access, portal access, or application access. (Most access policy items are available for this type.)
- ALL: Select to support LTM-APM and SSL-VPN access types.
- SWG - Explicit: Select to configure access using Secure Web Gateway explicit forward proxy.
- SWG - Transparent: Select to configure access using Secure Web Gateway transparent forward proxy. Note: Depending on licensing, you might not see all of these profile types.
Additional settings display.
-
In the Language Settings area, add and remove accepted languages, and set the default language.
A browser uses the highest priority accepted language. If no browser language matches the accepted languages list, the browser uses the default language.
-
Click Finished.
The access profile displays in the Access Profiles List. Default-log-setting is assigned to the access profile.
Before you start, you need an OAuth server configured in Access Policy Manager (APM) that supports clients (Mode is set to Client or Client + Resource Server) .
You add an OAuth Client agent to an access policy to request authorization from an OAuth server for one or more scopes. You can add more than one OAuth Client item to an access policy, with each item requesting permission for additional scopes.
-
On the Main tab, click Access > Profiles / Policies.
The Access Profiles (Per-Session Policies) screen opens.
-
In the Per-Session Policy column, click the Edit link for the access profile you want to configure.
The visual policy editor opens the access policy in a separate screen.
-
Click the (+) icon anywhere in the access policy to add a new item.
Note: Only an applicable subset of access policy items is available for selection in the visual policy editor for any access profile type.
A popup screen opens, listing predefined actions on tabs such as General Purpose, Authentication, and so on.
-
On the Authentication tab, select OAuth Client.
-
Click Add Item.
The screen is not active while the visual policy editor creates the action. The screen closes and a Properties screen opens.
-
In the Name field, type a name for the policy item.
This name is displayed in the action field for the policy.
-
From the Server list, select an OAuth server.
Only OAuth servers configured with Mode set to Client or Client + Resource Server display.
-
From the Grant Type list, select one of these options:
- Authorization code - Redirects the user to the external server to authenticate. The user is redirected back to APM with an authorization code. APM uses the authorization code to request an access token
- Password - Requests an access token from the external server by using the user’s credentials (username and password). If this method is configured, the user must provide their external credentials to APM; to make this happen you must insert a logon page before the OAuth Client item in the access or the per-request policy. If you select Authorization code, the Redirection URI field displays.
-
To enable OpenID Connect in the agent, perform these substeps:
-
For OpenID Connect, select Enabled.
Additional fields display.
-
For OpenID Connect Flow Type, retain Authorization code or select Hybrid and then select an entry for OpenID Connect Hybrid Response Type.
-
For OpenID Connect UserInfo Request, select a request.
-
-
Select the requests to make to the OAuth server from the access policy.
- Authentication Redirect Request - Specifies an auth-redirect-request type request, which redirects a user to an OAuth server. Displays when Grant Type is set to Authorization code.
- Token Request - Specifies a token-request type of request. You can make a selection from the Refresh Token Request list, but the OAuth Client does not use this request from an access policy.
Requests are configured in the Access > Federation > OAuth Client / Resource Server > Requests area of the product.
-
If the Redirection URI field displays, retain the default value (https://%{session.server.network.name}/oauth/client/redirect) or type a URI that points back to the APM client.
Important: If you type a URI, you must retain this path
/oauth/client/redirect. Only change the host name portion of the URI.The OAuth server uses the URI to send the user back to APM.
-
In the Scope field, type one or more scopes separated by spaces.
Note: Each time you add another OAuth Client agent to a policy, you must include the scopes (for example, email photos) that were requested in the previous instance of the OAuth Client and append any additional scopes (for example, contacts) to the list (for example, email photos contacts).
Read the OAuth provider documentation to learn the names of the scopes that they support and the URIs where you can obtain the data.
-
Click Save.
The Properties screen closes. The newly added item displays in the policy.
-
If you selected Password from the Grant Type list, you must insert a logon page agent to precede the OAuth Client agent.
-
Click (+) ahead of the OAuth Client on the policy branch.
-
On the Logon Page tab, select OAuth Logon Page and click Add Item.
A Properties screen displays.
-
Click Save.
The properties screen closes. The policy displays.
-
-
Complete the policy:
-
Add any branch rules that you need.
By default, the OAuth Client item has a successful branch for any valid non-error JSON response it receives. However, you can add other branch rules based on authorization server response to suit your needs.
-
Change branch endings as needed; change Deny to Allow where you want to provide access.
-
-
Click the Apply Access Policy link to apply and activate the changes to the policy.
Before you start, you need an OAuth server that supports resource servers (Mode is set to Resource or Client + Resource Server) configured in Access Policy Manager (APM).
You add an OAuth Scope item to a policy either to request the list of scopes associated with an opaque token or to request scope data from the OAuth server.
Note: If the access policy already includes an OAuth Client item, place the OAuth Scope agent somewhere after the OAuth Client on the policy branch.
-
On the Main tab, click Access > Profiles / Policies.
The Access Profiles (Per-Session Policies) screen opens.
-
In the Per-Session Policy column, click the Edit link for the access profile you want to configure.
The visual policy editor opens the access policy in a separate screen.
-
Click the (+) icon anywhere in the access policy to add a new item.
Note: Only an applicable subset of access policy items is available for selection in the visual policy editor for any access profile type.
A popup screen opens, listing predefined actions on tabs such as General Purpose, Authentication, and so on.
-
On the Authentication tab, select OAuth Scope.
-
Click Add Item.
The screen is not active while the visual policy editor creates the action. The screen closes and a Properties screen opens.
-
In the Name field, type a name for the policy item.
This name is displayed in the action field for the policy.
-
From Token Validation Mode, retain the default setting, External.
This mode allows the OAuth Scope agent to make scope requests and OpenID Connect UserInfo requests.
-
From the Server list, select an OAuth server.
Only OAuth servers configured with Mode set to Resource Server or Client + Resource Server display.
-
To get a list of scopes associated with an access token, from the Scopes Request list, select a request to send to the OAuth provider.
The list displays validation-scopes-request types.
If F5 (APM) is the OAuth provider, select F5ScopesRequest.
Requests are configured in the Federation > OAuth Client / Resource Server > Requests area of the product.
-
To add requests for scope data (for example, to request a user’s email address or profile), perform these steps:
-
Click Add new entry.
A new line is added to the list of entries.
-
In the Scope Name field, type the name of a scope that the OAuth provider supports.
The scope must be associated with the access token. (The user must have granted permission for this scope.)
For example, some OAuth providers support scopes named
emailorprofile. -
From the Request list, select a request.
The list includes scope-data-request types. Select one that you configured to meet the requirements of the specific OAuth provider.
-
-
To include a UserInfo request, select one from the OpenID Connect UserInfo Request list.
-
Click Save.
The Properties screen closes. The newly added item displays in the policy.
-
Complete the policy:
-
Add any additional policy items you require.
-
Change the ending from Deny to Allow on any access policy branch on which you want to grant access.
-
-
Click the Apply Access Policy link to apply and activate the changes to the policy.
Before you start, you need to have configured a JSON web token (JWT) provider list. You can configure it in the Access > Federation > JSON Web Token > Provider List area of the product.
You can add an OAuth Scope item to a policy to process JSON web tokens (JWTs) from multiple providers.
Note: If the access policy already includes an OAuth Client item, place the OAuth Scope agent somewhere after the OAuth Client on the policy branch.
-
On the Main tab, click Access > Profiles / Policies.
The Access Profiles (Per-Session Policies) screen opens.
-
In the Per-Session Policy column, click the Edit link for the access profile you want to configure.
The visual policy editor opens the access policy in a separate screen.
-
Click the (+) icon anywhere in the access policy to add a new item.
Note: Only an applicable subset of access policy items is available for selection in the visual policy editor for any access profile type.
A popup screen opens, listing predefined actions on tabs such as General Purpose, Authentication, and so on.
-
On the Authentication tab, select OAuth Scope.
-
Click Add Item.
The screen is not active while the visual policy editor creates the action. The screen closes and a Properties screen opens.
-
In the Name field, type a name for the policy item.
This name is displayed in the action field for the policy.
-
From Token Validation Mode, select Internal.
This mode allows the OAuth Scope agent to process JSON web tokens from multiple providers.
The JWT Provider List field displays.
-
From JWT Provider List, select a list.
Provider lists are configured in the Access > Federation > JSON Web Token > Provider List area of the product.
-
Click Save.
The Properties screen closes. The newly added item displays in the policy.
-
Complete the policy:
-
Add any additional policy items you require.
-
Change the ending from Deny to Allow on any access policy branch on which you want to grant access.
-
A per-request policy runs at each request. A per-request policy subroutine runs periodically at whichever of these intervals is shorter: the number of minutes specified in the OAuth server Token Validation Interval field on Access Policy Manager (APM®), or the interval that the external OAuth authentication server specifies in the expires_in attribute of the access token it issues.
Before you start, you need an OAuth server configured in Access Policy Manager (APM) that supports clients (Mode is set to Client or Client + Resource Server) .
You configure a per-request policy subroutine to periodically validate an OAuth token, to obtain a new or a refresh token, to get scopes and scope data.
-
On the Main tab, click Access > Profiles / Policies > Per-Request Policies.
The Per-Request Policies screen opens.
-
In the Name field, locate the policy that you want to update, then in the Per-Request Policy field, click the Edit link.
The visual policy editor opens in another tab.
-
Click the Add New Subroutine button.
A popup screen opens.
-
On the Select Subroutine template list, retain the selection Empty, and click Save.
The popup screen closes. The subroutine, with the heading [+] Subroutine: Name, displays below the main editor.
-
Expand the subroutine by clicking the [+] icon.
The subroutine displays.
-
Click the (+) icon anywhere in the subroutine to add a new item.
A small set of actions are provided for building a subroutine.
A popup screen displays actions on tabs, such as General Purpose and Authentication, and provides a search field.
-
On the Authentication tab, select OAuth Client.
-
Click Add Item.
The screen is not active while the visual policy editor creates the action. The screen closes and a Properties screen opens.
-
In the Name field, type a name for the policy item.
This name is displayed in the action field for the policy.
-
From the Server list, select an OAuth server.
Only OAuth servers configured with Mode set to Client or Client + Resource Server display.
-
From the Grant Type list, select one of these:
-
Authorization code - Redirects the user to the external server to authenticate. The user is redirected back to APM with an authorization code. APM uses the authorization code to request an access token
-
Password - Requests an access token from the external server by using the user’s credentials (username and password). If this method is configured, the user must provide their external credentials to APM; to make this happen, you must insert a logon page before the OAuth Client item in the access or the per-request policy.
Note: If you select the password grant type, every time the per-request policy subroutine runs, it must request credentials from the user.
-
-
To add an OpenID Connect UserInfo request to the policy, perform these steps:
-
For OpenID Connect, select Enabled.
Additional fields display.
-
For OpenID Connect Flow Type, retain Authorization code or, select Hybrid and then select an entry for OpenID Connect Hybrid Response Type.
-
For OpenID Connect UserInfo Request, select a request.
-
-
Select requests for the per-request policy to make to the OAuth server.
- Authentication Redirect Request - Specifies an auth-redirect-request type request, which redirects a user to an OAuth server. Displays when Grant Type is set to Authorization code.
- Token Request - Specifies a token-request type of request.
- Refresh Token Request - Specifies a token-refresh-request type of request. Requests are configured in the Access > Federation > OAuth Client / Resource Server > Requests area of the product.
-
If the Redirection URI field displays, retain the default value (https://%{session.server.network.name}/oauth/client/redirect) or type a URI that points back to the APM client.
Important: If you type a URI, you must retain this path
/oauth/client/redirect. Only change the host name portion of the URI.The OAuth server uses the URI to send the user back to APM.
-
In the Scope field, type one or more scopes separated by spaces.
Note: Each time you add another OAuth Client agent to a policy, you must include the scopes (for example, email photos) that were requested in the previous instance of the OAuth Client and append any additional scopes (for example, contacts) to the list (for example, email photos contacts).
Read the OAuth provider documentation to learn the names of the scopes that they support and the URIs where you can obtain the data.
-
Click Save.
The Properties screen closes. The newly added item displays in the policy.
-
If you selected Password from the Grant Type list, you must insert a logon page agent to precede the OAuth Client agent.
-
Click (+) ahead of the OAuth Client on the policy branch.
-
On the Logon Page tab, select OAuth Logon Page and click Add Item.
A Properties screen displays.
-
Click Save.
The properties screen closes. The policy displays.
-
-
Complete the policy:
-
Add any branch rules that you need.
By default, the OAuth Client item has a successful branch for any valid non-error JSON response it receives. However, you can add other branch rules based on authorization server response to suit your needs.
-
Change branch endings as needed; change Deny to Allow where you want to provide access.
-
-
Add the subroutine to the per-request policy:
-
On a per-request policy branch, click the (+) icon.
-
Select the Subroutines tab.
-
Select the subroutine and click Add Item.
The popup screen closes and the policy displays.
-
-
To rename the subroutine or to update number of seconds that the subroutine has to complete its interactions with the OAuth server, perform these steps:
-
Click Subroutine Settings/Rename.
-
To rename the subroutine, type in the Name field.
-
To update the timeout, type a number in the Subroutine Timeout (sec) field.
Important: No additional settings on this screen are applicable to the OAuth Client and OAuth Scope items.
-
Click Save.
The popup screen closes. The subroutine displays in the policy.
-
To affect network traffic, along with an access policy, a per-request policy must be specified on a virtual server.
Before you start, you need an OAuth server that supports resource servers (Mode is set to Resource or Client + Resource Server) configured in Access Policy Manager (APM).
To periodically get scopes and scope data for an existing access token, you configure an OAuth Scope agent in a per-request policy subroutine.
-
On the Main tab, click Access > Profiles / Policies > Per-Request Policies.
The Per-Request Policies screen opens.
-
In the Name field, locate the policy that you want to update, then in the Per-Request Policy field, click the Edit link.
The visual policy editor opens in another tab.
-
Click the Add New Subroutine button.
A popup screen opens.
-
On the Select Subroutine template list, retain the selection Empty, and click Save.
The popup screen closes. The subroutine, with the heading [+] Subroutine: Name, displays below the main editor.
-
Expand the subroutine by clicking the [+] icon.
The subroutine displays.
-
Click the (+) icon anywhere in the subroutine to add a new item.
A small set of actions are provided for building a subroutine.
A popup screen displays actions on tabs, such as General Purpose and Authentication, and provides a search field.
-
On the Authentication tab, select OAuth Scope.
-
Click Add Item.
The screen is not active while the visual policy editor creates the action. The screen closes and a Properties screen opens.
-
In the Name field, type a name for the policy item.
This name is displayed in the action field for the policy.
-
From Token Validation Mode, retain the default setting, External.
This mode allows the OAuth Scope agent to make scope requests and OpenID Connect UserInfo requests.
-
From the Server list, select an OAuth server.
Only OAuth servers configured with Mode set to Resource Server or Client + Resource Server display.
-
To get a list of scopes associated with an access token, from the Scopes Request list, select a request to send to the OAuth provider.
The list displays validation-scopes-request types.
If F5 (APM) is the OAuth provider, select F5ScopesRequest.
Requests are configured in the Federation > OAuth Client / Resource Server > Requests area of the product.
-
To add requests for scope data (for example, to request a user’s email address or profile), perform these steps:
-
Click Add new entry.
A new line is added to the list of entries.
-
In the Scope Name field, type the name of a scope that the OAuth provider supports.
The scope must be associated with the access token. (The user must have granted permission for this scope.)
For example, some OAuth providers support scopes named
emailorprofile. -
From the Request list, select a request.
The list includes scope-data-request types. Select one that you configured to meet the requirements of the specific OAuth provider.
-
-
To include a UserInfo request, select one from the OpenID Connect UserInfo Request list.
-
Click Save.
The Properties screen closes. The newly added item displays in the policy.
-
Add the subroutine to the per-request policy:
-
On a per-request policy branch, click the (+) icon.
-
Select the Subroutines tab.
-
Select the subroutine and click Add Item.
The popup screen closes and the policy displays.
-
-
To rename the subroutine or to update number of seconds that the subroutine has to complete its interactions with the OAuth server, perform these steps:
-
Click Subroutine Settings/Rename.
-
To rename the subroutine, type in the Name field.
-
To update the timeout, type a number in the Subroutine Timeout (sec) field.
Important: No additional settings on this screen are applicable to the OAuth Client and OAuth Scope items.
-
Click Save.
The popup screen closes. The subroutine displays in the policy.
-
To affect network traffic, along with an access policy, a per-request policy must be specified on a virtual server.
Before you start this task, you need to have configured a JSON web token (JWT) provider list. Provider lists are configured in the Access > Federation > JSON Web Token > Provider List area of the product.
You can add an OAuth Scope item to a policy to process JSON web tokens (JWTs) from multiple providers.
-
On the Main tab, click Access > Profiles / Policies > Per-Request Policies.
The Per-Request Policies screen opens.
-
In the Name field, locate the policy that you want to update, then in the Per-Request Policy field, click the Edit link.
The visual policy editor opens in another tab.
-
Click the Add New Subroutine button.
A popup screen opens.
-
On the Select Subroutine template list, retain the selection Empty, and click Save.
The popup screen closes. The subroutine, with the heading [+] Subroutine: Name, displays below the main editor.
-
Expand the subroutine by clicking the [+] icon.
The subroutine displays.
-
Click the (+) icon anywhere in the subroutine to add a new item.
A small set of actions are provided for building a subroutine.
A popup screen displays actions on tabs, such as General Purpose and Authentication, and provides a search field.
-
On the Authentication tab, select OAuth Scope.
-
Click Add Item.
The screen is not active while the visual policy editor creates the action. The screen closes and a Properties screen opens.
-
In the Name field, type a name for the policy item.
This name is displayed in the action field for the policy.
-
From Token Validation Mode, select Internal.
This mode allows the OAuth Scope agent to process JSON web tokens from multiple providers.
-
From JWT Provider List, select a list.
Provider lists are configured in the Access > Federation > JSON Web Token > Provider List area of the product.
-
Click Save.
The Properties screen closes. The newly added item displays in the policy.
You can create a virtual server to manage HTTPS traffic.
-
On the Main tab, click Local Traffic > Virtual Servers.
The Virtual Server List screen opens.
-
Click Create.
The New Virtual Server screen opens.
-
In the Name field, type a unique name for the virtual server.
-
In the Service Port field, type
443or select HTTPS from the list. -
From the HTTP Profile list, select http.
-
For the SSL Profile (Client) setting, from the Available list, select clientssl, and using the Move button, move the name to the Selected list.
-
Click Finished.
The HTTPS virtual server appears in the Virtual Server List screen.
You associate an access profile with a virtual server for use in establishing an access session. If you have configured a per-request policy, which is for use throughout the access session, you associate it with the virtual server also.
-
On the Main tab, click Local Traffic > Virtual Servers.
The Virtual Server List screen opens.
-
Click the name of the virtual server that manages access for the web application you are securing.
-
In the Access Policy area, from the Access Profile list, select the access profile that you configured earlier.
-
In the Access Policy area, from the Per-Request Policy list, select the policy that you configured earlier.
-
Click Update.
The access profile (and access policy) and the per-request policy are now associated with the virtual server.
The default OAuth Logon Page agent displays messages that instruct the user to log in using an authorization code or a resource owner password credentials (ROPC) grant type. It displays option buttons from which users select the OAuth provider through whom they want to log in.
Note: For an alternative look and feel, an advanced customization template for the OAuth Logon Page agent is available on DevCentral.
Customization options in the OAuth Logon Page agent enable an admin to add, update, delete, and reorganize the OAuth providers, as well as to configure the fields and text to display.
The OAuth Logon Page advanced customization template provides the code and the images necessary to display a logon page that, by default, looks like this.
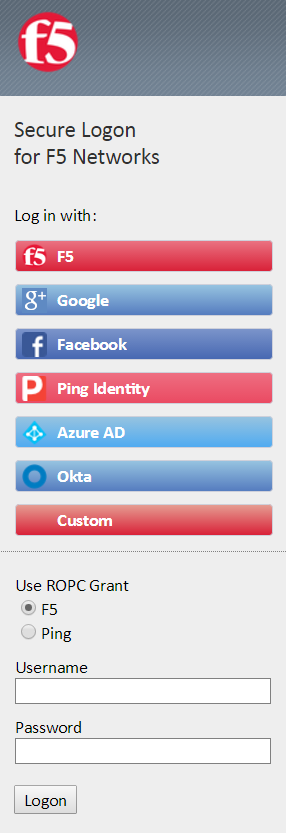
Note: No affiliation between F5 Networks, Inc. (and its affiliated companies), and any of the above companies, including their associated products and services, relating to the functionality above, exists or is implied, nor is there any actual or implied recommendation or endorsement thereof.
The template forms a starting point for additional customization to achieve a logon page with the preferred providers, images, colors, fields, and text.
The OAuth Logon Page template is available for download from DevCentral™ at devcentral.f5.com. Instructions for advanced customization with the OAuth Logon Page template are also available in BIG-IP Access Policy Manager: Advanced Customization Examples on DevCentral.
You can add, delete, and reorder the list of OAuth providers that display on an OAuth Logon Page.
-
Open the per-session policy (or the per-request policy subroutine) that you want to update.
-
Click the OAuth Logon Page item.
A Properties screen opens.
-
In row 1 of the Logon Page Agent table, click the Values field.
Row 1 contains values for the oauthprovidertype variable.
A popup screen displays options with a Value and a Text field for each provider.
-
Add, delete, or reorder the providers, and click Finished.
The popup screen closes. The updated list of providers displays in the Values field in row 1.
-
If you added a provider, add a branch rule for that provider:
-
Click the Branch Rules tab.
-
Click Add Branch Rule.
A new entry with Name and Expression settings displays.
-
In the Name field, replace the default name by typing a new name.
The name appears on the branch in the policy.
-
Select and copy an expression from another branch rule.
For example, copy the expression displayed for the F5 branch rule:
`expr` {[`mcget` {**session.logon.last.oauthprovidertype**}] == "`F5`"} -
For the branch rule that you added, in the Expression setting click the change link.
A popup screen opens.
-
Click the Advanced tab, paste the expression into the field, and replace the existing provider name (such as
F5) with the new provider name.For example, the result might look like this:
`expr` {[`mcget` {**session.logon.last.oauthprovidertype**}] == "`Siterequest`"} -
Click Finished.
The popup screen closes.
-
Click Save.
The properties screen closes and the policy displays.
-
-
Click Finished.
The popup screen closes.
-
If you are working with a per-session policy, click the Apply Access Policy link.
Some applications do not support standard HTTP redirection and cookies. For Access Policy Manager (APM®) to act as an OAuth resource server and provide an OAuth authorization layer into an API gateway, you must configure APM with a special access profile. This access profile also allows only a limited set of policy agents.
As a resource server gateway, APM must validate the tokens it receives. APM supports JSON web tokens (JWT) and validates them internally on the BIG-IP system. APM also supports opaque tokens: to validate them, APM must interact with OAuth providers that are external to the BIG-IP system. APM also supports requesting UserInfo at a URI on an OAuth provider.
A single OAuth Scope agent works to validate tokens internally or externally. If you need to do both, you need two OAuth Scope agents. You can configure them using one access profile and policies that branch to the separate agents. Or you can configure them using two access profiles with policies that each contain an OAuth Scope agent. Those details are up to you. In this example, we walk through configuring one access profile and a policy that includes one OAuth Scope agent.
This configuration supports OAuth client apps that send requests with an HTTP Authorization header that contains an OAuth Bearer token.
-
Creating APM access and per-request policies for a resource server gateway
-
Adding access profile and per-request policy to the virtual server
You create an access profile to provide the access policy configuration for a virtual server that establishes a secured session.
-
On the Main tab, click Access > Profiles / Policies.
The Access Profiles (Per-Session Policies) screen opens.
-
Click Create.
The New Profile screen opens.
-
In the Name field, type a name for the access profile.
Note: A access profile name must be unique among all access profile and any per-request policy names.
-
From the Profile Type list, select OAuth-Resource Server.
The User Identification Method setting changes to OAuth Token.
-
In the Language Settings area, add and remove accepted languages, and set the default language.
A browser uses the highest priority accepted language. If no browser language matches the accepted languages list, the browser uses the default language.
-
Click Finished.
The access profile displays in the Access Profiles List. Default-log-setting is assigned to the access profile.
Before you start this task, you need to have configured these objects in Access Policy Manager (APM):
- An OAuth server that supports resource servers only (Mode is set to Resource).
- An access profile of the OAuth-Resource Server type.
- A JSON web token provider list to process JWTs if you plan to process them with this agent.
To use Access Policy Manager (APM) as an OAuth resource server gateway, we advise using an OAuth Scope agent to validate the tokens that APM receives. You can configure an OAuth Scope agent in an access policy, a per-request policy subroutine, or both.
In addition to OAuth Scope, other authentication agents are available. For example, when retrieving a user name from a JWT token, you can then perform an AD/LDAP query to retrieve the user’s group and other details for further authorization as well as for generating a brand new token/assertion for the backend SSO server.
-
Open the access policy in the visual policy editor:
-
On the Main tab, click Access > Profiles / Policies > Access Profiles (Per-Session Policies).
The screen displays a list of access profiles.
-
Locate the correct access profile.
Make sure the Profile Type is set to OAuth-Resource Server.
-
In the Per-Session Policy field, click the Edit link.
The visual policy editor opens the access policy in a separate screen.
-
-
Click the (+) icon anywhere in the access policy to add a new item.
Note: Only an applicable subset of access policy items is available for selection in the visual policy editor for any access profile type.
A popup screen opens, listing predefined actions on tabs such as General Purpose, Authentication, and so on.
-
To review the subset of agents that are allowed for use with the OAuth-Resource Server access profile type, click each tab.
-
To configure the OAuth Scope agent to validate JSON web tokens internally, on the BIG-IP system, perform these substeps:
Note: You can configure an OAuth Scope agent to validate JWTs internally or to perform validation externally. With external validation, you can validate opaque tokens and get UserInfo. To perform internal validation and external validation requires configuration of more than one OAuth Scope agent.
To configure external validation instead, skip these substeps.
-
From Token Validation Scope, select Internal.
-
From JWT Provider List, select a list of providers.
-
Click Save.
The properties screen closes. The policy displays.
-
-
To configure an OAuth Scope agent to validate opaque tokens or to get UserInfo or both, perform these substeps:
-
From Token Validation Scope, select External.
-
On the Authentication tab, select OAuth Scope.
-
From the Server list, select an OAuth server that you know to be configured with Mode set to Resource Server.
Important: Do not select an OAuth server configured with Mode set to Client + Resource Server.
-
From the Scopes Request list, select a request.
Only validate-scopes-request type requests display.
If F5 (APM) is the OAuth provider, select F5ScopesRequest.
-
To add scope data requests, click Add new entry and, in the Scope Name field, type the name of a scope that the OAuth provider supports; then, from the Request list, select a scope data request that was configured to meet the requirements of the OAuth provider.
-
Click Save.
The properties screen closes. The policy displays.
-
-
To save and apply any changes that you made to the access policy, click Apply Access Policy.
-
To add an OAuth Scope agent to a per-request policy subroutine:
-
On the Main tab, click Access > Profiles / Policies > Per-Request Policies.
-
To open a per-request policy for editing, click the Edit link in thePer-Request Policy field.
Note: If you must create a per-request policy first, provide a name for it that is unique among all access profiles and per-request policies.
-
Click Add New Subroutine.
A popup screen opens. The Subroutine from template field specifies Empty.
-
Click Save.
The popup screen closes. The heading, [+] Subroutine: Name, displays below the main editor.
-
Expand the subroutine for editing by clicking the [+] icon.
-
In the subroutine area, click [+].
An Add Item popup screen opens.
-
On the Authentication tab, select OAuth Scope and click Add Item.
-
To configure the OAuth Scope agent properties, follow the instructions provided in this task previously.
-
To add the subroutine to the per-request policy, in the main editor click the [+] icon.
-
Click the Subroutines tab, select the subroutine, and click Add Item.
The subroutine displays in the per-request policy.
-
To put the access policy into effect, you must specify the access profile in the virtual server. If you configured OAuth authentication in a per-request policy subroutine, you must also specify the per-request policy in that virtual server.
You can create a virtual server to manage HTTPS traffic.
-
On the Main tab, click Local Traffic > Virtual Servers.
The Virtual Server List screen opens.
-
Click Create.
The New Virtual Server screen opens.
-
In the Name field, type a unique name for the virtual server.
-
In the Service Port field, type
443or select HTTPS from the list. -
From the HTTP Profile list, select http.
-
For the SSL Profile (Client) setting, from the Available list, select clientssl, and using the Move button, move the name to the Selected list.
-
Click Finished.
The HTTPS virtual server appears in the Virtual Server List screen.
You associate an access profile with a virtual server for use in establishing an access session. If you have configured a per-request policy, which is for use throughout the access session, you associate it with the virtual server also.
-
On the Main tab, click Local Traffic > Virtual Servers.
The Virtual Server List screen opens.
-
Click the name of the virtual server that manages access for the web application you are securing.
-
In the Access Policy area, from the Access Profile list, select the access profile that you configured earlier.
-
In the Access Policy area, from the Per-Request Policy list, select the policy that you configured earlier.
-
Click Update.
The access profile (and access policy) and the per-request policy are now associated with the virtual server.
After Access Policy Manager® (APM®) gets or validates an OAuth token, the token can be used for single sign-on (SSO). Simply create an OAuth bearer SSO configuration and select it from any configuration object where APM lets you do that; for example, in an access profile.
APM gets or validates tokens when OAuth Client or OAuth Scope agents run in a policy.
You create an OAuth bearer SSO configuration when you want to allow single-sign on using an OAuth token. SSO generates a signed JWT (JSON web token) and sends it to the backend as an OAuth bearer token.
-
On the Main tab, select Access > Single Sign-On > OAuth Bearer.
The OAuth Bearer Configurations screen opens.
-
Click Create.
The New SSO Configuration screen opens.
-
In the Name field, type a name for the SSO configuration.
The maximum length of a single sign-on configuration is 225 characters, including the partition name.
-
For Send Token, select when to send the token:
- To always send the token, select Always.
- To send the token when you receive a 4xx response from the server, select On 4xx Response and choose one or more 4xx responses.
-
For Log Settings, select the log settings to use for the access event logs.
By default, the log settings specified in the access profile are used. You can also create custom log settings or use the default-log-setting for this SSO configuration. Click + to create custom settings.
-
For Token Source, select Generate JWT and follow the remaining steps in this task to define the JWT.
-
For Issuer, type the URL for the JWT issuer. For example,
https://jwt-issuer.com. -
In Subject, retain the default value,
%{session.assigned.uuid}, or type a subject for the JWT.The session variable session.assigned.uuid contains the UUID that the system assigns to the session after the access policy completes.
-
To increase performance until the cached JWT expires, click Enable Token Cache to store the token in cache for the session and reuse it as needed.
-
For Access Token Lifetime, type the number of minutes you want the JWT access token to be considered valid.
The default is 5 minutes.
-
From Signing Key, select the JWK key configuration previously created for signing the token.
-
For Audience, add the audience claim or claims for which the JWT access token is intended. This is a list of values. Each value in this list can be a string, URI, or session variable.
-
For Scope, type one or more space-separated scope strings (using the ASCII character set) or session variables. For example,
openid phone email.Note: For example, to create a JWT claim called
scope, specify it here. You cannot use reserved words such as scope as the name of a JWT claim. -
If you created claims for the token, for JWT Claims, move the previously created claims you want to use to the Selected list.
-
The other fields are not required but you can set them if needed.
-
Click Finished.
When you configure an APM object that supports single sign-on, it includes an SSO Configuration property. Select the SSO bearer configuration from the object where you want to put SSO into effect.
You add an OAuth bearer SSO configuration to an access profile if you want to allow single sign-on using an OAuth bearer token.
Note: You can also select an SSO configuration from a portal access resource.
-
On the Main tab, click Access > Profiles / Policies.
The Access Profiles (Per-Session Policies) screen opens.
-
Click the name of the access profile that you want to edit.
The properties screen opens.
-
Click SSO / Auth Domains on the menu bar.
The SSO Across Authentication Domains screen opens.
-
From the SSO Configuration list, select the OAuth bearer SSO configuration you want the access profile to use.
Other settings on the screen are not relevant when using an OAuth bearer SSO configuration.
-
Click Update.
An access profile goes into effect when it is associated with a virtual server.
Access Policy Manager (APM®) collects OAuth performance statistics on the BIG-IP system. After you configure and start to use APM as an OAuth server or an OAuth client and resource server, APM collects statistics without requiring any additional setup.
To perform this task, you must be logged into the BIG-IP system in one of these user roles: manager, administrator, or resource administrator.
You chart server performance when you want to see the rate of requests that Access Policy Manager (APM), acting as an OAuth client or resource server or both, processes over a period of time.
-
On the Main tab, click Access > Overview > OAuth Reports > Client / Resource Server.
The x-axis for the chart specifies time. The y-axis specifies the rate: requests per second.
The screen displays the Overview line graph with data from the last hour. The legend specifies the request types represented by each colored line; Error represents errors that occurred for any of the requests.
-
To display the rate of requests for the interval represented by a point in the chart, place your cursor at the point in the chart.
The legend updates to display the rates.
-
To get the number of requests for a point in the chart, multiply the rate by the number of seconds in the interval.
The interval between two consecutive points on a chart depends on the selected Time.
-
To generate the chart for another period of time, select one from the Time list.
The interval between two consecutive points in an OAuth performance chart depends on the time period selected for the chart.
| Time | Interval |
|---|---|
| Last hour | 30 seconds |
| Last 3 hours | 1 minute (60 seconds) |
| Last 12 hours | 6 minutes (360 seconds) |
| Last day | 12 minutes (720 seconds) |
| Last week | 1 hour (3600 seconds) |
| Last 30 days | 4 hours (14400 seconds) |
| Last 3 months | 12 hours (43200 seconds) |
| Last 6 months | 1 day (86400 seconds) |
You might run into problems with an OAuth client or resource server on the BIG-IP system in some instances. Follow these tips to try to resolve any issues you might encounter.
|
Log message |
Possible explanations and corrective actions |
|---|---|
|
|
The server SSL profile is missing for the OAuth client or resource server that is specified in the OAuth server configuration. Verify the OAuth server configuration on the BIG-IP system. |
|
|
One or more URIs are not configured properly for the OAuth provider. Verify the OAuth provider configuration on the BIG-IP system. |
|
|
This is an internal APMD error; this error should not occur. |
|
|
A particular request object is not configured properly. Verify request object configuration on the BIG-IP system. |
|
|
This is an internal APMD error; this error should not occur. |
|
|
The authorization redirect request URI is invalid. Verify the OAuth Client agent configuration in the policy and verify the configuration for the authorization redirect request that it specifies. |
|
|
Authorization code sent by the authorization server is not found. There could be a problem on the OAuth client or on the external authorization server. Examine the error logs on the external authorization server. |
|
|
An improper grant type was used from the OAuth Client; this error should not occur. |
|
|
A parameter for an OAuth request was invalid; this error should not occur. |
|
|
The OAuth client (or resource server) received an empty response from the authorization server. Examine the error logs on the external authorization server. |
|
|
The OAuth resource server failed to get scope details. Examine the error logs on the external authorization server. |
|
|
This is an internal APMD error; this error should not occur. |
|
|
The OAuth client received an error code. Use the error code and message to help with troubleshooting. |
|
|
This warning means that the OAuth client agent failed to validate the token. When this happens, the OAuth client tries to refresh or get a new token |
|
|
This warning means that the OAuth client failed to refresh an access token. When this happens, the OAuth client tries to fetch a new token. |
|
|
This error indicates that the OAuth client or resource server failed to connect to the authorization server. Typically, this is caused by one or more configuration issues. Verify that these aspects of your configuration are correct:- DNS
|
|
|
Configure JSON web keys (JWKs) to verify this JSON Web Token (JWT) signature; or, request a new valid JWT |
|
|
The authorization server must include a base64 URL-encoded JSON Object Signing and Encryption (JOSE) header in the JWT. |
|
|
Request a new valid JWT. |
|
|
In an unsecured JWT, the authorization server must send a JOSE header with alg: none. |
|
|
The authorization server must send a JOSE header with the “alg” claim and value. |
|
|
The authorization server must send a JOSE payload with the “iss” claim and value. |
|
|
If the authorization server sends the “crit” header parameter, it must be a string array. |
|
|
If “crit” header parameter is specified in the JWT that the authorization server sends, it must be a non-empty string array. |
|
|
The JOSE header parameter sent in the JWT was invalid. Request a new valid JWT. |
|
|
Request a JWT signed by an algorithm supported by F5 Client. |
|
|
The authorization server must send a JOSE header with the “alg” claim and value. |
|
|
Configure the provider that matches this issuer with allowed algorithms=none. |
|
|
Configure the right issuer for this provider; or, request a JWT from the right provider. |
|
|
The JWT was not meant for this client; or, configure the right audience for the client. |
|
|
Invalid JWT received; request a new JWT. |
|
|
Request another JWT, because the received JWT has expired. |
|
|
Configuration on the authorization server that sends JWT must send the audience claim with a string value. |
|
|
The received JWT has been blacklisted; request a new valid JWT. |
|
|
Signature verification of the JWT did not succeed. |
|
|
Check JWK key configuration to match JWT signature |
|
|
Make sure the JWK key configuration matches the JWT algorithms |
|
|
Configure the correct symmetric key to verify this JWT signature. |
|
|
Configure the correct key to verify the received JWT signature. |