Updated Date: 07/07/2026
Configuring Webtops for Portal Access
There are three webtop types you can define on Access Policy Manager (APM®). You can define a network access only webtop, a portal access webtop, or a full webtop.
Important: Do not assign a webtop for a portal access connection configured for minimal patching mode. This configuration does not work.
-
A network access webtop provides a webtop for an access policy branch to which you assign only a network access resource for starting a network access connection that provides full network access.
-
A portal access webtop provides a webtop for an access policy branch to which you assign only portal access resources. When a user selects a resource, APM communicates with back-end servers and rewrites links in application web pages so that further requests from the client browser are directed back to the APM server.
-
A full webtop provides an access policy ending for an access policy branch to which you can optionally assign portal access resources, app tunnels, remote desktops, and webtop links, in addition to network access tunnels. Then, the full webtop provides your clients with a web page on which they can choose resources, including a network access connection to start.
Note: If you add a network access resource with Auto launch enabled to the full webtop, the network access resource starts when the user reaches the webtop. You can add multiple network access resources to a webtop, but only one can have Auto launch enabled.
A webtop provides a screen for your users to connect and disconnect from the portal access connection.
-
On the Main tab, click Access > Webtops > Webtop Lists.
The Webtops screen displays.
-
Click Create.
The New Webtop screen opens.
-
In the Name field, type a name for the webtop.
-
From the Type list, select Portal Access.
-
In the Portal Access Start URI field, specify the URI that the webtop starts.
-
Click Finished.
The webtop is now configured, and appears in the list. You can edit the webtop further, or assign it to an access policy.
To use this webtop, it must be assigned to an access policy with an advanced resource assign action or with a webtop, links and section assign action.
Important: Do not assign a webtop for a portal access connection configured for minimal patching mode. This configuration does not work.
A full webtop allows your users to connect and disconnect from a network access connection, portal access resources, SAML resources, app tunnels, remote desktops, and administrator-defined links.
-
On the Main tab, click Access > Webtops > Webtop Lists.
The Webtops screen displays.
-
Click Create.
The New Webtop screen opens.
-
In the Name field, type a name for the webtop.
-
From the Type list, select Full.
The Configuration area displays with additional settings configured at default values.
-
Click Finished.
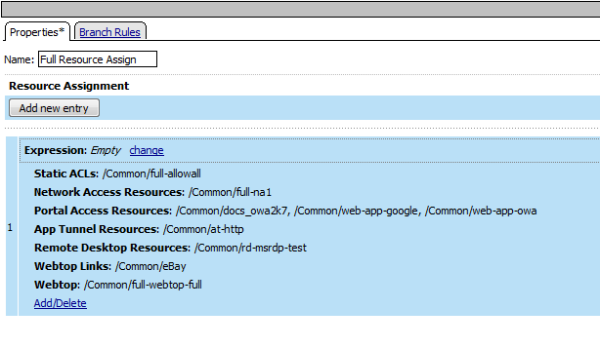
To use this webtop, it must be assigned to an access policy with an advanced resource assign action or with a webtop, links, and sections assign action. All resources assigned to the full webtop are displayed on the full webtop.
You can create and customize links that you can assign to full webtops. In this context, links are defined applications and websites that appear on a webtop, and can be clicked to open a web page or application. You can customize these links with descriptions and icons.
-
On the Main tab, click Access > Webtops > Webtop Links.
-
Click Create.
The New Webtop Link screen opens.
-
In the Name field, type a name for the webtop link.
-
From the Link Type list, select whether the link is a URI or hosted content.
- If you selected Application URI, in the Application URI field, type the application URI.
- If you selected Hosted Content, select the hosted file to use for the webtop link.
-
In the Caption field, type a descriptive caption.
The Caption field is pre-populated with the text from the Name field. Type the link text that you want to appear on the web link.
-
If you want to add a detailed description, type it in the Detailed Description field.
-
To specify an icon image for the item on the webtop, click in the Image field and choose an image, or click the Browse button.
Click the View/Hide link to show or hide the currently selected image.
-
Click Finished.
The webtop link is now configured, and appears in the list, and on a full webtop assigned with the same action. You can edit the webtop link further, or assign it to an access policy.
Before you can use this webtop link, it must be assigned to an access policy with a full webtop, using either an advanced resource assign action or a webtop, links and sections assign action.
At your option, you can override the default display for resources on a full webtop by organizing resources into user-defined sections. A webtop section specifies a caption, a list of resources that can be included in the section, and a display order for the resources. The order in which to display webtop sections is also configurable.
By default, resources display on a webtop in these sections: Applications and Links, and Network Access. Within the sections, resources display in alphabetical order.
Create a webtop section to specify a caption to display on a full webtop for a list of resources. Specify the order of the webtop section relative to other webtop sections.
-
On the Main tab, click Access > Webtops > Webtop Sections.
The Webtop Sections screen displays.
-
In the Name field, type a name for the webtop section.
-
From the Display Order list, select one the options.
Specify the display order of this webtop section relative to others on the webtop.
- First: Places this webtop section first.
- After: When selected, an additional list displays; select a webtop section from it to place this webtop section after it in order.
- Specify: When selected, an additional field displays. Type an integer in it to specify the absolute order for this webtop section.
-
From the Initial State list, select the initial display state:
- Expanded: Displays the webtop section with the resource list expanded.
- Collapsed: Displays the webtop section with the resource list collapsed.
-
Click Finished.
Specify resources for this webtop section.
Specify the resources to display in a webtop section.
Note: When these resources are assigned to a session along with the webtop section, they display in the section on the webtop.
-
On the Main tab, click Access > Webtops > Webtop Sections.
The Webtop Sections screen displays.
-
In the table, click the name of the webtop section that you want to update.
The Properties screen displays.
-
Repeat these steps until you have added all the resources that you require:
-
Click Add.
A properties screen displays the list of resources.
-
Locate the appropriate resources, select them, and click Update.
The Webtop Sections screen displays.
-
Webtop sections can be assigned in an access policy using Webtop, Links and Sections, or Advanced Resource Assign actions.
Use these properties to configure a webtop.
|
Property setting |
Value |
Description |
|---|---|---|
|
Type |
Network Access, Portal Access, or Full |
|
|
Portal Access Start URI |
URI. |
Specifies the URI that the web application starts. For full webtops, portal access resources are published on the webtop with the associated URI you define when you select the Publish on Webtop option. |
|
Minimize to Tray |
Enable or Disable. |
If this check box is selected, the webtop is minimized to the system tray automatically after the network access connection starts. With a network access webtop, the webtop automatically minimizes to the tray. With a full webtop, the webtop minimizes to the system tray only after the network access connection is started. Note: The Enable option does not work, however, for web browsers that do not support NPAPI plugins. The result is the main APM web browser window is not minimized to the system tray after network access connects successfully. |