Updated Date: 07/07/2026
Configuring an SWG Agent for User Identification
Transparent user identification makes a best effort to identify users without requesting credentials. It is not authentication. It should be used only when you are comfortable accepting a best effort at user identification.
Transparent user identification is supported in Secure Web Gateway (SWG) configurations for either explicit or transparent forward proxy. An agent obtains data and stores a mapping of IP addresses to user names in an IF-MAP server. An F5 DC Agent queries domain controllers. An F5 Logon Agent runs a script when a client logs in and can be configured to run a script when the client logs out.
Note: Agents are available only on a BIG-IP system with an SWG subscription.
In an access policy, a Transparent Identity Import item obtains the IP-address-to-username-mapping from the IF-MAP server. This item can be used alone for determining whether to grant access or be paired with another query to look up the user or validate user information.
To support this option, either the Secure Web Gateway F5 DC Agent or F5 Logon Agent must be downloaded, installed, and configured.
The F5 DC Agent enables transparent user identification, a best effort to identify users without requesting credentials.
Note: F5 DC Agent is available only on a BIG-IP system with an SWG subscription.
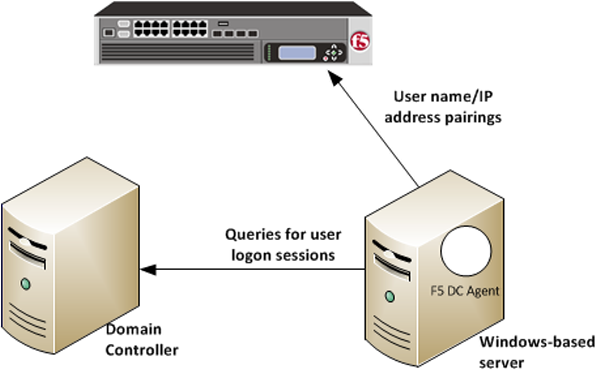
You can install the F5 DC Agent on a Windows-based server in any domain in the network. The F5 DC Agent discovers domains and domain controllers, queries the domain controllers for logon sessions, and sends an IP-address-to-user-name mapping to the BIG-IP system. F5 DC Agent sends only those new user name and IP address pairs recorded since the previous query. The BIG-IP system maintains user identity information in an IF-MAP server and stores only the most recently identified user name for a given IP address.
Note: F5 DC Agent does not transmit passwords or any other confidential information.
You can install more than one F5 DC Agent in your network and configure F5 DC Agents to communicate with the same BIG-IP system.
- NetBIOS port 139
- F5 DC Agent uses NetBIOS port 139 for automatic domain detection. If NetBIOS port 139 is blocked in your network, you can deploy an F5 DC Agent instance for each virtually or physically remote domain.
- Multiple subnets
- As a best practice, install a separate F5 DC Agent in each subnet to avoid problems gathering logon information from domain controllers.
- Network size, disk space, and RAM
- If your network is very large (10,000+ users or 30+ domain controllers), you might benefit from installing F5 DC Agent on multiple machines to evenly distribute resource usage. F5 DC Agent uses TCP to transmit data, and transmits roughly 80 bytes per user name and IP address pair.
| Number of users | Average amount of data transferred per day |
|---|---|
| 250 users | 30 KB |
| 2,000 users | 240 KB |
| 10,000 users | 1200 KB |
You use an iApps template to deploy an application service that configures objects that the F5 DC Agent uses to communicate with the IF-MAP server on the BIG-IP system.
Note: You can configure the F5 DC Agent to authenticate with the BIG-IP system using certificate inspection or using clientless HTTP basic authentication against a local user database.
-
To support certificate inspection:
-
Obtain a trusted certificate and key that are valid for all fully qualified domain names (FQDNs) used to access the BIG-IP system.
-
Import the certificate and key into the BIG-IP system.
You can import SSL certificates from the System area of the product.
-
-
Obtain the iApps template file for IF-MAP Secure Web Gateway from F5 DevCentralat
http://devcentral.f5.com:-
In the Search field, type
IF-MAPand click the search icon. -
Download the zip file and extract all contents.
Template file names end with
.tmpl.
-
-
Import the template:
-
On the Main tab, click iApps > Templates.
-
Next, click Import.
-
Select the Overwrite Existing Templates check box.
-
Click Choose File, then browse to and choose the template file.
-
Click Upload.
-
-
Deploy an application service:
-
On the Main tab, click iApps Application > Services, and then click Create.
-
In the Name field, type a name.
Note: The application service prefixes this name to the names of configuration objects it creates.
-
From the Template list, select f5.ifmap.
Note: This iApps template displays on the list only when APM is provisioned.
-
Follow the instructions on the screen to complete the deployment.
A summary displays the configuration objects.
-
Take note of the IP address of the virtual server created by the service. You need to type it into F5 DC Agent initialization file later.
Note: This virtual server must be accessible by the F5 DC Agent from a routing perspective.
-
-
To enable clientless HTTP basic authentication, create a user and password in the local user database.
The purpose of this user account is to authenticate communication between the F5 DC Agent and the BIG-IP system.
-
On the Main tab, click Access Policy > Local User DB > Manage Users.
The Manage Users screen displays.
-
Click Create New User.
The Create New Local User screen opens and displays User Information settings.
-
From the Instance list, select the instance created when you deployed the application service.
-
In the User Name field, type the user name.
Take note of the user name and password. You need to type them again later when you configure the initialization file for F5 DC Agent.
-
In the Password and Confirm Password fields, type the user’s password.
-
You can verify that there are no DNS or NetBIOS or network communications issues on a Windows-based server before you install the F5 DC Agent on it. Alternatively, you can use these steps for troubleshooting if you observe a problem.
-
Open a command prompt on the Windows-based server that hosts, or will host, the F5 DC Agent.
-
To verify that the Windows-based server sees all required domains, use the
net viewcommand.For example, type
net view/network -
To check for DNS issues, use the
nslookupcommand.For example, to verify that DNS resolves the host name, testmachine1, type this command: ``nslookup
**testmachine1**. If the DNS lookup succeeds, the result is similar to:Server: testdns.test.example.com Address: 10.56.1.4 Name: testmachine1.test.example.com Address: 10.56.100.15 -
To verify that F5 DC Agent will be able to use NetBIOS, try to telnet to a domain controller on port
139.If the command is successful, the screen remains blank. If unsuccessful, then:
- A router, firewall, or other device might be blocking NetBIOS traffic.
- NetBIOS might not be enabled and the domain controller might not be listening on port
139.
-
If you could not successfully telnet to a domain controller on port
139, verify the status of the port using thenetstatcommand.For example, type: ``netstat
-na**\| find** *"139"* -
To verify that the F5 DC Agent will be able to communicate with the virtual server on the BIG-IP system, telnet to the IP address of the virtual server on port
8096or on the port that you entered when creating the application service.This virtual server was created using an application service based on the f5.ifmap iApps template.
F5 DC Agent is available when Access Policy Manager (APM) is licensed and provisioned on the BIG-IP system. Before you perform these steps, make sure that the Windows Computer Browser service is running on the Windows server where you plan to install F5 DC Agent.
You perform this task to be able to identify clients transparently by IP address. (Do this only in an environment where IP addresses are trusted and unique.)
-
Go to the BIG-IP system Configuration utility Welcome screen.
If you are already logged in, click the F5 logo to open the Welcome screen.
-
In the BIG-IP User Identification Agents area, click the User Identification Agents link.
A
SWGUserIdentificationAgents.exefile downloads. -
Copy the downloaded file to a Windows-based server that is joined to a domain controller.
Important: Do not install F5 DC Agent on a domain controller because the F5 DC Agent can put a load on the domain controller.
-
From an account with both local and administrator privileges, click the
SWGUserIdentificationAgents.exefile to start the installer.The installer displays instructions.
-
Follow the instructions to complete the installation.
Important: F5 strongly recommends that you use the default destination folder. On the Destination Folder screen, click Next without making any changes.
Important: Install either F5 DC Agent or F5 Logon Agent, but not both. This overwrites the omapd user map every time an update is published.
The program installs a Windows service, F5 DC Agent.
The F5 DC Agent service must run from a privileged account. You can create a new user account or use an existing account configured as specified in step 1.
-
On the Windows-based server, create a user account for F5 DC Agent:
-
Assign to the new account both read/write privileges in all domains.
-
Make the account a member of the domain controller’s event reader group.
-
Assign the same password to this account on all domains.
-
Set the password setting to never expire.
This account exists only to provide a security context to access directory objects.
-
-
Configure the F5 DC Agent service to log on as the user account you just configured:
-
Open the Windows Services dialog box.
From the Control Panel, select Administrative Tools > Services.
-
Locate the F5 DC Agent service, right-click the service name, and select Stop.
-
Double-click the service name, and then select the Log On tab.
-
Select This account and type the account name and password for the account you created in step 1.
Note: Some domains require that you type the account name in the format domain\username.
-
Close the Services dialog box.
-
Start the F5 DC Agent service again after the initialization file configuration is complete.
Before you can configure the initialization file, you must have the F5 DC Agent installed on a domain-joined, Windows-based server. You must also have deployed an iApps application service to configure objects that enable communication between the F5 DC Agent and the BIG-IP system.
Note: The following steps require you to enter some values that are available only as a result of completing the prerequisites.
You configure an initialization file for the F5 DC Agent so that it can send IP address and user name pairs to the BIG-IP system.
-
Log on to the Windows-based server where you installed the F5 DC Agent.
-
Navigate to this directory:
C:\Program Files\F5 Networks\User Identity Agents\config. -
Using a text editor, open the
transid.inifile.The file contains one section, [DC Agent].
-
For IFMapServer, type the protocol, host address, and port for the server.
This is the virtual server that was created by the application service. Port
8096is the default port. You might have specified another port number when you deployed the application service.For example, IFMapServer=https://AA.BB.CC.DD:8096, where AA.BB.CC.DD is the IP address of the virtual server created by the application service.
-
To authenticate to the BIG-IP system using clientless HTTP authentication, type values for these parameters.
-
For IFMapUsername, type the name of the user that logs on to the IF-MAP server on behalf of the F5 DC Agent.
This is the name of a user you created in the local user database on the BIG-IP system.
-
For IFMapPassword, type the password for the user.
This is the password you typed in the local user database.
-
-
To authenticate using a certificate, for IFMapCertClient, type the path to the SSL certificate file to use for authenticating to the BIG-IP system.
This must match the name of the certificate you specified in the application service on the BIG-IP system. Make sure that this certificate is imported into the certificate store on the BIG-IP system.
-
For the remainder of the parameters, you can retain the default values or change them.
-
For IFMapLifeTimeType, retain the default value, forever.
IFMapLifeTimeType specifies whether to keep or purge a user entry from the IF-MAP server when a session ends or times out. The alternative value is session.
Note: You can specify an absolute lifetime for a user entry in the IPCleanLifetime property.
-
For PurgeOnStart, retain the default value, true.
PurgeOnStart specifies whether the IF-MAP server should purge user records after the F5 DC Agent restarts.
-
For IdleUpdate, you can retain the default value of 120 seconds.
IdleUpdate specifies the interval between keep-alive pings from the F5 DC Agent to the IF-MAP server.
-
For DiscoveryInterval, retain the default value of 84600 seconds (24 hours).
DiscoveryInterval specifies the interval at which the domain auto-discovery process runs.
-
For DC AgentEnable, retain the default value of true.
DC AgentEnable specifies whether domain auto-discovery is enabled (true) or disabled (false).
-
For QueryInterval, you can retain the default value of 10 seconds.
QueryInterval specifies the interval at which the F5 DC Agent queries domain controllers in seconds. Valid values are between 5 and 90 seconds.
-
For IPCleanLifetime, you can retain the default value of 7200 seconds (2 hours).
IPCleanLifetime specifies the amount of time a user entry remains in the IF-MAP server before it is removed, in seconds. Valid values are integers greater than 3600; specify 0 to disable.
-
-
Start or restart the F5 DC Agent service.
The F5 DC Agent discovers domain controllers and starts to send user identity information to the BIG-IP system.
After the F5 DC Agent starts for the first time, it might take a few minutes to complete domain discovery and to write the list of domains and domain controllers into the dc_agent.txt file. If the F5 DC Agent does not create a dc_agent.txt file, you can create one manually; refer to the examples in this task.
You configure the list of the domains and domain controllers that F5 DC Agent polls to ensure that the list is accurate and complete. If you installed more than one F5 DC Agent, you edit the dc_agent.txt file on each Windows-based server to ensure that each domain controller is queried by one F5 DC Agent only.
-
Log on to the Windows-based server where you installed the F5 DC Agent.
-
Navigate to this directory:
C:\Program Files\F5 Networks\User Identity Agents\. -
If the
dc_config.txtfile already exists, make a backup copy in another location. -
Create or open the
dc_config.txtfile using a text editor. -
Verify that all domains and controllers are on the list.
This example shows two domain controller entries in each of two domains, WEST_DOMAIN and EAST_DOMAIN; polling is enabled on each domain controller. Note the blank line at the end of the file; it is required.
[WEST_DOMAIN] dcWEST1=on dcWEST2=on [EAST_DOMAIN] dcEAST1=on dcEAST2=on -
If domains or domain controllers are missing, add them.
To make sure that F5 DC Agent can see a domain, run the
net view/domain command before you add the domain. -
If the list contains domain controllers that F5 DC Agent should not poll, change the entry value from on to off.
If you configure F5 DC Agent to avoid polling an active domain controller, the agent cannot transparently identify the users that log on to it.
Important: Rather than deleting a domain controller, change the setting to off. Otherwise, F5 DC Agent adds it to the file again after it next discovers domain controllers.
In this example, polling is disabled for the dcEAST2 domain controller.
dcEAST2=off -
Make sure that the file includes a carriage return after the last entry, creating a blank line at the end of the file.
If you do not include the hard return, the last entry in the file get truncated, and an error message is written.
-
Save the changes and close the file.
-
Use the Windows Services dialog box to restart the F5 DC Agent service.
You install F5 Logon Agent correctly by first removing any failed installations, and then installing.
-
Log on to the Windows-based server from a user account with local and domain administrator privilege.
-
From the Windows Programs and Features dialog box, uninstall the F5 Installer application.
-
From Windows Explorer, click the
SWGUserIdentificationAgents.exefile and follow the instructions to install F5 Logon Agent again.
When you are troubleshooting, you might want debug errors to be logged.
-
Log on to the Windows-based server where you installed the F5 DC Agent.
-
Navigate to this directory:
C:\Program Files\F5 Networks\User Identity Agents\config. -
Using a text editor, open the
diagnostics.cfgfile. -
Look for log4j.threshold in Global configuration.
-
Note the value for log4j.threshold; you will need it when you complete troubleshooting tasks.
-
Modify the value to DEBUG.
-
Restart the DC agent service.
Debug errors start to be logged.
-
When you are done with troubleshooting, edit the
diagnostics.cfgfile, reset log4j.threshold to the previous value, and restart the DC agent service.
Troubleshooting is critical if you suspect or determine that a user is not being correctly identified.
-
Log on to the client system that belongs to the user.
-
Open a browser and navigate to four or more distinctive web sites.
-
Log on to the Windows-based server where the F5 Logon Agent is installed.
-
Look for error messages in the Windows Event Viewer.
-
Proceed based on any error messages that you discover.
Error messages from the F5 DC Agent display in the Event Viewer on the Windows-based server where DC Agent is installed.
|
Error code |
Error message |
Possible causes |
|---|---|---|
|
3 |
|
An attempt was made to install F5 DC Agent using an account that does not have domain and local administrator privileges. As a result, some required files are not installed properly, and F5 DC Agent service cannot run. |
|
5 |
|
F5 DC Agent service does not have sufficient permissions to perform required tasks. This error can occur when: - A
|
|
53 |
ERROR_BAD_NETPATH |
A network problem prevents F5 DC Agent from contacting a domain controller. This error can occur when: - Windows Remote Registry Service is not running on the Windows server with the agent
|
|
71 |
|
The error results from F5 DC Agent automatic domain discovery process, used to identify new domains and domain controllers. It can also occur when F5 DC Agent tries to connect to a Windows XP-based computer that is broadcasting itself as the master browser for a non-company domain or workgroup. Although the issue might indicate a problem with connectivity to the domain controller, it is more likely that the domain is a workgroup with no domain controllers. This error can be ignored. |
|
997 |
|
An attempt was made to install F5 DC Agent using an account that does not have domain and local administrator privileges. As a result, some required files are not installed properly, and F5 DC Agent service cannot run. |
|
1058 |
|
This error is seen on startup. A Local Security Policy on the Windows-based server might have disabled the F5 DC Agent service. |
The F5 Logon Agent enables transparent user identification, a best effort to identify users without requesting credentials.
Note: F5 Logon Agent is available only on a BIG-IP system with an SWG subscription.
You can install the F5 Logon Agent on a Windows-based server in any domain in the network. The F5 Logon Agent identifies users in real time when the users log on to domains, which prevents missing a user logon because of a query timing issue. F5 Logon Agent sends up-to-date session information to the BIG-IP system.
Note: F5 Logon Agent does not transmit passwords or any other confidential information.
- When users log on to the network, a network logon script invokes the logon application (
LogonApp.exe). - The logon application contacts F5 Logon Agent using HTTP.
- F5 Logon Agent sends an NTLM authentication challenge, and the logon application provides a user name, hashed password, and IP address to F5 Logon Agent.
- F5 Logon Agent verifies the username and password combination from the logon application by establishing a session with the domain controller. (F5 Logon Agent contacts User Service to determine which domain controller is the logon source.)
- After verifying the user name and IP address pair, F5 Logon Agent sends the information to the BIG-IP system and adds an entry to its user map in local memory. The user map is periodically saved to a backup file,
AuthServer.bak. - The BIG-IP system records user name and IP address pairs to the BIG-IP system copy of the user map in local memory. Confidential information (such as user passwords) is not sent to the BIG-IP system.
You can install more than one F5 Logon Agent in your network, and configure F5 Logon Agents to communicate with the same BIG-IP system. If you have multiple BIG-IP systems, each BIG-IP system must be able to communicate with every F5 Logon Agent in your network.
- NetBIOS port 139
- F5 Logon Agent uses NetBIOS port 139 for automatic domain detection. If NetBIOS port 139 is blocked in your network, you can deploy an F5 Logon Agent instance for each virtually or physically remote domain.
- Multiple subnets
- As a best practice, install a separate F5 Logon Agent in each subnet to avoid problems gathering logon information from domain controllers.
- Network size, disk space, and RAM
- If your network is very large (10,000+ users or 30+ domain controllers), you might benefit from installing F5 Logon Agent on multiple machines to evenly distribute resource usage.
You use an iApps template to deploy an application service that configures objects that the F5 Logon Agent uses to communicate with the IF-MAP server on the BIG-IP system.
Note: You can configure the F5 Logon Agent to authenticate with the BIG-IP system using certificate inspection or using clientless HTTP basic authentication against a local user database.
-
Set up to support certificate inspection:
-
Obtain a trusted certificate and key that are valid for all fully qualified domain names (FQDNs) used to access the BIG-IP system.
-
Import the certificate and key into the BIG-IP system.
You can import SSL certificates from the System area of the product.
-
-
Obtain the IF-Maps iApps template file from F5 DevCentralat
http://devcentral.f5.com/wiki/iapp.Codeshare.ashx. -
Import the template:
-
On the Main tab, click iApps > Templates.
-
Click Import.
-
Select the Overwrite Existing Templates check box.
-
Click Browse, then browse to and select the template file.
-
Click Upload.
-
-
Deploy an application service:
-
On the Main tab, click iApps > Application Services, and then click Create.
-
In the Name field, type a name.
Note: The application service prefixes this name to the names of configuration objects it creates.
-
From the Template list, select f5.ifmap.
Note: This iApps template displays on the list only when APM is provisioned.
-
Follow the instructions on the screen to complete the deployment.
A summary displays the configuration objects.
-
Take note of the IP address of the virtual server created by the service. You need to type it into F5 Logon Agent initialization file later.
Note: This virtual server must be accessible by the F5 Logon Agent from a routing perspective.
-
-
To enable clientless HTTP basic authentication, create a user and password in the local user database.
The purpose of this user account is to authenticate communication between the F5 Logon Agent and the BIG-IP system.
-
On the Main tab, click Access Policy > Local User DB > Manage Users.
The Manage Users screen displays.
-
Click Create New User.
The Create New Local User screen opens and displays User Information settings.
-
From the Instance list, select the instance created when you deployed the application service.
-
In the User Name field, type the user name.
Take note of the user name and password. You need to type them again later when you configure the initialization file for F5 Logon Agent.
-
In the Password and Confirm Password fields, type the user’s password.
-
You can verify that there are no DNS or NetBIOS or network communications issues on a Windows-based server before you install the F5 DC Agent on it. Alternatively, you can use these steps for troubleshooting if you observe a problem.
-
Open a command prompt on the Windows-based server that hosts, or will host, the F5 DC Agent.
-
To verify that the Windows-based server sees all required domains, use the
net viewcommand.For example, type
net view/network -
To check for DNS issues, use the
nslookupcommand.For example, to verify that DNS resolves the host name, testmachine1, type this command: ``nslookup
**testmachine1**. If the DNS lookup succeeds, the result is similar to:Server: testdns.test.example.com Address: 10.56.1.4 Name: testmachine1.test.example.com Address: 10.56.100.15 -
To verify that F5 DC Agent will be able to use NetBIOS, try to telnet to a domain controller on port
139.If the command is successful, the screen remains blank. If unsuccessful, then:
- A router, firewall, or other device might be blocking NetBIOS traffic.
- NetBIOS might not be enabled and the domain controller might not be listening on port
139.
-
If you could not successfully telnet to a domain controller on port
139, verify the status of the port using thenetstatcommand.For example, type: ``netstat
-na**\| find** *"139"* -
To verify that the F5 DC Agent will be able to communicate with the virtual server on the BIG-IP system, telnet to the IP address of the virtual server on port
8096or on the port that you entered when creating the application service.This virtual server was created using an application service based on the f5.ifmap iApps template.
F5 Logon Agent is available when Access Policy Manager (APM) is licensed and provisioned on the BIG-IP system. Before you perform these steps, make sure that the Windows Computer Browser service is running on the Windows server where you plan to install F5 Logon Agent.
You perform this task to be able to identify clients transparently by IP address. (Do this only in an environment where IP addresses are trusted and unique.)
-
Go to the BIG-IP Configuration utility Welcome screen.
If you are already logged in, click the F5 logo to open the Welcome screen.
-
In the Secure Web Gateway User Identification Agents area, click the User Identification Agents link.
A
SWGUserIdentificationAgents.exefile downloads. -
Copy the downloaded file to a Windows-based server that is joined to a domain controller.
Important: Do not install F5 Logon Agent on a domain controller because the F5 Logon Agent can put a load on the domain controller.
-
From an account with both local and administrator privileges, click the
SWGUserIdentificationAgents.exefile to start the installer.The installer displays instructions.
-
Follow the instructions to complete the installation.
Important: F5 strongly recommends that you use the default destination folder. On the Destination Folder screen, click Next without making any changes.
Important: Install either F5 DC Agent or F5 Logon Agent, but not both. This overwrites the omapd user map every time an update is published.
The program installs a Windows service, F5 Logon Agent.
The F5 Logon Agent service must run from a privileged account. You can create a new user account or use an existing account configured as specified in step 1.
-
On the Windows-based server, create a user account for F5 Logon Agent:
-
Assign to the new account both read/write privileges in all domains.
-
Make the account a member of the domain controller’s event reader group.
-
Assign the same password to this account on all domains.
-
Set the password setting to never expire.
This account exists only to provide a security context to access directory objects.
-
-
Configure the F5 Logon Agent service to log on as the user account you just configured:
-
Open the Windows Services dialog box.
From the Control Panel, select Administrative Tools > Services.
-
Locate the F5 Logon Agent service, right-click the service name, and select Stop.
-
Double-click the service name, and then select the Log On tab.
-
Select This account and type the account name and password for the account you created in step 1.
Note: Some domains require that you type the account name in the format domain\username.
-
Close the Services dialog box.
-
Start the F5 Logon Agent service again after the initialization file configuration is complete.
Before you can configure the initialization file, you must have the F5 DC Agent installed on a domain-joined, Windows-based server. You must also have deployed an iApps application service to configure objects that enable communication between the F5 DC Agent and the BIG-IP system.
Note: The following steps require you to enter some values that are available only as a result of completing the prerequisites.
You configure an initialization file for the F5 DC Agent so that it can send IP address and user name pairs to the BIG-IP system.
-
Log on to the Windows-based server where you installed the F5 DC Agent.
-
Navigate to this directory:
C:\Program Files\F5 Networks\User Identity Agents\config. -
Using a text editor, open the
transid.inifile.The file contains one section, [DC Agent].
-
For IFMapServer, type the protocol, host address, and port for the server.
This is the virtual server that was created by the application service. Port
8096is the default port. You might have specified another port number when you deployed the application service.For example, IFMapServer=https://AA.BB.CC.DD:8096, where AA.BB.CC.DD is the IP address of the virtual server created by the application service.
-
To authenticate to the BIG-IP system using clientless HTTP authentication, type values for these parameters.
-
For IFMapUsername, type the name of the user that logs on to the IF-MAP server on behalf of the F5 DC Agent.
This is the name of a user you created in the local user database on the BIG-IP system.
-
For IFMapPassword, type the password for the user.
This is the password you typed in the local user database.
-
-
To authenticate using a certificate, for IFMapCertClient, type the path to the SSL certificate file to use for authenticating to the BIG-IP system.
This must match the name of the certificate you specified in the application service on the BIG-IP system. Make sure that this certificate is imported into the certificate store on the BIG-IP system.
-
For the remainder of the parameters, you can retain the default values or change them.
-
For IFMapLifeTimeType, retain the default value, forever.
IFMapLifeTimeType specifies whether to keep or purge a user entry from the IF-MAP server when a session ends or times out. The alternative value is session.
Note: You can specify an absolute lifetime for a user entry in the IPCleanLifetime property.
-
For PurgeOnStart, retain the default value, true.
PurgeOnStart specifies whether the IF-MAP server should purge user records after the F5 DC Agent restarts.
-
For IdleUpdate, you can retain the default value of 120 seconds.
IdleUpdate specifies the interval between keep-alive pings from the F5 DC Agent to the IF-MAP server.
-
For DiscoveryInterval, retain the default value of 84600 seconds (24 hours).
DiscoveryInterval specifies the interval at which the domain auto-discovery process runs.
-
For DC AgentEnable, retain the default value of true.
DC AgentEnable specifies whether domain auto-discovery is enabled (true) or disabled (false).
-
For QueryInterval, you can retain the default value of 10 seconds.
QueryInterval specifies the interval at which the F5 DC Agent queries domain controllers in seconds. Valid values are between 5 and 90 seconds.
-
For IPCleanLifetime, you can retain the default value of 7200 seconds (2 hours).
IPCleanLifetime specifies the amount of time a user entry remains in the IF-MAP server before it is removed, in seconds. Valid values are integers greater than 3600; specify 0 to disable.
-
-
Start or restart the F5 DC Agent service.
The F5 DC Agent discovers domain controllers and starts to send user identity information to the BIG-IP system.
You install F5 Logon Agent correctly by first removing any failed installations, and then installing.
-
Log on to the Windows-based server from a user account with local and domain administrator privilege.
-
From the Windows Programs and Features dialog box, uninstall the F5 Installer application.
-
From Windows Explorer, click the
SWGUserIdentificationAgents.exefile and follow the instructions to install F5 Logon Agent again.
When you are troubleshooting, you might want debug errors to be logged.
-
Log on to the Windows-based server where you installed the F5 DC Agent.
-
Navigate to this directory:
C:\Program Files\F5 Networks\User Identity Agents\. -
Using a text editor, open the
diagnostics.cfgfile. -
Look for log4j.threshold in Global configuration.
-
Note the value for log4j.threshold; you will need it when you complete troubleshooting tasks.
-
Modify the value to DEBUG.
-
Restart the Logon Agent service.
Debug errors start to be logged.
-
When you are done with troubleshooting, edit the
diagnostics.cfgfile, reset log4j.threshold to the previous value, and restart the Logon Agent service.
Troubleshooting is critical if you suspect or determine that a user is not being correctly identified.
-
Log on to the client system that belongs to the user.
-
Open a browser and navigate to four or more distinctive web sites.
-
Log on to the Windows-based server where the F5 Logon Agent is installed.
-
Look for error messages in the Windows Event Viewer.
-
Proceed based on any error messages that you discover.
This table explains the relevant files used by F5 Logon Agent after you install the installation file from the BIG-IP system Configuration utility Welcome screen.
| Filename | File location | Additional information |
|---|---|---|
LogonApp.exe |
Stored in User Identity Agents > LogonApp > Windows folder. | Sends user information to F5 Logon Agent. Captures user logon sessions as they occur. Runs on Windows client machines. |
logon.bat |
Stored in User Identity Agents > LogonApp > Windows folder. | Invokes LogonApp.exe, which runs on client machines and captures logon sessions. |
AuthServer.ini |
Stored in User Identity Agents > config folder. | Contains one initialization parameter for Logon Agent. |
When you install the F5 Logon Agent, you must create a logon script for clients that identify the clients to the BIG-IP system when they log on to a Windows domain. The application, LogonApp.exe, provides a username and IP address to F5 Logon Agent each time a Windows client connects to a Windows Active Directory or a Windows NT directory service.
When installing F5 Logon Agent, the following files are placed in the F5 Networks folder (by default, C:\Program Files\F5 Networks\User Identity Agents\LogonApp):
- LogonApp.exe
- logon.bat
When you install F5 Logon Agent on a Windows system, the installation stores a batch file, logon.bat, in your local User Identity Agents directory. The batch file contains instructions for using scripting parameters and two sample scripts: a logon script that runs LogonApp.exe, and a logout script that removes user information from the BIG-IP system when a user logs out. You can create a logon or logout script from the logon.bat examples.
-
On your Windows screen, click Start > Accessories > Notepad
-
In the untitled Notepad menu, click File > Open
-
Navigate to the directory with the logon.bat file. For example:
C:\Program Files\F5 Networks\User Identity Agents\LogonApp\Windows\logon.bat.The .bat file displays logon script examples.
-
Open a new Notepad file.
-
Using the examples in logon.bat, create a script for either F5 Logon Agent logon or logout options.
-
Click Save and select .bat as the file extension.
You have created a logon or logout script
You must create a script before you can run it on Active Directory.
You can configure your logon or logout script to run with a group policy on Active Directory.
-
On the Active Directory machine, click Control Panel.
The Control Panel window displays.
-
From the window, select Administrative Tools > Active Directory Users and Computers.
-
Right-click the domain and select Properties.
-
On the Group Policy tab, click New.
-
In the New Group Policy screen, create a new policy.
-
Click Edit.
A window displaying a tree structure displays.
-
Expand User Configuration.
-
For Windows Settings option, click Scripts (Logon/Logoff).
-
On the right screen, double-click Logon.
-
Click Show Files.
The folder that contains the logon script opens in Windows Explorer.
-
Copy the files
logon.batandLogonApp.exeto the folder. -
Close the Windows Explorer window.
-
In the Logon Properties dialog box, click Add.
-
For the Script Name field, type
logon.bat. -
Click OK.
-
In the domain Properties dialog box, click OK.
You have configured your logon or logout script to run with a group policy on Active Directory.
This table explains the relevant parameters used by a logon or logout script for F5 Logon Agent.
|
Parameter |
Description |
|---|---|
|
<server> |
The IP address of the BIG-IP system F5 Logon Agent. |
|
<port> |
The port number used by F5 Logon Agent. The default value is 15880. |
|
/NOPERSIST |
The following example logon script sends user information to F5 logon Agent at the logon step only. The information is not updated during the user’s session (NOPERSIST). The information is sent to port 15880 on the server identified by IP address 10.2.2.95. |
|
/COPY |
Copies the logon application to the |
|
/VERBOSE |
A debugging parameter that can be used only with help from technical support. |
|
/LOGOUT |
Used only in an optional logout script, this parameter removes the user’s logon information from the F5 Logon Agent user map when the user logs off. If you use Active Directory, this parameter can clear the logon information from the user map before the interval that is defined for F5 Logon Agent has elapsed. Use this optional parameter in a logout script in a batch file that is different than the one containing the logon script. The following example logout script clears the logon information for each user as soon as the user logs out. |