Updated Date: 07/07/2026
Single Sign-On and Multi-Domain Support
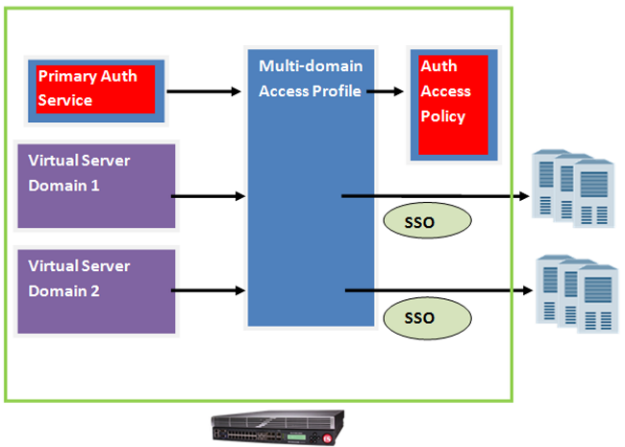
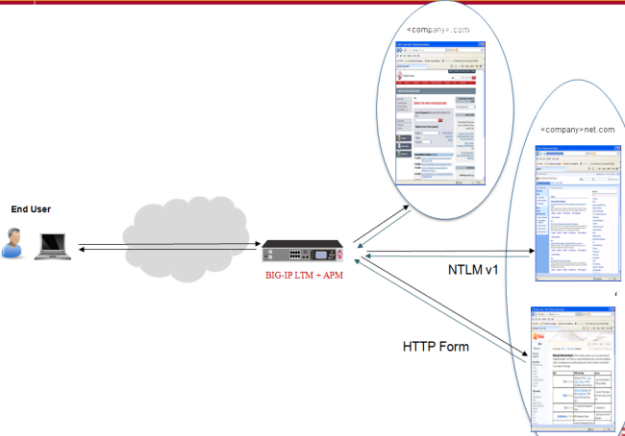
Access Policy Manager (APM) provides a method to enable users to use a single login or session across multiple virtual servers in separate domains. Users can access back-end applications through multiple domains or through multiple hosts within a single domain, eliminating additional credential requests when they go through those multiple domains. With multi-domain support, you have the option of applying different SSO methods across different domains.
Important: To enable multi-domain support, all virtual servers must be on a single BIG-IP system and share the same access profile. All virtual servers must include all of the profiles that the access profile requires (for example, VDI, rewrite, server SSL, connectivity, and so on).
APM provides the following benefits when using multi-domain support with SSO.
- Users can sign out from all domains at once.
- Users can move from one domain to another seamlessly. This eliminates the need to re-run the access policy, and maintains the established session for the user.
- Administrators can configure different cookie settings (Secure, Host/Domain, and Persistent) for different domains, and for different hosts within same domain.
- Administrators can set up multiple SSO configurations for users signing in to multiple back-end applications within a single APM session.
Setting up multi-domain support for SSO requires the following elements.
-
One BIG-IP system.
-
One or more virtual servers.
-
One access profile/policy that specifies the set of participating domains, and that profile is associated with each of the virtual servers participating in the domain group.
-
All virtual servers in this configuration must include all profiles that the access profile/policy requires (for example, VDI, rewrite, server SSL, connectivity, and so on).
Note: In some situations, iRules can be used to disable unneeded profiles.
-
An SSO configuration that is associated with each of the domains. Additionally, a designated URL that specifies the primary authentication service is included in the access profile.
Note: The host name of the URL is a virtual server that provides an access policy to retrieve the credentials from the user. If an un-authenticated user reaches any domain specified in the domain group, a re-direct is first made to the primary authenticating service so that credentials are collected to establish a session.
-
If the access profile/policy includes a webtop, the Primary Authentication URI in the SSO configuration must specify the portal FQDN.
Access Policy Manager® SSO lets you configure either a single domain or multiple domains for SSO.
To set up this configuration, follow the procedures in the task list.
These steps apply only if you are setting up your access policy for SSO single domain support.
-
On the Main tab, click Access > Profiles / Policies.
The Access Profiles (Per-Session Policies) screen opens.
-
From the list, select an access profile in which you want to add SSO capability.
The properties screen for that access profile opens.
-
On the menu bar, click SSO/Auth Domains.
-
For Domain Mode, select Single Domain.
-
For the SSO Configuration setting, select an available SSO configuration from the list to apply to your access policy.
-
Click Update.
-
On the menu bar, click Access Policy.
-
Click the name of the access profile for which you want to edit the access policy.
The properties screen opens for the profile you want to edit.
-
In the General Properties area, click the Edit Access Policy for Profile profile_name link.
The visual policy editor opens the access policy in a separate screen.
-
Click the (+) icon anywhere in the access policy to add a new item.
Note: Only an applicable subset of access policy items is available for selection in the visual policy editor for any access profile type.
A popup screen opens, listing predefined actions on tabs such as General Purpose, Authentication, and so on.
-
For Predefined Actions, under General Purpose, select SSO Credential Mapping, and click Add item.
-
Click Save.
You have now added SSO capability to your access policy.
A user should be able to connect to any one of the virtual servers that participate in the domain group, and receive a request for credentials only once. Subsequent connections to other virtual servers within the domain group should not require the users to provide their credentials.
-
On the Main tab, click Access > Profiles / Policies.
The Access Profiles (Per-Session Policies) screen opens.
-
From the list, select the access profile associated with all of the virtual servers in the multi-domain group and to which you want to add SSO capability.
The properties screen for that access profile opens.
-
On the menu bar, click SSO/Auth Domains.
-
For the Domain Mode setting, select Multiple Domains.
-
For Primary Authentication URI, type the URI the client is directed to, for example,
http://login.com, in order to receive an Access Policy Manager session.If the access profile/policy includes a webtop, for Primary Authentication URI specify the portal FQDN.
Each domain that you configure indicates the domain the Access Policy Manager session (established by the primary authentication URI) is bound to.
-
In the Authentication Domain Configuration area, configure the Cookie setting by selecting Host or Domain, and typing the IP address for the host or, for domain, typing the fully qualified domain name.
-
Select Cookie Options. By default, Secure is selected.
-
From the SSO Configuration list, select the configuration that you want to associate to each host or domain. (Defaults to None.)
-
Click Update.
Confirm that the correct log settings are selected for the access profile to ensure that events are logged as you intend.
Note: Log settings are configured in the Access > Overview > Event Log > Settings area of the product. They enable and disable logging for access system and URL request filtering events. Log settings also specify log publishers that send log messages to specified destinations.
-
On the Main tab, click Access > Profiles / Policies.
The Access Profiles (Per-Session Policies) screen opens.
-
Click the name of the access profile that you want to edit.
The properties screen opens.
-
On the menu bar, click Logs.
The access profile log settings display.
-
Move log settings between the Available and Selected lists.
You can assign up to three log settings that enable access system logging to an access profile. You can assign additional log settings to an access profile provided that they enable logging for URl request logging only.
Note: Logging is disabled when the Selected list is empty.
-
Click Update.
An access profile is in effect when it is assigned to a virtual server.
For every domain, you need to create a virtual server.
-
On the Main tab, click Local Traffic > Virtual Servers.
The Virtual Server List screen opens.
-
Click Create.
The New Virtual Server screen opens.
-
In the Name field, type a unique name for the virtual server.
-
In the Destination Address/Mask field:
- If you want to specify a single IP address, confirm that the Host button is selected, and type the IP address in CIDR format.
- If you want to specify multiple IP addresses, select the Address List button, and confirm that the address list that you previously created appears in the box.
The supported format is address/prefix, where the prefix length is in bits. For example, an IPv4 address/prefix is
10.0.0.1or10.0.0.0/24, and an IPv6 address/prefix isffe1::0020/64or2001:ed8:77b5:2:10:10:100:42/64. When you use an IPv4 address without specifying a prefix, the BIG-IP system automatically uses a/32prefix.
Note: The IP address or addresses for this field must be on the same subnet as the external self-IP address.
-
From Access Profile, select the profile to attach to the virtual server.
This same profile must be associated with each of the virtual servers participating in the multi-domain configuration.
-
Make sure to include all profiles that the access profile/policy requires (for example, VDI, rewrite, server SSL, connectivity, and so on).
-
Click Finished.
Create a virtual server for every domain you specify in your access policy.