Updated Date: 07/07/2026
Smart Card Authentication for VMware View Clients
Access Policy Manager (APM®) supports smart card SSO for VMware Horizon View 6.2 or later. APM also supports smart card authentication for 6.2 and other supported versions of VMware Horizon View.
For the supported versions of VMware Horizon View, see BIG-IP APM® Client Compatibility Matrix on the AskF5™ web site located at http://support.f5.com/.
To configure APM for smart card SSO, see Overview: Supporting smart card SSO for VMWare View in BIG-IP Access Policy Manager: Third-Party Integration on the AskF5™ web site located at http://support.f5.com/.
To configure APM for smart card authentication, see Overview: Supporting smart card authentication for VMWare View in BIG-IP Access Policy Manager: Third-Party Integration on the AskF5™ web site located at http://support.f5.com/.
On a BIG-IP system configured as a SAML Identity Provider (IdP), Access Policy Manager® can support smart card single-sign on (SSO) to a VMware View Horizon Server.
The configuration uses SSL client certificate validation mechanisms. For a successful configuration, use these instructions and the settings specified in them.
Note: F5 supports this configuration only for use with VMware View Horizon Server version 6.2 or later.
With Access Policy Manager (APM®) configured to support smart card SSO for VMware Horizon View server, if you launch the standalone VMware View Client from the Access Policy Manager (APM®) webtop, the VMware Horizon View server prompts for a PIN. This is expected behavior.
VMware Horizon HTML5 Client does not support smart card redirection. If a user authenticates to Access Policy Manager with a smart card and then launches an HTML5 desktop, a screen prompts the user for domain credentials. The user cannot use the smart card and must supply credentials to log in to the desktop.
A VMware View Client makes connections to support different types of traffic between it and a View Connection Server. For Access Policy Manager ® to support these connections, it requires two virtual servers that share the same destination IP address. One virtual server processes HTTPS traffic and performs authentication for the View Client. An addition virtual server processes PC over IP (PCoIP) traffic.
Before you start this task, import the CA certificate for VMware View Horizon server to the BIG-IP system certificate store.
You create a custom client SSL profile to request an SSL certificate from the client at the start of the session. This enables a Client Cert Inspection item in an access policy to check whether a valid certificate was presented.
-
On the Main tab, click Local Traffic > Profiles > SSL > Client.
The Client SSL profile list screen opens.
-
Click Create.
The New Server SSL Profile screen opens.
-
In the Name field, type a unique name for the profile.
-
From the Parent Profile list, select clientssl.
The default settings for the profile specify a 10-second SSL handshake timeout. Some users with smart cards cannot authenticate within that time. You can increase the timeout if this is the case at your site.
-
From the Configuration list, select Advanced.
-
If you have VMware View clients on Mac OS X, disable TLS 1.2 in the Options List area:
-
In the Available Options list, select No TLS 1.2.
-
Click Enable.
-
-
If you change the values for the Cache Size or the Cache Timeout setting, do not specify a value of zero (0) for either setting.
When these values are 0, the client must supply a PIN on each browser page refresh.
-
Scroll down to Handshake Timeout and select the Custom check box.
Additional settings become available.
-
To limit the timeout to a number of seconds, select Specify from the list, and type the required number in the seconds field.
In the list, the value Indefinite specifies that the system continue trying to establish a connection for an unlimited time. If you select Indefinite, the seconds field is no longer available.
-
Scroll down to the Client Authentication area.
-
Next to Client Authentication, select the Custom check box.
The settings become available.
-
From the Client Certificate list, select request.
Do not select require.
-
From the Trusted Certificate Authorities and Advertised Certificate Authorities, select the certificates you imported previously.
-
Click Finished.
Specify a host virtual server to use as the SAML Identity Provider (IdP).
-
On the Main tab, click Local Traffic > Virtual Servers.
The Virtual Server List screen opens.
-
Click Create.
The New Virtual Server screen opens.
-
In the Name field, type a unique name for the virtual server.
-
For the Destination Address/Mask setting, confirm that the Host button is selected, and type the IP address in CIDR format.
The supported format is address/prefix, where the prefix length is in bits. For example, an IPv4 address/prefix is
10.0.0.1or10.0.0.0/24, and an IPv6 address/prefix isffe1::0020/64or2001:ed8:77b5:2:10:10:100:42/64. When you use an IPv4 address without specifying a prefix, the BIG-IP system automatically uses a/32prefix.Note: The IP address you type must be available and not in the loopback network.
-
In the Service Port field, type
443or select HTTPS from the list. -
For the HTTP Profile (Client) setting, verify that the default HTTP profile, http, is selected.
-
For the SSL Profile (Client) setting, from the Available list, select the name of the Client SSL profile you previously created and move the name to the Selected list.
-
For the SSL Profile (Server) setting, select pcoip-default-serverssl.
-
From the Source Address Translation list, select Auto Map.
-
Click Finished.
Configure a SAML Identity Provider (IdP) service for Access Policy Manager (APM), as a SAML IdP, to support single sign-on (SSO) authentication to VMware View Horizon server for clients with a smart card.
-
On the Main tab, click Access > Federation > SAML Identity Provider.
The Local IdP Services screen opens.
-
Click Create.
The Create New IdP Service popup screen displays.
-
In the IdP Service Name field, type a unique name for the SAML IdP service.
The maximum length of a single sign-on configuration, such as the SAML IdP service, is 225 characters, including the partition name.
-
In the IdP Entity ID field, type a unique identifier for the IdP (this BIG-IP system).
Typically, the ID is a URI that points to the BIG-IP virtual server that is going to act as a SAML IdP. If the entity ID is not a valid URL, the Host field is required.
For example, type
https://siterequest.com/idp, where the path points to the virtual server you use for BIG-IP system as a SAML IdP. -
If the IdP Entity ID field does not contain a valid URI, you must provide one in the IdP Name Settings area:
-
From the Scheme list select https or http.
-
In the Host field, type a host name.
For example, type
siterequest.comin the Host field.
-
-
For SAML Profiles, be sure to retain the default setting (Web Browser SSO).
-
On the left pane, select Endpoint Settings and select a service from the Artifact Resolution Service list.
Note: APM does not use the artifact resolution service, but one must be included in the IdP metadata. If you leave the Artifact Resolution Service list blank, you can edit the IdP metadata later to add an artifact resolution service to it.
-
On the left pane, select Assertion Settings.
Settings display in the right pane.
-
From the Assertion Subject Type list, select Persistent Identifier.
-
From the Assertion Subject Value list, type the name of the custom session variable into which you stored the user principal name (UPN).
You must type a percent sign (%) first and then enclose the session variable name in curly braces ({}).
For example, type %{session.custom.certupn}.
-
In the Authentication Context Class Reference field, select urn:oasis:names:tc:SAML:2.0:ac:classes:TLSClient.
The URI reference identifies an authentication context class that describes an authentication context declaration.
-
In the Assertion Validity (in seconds) field, type the number of seconds for which the assertion is valid.
-
-
From the left pane, select SAML Attributes.
Table headings display in the right pane.
-
Add an unencrypted SAML attribute for the certificate:
This is mandatory.
-
Click Add.
A Create New SAML Attribute popup screen displays.
-
In the Name field, type certificate.
-
Click Add.
An entry field displays in the Values table.
-
In the Values field, type
%{view.broker.smartcard.cert}and click Update. -
Keep the Encrypt check box cleared and click OK.
The Create New SAML Attribute popup screen closes.
-
-
Add an encrypted SAML attribute for the pin.
This is mandatory.
-
Click Add.
A Create New SAML Attribute popup screen displays.
-
In the Name field, type pin.
-
Click Add.
An entry field displays in the Values table.
-
In the Values field, type
%{view.broker.smartcard.pin}and click Update. -
Select the Encrypt check box.
-
For Type, select AES128 and click OK.
The Create New SAML Attribute popup screen closes.
-
-
For a disclaimer, add an unencrypted SAML attribute.
-
Click Add.
A Create New SAML Attribute popup screen displays.
-
In the Name field, type disclaimer.
-
Click Add.
An entry field displays in the Values table.
-
In the Value(s) field, type false and click Update.
-
Keep the Encrypt check box cleared and click OK.
The Create New SAML Attribute popup screen closes.
-
-
On the left pane, select Security Settings and select a certificate and a key from the BIG-IP system store to use for signing the assertion.
-
From the Signing Key list, select the key from the BIG-IP system store.
The default is None.
-
From the Signing Certificate list, select the certificate from the BIG-IP system store.
When selected, the IdP (the BIG-IP system) publishes this certificate to the service provider so the service provider can verify the assertion. None is selected by default.
-
-
Click OK.
The popup screen closes. The new IdP service appears on the list.
You need to convey the SAML Identity Provider (IdP) metadata from Access Policy Manager (APM) to the external service providers that use the SAML IdP service. Exporting the IdP metadata for a SAML IdP service to a file provides you with the information that you need to do this.
-
On the Main tab, click Access > Federation > SAML Identity Provider.
The Local IdP Services screen opens.
-
Select a SAML IdP service from the table and click Export Metadata.
A popup screen opens, with No selected on the Sign Metadata list.
-
Select the Use VMware View Format check box.
-
Select OK.
APM downloads an XML file.
An XML file that contains IdP metadata is available.
If you did not specify an artifact resolution service when you configured the SAML Identity Provider (IdP) service, you must define an artifact resolution service in the IdP metadata XML file that you exported from Access Policy Manager (APM).
-
Locate the IdP metadata XML file that you downloaded onto your system.
-
Use a text editor to open the file.
-
Add a line to the file that defines the service, following this example.
<ArtifactResolutionService Binding="urn:oasis:names:tc:SAML:2.0:bindings:SOAP" Location="https://165.160.15.20:443/saml/idp/profile/soap/ars" index="0" isDefault="true"></ArtifactResolutionService> -
Save the XML file and exit the text editor.
You can use iRules to respond with SAML Identity Provider (IdP) XML metadata for a particular URI.
Note: For complete and detailed information iRules syntax, see the F5 Networks DevCentral web site (http://devcentral.f5.com).
-
On the Main tab, click Local Traffic > iRules.
The iRule List screen opens, displaying any existing iRules.
-
Click Create.
The New iRule screen opens.
-
In the Name field, type a unique name for the iRule.
The full path name of the iRule cannot exceed 255 characters.
-
In the Definition field, type the syntax for the iRule using Tool Command Language (Tcl) syntax.
This example specifies a URI,
/SAAS/API/1.0/GET/metadata/, and includes the content of the SAML IdP metadata in the response. (The example elides the metadata for brevity.)when HTTP_REQUEST { if { [HTTP::path] contains "/SAAS/API/1.0/GET/metadata/" and [HTTP::method] equals "GET" } { HTTP::respond 200 content {<?xml version="1.0" encoding="UTF-8" ?> <EntityDescriptor xmlns="urn:oasis:names:tc:SAML:2.0:metadata" ID="Ie662e22302a165c" xmlns:saml="urn:oasis:names:tc:SAML:2.0:assertion" xmlns:ds="http://www.w3.org/2000/09/xmldsig#" entityID="https://siterequest.com/idp"> <IDPSSODescriptor protocolSupportEnumeration="urn:oasis:names:tc:SAML:2.0:protocol"> . . . </IDPSSODescriptor> </EntityDescriptor>} } } -
Click Finished.
The new iRule appears in the list of iRules on the system.
You must add this iRule to the virtual server that processes the traffic from the SAML service provider (SP).
From VMware View Connection Server (VCS), create a SAML Authenticator that points to APM so that VCS can recognize APM as a trusted SAML Identity Provider (IdP).
-
Using the VMware software that you use to administer a VCS, create a new SAML Authenticator with these properties:
-
For SAML Authenticator, type the FQDN of your virtual server.
-
For Metadata URL, type the URI where the VCS can get the SAML IdP metadata.
Normally, the VCS should attempt to request the metadata and verify it.
For example, type https://sitrerequest.com/SAAS/API/1.0/GET/metadata/, where
https://siterequest.comis the virtual server for the SAML IdP service, and/SAAS/API/1.0/GET/metadata/is the URI for which the iRule on the virtual server responds with SAML IdP metadata.
-
-
To apply the changes after choosing a new SAML Authenticator, you must restart the VCS.
Obtain the VMware View Connection Server (VCS) SAML Service Provider (SP) metadata file from https://vcs-fqdn/SAML/metadata/sp.xml, where vcs-fqdn is the fully qualified domain name of the VCS. Copy the file to a location where it is available for BIG-IP Access Policy Manager (APM) to import it.
Configure a SAML service provider (SP) connector so that APM can recognize a VCS as a supported consumer of SAML assertions.
-
On the Main tab, click Access > Federation > SAML Identity Provider > External SP Connectors.
A list of SAML SP connectors displays.
-
On the Create button, click the selector arrow and select From Metadata.
The Create New SAML Service Provider popup screen displays.
-
For the Select File field, click Browse and browse to and select the SP metadata file that you copied from the VCS.
-
In the Service Provider Name field, type a unique name for the SAML SP connector.
-
Click OK.
The popup screen closes.
-
Verify that the security settings are correct for the newly created SP connector:
-
Click the name of the newly created SAML SP connector.
The Edit SAML Service Provider popup screen displays.
-
On the left pane, select Security Settings.
-
In the Response sent to this SP area, ensure that the Response must be signed and the Assertion must be signed check boxes are selected.
-
-
Click OK.
The popup screen closes.
The new SAML SP connector is available to bind to the SAML IdP service.
Bind a SAML Identity Provider (IdP) service and a SAML service provider (SP) connector so that the BIG-IP system can provide authentication (SAML IdP service) to the external SAML service provider.
-
On the Main tab, click Access > Federation > SAML Identity Provider.
The Local IdP Services screen opens.
-
Select a SAML IdP service from the list.
Select an IdP service that you configured for use with one particular SP connector only.
-
Click Bind/Unbind SP Connectors.
The screen displays a list of available SAML SP connectors.
-
Select the one SAML SP connector that you want to pair with this IdP service.
-
Select OK.
The screen closes.
The SAML SP connector that you selected is bound to the SAML IdP service.
Configure a VMware View remote desktop resource to support smart card authentication using SAML.
-
On the Main tab, click Access > Connectivity / VPN > VDI / RDP > Remote Desktops.
The Remote Desktops screen opens.
-
Click Create.
The New Resource screen opens.
-
For the Type setting, select VMware View.
-
For the Destination setting, select Pool and from thePool Name list, select a pool of View Connection Servers that you configured previously.
-
For the Server Side SSL setting, select the Enable check box.
View Connection Servers must use HTTPS (default) to support smart card authentication.
-
In the Single Sign-On area, select the Enable SSO check box.
-
From the SSO Method list, select SAML.
-
From the SAML Resource list, select the SAML IdP service that you configured previously.
-
In the Customization Settings for the language_name area, type a Caption.
The caption is the display name of the VMware View resource on the APM full webtop.
-
Click Finished.
All other parameters are optional.
This creates the VMware View remote desktop resource. To use it, you must assign it along with a full webtop in an access policy.
You create an access profile to provide the access policy configuration for a virtual server that establishes a secured session.
-
On the Main tab, click Access > Profiles / Policies.
The Access Profiles (Per-Session Policies) screen opens.
-
Click Create.
The New Profile screen opens.
-
In the Name field, type a name for the access profile.
Note: A access profile name must be unique among all access profile and any per-request policy names.
-
From the Profile Type list, select SSL-VPN.
Additional settings display.
-
From the Profile Scope list, retain the default value or select another.
- Profile: Gives a user access only to resources that are behind the same access profile. This is the default value.
- Virtual Server: Gives a user access only to resources that are behind the same virtual server.
- Global: Gives a user access to resources behind any access profile that has global scope.
-
For Customization Type, select Modern.
You can also use Standard but Modern customization is simpler and provides better compatibility for modern cross-platform and cross-device applications.
-
To configure timeout and session settings, select the Custom check box.
-
In the Inactivity Timeout field, type the number of seconds that should pass before the access policy times out. Type
0to set no timeout.If there is no activity (defined by the Session Update Threshold and Session Update Window settings in the Network Access configuration) between the client and server within the specified threshold time, the system closes the current session.
-
In the Access Policy Timeout field, type the number of seconds that should pass before the access profile times out because of inactivity.
Type
0to set no timeout. -
In the Maximum Session Timeout field, type the maximum number of seconds the session can exist.
Type
0to set no timeout. -
In the Max Concurrent Users field, type the maximum number of users that can use this access profile at the same time.
Type
0to set no maximum. -
In the Max Sessions Per User field, type the maximum number of concurrent sessions that one user can start.
Type
0to set no maximum.Note: Only a user in the administrator, application editor, manager, or resource administrator role has access to this field.
-
In the Max In Progress Sessions Per Client IP field, type the maximum number of concurrent sessions that can be in progress for a client IP address.
When setting this value, take into account whether users will come from a NAT-ed or proxied client address and, if so, consider increasing the value accordingly. The default value is 128.
Note: Only a user in the administrator, application editor, manager, or resource administrator role has access to this field.
Note: F5 does not recommend setting this value to
0(unlimited). -
Select the Restrict to Single Client IP check box to restrict the current session to a single IP address.
This setting associates the session ID with the IP address.
Note: Only a user in the administrator, application editor, manager, or resource administrator role has access to this field.
Upon a request to the session, if the IP address has changed the request is redirected to a logout page, the session ID is deleted, and a log entry is written to indicate that a session hijacking attempt was detected. If such a redirect is not possible, the request is denied and the same events occur.
-
To configure logout URIs, in the Configurations area, type each logout URI in the URI field, and then click Add.
-
In the Logout URI Timeout field, type the delay in seconds before logout occurs for the customized logout URIs defined in the Logout URI Include list.
-
To configure SSO:
- For users to log in to multiple domains using one SSO configuration, skip the settings in the SSO Across Authentication Domains (Single Domain mode) area. You can configure SSO for multiple domains only after you finish the initial access profile configuration.
- For users to log in to a single domain using an SSO configuration, configure settings in the SSO Across Authentication Domains (Single Domain mode) area, or you can configure SSO settings after you finish the initial access profile configuration.
-
In the Domain Cookie field, specify a domain cookie, if the application access control connection uses a cookie.
-
In the Cookie Options setting, specify whether to use a secure cookie.
- If the policy requires a secure cookie, select the Secure check box to add the secure keyword to the session cookie.
- If you are configuring an LTM access scenario that uses an HTTPS virtual server to authenticate the user and then sends the user to an existing HTTP virtual server to use applications, clear this check box.
-
If the access policy requires a persistent cookie, in the Cookie Options setting, select the Persistent check box.
This sets cookies if the session does not have a webtop. When the session is first established, session cookies are not marked as persistent; but when the first response is sent to the client after the access policy completes successfully, the cookies are marked persistent. Persistent cookies are updated for the expiration timeout every 60 seconds. The timeout is equal to session inactivity timeout. If the session inactivity timeout is overwritten in the access policy, the overwritten value will be used to set the persistent cookie expiration.
-
From the SSO Configurations list, select an SSO configuration.
-
In the Language Settings area, add and remove accepted languages, and set the default language.
A browser uses the highest priority accepted language. If no browser language matches the accepted languages list, the browser uses the default language.
-
Click Finished.
The access profile displays in the Access Profiles List. Default-log-setting is assigned to the access profile.
To add an SSO configuration for multiple domains, click SSO / Auth Domains on the menu bar. To provide functionality with an access profile, you must configure the access policy. The default access policy for a profile denies all traffic and contains no actions. Click Edit in the Access Policy column to edit the access policy.

|
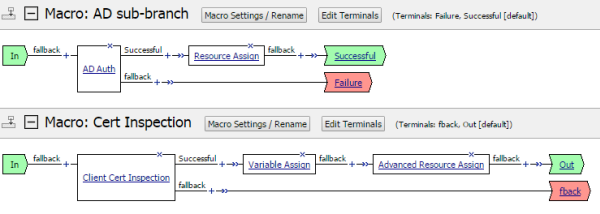
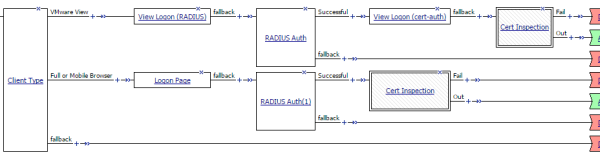
1 |
Client Type detects a standalone VMware View Client. |
|
2 |
In the properties for the agent, the VMware View Logon Screen property specifies Smart Card. |
|
3 |
Macrocall to Cert Inspection and Resources. |
|
4 |
Client Type detects a web-based client. |
|
5 |
Macrocall to Cert Inspection and Resources. |
|
6 |
Inspect certificate from the smart card. (Relies on LTM to obtain certificate during initial SSL handshake based on specification in SSL client profile.) |
|
7 |
Extracts the User Principal Name from SSL certificate information and stores it in a custom session variable. |
|
8 |
Assign a full webtop and a VMware View remote desktop resource configured for SAML SSO. |


Access Policy Manager (APM) supports this configuration when the BIG-IP system, configured as a SAML Identity Provider (IdP), provides authentication service that is consumed by a VMware View Connection Server (VCS), configured as a SAML service provider.
Create an access policy so that web-based and standalone VMware View clients can use a smart card for authenticating with APM.
Note: Although users of the HTML5 client can log on to APM with a smart card, when they try to connect to a VCS, they must still enter credentials.
-
On the Main tab, click Access > Profiles / Policies.
The Access Profiles (Per-Session Policies) screen opens.
-
In the Per-Session Policy column, click the Edit link for the access profile you want to configure.
The visual policy editor opens the access policy in a separate screen.
-
Click the (+) icon anywhere in the access policy to add a new item.
Note: Only an applicable subset of access policy items is available for selection in the visual policy editor for any access profile type.
A popup screen opens, listing predefined actions on tabs such as General Purpose, Authentication, and so on.
-
On the Endpoint Security (Server-Side) tab, select Client Type, and then click Add Item.
The Client Type action identifies clients and enables branching based on the client type.
A properties screen opens.
-
Click Save.
The properties screen closes. The visual policy editor displays the Client Type action.
-
To accept smart card logon from a standalone VMware View Client, add a smart card logon screen:
Actions on the Full/Mobile branch support web-based clients, and actions on the VMware View branch support standalone VMware View clients.
-
Add a VMware View Logon Page action to the policy.
A properties screen opens.
-
From the VMware View Logon Screen list, select Smart Card.
-
Click Save.
The properties screen closes and the policy displays.
-
-
To inspect the client certificate, add the Client Cert Inspection agent to the access policy on one or more branches as appropriate.
The agent verifies the result of the SSL handshake request that occurs at the start of the session and makes SSL certificate information available to the policy.
-
Add an action to the access policy to obtain the User Principal Name (UPN) on one or more branches as appropriate.
You might add a Variable Assign action and configure it to extract the UPN from the certificate information or configure an AD Query that retrieves the UPN.
-
After successful authentication and successful retrieval of the UPN, assign resources to the session.
-
Click the (+) sign after the previous action.
-
On the Assignment tab, select the Advanced Resource Assign agent, and then click Add Item.
The Resource Assignment window opens.
-
Click Add new entry.
A new line is added to the list of entries.
-
Click the Add/Delete link below the entry.
The screen changes to display resources on multiple tabs.
-
On the Remote Desktop tab, select the VMware View remote desktop resource that you configured for SAML SSO previously.
A system-defined ACL for the remote desktop resource is automatically assigned to the policy. The ACL specifies the allow action for the resource items associated with the remote desktop resource.
-
On the Webtop tab, select a full webtop.
-
Select any other resources that you want to assign to the policy.
If you assign a Network Access resource to the policy, be sure to also assign an ACL that allows access to the resources that you want users to have. Otherwise, the ACL that rejects all connections blocks access.
If you assign a Portal Access resource to the policy, be sure to also assign an ACL that allows access to all parts of the web sites specified in the start URI or hosted content fields of the Portal Access configuration. Otherwise, the ACL that rejects all connections blocks access.
-
Click Update.
The popup screen closes.
-
Click Save.
The properties screen closes and the policy displays.
-
-
To grant access at the end of any branch, change the ending from Deny to Allow:
-
Click Deny.
The default branch ending is Deny.
A popup screen opens.
-
Select Allow and click Save.
The popup screen closes. The Allow ending displays on the branch.
-
-
ClickApply Access Policy.
To apply this access policy to network traffic, add the access profile to a virtual server.
Note: To ensure that logging is configured to meet your requirements, verify the log settings for the access profile.
You must supply the User Principal Name (UPN) as the Assertion Subject Value for the SAML Identity Provider (IdP) service.
Note: This example adds a Variable Assign action to the access policy. The action uses a Tcl expression that extracts the UPN from the X509 certificate for the client and stores it in a user-defined session variable.
-
On the Main tab, click Access > Profiles / Policies.
The Access Profiles (Per-Session Policies) screen opens.
-
In the Per-Session Policy column, click the Edit link for the access profile you want to configure.
The visual policy editor opens the access policy in a separate screen.
-
On an access policy branch, click the (+) icon
The Variable Assign action must occur after a Client Cert Inspection action runs successfully. The Variable Assign action relies on X509 information that the Client Cert Inspection action provides.
A popup screen displays actions on tabs, such as General Purpose and Authentication, and provides a search field.
-
Type
varin the search field, select Variable Assign from the results list, and then click Add Item.The Variable Assign properties screen opens.
-
On the left side of the variable assign properties screen, select Custom Variable from the list and in the field, type the name of a custom session variable.
For example, type
session.custom.certupn.Remember the session variable name; you must use it as the assertion subject value for the IdP. You will need to enter it into the IdP service configuration later.
-
On the right side of the variable assignment properties screen, select Custom Expression from the list and in the field, type a Tcl expression to extract the UPN from the X509 certificate as shown here.
foreach x [split [mcget {session.ssl.cert.x509extension}] "\n"] { if { [string first "othername:UPN" $x] >= 0 } { return [string range $x [expr { [string first "<" $x] + 1 }] [expr { [string first ">" $x] - 1 }]]; } }; return ""; -
Click Save.
The properties screen closes and the policy displays.
The Variable Assign action is added to the access policy. You probably need to configure additional actions in the access policy.
You associate an access profile, connectivity profile, VDI profile, and an iRule with the virtual server so that Access Policy Manager can apply them to incoming traffic.
-
On the Main tab, click Local Traffic > Virtual Servers.
The Virtual Server List screen opens.
-
Click the name of the virtual server that you want to update.
-
In the Access Policy area, from the Access Profile list, select the access profile that you configured earlier.
-
From the Connectivity Profile list, select a connectivity profile.
-
From the VDI Profile list, select a VDI profile.
You can select the default profile, vdi.
-
In the Resources area, for the iRules setting, from the Available list, select the name of the iRule that you want to assign, and move the name into the Enabled list.
-
Click Update.
Your access policy and the iRule are now associated with the virtual server.
Before you start, you must have configured a virtual server to process HTTPS traffic. You need to know the destination IP address of that virtual server.
You create this virtual server to support a PC over IP (PCoIP) data channel for View Client traffic.
-
On the Main tab, click Local Traffic > Virtual Servers.
The Virtual Server List screen opens.
-
Click Create.
The New Virtual Server screen opens.
-
In the Name field, type a unique name for the virtual server.
-
In the Destination Address field, type the IP address.
Note: Type the same IP address as for the virtual server that processes HTTPS traffic
-
In the Service Port field, type
4172. -
From the Protocol list, select UDP.
-
From the Protocol Profile (Client) list, select a predefined or user-defined UDP profile.
-
From the Source Address Translation list, select Auto Map.
-
In the Access Policy area, from the VDI Profile list, select a VDI profile.
You can select the default profile, vdi.
-
Click Finished.
If you configured the HTTPS and UDP virtual servers with a private IP address that is not reachable from the Internet, but instead a publicly available device (typically a firewall or a router) performs NAT for it, you need to perform these steps.
You update the access policy by assigning the variable view.proxy_addr to the hostname that the client uses to reach the virtual server. Otherwise, a View Client cannot connect when the virtual servers have a private IP address.
-
On the Main tab, click Access > Profiles / Policies.
The Access Profiles (Per-Session Policies) screen opens.
-
In the Per-Session Policy column, click the Edit link for the access profile you want to configure.
The visual policy editor opens the access policy in a separate screen.
-
Click the (+) icon anywhere in the access policy to add a new item.
Note: Only an applicable subset of access policy items is available for selection in the visual policy editor for any access profile type.
A popup screen opens, listing predefined actions on tabs such as General Purpose, Authentication, and so on.
-
Type
varin the search field, select Variable Assign from the results list, and then click Add Item.The Variable Assign properties screen opens.
-
Click the change link next to the empty entry.
A popup screen displays two panes, with Custom Variable selected on the left and Custom Expression selected on the right.
-
In the Custom Variable field, type
view.proxy_addr. -
In the Custom Expression field, type
expr {"*hostname*"}where hostname is the fully qualified domain name that the client uses to reach the virtual server.Tip: Another way to extract the initial hostname (either the IP address or fully qualified domain name) in the Custom Expression field is to type:
expr { [mcget {session.server.network.name}] } -
Click Finished to save the variable and expression and return to the Variable Assign action popup screen.
-
Click Save.
The properties screen closes and the policy displays.
-
Click the Apply Access Policy link to apply and activate the changes to the policy.
On a BIG-IP system configured as a SAML Identity Provider (IdP), Access Policy Manager® (APM®) supports smart card authentication for VMware View Horizon Server browser-based clients and View Clients.
Note: Although, APM supports smart card single sign-on for VMWare Horizon View version 6.2 or later, this configuration does not support it.
The configuration uses SSL client certificate validation mechanisms. For a successful configuration, use these instructions and the settings specified in them.
-
Configuring IdP service for VMware View smart card authentication
-
Updating the Access Policy settings and resources on the virtual server
With Access Policy Manager (APM®) configured to support smart card authentication for VMware Horizon View server, the user of a standalone VMware View Client must supply a smart card PIN more than once. When the user logs on to APM, APM displays a screen that prompts for a PIN. Whenever the user launches a desktop or application, the VMware Horizon View server prompts for a PIN.
Access Policy Manager (APM) supports smart card authentication for browser-based clients of VMware View Horizon server if the access policy is configured to use certificate-based authentication. Browser-based clients use the smart card first to authenticate to APM. Then, every time the user launches a desktop or application, the user must use the smart card again to authenticate to the VMware Horizon View server.
VMware Horizon HTML5 Client does not support smart card redirection. If a user authenticates to Access Policy Manager with a smart card and then launches an HTML5 desktop, a screen prompts the user for domain credentials. The user cannot use the smart card and must supply credentials to log in to the desktop.
A VMware View Client makes connections to support different types of traffic between it and a View Connection Server. For Access Policy Manager ® to support these connections, it requires two virtual servers that share the same destination IP address. One virtual server processes HTTPS traffic and performs authentication for the View Client. An addition virtual server processes PC over IP (PCoIP) traffic.
Before you start this task, import the CA certificate for VMware View Horizon server to the BIG-IP system certificate store.
You create a custom client SSL profile to request an SSL certificate from the client at the start of the session. This enables a Client Cert Inspection item in an access policy to check whether a valid certificate was presented.
-
On the Main tab, click Local Traffic > Profiles > SSL > Client.
The Client SSL profile list screen opens.
-
Click Create.
The New Server SSL Profile screen opens.
-
In the Name field, type a unique name for the profile.
-
From the Parent Profile list, select clientssl.
The default settings for the profile specify a 10-second SSL handshake timeout. Some users with smart cards cannot authenticate within that time. You can increase the timeout if this is the case at your site.
-
From the Configuration list, select Advanced.
-
If you have VMware View clients on Mac OS X, disable TLS 1.2 in the Options List area:
-
In the Available Options list, select No TLS 1.2.
-
Click Enable.
-
-
If you change the values for the Cache Size or the Cache Timeout setting, do not specify a value of zero (0) for either setting.
When these values are 0, the client must supply a PIN on each browser page refresh.
-
Scroll down to Handshake Timeout and select the Custom check box.
Additional settings become available.
-
To limit the timeout to a number of seconds, select Specify from the list, and type the required number in the seconds field.
In the list, the value Indefinite specifies that the system continue trying to establish a connection for an unlimited time. If you select Indefinite, the seconds field is no longer available.
-
Scroll down to the Client Authentication area.
-
Next to Client Authentication, select the Custom check box.
The settings become available.
-
From the Client Certificate list, select request.
Do not select require.
-
From the Trusted Certificate Authorities and Advertised Certificate Authorities, select the certificates you imported previously.
-
Click Finished.
Specify a host virtual server to use as the SAML Identity Provider (IdP).
-
On the Main tab, click Local Traffic > Virtual Servers.
The Virtual Server List screen opens.
-
Click Create.
The New Virtual Server screen opens.
-
In the Name field, type a unique name for the virtual server.
-
For the Destination Address/Mask setting, confirm that the Host button is selected, and type the IP address in CIDR format.
The supported format is address/prefix, where the prefix length is in bits. For example, an IPv4 address/prefix is
10.0.0.1or10.0.0.0/24, and an IPv6 address/prefix isffe1::0020/64or2001:ed8:77b5:2:10:10:100:42/64. When you use an IPv4 address without specifying a prefix, the BIG-IP system automatically uses a/32prefix.Note: The IP address you type must be available and not in the loopback network.
-
In the Service Port field, type
443or select HTTPS from the list. -
For the HTTP Profile (Client) setting, verify that the default HTTP profile, http, is selected.
-
For the SSL Profile (Client) setting, from the Available list, select the name of the Client SSL profile you previously created and move the name to the Selected list.
-
For the SSL Profile (Server) setting, select pcoip-default-serverssl.
-
From the Source Address Translation list, select Auto Map.
-
Click Finished.
Configure a SAML Identity Provider (IdP) service for Access Policy Manager (APM), as a SAML IdP, to provide authentication to VMware View clients with a smart card.
-
On the Main tab, click Access > Federation > SAML Identity Provider.
The Local IdP Services screen opens.
-
Click Create.
The Create New IdP Service popup screen displays.
-
In the IdP Service Name field, type a unique name for the SAML IdP service.
The maximum length of a single sign-on configuration, such as the SAML IdP service, is 225 characters, including the partition name.
-
In the IdP Entity ID field, type a unique identifier for the IdP (this BIG-IP system).
Typically, the ID is a URI that points to the BIG-IP virtual server that is going to act as a SAML IdP. If the entity ID is not a valid URL, the Host field is required.
For example, type
https://siterequest.com/idp, where the path points to the virtual server you use for BIG-IP system as a SAML IdP. -
If the IdP Entity ID field does not contain a valid URI, you must provide one in the IdP Name Settings area:
-
From the Scheme list select https or http.
-
In the Host field, type a host name.
For example, type
siterequest.comin the Host field.
-
-
On the left pane, select SAML Profiles and select the Enhanced Client or Proxy Profile (ECP) check box.
-
To specify an artifact resolution service, on the left pane select Endpoint Settings and select a service from the Artifact Resolution Service list.
Note: APM does not use the artifact resolution service, but one must be included in the IdP metadata. If you leave the Artifact Resolution Service list blank, you can edit the IdP metadata later to add an artifact resolution service to it.
-
On the left pane, select Assertion Settings.
The applicable settings display.
-
From the Assertion Subject Type list, select Persistent Identifier.
-
From the Assertion Subject Value list, type the name of the custom session variable into which you stored the user principal name (UPN).
First, you must type a percent sign (
%) and then enclose the session variable name in curly braces ({}).For example, type %{session.custom.certupn}.
-
In the Authentication Context Class Reference field, select a URI reference that ends with PasswordProtectedTransport.
The URI reference identifies an authentication context class that describes an authentication context declaration.
-
In the Assertion Validity (in seconds) field type the number of seconds for which the assertion is valid.
-
-
On the left pane, select SAML Attributes.
-
Click Add.
A Create New SAML Attribute popup screen displays.
-
In the Name field, type disclaimer.
-
Click Add.
Entry fields display in the table.
-
In the Value(s) field, type
falseand click Update.This value must not be encrypted.
-
Click OK.
The Create New SAML Attribute popup screen closes.
The disclaimer attribute set to false is required. You can add additional attributes if needed.
-
-
On the left pane, select Security Settings and select a certificate and a key from the BIG-IP system store to use for signing the assertion.
-
From the Signing Key list, select the key from the BIG-IP system store.
None is selected by default.
-
From the Signing Certificate list, select the certificate from the BIG-IP system store.
When selected, the IdP (the BIG-IP system) publishes this certificate to the service provider so the service provider can verify the assertion. None is selected by default.
-
-
Click OK.
The popup screen closes. The new IdP service appears on the list.
You need to convey the SAML Identity Provider (IdP) metadata from Access Policy Manager (APM) to the external service providers that use the SAML IdP service. Exporting the IdP metadata for a SAML IdP service to a file provides you with the information that you need to do this.
-
On the Main tab, click Access > Federation > SAML Identity Provider.
The Local IdP Services screen opens.
-
Select a SAML IdP service from the table and click Export Metadata.
A popup screen opens, with No selected on the Sign Metadata list.
-
Select the Use VMware View Format check box.
-
Select OK.
APM downloads an XML file.
An XML file that contains IdP metadata is available.
If you did not specify an artifact resolution service when you configured the SAML Identity Provider (IdP) service, you must define an artifact resolution service in the IdP metadata XML file that you exported from Access Policy Manager (APM).
-
Locate the IdP metadata XML file that you downloaded onto your system.
-
Use a text editor to open the file.
-
Add a line to the file that defines the service, following this example.
<ArtifactResolutionService Binding="urn:oasis:names:tc:SAML:2.0:bindings:SOAP" Location="https://165.160.15.20:443/saml/idp/profile/soap/ars" index="0" isDefault="true"></ArtifactResolutionService> -
Save the XML file and exit the text editor.
You can use iRules to respond with SAML Identity Provider (IdP) XML metadata for a particular URI.
Note: For complete and detailed information iRules syntax, see the F5 Networks DevCentral web site (http://devcentral.f5.com).
-
On the Main tab, click Local Traffic > iRules.
The iRule List screen opens, displaying any existing iRules.
-
Click Create.
The New iRule screen opens.
-
In the Name field, type a unique name for the iRule.
The full path name of the iRule cannot exceed 255 characters.
-
In the Definition field, type the syntax for the iRule using Tool Command Language (Tcl) syntax.
This example specifies a URI,
/SAAS/API/1.0/GET/metadata/, and includes the content of the SAML IdP metadata in the response. (The example elides the metadata for brevity.)when HTTP_REQUEST { if { [HTTP::path] contains "/SAAS/API/1.0/GET/metadata/" and [HTTP::method] equals "GET" } { HTTP::respond 200 content {<?xml version="1.0" encoding="UTF-8" ?> <EntityDescriptor xmlns="urn:oasis:names:tc:SAML:2.0:metadata" ID="Ie662e22302a165c" xmlns:saml="urn:oasis:names:tc:SAML:2.0:assertion" xmlns:ds="http://www.w3.org/2000/09/xmldsig#" entityID="https://siterequest.com/idp"> <IDPSSODescriptor protocolSupportEnumeration="urn:oasis:names:tc:SAML:2.0:protocol"> . . . </IDPSSODescriptor> </EntityDescriptor>} } } -
Click Finished.
The new iRule appears in the list of iRules on the system.
You must add this iRule to the virtual server that processes the traffic from the SAML service provider (SP).
From VMware View Connection Server (VCS), create a SAML Authenticator that points to APM so that VCS can recognize APM as a trusted SAML Identity Provider (IdP).
-
Using the VMware software that you use to administer a VCS, create a new SAML Authenticator with these properties:
-
For SAML Authenticator, type the FQDN of your virtual server.
-
For Metadata URL, type the URI where the VCS can get the SAML IdP metadata.
Normally, the VCS should attempt to request the metadata and verify it.
For example, type https://sitrerequest.com/SAAS/API/1.0/GET/metadata/, where
https://siterequest.comis the virtual server for the SAML IdP service, and/SAAS/API/1.0/GET/metadata/is the URI for which the iRule on the virtual server responds with SAML IdP metadata.
-
-
To apply the changes after choosing a new SAML Authenticator, you must restart the VCS.
Configure a SAML service provider (SP) connector with the settings specified here, so that APM can recognize the VMware View Connection Server (VCS) as a supported consumer of SAML assertions.
Note: If the VMware View Horizon server version is earlier than 6.2, do not import the SAML service provider metadata file from the VCS in place of performing these steps. Metadata files for earlier versions do not meet the requirements for this configuration.
-
On the Main tab, click Access > Federation > SAML Identity Provider.
The Local IdP Services screen opens.
-
On the menu bar, expand SAML Identity Provider and click External SP Connectors.
A list of SAML SP connectors displays.
-
Click Create.
The Create New SAML SP Connector screen opens.
-
In the Service Provider Name field, type a unique name for the SAML SP connector.
-
In the SP Entity ID field, type a unique identifier for the service provider.
This is usually a unique URI that represents the service provider. You should obtain this value from the service provider.
-
Select Endpoint Settings from the left pane.
The appropriate settings are displayed.
-
In the Assertion Consumer Services area, specify one assertion consumer service with PAOS binding.
-
Click Add.
A new row displays in the table.
-
In the Index field, type the index number, zero (0) or greater.
-
Select the Default check box.
-
In the Assertion Consumer Service URL field, type the URL where the IdP can send an assertion to this service provider.
-
From the Binding list, select PAOS.
-
Click Update.
-
-
Select Security Settings from the left pane.
-
Clear the Require Signed Authentication Request check box.
-
Select the Response must be signed and Assertion must be signed check boxes, and then select an algorithm from the Signing Algorithm list.
-
-
Click OK.
The popup screen closes.
The new SAML SP connector is available to bind to the SAML IdP service.
Bind a SAML Identity Provider (IdP) service and a SAML service provider (SP) connector so that the BIG-IP system can provide authentication (SAML IdP service) to the external SAML service provider.
-
On the Main tab, click Access > Federation > SAML Identity Provider.
The Local IdP Services screen opens.
-
Select a SAML IdP service from the list.
Select an IdP service that you configured for use with one particular SP connector only.
-
Click Bind/Unbind SP Connectors.
The screen displays a list of available SAML SP connectors.
-
Select the one SAML SP connector that you want to pair with this IdP service.
-
Select OK.
The screen closes.
The SAML SP connector that you selected is bound to the SAML IdP service.
Configure a VMware View remote desktop resource to support smart card authentication using SAML.
-
On the Main tab, click Access > Connectivity / VPN > VDI / RDP > Remote Desktops.
The Remote Desktops screen opens.
-
Click Create.
The New Resource screen opens.
-
For the Type setting, select VMware View.
-
For the Destination setting, select Pool and from thePool Name list, select a pool of View Connection Servers that you configured previously.
-
For the Server Side SSL setting, select the Enable check box.
View Connection Servers must use HTTPS (default) to support smart card authentication.
-
In the Single Sign-On area, select the Enable SSO check box.
-
From the SSO Method list, select SAML.
-
From the SAML Resource list, select the SAML IdP service that you configured previously.
-
In the Customization Settings for the language_name area, type a Caption.
The caption is the display name of the VMware View resource on the APM full webtop.
-
Click Finished.
All other parameters are optional.
This creates the VMware View remote desktop resource. To use it, you must assign it along with a full webtop in an access policy.
You create an access profile to provide the access policy configuration for a virtual server that establishes a secured session.
-
On the Main tab, click Access > Profiles / Policies.
The Access Profiles (Per-Session Policies) screen opens.
-
Click Create.
The New Profile screen opens.
-
In the Name field, type a name for the access profile.
Note: A access profile name must be unique among all access profile and any per-request policy names.
-
From the Profile Type list, select SSL-VPN.
Additional settings display.
-
From the Profile Scope list, retain the default value or select another.
- Profile: Gives a user access only to resources that are behind the same access profile. This is the default value.
- Virtual Server: Gives a user access only to resources that are behind the same virtual server.
- Global: Gives a user access to resources behind any access profile that has global scope.
-
For Customization Type, select Modern.
You can also use Standard but Modern customization is simpler and provides better compatibility for modern cross-platform and cross-device applications.
-
To configure timeout and session settings, select the Custom check box.
-
In the Inactivity Timeout field, type the number of seconds that should pass before the access policy times out. Type
0to set no timeout.If there is no activity (defined by the Session Update Threshold and Session Update Window settings in the Network Access configuration) between the client and server within the specified threshold time, the system closes the current session.
-
In the Access Policy Timeout field, type the number of seconds that should pass before the access profile times out because of inactivity.
Type
0to set no timeout. -
In the Maximum Session Timeout field, type the maximum number of seconds the session can exist.
Type
0to set no timeout. -
In the Max Concurrent Users field, type the maximum number of users that can use this access profile at the same time.
Type
0to set no maximum. -
In the Max Sessions Per User field, type the maximum number of concurrent sessions that one user can start.
Type
0to set no maximum.Note: Only a user in the administrator, application editor, manager, or resource administrator role has access to this field.
-
In the Max In Progress Sessions Per Client IP field, type the maximum number of concurrent sessions that can be in progress for a client IP address.
When setting this value, take into account whether users will come from a NAT-ed or proxied client address and, if so, consider increasing the value accordingly. The default value is 128.
Note: Only a user in the administrator, application editor, manager, or resource administrator role has access to this field.
Note: F5 does not recommend setting this value to
0(unlimited). -
Select the Restrict to Single Client IP check box to restrict the current session to a single IP address.
This setting associates the session ID with the IP address.
Note: Only a user in the administrator, application editor, manager, or resource administrator role has access to this field.
Upon a request to the session, if the IP address has changed the request is redirected to a logout page, the session ID is deleted, and a log entry is written to indicate that a session hijacking attempt was detected. If such a redirect is not possible, the request is denied and the same events occur.
-
To configure logout URIs, in the Configurations area, type each logout URI in the URI field, and then click Add.
-
In the Logout URI Timeout field, type the delay in seconds before logout occurs for the customized logout URIs defined in the Logout URI Include list.
-
To configure SSO:
- For users to log in to multiple domains using one SSO configuration, skip the settings in the SSO Across Authentication Domains (Single Domain mode) area. You can configure SSO for multiple domains only after you finish the initial access profile configuration.
- For users to log in to a single domain using an SSO configuration, configure settings in the SSO Across Authentication Domains (Single Domain mode) area, or you can configure SSO settings after you finish the initial access profile configuration.
-
In the Domain Cookie field, specify a domain cookie, if the application access control connection uses a cookie.
-
In the Cookie Options setting, specify whether to use a secure cookie.
- If the policy requires a secure cookie, select the Secure check box to add the secure keyword to the session cookie.
- If you are configuring an LTM access scenario that uses an HTTPS virtual server to authenticate the user and then sends the user to an existing HTTP virtual server to use applications, clear this check box.
-
If the access policy requires a persistent cookie, in the Cookie Options setting, select the Persistent check box.
This sets cookies if the session does not have a webtop. When the session is first established, session cookies are not marked as persistent; but when the first response is sent to the client after the access policy completes successfully, the cookies are marked persistent. Persistent cookies are updated for the expiration timeout every 60 seconds. The timeout is equal to session inactivity timeout. If the session inactivity timeout is overwritten in the access policy, the overwritten value will be used to set the persistent cookie expiration.
-
From the SSO Configurations list, select an SSO configuration.
-
In the Language Settings area, add and remove accepted languages, and set the default language.
A browser uses the highest priority accepted language. If no browser language matches the accepted languages list, the browser uses the default language.
-
Click Finished.
The access profile displays in the Access Profiles List. Default-log-setting is assigned to the access profile.
To add an SSO configuration for multiple domains, click SSO / Auth Domains on the menu bar. To provide functionality with an access profile, you must configure the access policy. The default access policy for a profile denies all traffic and contains no actions. Click Edit in the Access Policy column to edit the access policy.
|
1 |
Client Type detects a standalone VMware View Client. |
|
2 |
In the properties for the agent, the VMware View Logon Screen property specifies Smart Card. |
|
3 |
Macrocall to Cert Inspection and Resources. |
|
4 |
Client Type detects a web-based client. |
|
5 |
Macrocall to Cert Inspection and Resources. |
|
6 |
Inspect certificate from the smart card. (Relies on LTM to obtain certificate during initial SSL handshake based on specification in SSL client profile.) |
|
7 |
Extracts the User Principal Name from SSL certificate information and stores it in a custom session variable. |
|
8 |
Assign a full webtop and a VMware View remote desktop resource configured for SAML SSO. |
Access Policy Manager (APM) supports this configuration when the BIG-IP system, configured as a SAML Identity Provider (IdP), provides authentication service that is consumed by a VMware View Connection Server (VCS), configured as a SAML service provider.
Create an access policy so that web-based and standalone VMware View clients can use a smart card for authenticating with APM.
Note: Users of VMware Horizon HTML5 Client can log on to APM with a smart card, but when they try to connect to a View Connection Server they must still enter credentials.
-
On the Main tab, click Access > Profiles / Policies.
The Access Profiles (Per-Session Policies) screen opens.
-
In the Per-Session Policy column, click the Edit link for the access profile you want to configure.
The visual policy editor opens the access policy in a separate screen.
-
Click the (+) icon anywhere in the access policy to add a new item.
Note: Only an applicable subset of access policy items is available for selection in the visual policy editor for any access profile type.
A popup screen opens, listing predefined actions on tabs such as General Purpose, Authentication, and so on.
-
On the Endpoint Security (Server-Side) tab, select Client Type, and then click Add Item.
The Client Type action identifies clients and enables branching based on the client type.
A properties screen opens.
-
Click Save.
The properties screen closes. The visual policy editor displays the Client Type action.
-
To accept smart card logon from a standalone VMware View Client, add a smart card logon screen:
Actions on the VMware View branch support standalone VMware View clients.
-
Add a VMware View Logon Page action to the policy.
A properties screen opens.
-
From the VMware View Logon Screen list, select Smart Card.
-
Click Save.
The properties screen closes and the policy displays.
-
-
To inspect the client certificate, add the Client Cert Inspection agent to the access policy on one or more branches as appropriate.
Actions on the Client Type****Full/Mobile branch support web-based clients and certificate-based access is required to support them.
The Client Cert Inspection agent verifies the result of the SSL handshake request that occurs at the start of the session and makes SSL certificate information available to the policy.
-
Add an action to the access policy to obtain the User Principal Name (UPN) on one or more branches as appropriate.
You might add a Variable Assign action and configure it to extract the UPN from the certificate information or configure an AD Query that retrieves the UPN.
-
After successful authentication and successful retrieval of the UPN, assign resources to the session.
-
Click the (+) sign after the previous action.
-
On the Assignment tab, select the Advanced Resource Assign agent, and then click Add Item.
The Resource Assignment window opens.
-
Click Add new entry.
A new line is added to the list of entries.
-
Click the Add/Delete link below the entry.
The screen changes to display resources on multiple tabs.
-
On the Remote Desktop tab, select the VMware View remote desktop resource that you configured for SAML SSO previously.
A system-defined ACL for the remote desktop resource is automatically assigned to the policy. The ACL specifies the allow action for the resource items associated with the remote desktop resource.
-
On the Static ACL tab, select an ACL that rejects all connections.
Important: Adding an ACL that is last in order and rejects all connections keeps users from accessing any host and port combinations other than those to which they have been explicitly allowed access by the other ACLs assigned to the policy.
-
On the Webtop tab, select a full webtop.
-
Select any other resources that you want to assign to the policy.
If you assign a Network Access resource to the policy, be sure to also assign an ACL that allows access to the resources that you want users to have. Otherwise, the ACL that rejects all connections blocks access.
If you assign a Portal Access resource to the policy, be sure to also assign an ACL that allows access to all parts of the web sites specified in the start URI or hosted content fields of the Portal Access configuration. Otherwise, the ACL that rejects all connections blocks access.
-
Click Update.
The popup screen closes.
-
Click Save.
The properties screen closes and the policy displays.
-
-
To grant access at the end of any branch, change the ending from Deny to Allow:
-
Click Deny.
The default branch ending is Deny.
A popup screen opens.
-
Select Allow and click Save.
The popup screen closes. The Allow ending displays on the branch.
-
-
ClickApply Access Policy.
To apply this access policy to network traffic, add the access profile to a virtual server.
Note: To ensure that logging is configured to meet your requirements, verify the log settings for the access profile.
You must supply the User Principal Name (UPN) as the Assertion Subject Value for the SAML Identity Provider (IdP) service.
Note: This example adds a Variable Assign action to the access policy. The action uses a Tcl expression that extracts the UPN from the X509 certificate for the client and stores it in a user-defined session variable.
-
On the Main tab, click Access > Profiles / Policies.
The Access Profiles (Per-Session Policies) screen opens.
-
In the Per-Session Policy column, click the Edit link for the access profile you want to configure.
The visual policy editor opens the access policy in a separate screen.
-
On an access policy branch, click the (+) icon
The Variable Assign action must occur after a Client Cert Inspection action runs successfully. The Variable Assign action relies on X509 information that the Client Cert Inspection action provides.
A popup screen displays actions on tabs, such as General Purpose and Authentication, and provides a search field.
-
Type
varin the search field, select Variable Assign from the results list, and then click Add Item.The Variable Assign properties screen opens.
-
On the left side of the variable assign properties screen, select Custom Variable from the list and in the field, type the name of a custom session variable.
For example, type
session.custom.certupn.Remember the session variable name; you must use it as the assertion subject value for the IdP. You will need to enter it into the IdP service configuration later.
-
On the right side of the variable assignment properties screen, select Custom Expression from the list and in the field, type a Tcl expression to extract the UPN from the X509 certificate as shown here.
foreach x [split [mcget {session.ssl.cert.x509extension}] "\n"] { if { [string first "othername:UPN" $x] >= 0 } { return [string range $x [expr { [string first "<" $x] + 1 }] [expr { [string first ">" $x] - 1 }]]; } }; return ""; -
Click Save.
The properties screen closes and the policy displays.
The Variable Assign action is added to the access policy. You probably need to configure additional actions in the access policy.
You associate an access profile, connectivity profile, VDI profile, and an iRule with the virtual server so that Access Policy Manager can apply them to incoming traffic.
-
On the Main tab, click Local Traffic > Virtual Servers.
The Virtual Server List screen opens.
-
Click the name of the virtual server that you want to update.
-
In the Access Policy area, from the Access Profile list, select the access profile that you configured earlier.
-
From the Connectivity Profile list, select a connectivity profile.
-
From the VDI Profile list, select a VDI profile.
You can select the default profile, vdi.
-
In the Resources area, for the iRules setting, from the Available list, select the name of the iRule that you want to assign, and move the name into the Enabled list.
-
Click Update.
Your access policy and the iRule are now associated with the virtual server.
Before you start, you must have configured a virtual server to process HTTPS traffic. You need to know the destination IP address of that virtual server.
You create this virtual server to support a PC over IP (PCoIP) data channel for View Client traffic.
-
On the Main tab, click Local Traffic > Virtual Servers.
The Virtual Server List screen opens.
-
Click Create.
The New Virtual Server screen opens.
-
In the Name field, type a unique name for the virtual server.
-
In the Destination Address field, type the IP address.
Note: Type the same IP address as for the virtual server that processes HTTPS traffic
-
In the Service Port field, type
4172. -
From the Protocol list, select UDP.
-
From the Protocol Profile (Client) list, select a predefined or user-defined UDP profile.
-
From the Source Address Translation list, select Auto Map.
-
In the Access Policy area, from the VDI Profile list, select a VDI profile.
You can select the default profile, vdi.
-
Click Finished.
If you configured the HTTPS and UDP virtual servers with a private IP address that is not reachable from the Internet, but instead a publicly available device (typically a firewall or a router) performs NAT for it, you need to perform these steps.
You update the access policy by assigning the variable view.proxy_addr to the hostname that the client uses to reach the virtual server. Otherwise, a View Client cannot connect when the virtual servers have a private IP address.
-
On the Main tab, click Access > Profiles / Policies.
The Access Profiles (Per-Session Policies) screen opens.
-
In the Per-Session Policy column, click the Edit link for the access profile you want to configure.
The visual policy editor opens the access policy in a separate screen.
-
Click the (+) icon anywhere in the access policy to add a new item.
Note: Only an applicable subset of access policy items is available for selection in the visual policy editor for any access profile type.
A popup screen opens, listing predefined actions on tabs such as General Purpose, Authentication, and so on.
-
Type
varin the search field, select Variable Assign from the results list, and then click Add Item.The Variable Assign properties screen opens.
-
Click the change link next to the empty entry.
A popup screen displays two panes, with Custom Variable selected on the left and Custom Expression selected on the right.
-
In the Custom Variable field, type
view.proxy_addr. -
In the Custom Expression field, type
expr {"*hostname*"}where hostname is the fully qualified domain name that the client uses to reach the virtual server.Tip: Another way to extract the initial hostname (either the IP address or fully qualified domain name) in the Custom Expression field is to type:
expr { [mcget {session.server.network.name}] } -
Click Finished to save the variable and expression and return to the Variable Assign action popup screen.
-
Click Save.
The properties screen closes and the policy displays.
-
Click the Apply Access Policy link to apply and activate the changes to the policy.
If you have configured Access Policy Manager for smart card authentication and your users cannot enter a PIN and insert a smart card into a reader before the SSL handshake times out, they can experience problems such as browser failure or errors because the BIG-IP system sends a TCP reset after the SSL handshake times out. You can mitigate this problem by increasing the handshake timeout in the client SSL profile.
By default, a client SSL profile provides a 10-second SSL handshake timeout. You might need to modify the timeout to give users who must authenticate using a smart card more time for the SSL handshake to complete.
-
On the Main tab, click Local Traffic > Profiles > SSL > Client.
The Client SSL profile list screen opens.
-
In the Name column, click the name of the profile you want to modify.
-
From the Configuration list, select Advanced.
-
Scroll down to Handshake Timeout and select the Custom check box.
Additional settings become available.
-
Select Specify from the list, and type the desired number in the seconds field.
For users who must type a PIN, 20 seconds is probably a reasonable timeout. For users who must type a PIN and insert a smart card into a reader, 25 or 30 seconds should be adequate.
Note: F5 does not recommend increasing the handshake timeout for any purpose other than client authentication.
-
Click Update.