Updated Date: 07/07/2026
Configuring AFM IP Address Intelligence
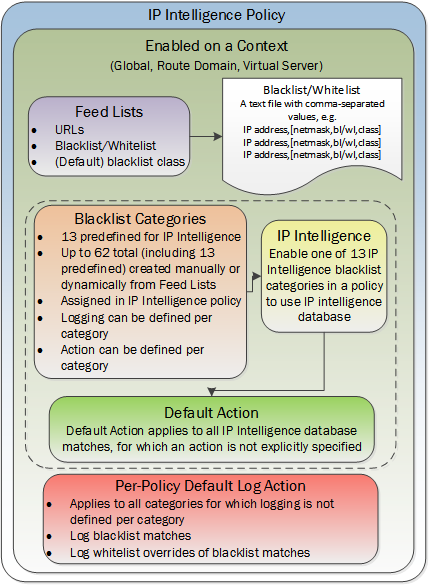
In the BIG-IP Network Firewall, you can configure policies to validate traffic against an IP intelligence database. Such traffic can be handled automatically if it originates from known-bad or questionable IP addresses. To use existing lists of known bad IPs, you can configure policies to automatically query feed lists that specify blacklist and whitelist IP address entries, and assign default classes and blacklist or whitelist behaviors to those feed lists. In addition, you can manually add an IP address to a blacklist category, or remove an IP address from a blacklist category.
You can control the actions for each blacklist category by specifying such actions in a policy, and you can configure default action and default logging for each policy. Furthermore, you can configure logging and actions per category. You can apply IP Intelligence policies at the global context, to a virtual server, or on a route domain.
The requirements for using IP Intelligence are:
- The system must have an IP Intelligence license.
- The system must have an Internet connection either directly or through an HTTP proxy server (see proxy configuration values below).
- The system must have DNS configured (go to System > Configuration > Device > DNS).
Note: When an HTTP proxy server is configured, DNS configuration is not always required. However, in some cases, such as when the proxy.host is not defined as the IP address, DNS is required.
Important: IP Intelligence is enabled by default if you have a license for it. You only need to enable it if it was previously disabled.
To enable IP Intelligence on the BIG-IP system, you enable auto-update to download the IP intelligence database to the system.
-
Log in to the command line for the BIG-IP system.
-
To determine whether IP intelligence auto-update is enabled, type the following command:
tmsh list sys db iprep.autoupdateIf the value of the
iprep.autoupdatevariable isdisable, IP intelligence is not enabled. If it isenable, your task is complete. No further steps are necessary. -
If disabled, at the prompt, type
tmsh modify sys db iprep.autoupdate value enableThe system downloads the IP intelligence database and stores it in the binary file,
/var/IpRep/F5IpRep.dat. It is updated every 5 minutes. -
If the BIG-IP system is behind a firewall, make sure that the BIG-IP system has external access to
vector.brightcloud.comusing port443.That is the IP Intelligence server from which the system gets IP Intelligence information.
-
If the BIG-IP system connects to the Internet using a forward proxy server, set these system database variables.
-
Type
tmsh modify sys db proxy.host value *hostname*to specify the host name of the proxy server. -
Type
tmsh modify sys db proxy.port value *port\_number*to specify the port number of the proxy server. -
Type
tmsh modify sys db proxy.username value *username*to specify the user name to log in to the proxy server. -
Type
tmsh modify sys db proxy.password value *password*to specify the password to log in to the proxy server.
-
The IP Intelligence feature remains enabled unless you disable it with the command tmsh modify sys db iprep.autoupdate value disable.
You can create iRules to instruct the system how to handle traffic from IP addresses with questionable reputations, or use Application Security Manager to configure IP Intelligence blocking. You can configure IP intelligence for Advanced Firewall Manager by assigning IP intelligence policies to the global, route domain, or virtual server context.
Along with the IP address, the IP intelligence database stores the category that explains the reason that the IP address is considered untrustworthy.
| Category Name | Description |
|---|---|
| additional | IP addresses that are added from additional categories not more explicitly defined. |
| appiq_badactors | IP addresses gathered from AppIQ central management. |
| application_denial_of_service | IP addresses involved in application DoS Attacks, or anomalous traffic detection. |
| attacked_ips | Destination IP addresses under attack. |
| botnets | IP addresses of computers that are infected with malicious software (Botnet Command and Control channels, and infected zombie machines) and are controlled as a group by a Bot master, and are now part of a botnet. Hackers can exploit botnets to send spam messages, launch various attacks, or cause target systems to behave in other unpredictable ways. |
| cloud_provider_networks | IP addresses and networks that belong to cloud providers, which offer services hosted on their servers via the Internet. |
| denial_of_service | IP addresses that have launched denial-of-service (DoS) attacks, distributed denial-of-service (DDoS) attacks, anomalous SYN flood attacks, or anomalous traffic detection. These attacks are usually requests for legitimate services, but occur at such a fast rate that targeted systems cannot respond quickly enough and become bogged down or unable to service legitimate clients. |
| infected_sources | Active IP addresses that issue HTTP requests with a low reputation index score, or that are known malicious web sites offering or distributing malware, shell code, rootkits, worms, or viruses. |
| mobile_threats | IP addresses of malicious and unwanted mobile applications. |
| phishing | IP addresses that host phishing sites, and other kinds of fraud activities, such as ad click fraud or gaming fraud. |
| proxy | IP addresses that are associated with web proxies that shield the originator’s IP address (such as proxy and anonymization services). This category also includes TOR anonymizer addresses in versions prior to 13.1.0. |
| scanners | IP addresses that are involved in reconnaissance, such as probes, host scan, domain scan, and password brute force, typically to identify vulnerabilities for later exploits. |
| spam_sources | IP addresses tunneling spam messages through proxy, anomalous SMTP activities and forum spam activities. |
| tor_proxy | IP addresses acting as exit nodes for the Tor Network. Exit nodes are the last point along the proxy chain and make a direct connection to the originator’s intended destination. |
| web_attacks | IP addresses involved in cross site scripting, iFrame injection, SQL injection, cross domain injection, or domain password brute force. |
| windows_exploits | Active IP addresses that have exercised various exploits against Windows resources by offering or distributing malware, shell code, rootkits, worms, or viruses using browsers, programs, downloaded files, scripts, or operating system vulnerabilities. |
Blacklist categories are used to categorize IP addresses by type. For example, the default category infected_sources, represents the IP addresses of hosts distributing viruses, worms or malware. You can create new customized categories, or use the default AFM system blacklist categories. Once created, you can add IP addresses to a blacklist category in one of three ways:
-
Single IPv4 or IPv6 addresses
-
Fully Qualified Domain Names (FQDN)
-
Geographic Locations
Note: If you intend to use FQDN, you must add a DNS resolver with a forward zone entry for the FQDN. Review the next section; Creating a DNS Resolver for FQDNs.
The AFM system can have up to 62 blacklist categories. Once created, blacklist categories are available for association with an IP Intelligence policy.
You must have one or more remote DNS resolver IP addresses.
You must add a DNS Resolver object with a forward zone entry if you intend to add fully qualified domain names (FQDN) to a blacklist category.
-
On the Main tab, click Network > DNS Resolvers.
-
Click Create.
-
Type a unique name for the remote DNS resolver object in the Name field.
-
Click Finished.
The DNS Resolver object appears in the DNS Resolver List.
-
Click the Name of the new DNS Resolver object.
-
Click Forward Zones in the menu bar at the top of the page
-
Click Add to the far right of the page.
-
In the Name field, type the name of the FQDN being added to the blacklist category.
Note: To forward requests for any FQDN, specify . (period) as the name.
For example,
.orsite.example.comare valid zone names. -
Add one or more nameservers:
-
In the Address field, type the IPv4 or IPv6 address of the DNS nameserver that is considered authoritative for the zone.
-
Click Add.
The address is added to the list.
Note: The order of nameservers in the configuration does not impact which nameserver the system selects to forward a query to.
-
-
Click Finished
You have added a DNS Resolver object to resolve a FQDN entry added to a blacklist category.
You can create a blacklist category to configure policy-based responses to specific types of addresses. Then you can specify an address as belonging to a blacklist category so you can see the types of categories that are triggered in the logs, and so you can provide unique responses on a per-category basis.
-
On the Main tab, click Security > Network Firewall > IP Intelligence > Blacklist Categories.
The Blacklist Categories screen opens.
-
Click Create to create a new IP Intelligence blacklist category.
-
In the Name field, type a name for the blacklist category.
-
In the Description field, type a description for the blacklist category.
-
Select the Match Type for the IP intelligence category.
By default, IP intelligence blacklist categories match Source only, but you can configure categories to match Source and Destination or Destination only.
-
Click Finished.
The list screen and the new item are displayed.
You can add single IP addresses, Fully Qualified Domain Names (FQDN) or Geographic Locations to a selected blacklist category. The settings defined in an IP intelligence policy will be applied to the IP address.
-
On the Main tab, click Security > Network Firewall > IP Intelligence > Blacklist Categories.
The Blacklist Categories screen opens.
-
Select the check box next to an IP intelligence category.
You can select more than one IP intelligence category.
-
Click the Add to Category button.
The Add Entry popup screen appears.
-
In the Insert field, type a single IPv4 or IPv6 address, a Geographic Location, or an FQDN.
-
In the Seconds field, specify the duration for which the address should be added to the blacklist category.
-
To allow the IP address to be advertised to edge routers so they will null route the traffic, select Allow Advertisements.
-
Click the Add Address button.
The IP address is added to the blacklist category or categories.
You can easily remove single IP address from a blacklist manually. You do this by selecting the blacklist category, and removing the IP address.
-
On the Main tab, click Security > Network Firewall > IP Intelligence > Blacklist Categories.
The Blacklist Categories screen opens.
-
Select the check box next to an IP intelligence category.
You can select more than one IP intelligence category.
-
Click the Delete from Category button.
The Delete Entry popup screen appears.
-
In the Delete (IP Address) field, type an IP address to remove from the selected blacklist category or categories.
The Delete Entry popup screen appears.
-
In the Insert (IP Address) field, type an IP address to add to the blacklist category or categories.
-
Click the Delete Address button.
The IP address is removed from the blacklist category or categories.
A feed list is used to retrieve IP Address blacklists and whitelists from remote servers. Blacklists and whitelists are also referred to as feed files, and are typically located at specified URLs. A feed list can retrieve feed files using FTP, HTTP, or HTTPS protocols.
Important: If you choose the HTTPS protocol, the remote server’s SSL certificate must be in the BIG-IP system’s ca-bundle.crt file. Refer to article K54041205: Configure AFM IP Intelligence to validate third party Certificate Authorities at https://support.f5.com/csp/article/K54041205.
Once a feed list is created, you associate the feed list with an IP Intelligence policy. The list is then used by the policy to retrieve feed files and dynamically update the blacklist and whitelist policy.
Feed lists dynamically define IP addresses that have been blacklisted or whitelisted. The IP Intelligence policy uses feed lists to dynamically filter traffic.
A feed list defines the feeds that dynamically update the IP address intelligence database for your system.
| Feed list setting | Description |
|---|---|
| URL | Select FTP, HTTP, or HTTPS, then specify the URL for the feed. Feeds are typically text files. An example for a local file might be http://172.10.1.23/feed.txt . |
| List Type | Whitelist or Blacklist. Specifies the default classification for all URLs in the feed for which a category is not specified. |
| Blacklist Category | Specifies a default category for the list. This is the default blacklist category for all blacklist URLs in the feed for which a category is not specified. On the BIG-IP system, you can specify a total of 62 categories; however, 9 categories are used by the IP Intelligence database. |
| Poll Interval | Specifies how often the feed URL is polled for new feeds. |
| Username | The user name to access the feed list file, if required. |
| Password | The password to access the feed list file, if required. |
| Feed URLs | In this area you can add, replace, or delete feed URLs from the feed list. |
A feed is a simple comma-separated value (CSV) file. The file contains four comma-separated values per line.
|
Position |
Value |
Definition |
|---|---|---|
|
1 |
IP Address |
The IP address to be blacklisted or whitelisted. This is the only field that is required in each entry in the file. All other entries are optional. Important: If you append a route domain with a percentage sign and the route domain number, the route domain is not used. |
|
2 |
Network Mask |
(Optional) The network mask for the IP address as a CIDR (such as, |
|
3 |
Whitelist/Blacklist |
(Optional) Identifies whether the IP address is a whitelist or blacklist address. You can type |
|
4 |
Category |
(Optional) Type the category name for the entry. Leave this field blank to retain the default specified for the feed. |
In this feed list file example, only the first entry specifies a value for every field. The third and fourth entries, 10.10.0.12 and 10.0.0.12, will be set to blacklist or whitelist entries depending on the setting for the feed. 10.10.0.12 is specified with a category of botnets; however, if the default setting for the feed is a whitelist, this is ignored. When an IP address has both a blacklist and a whitelist entry from the configuration, the whitelist entry takes precedence. The more specific entry takes precedence, so if an entry in the feed list file specifies a setting, that setting overrules the default setting for the feed list or category.
10.0.0.2,32,bl,spam_sources
10.0.0.3,,wl,
10.10.0.12,,botnets
10.0.0.12,,,
10.0.0.13,,bl,
You can add whitelist and blacklist IP addresses to your configuration automatically by setting up feeds and capturing them with a feed list.
-
On the Main tab, click Security > Network Firewall > IP Intelligence > Feed Lists.
The Feed Lists screen opens.
-
Click Create to create a new IP Intelligence feed list.
-
In the Name field, type a name for the feed list.
-
Configure Feed URLs with an HTTP, HTTPS, or FTP URL, the list type, the blacklist category, and the polling interval. Specify a user name and password, if required to access the feed list.
A feed URL includes the actual URL to the text file, and information about the defaults for that file. Within the feed file, however, any URL can be configured to be a whitelist or blacklist entry, and assigned to a blacklist category.
-
Click the Add button to add a feed URL to the feed list.
-
Click Finished.
The list screen and the new item are displayed.
An IP intelligence policy combines combines feed lists, default actions, logging settings, and actions for blacklist categories into a container that you can apply to a virtual server or route domain.
You can verify IP addresses against the preconfigured IP Intelligence database, and against IPs from your own feed lists, by creating an IP Intelligence policy.
-
On the Main tab, click DoS Setup > IP Intelligence > Policies.
The IP Intelligence Policies screen opens.
-
Click Create to create a new IP Intelligence policy.
-
In the Name field, type a name for the IP intelligence policy.
-
To add feed lists to the policy, click the name of an Available feed list, and then add it to the Selected list.
-
For Default Action, set the default action for the IP intelligence policy as a whole.
- Select Accept to allow packets from categorized addresses that have no action applied on the feed list.
- Select Drop to drop packets from categorized addresses that have no action applied on the feed list. The default action applies to addresses that are not assigned a blacklist category in the feed list. The IP Intelligence feature uses the action specified in a feed list entry, when available.
-
Set Default Log Actions for the IP intelligence policy as a whole.
- Log Whitelist Overrides logs only whitelist matches that override blacklist matches.
- Log Blacklist Category Matches logs IP addresses that match blacklist categories.
- Select both Log Blacklist Category Matches and Log Whitelist Overrides to log all blacklist matches, and all whitelist matches that override blacklist matches. Note: Whitelist matches always override blacklist matches.
-
To customize default actions and logging for any of the blacklist categories, specify default actions in the Blacklist Matching Policy setting.
Note: The default action for a blacklist category is always Reject.
For each category that you want to customize:
-
From the Blacklist Category list, select a category.
-
For Action, select Use Policy Default to use the default action for this policy; select Drop to drop packets from sources of the specified type, as identified by the IP address intelligence database; or select Accept to allow packets in this category.
-
For Log Blacklist Category Matches, select Use Policy Default to use the default log action for blacklist matches; Yes affords visibility into blacklist matches and logs all packets, but provides no hardware acceleration data; Limited logs statistics every 256 packets and includes hardware acceleration; No does not log blacklist matches but provides the highest performance with hardware acceleration.
Note: Hardware acceleration in IP Intelligence (IPI) is only applicable for source IPs and not applicable for destination IPs.
-
For Log Whitelist Overrides, select Use Policy Default to use the default log action for whitelist overrides; select Yes or No to override the default action.
-
For Match Override, select the matching criteria that overrides a blacklist match. You can require a source match, a destination match, or both a source and destination match to override a blacklist match with a whitelist.
-
Click Add to add the custom defaults for the category.
You can also select Replace to replace the defaults for a category.
-
Repeat these steps for any category for which you want to customize default actions.
The custom categories are listed at the bottom. You can select and delete them if things change.
-
-
Click Finished.
You created an IP intelligence policy. Next, it needs to be assigned globally to the BIG-IP system, to a specific virtual server, or a route domain so that it is applied to the correct traffic.
You can assign an IP Intelligence policy globally, to apply blacklist and whitelist matching actions and logging to all traffic.
-
On the Main tab, click Security > Network Firewall > IP Intelligence > Policies.
The IP Intelligence Policies screen opens.
-
From the Global Policy list, select the IP Intelligence policy to apply to all traffic on the BIG-IP system.
-
Click Update.
The list screen and the updated item are displayed.
The specified IP Intelligence policy is applied to all traffic.
You can assign an IP Intelligence policy to a virtual server, to apply blacklist and whitelist matching actions and logging to traffic on that virtual server only.
-
On the Main tab, click Local Traffic > Virtual Servers.
The Virtual Server List screen opens.
-
Click the name of the virtual server you want to modify.
-
On the menu bar, from the Security menu, choose Policies.
-
Next to IP Intelligence, select Enabled, then select the IP intelligence policy to apply to traffic on the virtual server.
-
Click Update.
The list screen and the updated item are displayed.
The specified IP Intelligence policy is applied to traffic on the selected virtual server.
You can assign an IP Intelligence policy to a route domain, to apply blacklist and whitelist matching actions and logging to route domain traffic.
-
On the Main tab, click Network > Route Domains.
The Route Domain List screen opens.
-
In the Name column, click the name of the relevant route domain.
-
From the IP Intelligence Policy list, select an IP Intelligence policy to enforce on this route domain.
-
Click Update.
The system displays the list of route domains on the BIG-IP system.
The specified IP Intelligence policy is applied to traffic on the route domain.