Updated Date: 07/07/2026
Active Directory Authentication
You can authenticate using Active Directory authentication with Access Policy Manager. We support using Kerberos-based authentication through Active Directory.
Access Policy Manager (APM®) supports password management for Active Directory authentication.
The process works in this sequence:
- Access Policy Manager uses the client’s user name and password to authenticate against the Active Directory server on behalf of the client.
- If the user password on the Active Directory server has expired, Access Policy Manager returns a new logon screen back to the user, requesting that the user change the password.
- After the user submits the new password, Access Policy Manager attempts to change the password on the Active Directory server. If this is successful, the user’s authentication is validated.
If the password change fails, it is likely that the Active Directory server rejected it because the password did not meet the minimum requirements such as password length.
In the AD Auth action, APM provides a Max Password Reset Attempts Allowed property.
In the Logon page action, APM provides a Checkbox property in the visual policy editor. You can add the option on the APM logon screen to change the log on password.
Using AAA high availability with Access Policy Manager (APM), you can configure multiple authentication servers to process requests, so that if one authentication server goes down or loses connectivity, the others can resume authentication requests, and new sessions can be established, as usual.
Note: Although new authentications fail if the BIG-IP system loses connectivity to the server, existing sessions are unaffected provided that they do not attempt to re-authenticate.
APM supports the following AAA servers for high availability: RADIUS, Active Directory, LDAP, CRLDP, and TACACS+. APM supports high availability by providing the option to create a pool of server connections when you configure the supported type of AAA server.
Note: If you use AAA with pools, such as RADIUS pools or Active Directory pools, APM assigns each pool member with a different number for the pool member’s priority group value. APM must define each pool member with a different priority group because AAA load balancing is not used. The priority group number increases automatically with each created pool member. Alternative AAA pool configurations can be defined manually using the full flexibility of Local Traffic Manager (LTM) if high availability is desired.
For Active Directory, Access Policy Manager (APM) converts an attribute value to hex only if the value contains unprintable characters. If the session variable contains several values, and one or more of those values is unprintable, then APM converts only those particular values to hex.
7ecc84a2.session.ad.last.attr.objectSid 58 /
0x01050000000000051500000013fe8e97c03cd5b5ad04e2e2550400007ecc84a2.session.ad.last.attr.memberOf 460 |
CN=printable group,OU=groups,OU=someco,DC=sherwood,DC=labt,DC=fp,DC=somelabnet,DC=com |
0x434e3d756e7072696e7461626c6520c2bdc2a12067726f75702c4f553d67726f7570732c4f553d66352 | /
c44433d73686572776f6f642c44433d6c6162742c44433d66702c44433d66356e65742c44433d636f6d | /
CN=Domain Users,CN=Users,DC=smith,DC=labt,DC=fp,DC=somlabnet,DC=com | /
CN=CERTSVC_DCOM_ACCESS,CN=Users,DC=smith,DC=labt,DC=fp,DC=somelabnet,DC=com | /
CN=Users,CN=Builtin,DC=smith,DC=labt,DC=fp,DC=somelabnet,DC=com | If you are adding Active Directory authentication to an existing access policy, you do not need to create another access profile, and the access policy might already include a logon page.
You configure an Active Directory AAA server in Access Policy Manager (APM) to specify domain controllers for APM to use for authenticating users.
-
On the Main tab, click Access > Authentication > Active Directory.
The Active Directory Servers list screen opens.
-
Click Create.
The New Server properties screen opens.
-
In the Name field, type a unique name for the authentication server.
-
In the Domain Name field, type the name of the Windows domain.
-
For the Server Connection setting, select one of these options:
Note: When configuring an Active Directory AAA server that is located in a nondefault route domain, you must select Use Pool and specify the pool containing the Active Directory server.
-
Select Use Pool to set up high availability for the AAA server.
Note: The Timeout value does not apply if you select Use Pool.
-
Select Direct to set up the AAA server for standalone functionality.
-
-
If you selected Direct, type a name in the Domain Controller field.
-
If you selected Use Pool, configure the pool:
-
Type a name in the Domain Controller Pool Name field.
-
Specify the Domain Controllers in the pool by typing the IP address and host name for each, and clicking the Add button.
-
To monitor the health of the AAA server, you have the option of selecting a health monitor: only the gateway_icmp monitor is appropriate in this case; you can select it from the Server Pool Monitor list.
-
-
In the Admin Name field, type a case-sensitive name for an administrator who has Active Directory administrative permissions.
An administrator name and password are required for an AD Query access policy item to succeed when it includes particular options. Credentials are required when a query includes an option to fetch a primary group (or nested groups), to prompt a user to change password, or to perform a complexity check for password reset.
-
In the Admin Password field, type the administrator password associated with the Domain Name.
-
In the Verify Admin Password field, retype the administrator password associated with the Domain Name setting.
-
In the Group Cache Lifetime field, type the number of days.
The default lifetime is 30 days.
-
In the Password Security Object Cache Lifetime field, type the number of days.
The default lifetime is 30 days.
-
To clear cache, click the Clear Cache button. It is useful in cases where stale tickets exist on the system.
-
From the Kerberos Preauthentication Encryption Type list, select an encryption type.
The default is None. If you specify an encryption type, the BIG-IP system includes Kerberos preauthentication data within the first authentication service request (AS-REQ) packet.
-
Specify whether to enable Kerberos KDC Validation. The Kerberos Key Distribution Center (KDC) is a network service that supplies session tickets and temporary session keys to users and computers within an Active Directory domain. The KDC runs on each domain controller and is responsible for authenticating users. The KDC validation allows you to prevent a KDC spoofing attack.
You configure a KDC validation by importing a keytab file that you exported from the Kerberos KDC. When you enable the KDC validation, after obtaining the ticket-granting ticket (TGT) and validating the user, the BIG-IP system requests a service ticket on behalf of the user. It validates the returned service ticket against the secret key for the KDC, which is stored in a keytab file. When the validation with the keytab file fails, the KDC server is considered untrusted, and the user is not authenticated.
-
In the Service Name field, specify the Kerberos service name. This Service Name field displays after you enable KDC Validation.
Note: The service name should be given as
service-class/service-hostname. For example, HTTP/app1, HOST/hostbigip. The BIG-IP system appends the domain name based on the user’s domain in the authentication request. -
In the Keytab File area, locate and upload the keytab file containing Kerberos encrypted keys. It contains the service keys that the server uses to authenticate the client. This option displays after you enable KDC Validation.
To use a stored file, click Use Stored File. To upload and use a new file, click Upload New File. Click Choose File to browse and select the keytab file.
-
In the Timeout field, accept the default value or type a number of seconds.
Note: The Timeout value does not apply if you selected Use Pool.
The timeout specifies the number of seconds to reach the AAA Active Directory server initially. After the connection is made, the timeout for subsequent operations against the AAA Active Directory server is 180 seconds and is not configurable.
-
Click Finished.
The new server displays on the list.
The new Active Directory server is added to the Active Directory Servers list.
To create a new keytab file for host SPN on the Windows DC, perform the following procedure.
-
Log in to the Windows DC as an administrator.
-
Open Active Directory Users and Computers and create a new user account for each HTTP service account.
Note: For security purposes, F5 recommends selecting the This account supports Kerberos AES 256 bit encryption check box on the Account tab in the user Properties after the account is created.
-
Open a command prompt and create a new keytab file using the following syntax:
ktpass -princ <userPrincipalName> -mapuser <service account distinguishedName> crypto <encryption type> -ptype KRB5_NT_PRINCIPAL -pass <password> -out <keytab filename>For example:
ktpass -princ HTTP/app1.example.com@EXAMPLE.COM -mapuser http_app1 crypto AES256-SHA1 -ptype KRB5_NT_PRINCIPAL -pass pass1234 -out app1example.keytab -
Repeat steps 2 and 3 to generate a keytab file for each child domain if the given domain has child domains.
Merge all individual keytab files before uploading to the BIG-IP system.
You can use the ktutilutility, available on the BIG-IP APM, to merge multiple keytab files into a single keytab file with individual entries for each service.
-
Using a utility like SCP or WinSCP, upload all your keytab files you created in the Creating a new keytab file with the ktpass command procedure to the BIG-IP APM system for merging. For example, you can upload them to the /var/tmp directory.
-
Log in to the BIG-IP command line.
-
Start the ktutil utility by entering the following command:
ktutil -
To read each keytab file you uploaded in step 1, use the following command syntax in ktutil:
read_kt <keytab filename>For example if you uploaded your keytab files to the /var/tmp directories, enter the following commands:
read_kt /var/tmp/app1example.keytabread_kt /var/tmp/app2example.keytabread_kt /var/tmp/app3example.keytab -
To merge and write the multiple keytab files, use the following command syntax in ktutil:
write_kt <merged keytab filename>For example, enter the following command to write and save the merged keytab file:
write_kt /var/tmp/appservice.keytab -
To quit the ktutil utility, enter the following command:
quit
You create an access profile to provide the access policy configuration for a virtual server that establishes a secured session.
-
On the Main tab, click Access > Profiles / Policies.
The Access Profiles (Per-Session Policies) screen opens.
-
Click Create.
The New Profile screen opens.
-
In the Name field, type a name for the access profile.
Note: A access profile name must be unique among all access profile and any per-request policy names.
-
From the Profile Type list, select one these options:
-
LTM-APM: Select for a web access management configuration.
-
SSL-VPN: Select to configure network access, portal access, or application access. (Most access policy items are available for this type.)
-
ALL: Select to support LTM-APM and SSL-VPN access types.
-
SSO: Select to configure matching virtual servers for Single Sign-On (SSO).
Note: No access policy is associated with this type of access profile
-
RDG-RAP: Select to validate connections to hosts behind APM when APM acts as a gateway for RDP clients.
-
SWG - Explicit: Select to configure access using Secure Web Gateway explicit forward proxy.
-
SWG - Transparent: Select to configure access using Secure Web Gateway transparent forward proxy.
-
System Authentication: Select to configure administrator access to the BIG-IP system (when using APM as a pluggable authentication module).
-
Identity Service: Used internally to provide identity service for a supported integration. Only APM creates this type of profile.
Note: You can edit Identity Service profile properties.
Note: Depending on licensing, you might not see all of these profile types.
Additional settings display.
-
-
From the Profile Scope list, select one these options to define user scope:
- Profile: Access to resources behind the profile.
- Virtual Server: Access to resources behind the virtual server.
- Global: Access to resources behind any access profile with global scope.
- Named: Access for SSL Orchestrator users to resources behind any access profile with global scope.
- Public: Access to resources that are behind the same access profile when the Named scope has configured the session and is checked based on the value and string configured in the Named scope field.
-
In the Language Settings area, add and remove accepted languages, and set the default language.
A browser uses the highest priority accepted language. If no browser language matches the accepted languages list, the browser uses the default language.
-
Click Finished.
The access profile displays in the Access Profiles List. Default-log-setting is assigned to the access profile.
Confirm that the correct log settings are selected for the access profile to ensure that events are logged as you intend.
Note: Log settings are configured in the Access > Overview > Event Log > Settings area of the product. They enable and disable logging for access system and URL request filtering events. Log settings also specify log publishers that send log messages to specified destinations.
-
On the Main tab, click Access > Profiles / Policies.
The Access Profiles (Per-Session Policies) screen opens.
-
Click the name of the access profile that you want to edit.
The properties screen opens.
-
On the menu bar, click Logs.
The access profile log settings display.
-
Move log settings between the Available and Selected lists.
You can assign up to three log settings that enable access system logging to an access profile. You can assign additional log settings to an access profile provided that they enable logging for URl request logging only.
Note: Logging is disabled when the Selected list is empty.
-
Click Update.
An access profile is in effect when it is assigned to a virtual server.
Before you configure an access policy to use Active Directory authentication, you must have at least one Active Directory AAA server configured.
You create an access policy like this one to obtain user credentials and use them to authenticate the user against an external Active Directory server before granting access.
-
On the Main tab, click Access > Profiles / Policies.
The Access Profiles (Per-Session Policies) screen opens.
-
In the Per-Session Policy column, click the Edit link for the access profile you want to configure.
The visual policy editor opens the access policy in a separate screen.
-
Click the (+) icon anywhere in the access policy to add a new item.
Note: Only an applicable subset of access policy items is available for selection in the visual policy editor for any access profile type.
A popup screen opens, listing predefined actions on tabs such as General Purpose, Authentication, and so on.
-
On the Logon tab, select Logon Page and click the Add Item button.
The Logon Page Agent properties screen opens.
-
Make any changes that you require to the logon page properties and click Save.
The properties screen closes and the policy displays.
-
Click the (+) icon anywhere in the access policy to add a new item.
Note: Only an applicable subset of access policy items is available for selection in the visual policy editor for any access profile type.
A popup screen opens, listing predefined actions on tabs such as General Purpose, Authentication, and so on.
-
On the Authentication tab, select AD Auth and click Add Item.
A Properties popup screen opens.
-
From the Server list, select the AAA Active Directory server to use for authentication, and click Save.
-
You can also set these options.
|
Option |
Description |
|---|---|
|
Cross Domain Support |
Specifies whether AD cross domain authentication support is enabled for AD Auth agent. |
|
Complexity check for Password Reset |
Specifies whether Access Policy Manager performs a password policy check. Note: Enabling this option increases overall authentication traffic significantly because Access Policy Manager must retrieve additional information. Because this option might require administrative privileges, if you enable it you should specify the administrator name and password on the AAA Active Directory server configuration page. |
|
Show Extended Error |
When enabled, displays the comprehensive error messages generated by the authentication server to show on the user’s Logon page. This setting is intended for use in testing only in a production or debugging environment. If you enable this setting in a live environment, your system might be vulnerable to malicious attacks |
|
Max Logon Attempts Allowed |
Specifies the number of user authentication logon attempts to allow.Note: To use this access policy for Citrix Receiver client access, set the value to 1. |
|
Max Password Reset Attempts Allowed |
Specifies the number of times that Access Policy Manager allows the user to try to change password. |
- Click Apply Access Policy to save your configuration.
This adds a logon page and Active Directory authentication to the access policy.
To apply this access policy to network traffic, add the access profile to a virtual server.
Note: To ensure that logging is configured to meet your requirements, verify the log settings for the access profile.
When creating a virtual server for an access policy, specify an IP address for a single host as the destination address.
-
On the Main tab, click Local Traffic > Virtual Servers.
The Virtual Server List screen opens.
-
Click Create.
The New Virtual Server screen opens.
-
In the Name field, type a unique name for the virtual server.
-
For the Destination Address/Mask setting, confirm that the Host button is selected, and type the IP address in CIDR format.
The supported format is address/prefix, where the prefix length is in bits. For example, an IPv4 address/prefix is
10.0.0.1or10.0.0.0/24, and an IPv6 address/prefix isffe1::0020/64or2001:ed8:77b5:2:10:10:100:42/64. When you use an IPv4 address without specifying a prefix, the BIG-IP system automatically uses a/32prefix.Note: The IP address you type must be available and not in the loopback network.
-
In the Service Port field:
- If you want to specify a single service port or all ports, confirm that the Port button is selected, and type or select a service port.
- If you want to specify multiple ports other than all ports, select the Port List button, and confirm that the port list that you previously created appears in the box.
-
From the HTTP Profile (Client) list, select a previously-created HTTP/2 profile for client-side traffic.
-
If you use server SSL for this connection, from the SSL Profile (Server) list, select a server SSL profile.
-
If you use client SSL for this profile, from the SSL Profile (Client) list, select a client SSL profile.
-
In the Access Policy area, from the Access Profile list, select the access profile that you configured earlier.
-
From the Connectivity Profile list, select a connectivity profile.
You can select the default connectivity profile, connectivity if you have not defined a specific profile for the traffic that is directed to this virtual server.
-
Click Finished.
To effectively test that high availability works for your authentication servers, you should have two servers that are accessible, where you can remove one of them from the network.
Note: High availability is supported for these authentication server types only: RADIUS, Active Directory, LDAP, CRLDP, and TACACS+.
If you configured a supported authentication server type to use a pool of connection servers, you can test the configuration using these steps.
-
Begin a
tcpdumpon the Access Policy Manager, using a protocol analyzer, and scanning for packets destined for the specific port for your authentication server. -
Log in to the virtual server with both servers active.
-
Using the
tcpdumprecords, verify that the requests are being sent to the higher priority server. -
Log out of the virtual server.
-
Disable the higher-priority server.
-
Log in to the virtual server again.
-
Verify that the request is being sent to the other server.
-
Log out again, re-enabling the server, and try one more time to verify that the new requests are being sent to the high priority server.
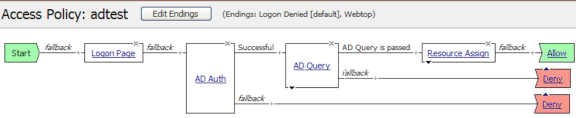
This is an example of an access policy with all the associated elements that are needed to authenticate and authorize your users with Active Directory authentication and Active Directory query.
Import user groups from an Active Directory server to make them available for assigning resources to an Active Directory group. When you configure the AD Group Resource Assign access policy item, you can type group names to exactly match those on the Active Directory server, or you can select them from the imported list of groups.
-
Select Access > Authentication > Active Directory.
The Active Directory Servers screen displays.
-
Click the name of the server that you want to update.
The Properties screen displays.
-
From the menu bar, click Groups.
-
From the Groups area of the screen, click Update.
The screen displays the number of groups, the date last updated, and the list of groups.
You can select groups from a list that you upload from an Active Directory server; alternately, or in addition. you can type group names to exactly match Active Directory groups. If you plan to select groups and have not updated the list recently, update it from the Groups screen for the AAA Active Directory server before you start.
Use an AD Group Resource Assign action to assign resources to one or more groups that are configured on the Active Directory server. For every group to which a user belongs, the corresponding resources will be assigned to the session.
-
On a policy branch, click the (+) icon to add an item to the policy.
A popup screen displays actions on tabs, such as General Purpose and Authentication, and provides a search field.
-
On the Assignment tab, select the AD Group Resource Assign agent, and then click Add Item.
The AD Group Resource Assign screen opens, displaying a blank entry in the Groups area.
-
To make a list of groups available, select a server from the Server list.
A brief pause occurs while the agent retrieves any groups that were previously uploaded from the Active Directory server to the BIG-IP system.
-
To add an entry, click Add entry.
An entry must include at least one group and the resources to be assigned to it. You can add multiple entries.
A numbered entry displays in the Groups area.
-
In the Groups area, click the edit link for the entry that you want to update.
A popup screen opens to the Groups tab.
-
If you need to add a group, in the New Group field, type the name of a group that exists on the server and click Add group manually.
When the access policy runs, this action queries the group names using the memberOf attribute in the directory.
The group displays in the list on the Groups tab.
-
Select at least one group.
-
Repeat these steps for each type of resource that you require.
The screen displays one tab for each resource type.
-
Click a tab.
-
Select the resources that you want to assign to the selected groups.
Typical resource assignment rules apply. For example, you can assign multiple webtop links to a group, but you can assign only one webtop.
-
-
Click the Update button.
The LDAP Group Resource Assign screen opens, and displays the groups and resources in the entry in the Groups table.
-
Create any additional entries that you require.
-
Click Save.
The properties screen closes and the policy displays.
This configures an AD group resource assign action and adds it to the access policy.
When the AD Auth access policy item runs, it populates session variables which are then available for use in access policy rules. The tables list the session variables for the Active Directory access policy items and for a logon access policy item.
|
Session Variable |
Description |
|---|---|
|
session.ad.last.actualdomain |
AD Auth agent sets this variable to the actual user domain used for successful Active Directory authentication, whether cross-domain support is enabled or disabled. |
|
session.ad.last.authresult |
Provides the result of the Active Directory authentication. The available values are: - 0: Failed
|
|
session.ad.last.errmsg |
Displays the error message for the last login. If session.ad.last.authresultis set to 0, then session.ad.last.errmsg might be useful for troubleshooting purposes. |
| Session Variable | Description |
|---|---|
| session.logon.last.username | Provides user credentials. The username string is stored after encrypting, using the system’s client key. |
| session.logon.last.password | Provides user credentials. The password string is stored after encrypting, using the system’s client key. |
| Rules | Explanation |
|---|---|
| Cross-domain support and split domain from username are both enabled. | If you enable cross domain support, and enable split domain username at the login page, and then the user enters his user name, such as user@domain.com, Access Policy Manager uses the user@domain.com as the user principal name to authenticate the user against USERNAME.COM domain. |
| Cross-domain support is enabled but split domain from username is disabled | Access Policy Manager handles the user’s input as a simple user name and escape “@” and “\” chars. In other words, Access Policy Manager uses user\@userdomain.com@DEFAULTREALM.COM to authenticate the user, where DEFAULTREALM.COM is the domain name that was configured on the AAA AD Server configuration page. |
| If user does not specify a user’s domain | Regardless of whether split domain from username option is enabled or disabled, Access Policy Manager uses user@defaultrealm.com to authenticate the user. |
You might run into problems with Active Directory authentication and query processes in some instances. Follow these tips to try to resolve any issues you might encounter.
| Possible error messages | Possible explanations and corrective actions |
|---|---|
Domain controller reply did not match expectations.(-1765328237) |
This error occurs when the principal/domain name does not match the domain controller server’s database. For example, if the actual domain is SALES.MYCOMPANY.COM, and the administrator specifies STRESS as the domain, then the krb5.conf file displays the following: default_realm = SALES SALES = { domain controller = (domain controller server) admin = (admin server) So, when the administrator tries to authenticate with useraccount@SALES, the krb5 library notices that the principal name SALES differs from the actual one in the server database. |
|
You should |
Steps to take |
|---|---|
|
Check that your access policy is attempting to perform authentication |
Note: Make sure that your log level is set to the appropriate level. The default log level is notice. |
|
Confirm network connectivity |
|
|
Check the Active Directory server configuration |
Note: Since Active Directory is sensitive to time settings, use NTP to set the correct time on the BIG-IP system. |
|
Capture a tcpdump |
Use the tcpdump utility on the BIG-IP system to record activities between Access Policy Manager and the authentication server when authentication attempts are made. 1. Type a command to start the tcpdump utility. For example, type Note: For tcpdump utility syntax, refer to SOL411: Overview of packet tracing with the tcpdump utility on the AskF5 web site located at
Important: If you decide to escalate the issue to customer support, you must provide a capture of the tcpdump when you encounter authentication issues that you cannot otherwise resolve on your own. |
Active Directory Trusted Domains option in BIG-IP Access Policy Manager® (APM®) manages Active Directory AAA trusted domains. For enterprises that are service providers, their customers might have their own enterprise network infrastructure. Using APM, the service provider provides access to their customers’ networks. To avoid network traffic collisions between two customer networks, the service provider separates each customer using route domains.
A route domain is a configuration object that isolates network traffic for a particular application on the network. The service provider uses Active Directory to authenticate their customer users. However, each customer’s Active Directory service can contain multiple trusted domains or forests. The service provider can use the Active Directory Trusted Domains option to authenticate users across all trusted domains or forests for a customer.
You must create at least one Active Directory AAA server before you can configure an Active Directory Trusted Domain.
Configure an Active Directory Trusted Domain in Access Policy Manager (APM) to authenticate users in route domains with at least one trusted domain.
-
On the Main tab, click Access > Authentication > Active Directory > Trusted Domains.
The Trusted Domains screen opens.
-
Click Create.
The Create New Active Directory Trusted Domains screen opens.
-
In the Name field, type a name for the Active Directory Trusted Domain.
-
In the Description field, type a description for the Active Directory Trusted Domain.
-
For the XXX setting, in the Available list, select the Active Directory AAA server that you want to add to the Trusted Domain, and click << to move the Active Directory AAA server into the Selected list.
-
From the Root list, select a root domain.
You use the root domain for an initial authentication request, such as an entry point to an Active Directory forest.
-
Click OK.
You have now added an Active Directory Trusted Domain to the Active Directory Trusted Domain list.
You can now add the Active Directory Trusted Domain option to either the AD Auth agent or the AD Query agent in the visual policy editor.
Note: You can select a trusted domain only if you enable the Cross Domain support option.