


Updated Date: 07/07/2026
Using APM as a SAML Service Provider
For Access Policy Manager to act as a SAML service provider (SP), you must configure the following:
- SAML SP service – one required
- SAML Identity Provider (IdP) connectors – one or more required
- An SSL certificate and key from each SAML IdP, imported into the store on the BIG-IP system
- An access profile
- An access policy that includes the SAML Auth agent
- A virtual server that assigns the access profile
Note: When configuring a SAML SP, you cannot configure it as a portal access resource. If the BIG-IP system is configured as a portal access to a backend resource that is the actual SAML SP, then the portal access (rewrite filter) does URL rewriting, which is not compatible with SAML functionality. The SAML SP backend resource needs to be configured as a pool for this to work.
When configured as a SAML SP, you can use step-up authentication with SAML. You need to put a SAML Auth agent in a subroutine in a per-request policy. The policy can then perform step-up authentication, for example, when end users access different resources. Refer to BIG-IP APM: Implementing Zero Trust with Per-Request Policies for an example of using step-up authentication with SAML.
A SAML SP service is a type of AAA service in Access Policy Manager (APM ). It requests authentication from an external SAML Identity Provider (IdP) that is specified on APM in a SAML IdP connector. (You bind a SAML service provider (SP) service to one or more SAML IdP connectors.) APM requests authentication from an IdP and consumes assertions from it to allow access to resources behind APM.
On a BIG-IP system that you use as a SAML service provider (SP), you can bind an SP service to one or more SAML Identity Provider (IdP) connectors (each of which specifies an external IdP). When you bind an SP service to multiple IdP connectors, Access Policy Manager chooses the correct IdP connector at run time through a filtering and matching process called IdP discovery.
You might bind multiple IdP connectors to an SP service on the BIG-IP system when you must provide services to different businesses and universities, each of which specifies an IdP to identify their users. When the user’s information arrives at the SP service on the BIG-IP system, the SP service identifies the correct IdP and redirects the user to authenticate against that IdP before the SP service provides access to the service.
Note: The SP service performs IdP discovery for a user only when the user initiates connection from an SP.
On a BIG-IP system configured as an SP, the typical access policy presents a logon page to the user. The Logon Page action populates session variables. You can customize the Logon Page action and affect session variable values. A SAML Auth action follows the logon page.
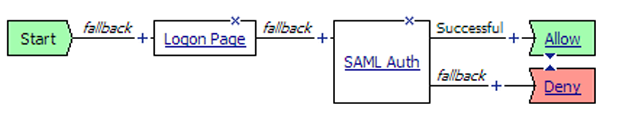
A SAML Auth action specifies an SP service. An SP service is an AAA service that requests authentication from an external IdP (specified in an IdP connector).
Among multiple IdP connectors, the BIG-IP system must discover the correct external IdP with which to authenticate a user. For IdP discovery to work, you must specify matching criteria, a session variable name and value, for each IdP connector.
For example, users of a service might go to a particular landing page. When you bind the IdP connector, for the external IdP that serves those users, to the SP service, select the %{session.server.landinguri} session variable and supply a landing path value, such as, /south*. For users going to URLs such as https://sp-service/southwest and https://sp-service/southeast, the SP service selects the same IdP to authenticate them.
These are some common customization examples for the Logon Page action.
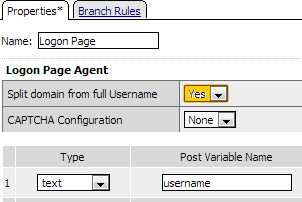
Select Yes for Split domain from full Username. The Logon Page agent takes the user name, such as joe@office.com, that was entered and creates the following session variables with these values.
| Session Variable | Value |
|---|---|
| %{session.logon.last.username} | joe |
| %{session.logon.last.domain} | office.com |
| %{session.logon.last.logonname} | joe@office.com |
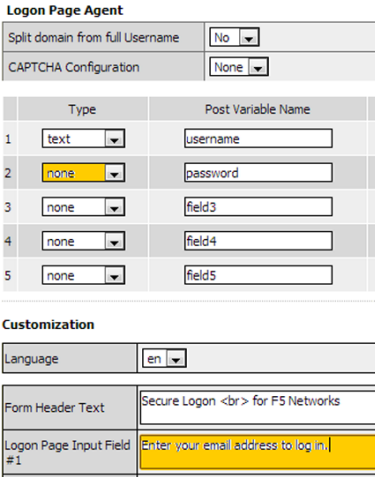
Change the prompt for the first text field (username field). To omit the password: for Type, select none from the list.
An IdP connector specifies how a BIG-IP system, configured as a SAML service provider (SP), connects with an external SAML identity provider (IdP).
You can use one or more of these methods to configure SAML identity provider (IdP) connectors in Access Policy Manager (APM).
-
From metadata - Obtain a metadata file from the vendor and import it into APM. The advantage to this method is that the vendor provides all required data, including the certificate. You can complete the configuration by simply typing a unique name for the identity provider, and browsing to and importing the file. APM imports the certificate to the BIG-IP system and configures the SAML IdP connector.
-
From template - Use templates that APM provides for some vendors. The advantages to this method are that:
- Most required data is included in the template. (Note that the certificate is not included.)
- Additional required data is minimal and is available from the vendor. APM configures the SAML IdP connector. You must obtain a certificate from the vendor and import it into the BIG-IP system.
-
Custom - Research the identity provider requirements and type all settings into the Configuration utility. Use this method when a metadata file or a template for an identity provider is not available. APM configures the SAML IdP connector. You must obtain a certificate from the vendor and import it into the BIG-IP system.
-
IdP Automation - Provide files with cumulative IdP metadata on remote systems, then configure BIG-IP IdP automation to poll the files periodically and create IdP connectors and bind them to a specific service provider (SP) service.
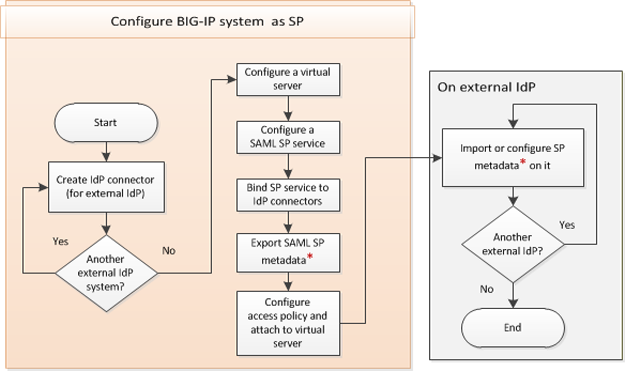
Setting up a BIG-IP system as a SAML service provider (SP) involves two steps:
- First, you set up one BIG-IP system as a SAML service provider (SP)
- Then, you go to one or more external SAML identity provider (IdP) systems and configure connectivity to the SP system
Note: When configuring a SAML SP, you cannot configure it as a portal access resource. If the BIG-IP system is configured as a portal access to a backend resource that is the actual SAML SP, then the portal access (rewrite filter) does URL rewriting, which is not compatible with SAML functionality. The SAML SP backend resource needs to be configured as a pool for this to work.
This flowchart illustrates the process for configuring a BIG-IP system as a SAML service provider (SP). In this configuration, the BIG-IP system relies on external SAML Identity Providers (IdPs).
You configure a SAML IdP connector so that Access Policy Manager (APM) (as a SAML service provider) can send authentication requests to this Identity Provider (IdP), relying on it to authenticate users and to provide access to resources behind APM.
-
On the Main tab, click Access > Federation > SAML Service Provider > External IdP Connectors.
The External IdP Connectors screen displays.
-
Click Create > Custom.
The Create New SAML IdP Connector screen opens.
-
In the Name field, type a unique name for the SAML IdP connector.
-
In the IdP Entity ID field, type a unique identifier for the IdP.
This is usually a URI. Obtain this value from the vendor.
-
To configure single sign-on service, from the left pane, select Endpoint Settings > Single Sign On Service Settings.
The screen changes to display the applicable settings.
-
In the Single Sign On Service URL field, type the location on the IdP where APM should send authentication requests.
-
From the Single Sign On Service Binding field, select one:
- POST (the default value)
- Redirect This is the binding APM uses to send authentication requests to the IdP.
-
For the service provider to connect to an artifact resolution service and exchange an artifact for an assertion, select Endpoint Settings > Artifact Resolution.
-
In the Artifact Resolution Service Settings area, in the Location URL field, type the URI of the IdP artifact resolution service.
The URI must include the scheme, host name, port, and full path.
-
In the IP Address field, type the IP address that this BIG-IP system (as SP) will use to connect to the IdP artifact resolution service.
The value must be a valid IPv4 or IPv6 address.
Note: The host name from the Location URL must resolve to this IP address.
-
In the Port field, type the port for the artifact resolution service.
This must match the port number from the Location URL.
-
To specify that the IdP requires that artifact resolve requests be signed, select the Sign Artifact Resolution Request check box, and select a profile from the Server SSL Profile list.
-
If the artifact resolution service is protected by HTTP Basic authentication, in the User Name field, type a Basic user name and in the Password field type a password.
-
-
Select Assertion Settings from the left pane.
-
From the Identity Location list, select where to find the principal (usually, this is a user) to be authenticated:
-
Subject - In the subject of the assertion. This is the default setting.
-
Attribute - In an attribute. If selected, the Identity Location Attribute field displays, and you must type an attribute name into it.
Note: If the assertion from the IdP does not include this attribute, the BIG-IP system (as SP) does not accept the assertion as valid.
-
-
Select Security Settings from the left pane.
-
To require that the SAML SP sign the assertion request before sending it to the IdP, select the Must be signed check box and select an algorithm from the Signing Algorithm list.
-
From the Certificate Settings area, select a certificate from the IdP’s Assertion Verification Certificate list.
The BIG-IP system uses this certificate from the IdP to verify the signature of the assertion from the IdP. If the certificate from the IdP is not in the BIG-IP system store, obtain it and import it into the store. Then edit this IdP connector to select the certificate for it.
-
-
Select SLO Service Settings from the left pane.
-
In the Single Logout Request URL field, type a URL.
When a service provider initiates a logout, APM sends the logout request to the SAML Identity Provider (IdP) using this URL.
-
In the Single Logout Response URL field, type a URL.
When the IdP initiates a logout, APM sends the logout response to the IdP using this URL.
Note: APM supports HTTP-POST binding for the SLO service. For SLO to work, all entities (SPs and IdPs) must support SLO.
-
-
Click OK.
The popup screen closes.
APM creates a SAML IdP connector. It is available to bind to a SAML SP service.
Before you start this task, configure a client SSL profile and a server SSL profile.
Note: Access Policy Manager supports using a non-SSL virtual server for the BIG-IP system (as SP). However, we highly recommend using an SSL virtual server for security reasons. The following procedure includes steps that are required for configuring an SSL virtual server. These are: selecting client and server SSL profiles and setting the service port to HTTPS.
Specify a host virtual server to use as the SAML SP.
-
On the Main tab, click Local Traffic > Virtual Servers.
The Virtual Server List screen opens.
-
Click Create.
The New Virtual Server screen opens.
-
In the Name field, type a unique name for the virtual server.
-
For the Destination Address/Mask setting, confirm that the Host button is selected, and type the IP address in CIDR format.
The supported format is address/prefix, where the prefix length is in bits. For example, an IPv4 address/prefix is
10.0.0.1or10.0.0.0/24, and an IPv6 address/prefix isffe1::0020/64or2001:ed8:77b5:2:10:10:100:42/64. When you use an IPv4 address without specifying a prefix, the BIG-IP system automatically uses a/32prefix.Note: The IP address you type must be available and not in the loopback network.
-
In the Service Port field, type
443or select HTTPS from the list. -
For the HTTP Profile (Client) setting, verify that the default HTTP profile, http, is selected.
-
For the SSL Profile (Client) setting, from the Available list, select the name of the Client SSL profile you previously created and move the name to the Selected list.
-
For the SSL Profile (Server) setting, from the Available list, select the name of the Server SSL profile you previously created and move the name to the Selected list.
-
Click Finished.
The virtual server for the BIG-IP system configured as an SP now appears on the Virtual Server List. The virtual server destination is available for use in a SAML SP service configuration.
Configure a SAML service provider (SP) service for Access Policy Manager to provide AAA authentication, requesting authentication and receiving assertions from a SAML identity provider (IdP).
-
On the Main tab, click Access > Federation > SAML Service Provider.
The Local SP Services screen displays.
-
Click Create.
The Create New SAML SP Service screen opens.
-
In the Name field, type a unique name for the SAML SP service.
-
In the Entity ID field, type a unique identifier for a SAML SP entity.
It is recommended that Entity ID is a URL that contains the FQDN of the SP virtual server. If Scheme and Host are specified, the SAML SP entity can be a unique identifier other than a URL. It can use session variables that are exposed as real values at runtime. For example,
https://%{session.server.network.name} -
If the Entity ID field does not contain a valid URI, in the SP Name Settings area from the Scheme list, select https or http and in the Host field, type a host name.
For example, type
siterequest.comin the Host field. -
In the Relay State field, type a value.
The value can be an absolute path, such as
hr/index.htmlor a URI, such ashttps://www.abc.com/index.html. It is where the service provider redirects users after SAML single sign-on completes. -
For this service provider to request an artifact instead of an assertion from the IdP, from the left pane select Endpoint Settings and, from the Assertion Consumer Service Binding list, select Artifact.
POST is the default setting.
-
From the left pane, select Security Settings.
The screen displays the applicable settings.
-
If you want this BIG-IP system to send signed authentication requests to the SAML IdP, select Signed Authentication Request. Then select a key and a certificate from those in the BIG-IP system store from the Message Signing Private Key and Message Signing Certificate lists.
-
If this BIG-IP system requires signed assertions from the SAML IdP, ensure that the Want Signed Assertion check box remains selected.
-
If this BIG-IP system requires encrypted assertions from the SAML IdP, select Want Encrypted Assertion. Then select a key and a certificate from those in the BIG-IP system store from the Assertion Decryption Private Key and Assertion Decryption Certificate lists.
The BIG-IP system uses the private key and certificate to decrypt the assertion.
-
To configure additional service provider attributes, from the left pane click Advanced.
The screen displays the applicable settings.
-
To force users to authenticate again even when they have an SSO session at the identity provider, select the Force Authentication check box.
This setting is for use when the external IdP supports a force authentication flag.
-
To allow the external IdP, when processing requests from this BIG-IP system as SP, to create a new identifier to represent the principal, select the Allow Name-Identifier Creation check box.
-
To specify the type of identifier information to use, select a URI reference from the Name-Identifier Policy Format list.
For example, if a Service Provider (SP) initiates SSO by sending an
AuthnRequestto the IdP with format urn:oasis:names:tc:SAML:1.1:nameid-format:emailAddress, then the IdP response should contain the subject identity in email format. -
To specify that the assertion subject’s identifier be returned in the namespace of an SP other than the requester, or in the namespace of a SAML affiliation group of SPs, type a value in the SP Name-Identifier Qualifier field.
-
Click OK.
The screen closes.
APM creates the SAML SP service. It is available to bind to SAML IdP connectors and to export to a metadata file.
Select a SAML SP service and bind one or more SAML IdP connectors to it so that this device (BIG-IP system as a SAML service provider) can request authentication from the appropriate external IdP.
Note: If you bind this SP service to more than one IdP connector, you must configure matching criteria for each IdP connector. When users initiate connections at service providers, the BIG-IP system uses matching criteria to identity the correct IdP among many using SAML IdP discovery.
-
On the Main tab, click Access > Federation > SAML Service Provider.
The Local SP Services screen displays.
-
Select a SAML SP service from the list.
-
Click Bind/Unbind IdP Connectors.
A pop-up screen displays a list of any IdP connectors that are associated with this SP service.
-
To add an SAML IdP connector to the list, click Add New Row.
-
To bind only one IdP connector with this SP service, complete the configuration:
-
Select a connector from the SAML IdP Connectors list in the new row.
When you bind only one IdP connector to an SP service, you do not need to fill in the Matching Source and Matching Value fields.
-
Click the Update button.
The configuration is not saved until you click OK.
-
Click OK.
APM saves the configuration. The screen closes.
-
-
To bind multiple IdP connectors with this SP service, complete the configuration:
-
Select a connector from the SAML IdP Connectors list in the new row.
-
In the Matching Source field, select or type the name of a session variable.
Use a session variable only if it is populated in the policy before the SAML Auth action.
For example, select %{session.server.landinguri} or type
%{session.logon.username}. -
In the Matching Value field, type a value.
The value can include the asterisk (*) wild card.
For example, type
*hibb*orsouth*. -
Click the Update button.
The configuration is not saved until you click OK.
-
To add other IdP connectors, start by clicking Add New Row, fill the new row, and end by clicking Update.
-
Click OK.
APM saves the configuration. The screen closes.
-
The SAML IdP connectors that you selected are bound the SAML SP service.
You need to convey the SP metadata from APM to the external SAML IdP that provides authentication service to this SP. Exporting the SAML SP metadata to a file provides you with the information that you need to do this.
-
On the Main tab, click Access > Federation > SAML Service Provider.
The Local SP Services screen displays.
-
Select an SP service from the list and click Export Metadata.
A popup window opens, displaying No on the Sign Metadata list.
-
For APM to sign the metadata, perform these steps:
-
From the Sign Metadata list, select Yes.
-
From the Signing Key list, select a key.
APM uses the key to sign the metadata.
-
From the Signature Verification Certificate list, select a certificate.
APM exports the certificate to the metadata file. The system on which you import the metadata file can use the certificate to verify the metadata signature.
-
-
Select OK.
APM downloads an XML file.
You must either import the XML file on the IdP system or use the information in the XML file to configure SP metadata on the IdP system .
Before you start this task, configure an access profile.
When you use this BIG-IP system as a SAML service provider (SP), configure an access policy to direct users to an external SAML Identity Provider (IdP) for authentication.
-
On the Main tab, click Access > Profiles / Policies.
The Access Profiles (Per-Session Policies) screen opens.
-
In the Per-Session Policy column, click the Edit link for the access profile you want to configure.
The visual policy editor opens the access policy in a separate screen.
-
Click the (+) icon anywhere in the access policy to add a new item.
Note: Only an applicable subset of access policy items is available for selection in the visual policy editor for any access profile type.
A popup screen opens, listing predefined actions on tabs such as General Purpose, Authentication, and so on.
-
On the Authentication tab, select SAML Auth and click the Add Item button.
The SAML Auth properties window opens.
-
In the SAML Authentication SP area from the AAA Server list, select a SAML SP service and click Save.
The Access Policy window displays.
-
Add any additional actions that you require to complete the policy.
-
Change the Successful rule branch from Deny to Allow, and then click the Save button.
-
At the top of the window, click the Apply Access Policy link to apply and activate your changes to this access policy.
-
Click the Close button to close the visual policy editor.
You have an access policy that uses SAML authentication against an external SAML IdP and further qualifies the resources that a user can access.
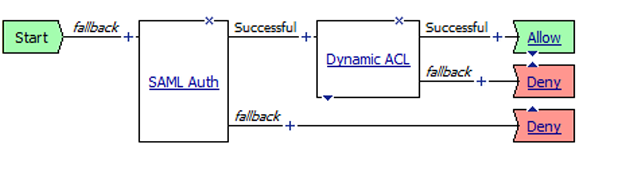
To apply this access policy to network traffic, add the access profile to a virtual server.
Note: To ensure that logging is configured to meet your requirements, verify the log settings for the access profile.
Confirm that the correct log settings are selected for the access profile to ensure that events are logged as you intend.
Note: Log settings are configured in the Access > Overview > Event Log > Settings area of the product. They enable and disable logging for access system and URL request filtering events. Log settings also specify log publishers that send log messages to specified destinations.
-
On the Main tab, click Access > Profiles / Policies.
The Access Profiles (Per-Session Policies) screen opens.
-
Click the name of the access profile that you want to edit.
The properties screen opens.
-
On the menu bar, click Logs.
The access profile log settings display.
-
Move log settings between the Available and Selected lists.
You can assign up to three log settings that enable access system logging to an access profile. You can assign additional log settings to an access profile provided that they enable logging for URl request logging only.
Note: Logging is disabled when the Selected list is empty.
-
Click Update.
An access profile is in effect when it is assigned to a virtual server.
You associate the access profile with the virtual server so that the system can apply the profile to incoming traffic.
-
On the Main tab, click Local Traffic > Virtual Servers.
The Virtual Server List screen opens.
-
Click the name of the virtual server you want to modify.
-
In the Access Policy area, from the Access Profile list, select the access profile that you configured earlier.
-
Click Update to save the changes.
To complete the agreement between APM as the SAML service provider and a SAML IdP, you must configure service provider metadata at the IdP.
Note: The method for configuring SAML service provider metadata at a SAML IdP will vary by vendor.
-
Using the method that the vendor provides, either:
-
Import the SAML SP metadata file that you exported from APM for a SAML SP service that is bound to the SAML IdP connector for this IdP.
-
Or take information from the SAML SP metadata file that you exported from APM and add it using the vendor’s interface. Pay particular attention to the values for entityID, AssertionConsumerService, and the certificate.
Note: Typically, the value of AssertionConsumerService is a URL that looks like this:
https://bigip-sp-vs/saml/sp/profile/post/acs.
-
You create SAML authentication context classes to provide URIs to SAML service providers. These URIs specify authentication methods in SAML authentication requests and authentication statements.
-
On the Main tab, click Access > Federation > SAML Service Provider.
The Local SP Services screen displays.
-
Click Authentication Context Classes.
The Authentication Context Classes screen displays.
-
Click Create.
The Create New SAML Authentication Context Classes screen displays.
-
Click General Settings.
-
In theName field, type a name used in the SAML Service Provider (SP) local SP service configuration.
-
In the Description field, type a descriptive text for the authentication context classes.
-
Click Authentication Classes.
-
Click Add.
-
In the Name field, type a name for the authentication class.
-
From the Value dropdown menu, select an existing value.
-
Add more values as needed.
-
Click Update.
-
Click OK.
An authentication context class with a list of authentication contexts is available.