Updated Date: 07/07/2026
Configuring Device-Specific Probing and Statistics Collection
BIG-IP DNS performs intelligent probing of your network resources to determine whether the resources are up or down. In some circumstances, for example, if your network contains firewalls, you might want to set up device-specific probing to specify which BIG-IP systems probe specific servers for health and performance data.
Prober selection and fallback options are available to provide a variety of monitoring choices for data centers and servers. Allowing the customization of prober selection for a particular environment may be useful in reducing false negatives due to network configuration issues and outages. The prober selection option specifies which BIG-IP system(s) are preferred when selecting a local prober. The prober fallback option controls what the BIG-IP system does when not enough probers of the type specified are available.
A Prober pool is an ordered collection of one or more BIG-IP systems. BIG-IP DNS can be a member of more than one Prober pool, and a Prober pool can be assigned to an individual server or a data center. When you assign a Prober pool to a data center, by default, the servers in that data center inherit that Prober pool.
The members of a Prober pool perform monitor probes of servers to gather data about the health and performance of the resources on the servers. BIG-IP DNS makes load balancing decisions based on the gathered data.
This figure illustrates one example of how Prober pools work. A pool is selected as the Prober Preference and the default setting (Any Available) for Prober Fallback. BIG-IP DNS contains two BIG-IP Local Traffic Manager (LTM) systems that are assigned Prober pools and one BIG-IP LTM system that is not assigned a Prober pool:
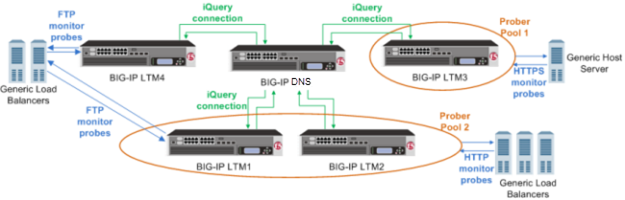
- Prober Pool 1 is assigned to a generic host server
- BIG-IP LTM3 is the only member of Prober Pool 1, and performs all HTTPS monitor probes of the server.
- Prober Pool 2 is assigned to generic load balancers
- BIG-IP LTM1 and BIG-IP LTM2 are members of Prober Pool 2. These two systems perform HTTP monitor probes of generic load balancers based on the load balancing method assigned to Prober Pool 2.
- The generic load balancers on the left side of the graphic are not assigned a Prober pool
- When the generic load balancers use the default Prober Preference and Fallback settings, BIG-IP DNS can solicit any BIG-IP system to perform FTP monitor probes of these load balancers, including systems that are Prober pool members.
The status of a Prober pool also indicates the status of the members of the pool. If at least one member of a Prober pool has green status (Available), the Prober pool has green status.
The status of a Prober pool member indicates whether the BIG-IP DNS system, on which you are viewing status, can establish an iQuery connection with the member.
Note: If a Prober pool member has red status (Offline), no iQuery connection exists between the member and the BIG-IP DNS system on which you are viewing status. Therefore, that BIG-IP DNS system cannot request that member to perform probes, and the Prober pool will not select the member for probe load balancing.
You can view the number of successful and failed probe requests that the BIG-IP DNS system (on which you are viewing statistics) made to the Prober pools. These statistics reflect only the number of Probe requests and their success or failure. These statistics do not reflect the actual probes that the pool members made to servers on your network.
Prober pool statistics are not aggregated among the BIG-IP DNS systems in a synchronization group. The statistics on one BIG-IP DNS include only the requests made from that BIG-IP DNS system.
On BIG-IP DNS, create a data center to contain the servers that reside on a subnet of your network.
-
On the Main tab, click DNS > GSLB > Data Centers.
The Data Center List screen opens.
-
Click Create.
The New Data Center screen opens.
-
In the Name field, type a name to identify the data center.
Important: The data center name is limited to 63 characters.
-
In the Location field, type the geographic location of the data center.
-
In the Contact field, type the name of either the administrator or the department that manages the data center.
-
From the Prober Preference list, select the preferred type of prober(s).
|
Inside Data Center |
By default, select probers inside the data center. |
|
Outside Data Center |
Select probers outside the data center. |
|
Specific Prober Pool |
Select one of the Probers from the drop-down list. When you want to assign a Prober pool at the data center level.Note: Prober pools are not used by the bigip monitor. |
- From the Prober Fallback list, select the type of prober(s) to use if insufficient numbers of the preferred type are available.
|
Any Available |
By default, select any available prober. |
|
Inside Data Center |
Select probers inside the data center. |
|
Outside Data Center |
Select probers outside the data center. |
|
None |
No fallback probers are selected. Prober fallback is disabled. |
|
Specific Prober Pool |
Select one of the Probers from the drop-down list. When you want to assign a Prober pool at the data center level. |
-
From the State list, select Enabled.
-
Click Finished.
Now you can create server objects and assign them to this data center.
Repeat these steps to create additional data centers.
Ensure that at least one data center exists in the configuration.
On BIG-IP DNS, define a server that represents a physical server in your network. Repeat these steps for each server in your network, including the BIG-IP DNS itself, other BIG-IP systems, other load balancers, and third-party host servers.
Important: At a minimum, you must define two servers, one that represents BIG-IP DNS and one that represents another managed server (either a load balancing or host server).
-
On the Main tab, click DNS > GSLB > Servers.
The Server List screen opens.
-
Click Create.
The New Server screen opens.
-
In the Name field, type a name for the server.
Important: Server names are limited to 63 characters.
-
From the Product list, select the server type.
The server type determines the metrics that the system can collect from the server.
Note: If your network uses a server that is not on this list, use the Generic Load Balancer or Generic Host option.
-
In the Address List area, add the IP addresses of the server.
-
Type an external (public) IP address in the Address field, and then click Add.
-
If you use NAT, type an internal (private) IP address in the Translation field, and then click Add.
You can add more than one IP address, depending on how the server interacts with the rest of your network.
-
-
From the Data Center list, select the data center where the server resides.
-
From the Prober Preference list, select the preferred type of prober(s).
|
Inherit From Data Center |
By default, a server inherits the prober preference selection assigned to the data center in which the server resides. |
|
Inside Data Center |
A server selects the probers from inside the data center where the server resides. |
|
Outside Data Center |
A server selects the probers from outside the data center where the server resides. |
|
Specific Prober Pool |
Select one of the Prober pools from the drop-down list. When assigning the Prober pool at the server level.Note:Prober pools are not used by the bigip monitor. |
- From the Prober Fallback list, select the type of prober(s) to be used if insufficient numbers of the preferred type are available.
|
Inherit From Data Center |
By default, a server inherits the prober fallback selection assigned to the data center in which the server resides. |
|
Any Available |
For selecting any available prober. |
|
Inside Data Center |
A server selects probers from inside the data center where the server resides. |
|
Outside Data Center |
A server selects probers from outside the data center where the server resides. |
|
None |
No fallback probers are selected. Prober fallback is disabled. |
|
Specific Prober Pool |
Select one of the probers from the list When you want to assign a prober pool at the server level. |
-
From the State list, select Enabled.
-
In the Health Monitors setting, assign health monitors to the server by moving them from the Available list to the Selected list.
Tip: If the server is a BIG-IP system, use the
bigipmonitor. If the server is a generic host, consider using the gateway_icmp monitor, because this monitor simply checks that the server responds to a ping. -
From the Availability Requirements list, select an option and enter any required values.
|
All Health Monitors |
By default, specifies that all of the selected health monitors must be successful before the server is considered up (available). |
|
At Least |
The minimum number of selected health monitors that must be successful before the server is considered up. |
|
Require |
The minimum number of successful probes required from the total number of probers requested. |
-
From the Virtual Server Discovery list, select how you want virtual servers to be added to the system.
Important: If the virtual server IP address translation feature is going to be used, then BIG-IP DNS will automatically disable Virtual Server Discovery for the given server object globally.
|
Disabled |
The system does not use the discovery feature to automatically add virtual servers. This is the default value. Use this option for a standalone BIG-IP DNS system or for a BIG-IP DNS/LTM combo system when you plan to manually add virtual servers to the system, or if your network uses multiple route domains. |
|
Enabled |
The system uses the discovery feature to automatically add and delete virtual servers. Use this option for a BIG-IP DNS/LTM combo system when you want the BIG-IP DNS system to discover LTM virtual servers. |
|
Enabled (No Delete) |
The system uses the discovery feature to automatically add virtual servers and does not delete any virtual servers that already exist in the configuration. Use this option for a BIG-IP DNS/LTM combo system when you want the BIG-IP DNS system to discover LTM virtual servers. |
-
Click Finished.
The Server List screen opens displaying the new server in the list.
Obtain a list of the BIG-IP systems in your network and ensure that a server object is configured on the BIG-IP DNS for each system.
Create a Prober pool that contains the BIG-IP systems that you want to perform monitor probes of a specific server or the servers in a data center.
-
On the Main tab, click DNS > GSLB > Prober Pools.
The Prober Pool List screen opens.
-
Click Create.
The New Prober Pool screen opens.
-
In the Name field, type a name for the Prober pool.
Important: Prober pool names are limited to
63characters. -
Select a method from the Load Balancing Method list.
|
Round Robin |
BIG-IP DNS load balances monitor probes among the members of a Prober pool in a circular and sequential pattern. |
|
Global Availability |
BIG-IP DNS selects the first available Prober pool member to perform a monitor probe. |
-
Assign members to the pool by moving servers from the Available list to the Selected list.
-
To reorder the members in the Selected list, choose a server and use the Up and Down buttons to move the server to a different location in the list.
The order of the servers in the list is important in relation to the load balancing method you selected.
-
Click Finished.
Assign the Prober pool to a data center or a server.
Ensure that a Prober pool is available on the system.
To make a specific collection of BIG-IP systems available to probe the servers in a data center, assign a Prober pool to the data center.
-
On the Main tab, click DNS > GSLB > Data Centers.
The Data Center List screen opens.
-
Click a data center name.
The data center settings and values display.
-
From the Prober Preference or Prober Fallback list, select the Prober pool that contains the BIG-IP systems that you want to perform monitor probes of the servers in this data center.
Note: The Prober Fallback may specify a Prober pool, but it is only used if there are no probers up of the type specified by the Prober Preference value.
Note: Prober pools are not used by the bigip monitor.
-
Click Update.
Ensure that a Prober pool is available on the system.
To specify which BIG-IP systems perform monitor probes of a server, assign a Prober pool to the server.
-
On the Main tab, click DNS > GSLB > Servers.
The Server List screen opens.
-
In the Server List area, click a server name.
The server settings and values display.
-
From the Prober Preference or Prober Fallback list, select the Prober pool that contains the BIG-IP systems that you want to perform monitor probes of the servers in this data center.
Note: The Prober Fallback may specify a Prober pool, but it is only used if there are no probers up of the type specified by the Prober Preference value.
Note: Prober pools are not used by the bigip monitor.
-
Click Update.
You can view status and statistics for Prober pools and the members of the pools.
-
On the Main tab, click DNS > GSLB > Prober Pools.
The Prober Pool List screen opens.
-
On the menu bar, click Statistics.
The Global Traffic Statistics screen opens.
-
Click the Refresh button.
The statistics are updated.
-
To view additional information about the status of a Prober pool, place your cursor over the icon in the Status column.
-
To view additional information about the status of a Prober pool member, click View in the Members column, and then place your cursor over the icon in the Status column of a specific member.
When a resource is marked down, you can open the BIG-IP DNS log to view the SNMP trap and determine which member of a Prober pool marked the resource down.
-
On the Main tab, click System > Logs.
The System logs screen opens.
-
On the menu bar, click Local Traffic.
The Local Traffic logs screen opens.
-
You can either scroll through the log or search for a log entry about a specific event.