


Updated Date: 07/07/2026
Advanced Customization Using Templates
Complete these initial steps to work with Access Policy Manager® advanced customization templates (1, 2, and 3) for the Logon Page.
To use an F5 customization template, start by completing these steps.
-
Download the templates from the Customizing APM end user login page with APM Advanced Customization Templates page on DevCentral and extract all the files.
-
Create a new access profile or identify an existing one that you want to customize.
-
Either add a new Logon Page item to the access policy or edit an existing Logon Page item in the visual policy editor to return it to these default settings:
-
Make sure there is one logon page field of type text and that the Post Variable Name field contains
usernameand that the Read Only field is set to No. -
Make sure there is one field of type password and that the Post Variable Name field contains
passwordand that the Read Only field is set to No. -
Make sure there are three logon page fields of type none.
-
Save any changes you made to the logon page item.
-
-
In the visual policy editor, click Apply Access Policy.
Import any graphics from F5 advanced customization template-1, template-2, or template-3 into the Image Browser to make them available to the Customization Tool.
-
On the Main tab, click Access > Profiles / Policies > Customization > General.
The Customization tool appears in General Customization view, displaying Form Factor: Full/Mobile Browser settings.
-
On the menu bar, click Image Browser.
The image browser opens in a new screen.
-
Import each graphic file that was included with the template:
-
Click Add Image.
A file browser screen opens.
-
Locate the folder into which you extracted files from the template.
-
Select a graphic file (
.jpg,.png,.gif), and click Open.Note: In the Image Browser, a file retains its name. The name of each file in the Image Browser must be unique.
After the file loads, the image displays in the Image Browser, labeled with its name. If a file of the same name already exists in the Image Browser, the file does not load.
-
If a file does not load due to a naming conflict, you must either delete the file of the same name from the Image Browser and then try to upload it again or rename the file in the template folder and then try to upload it again.
-
-
Close the image browser screen.
Files in the image browser are available to select from any object that you customize.
Adding an image to the Advanced Customization Images in the General Customization view is a prerequisite to changing the name of the background image in the code during advanced customization.
Note: A template might include more than one background image file. Perform these steps for each one.
-
From the General Customization view, expand these folders Customization Settings > Access Profiles > NameOfYourProfile > Common.
-
Click Advanced Customization Images.
Ten image names and values display in the right pane. The default value of any image that has not been replaced by a custom image is /public/images/my/tr.gif.
-
Click the value of any image to replace it with a custom image.
An icon displays at the end of the row.
-
Click the icon.
A Replace button displays below the row.
-
Click Replace.
A popup screen opens displaying images that were imported into the image browser.
-
Locate the image you want to use as the background image, click it, and click Change.
Note: A background image included with a template has the word
backgroundin its name, such asbackground.jpgorbackground.png. If multiple background images are included, a number is appended to the name; for example,background-1.pngorbackground-2.png.The popup screen closes. A value similar to /Common/background.jpg displays in the value field.
-
Press Enter to finalize the change.
The value in the field changes to something like this
/public/images/customization/*NameOfYourProfile*_general_ui/image*xx*_en.*png*. -
Copy the value for the custom image from the field; save it in a memo or notepad file and note that it is the name of the background image that you want to use.
-
Replace any other default images (/public/images/my/tr.gif) with any other background image files that you find in the template folder.
Copy the value of each image to the memo or notepad file.
-
On the menu bar, click Save.
Edit the stylesheet code provided with the template and then append the edited code to stylesheets in the Customization tool to use a custom background image.
-
Navigate to the folder on your system with the template files.
-
Open the
apm.css-addonfile with a text editor. -
Search for these characters, including the dot: background.
Commented lines of code display above, around, or below these characters. Instructions in the comments describe whether to uncomment any lines of code; they also specify which filename to replace with the value of a background image from your notes.
-
Follow the instructions in the code.
-
Save the file.
-
Copy the entire contents of the file.
-
On the Main tab, click Access > Profiles / Policies > Customization > Advanced.
-
Expand these folders Customization Settings > Access Profiles > NameOfYourProfile > Common.
A list of files displays, including these stylesheets:
apm_full.css,apm_mobile.css,apm_mobile_ppc.css, andapm_edge.css. -
Repeat these steps for each stylesheet:
-
Click the name of the style sheet.
Code displays in the right pane
-
Scroll to the end of the code and after the last line, paste the contents of the
apm.css-addonfile. -
At the top of the right pane, select Save Draft.
A popup confirmation screen displays.
-
Click Yes.
The name of the file that you saved now displays in italics.
-
-
On the menu bar, click Save.
The name of any file that you saved as a draft changes to display without italics.
Access Policy Manager advanced customization template 1 provides the code and images to produce a logon page with this look and feel.
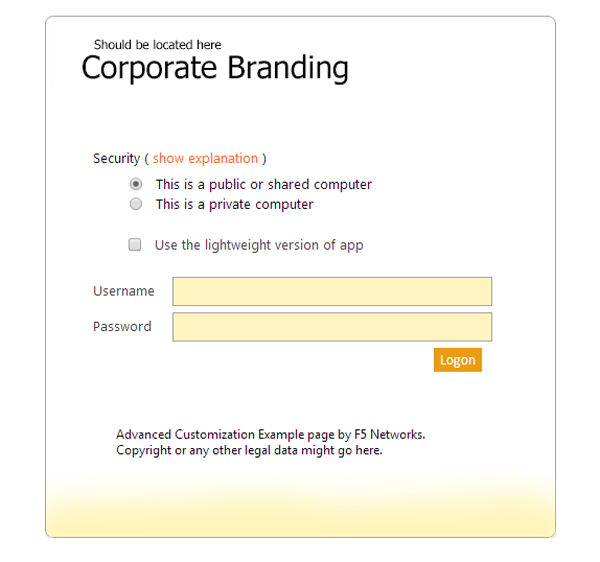
The radio buttons and check box on this page are hardcoded in the logon page code that is included with template 1. Before you start these tasks, download the template, import the graphics from the template into the Customization tool, and complete the steps for replacing the background image in the code.
Adding an image to Advanced Customization Images in the General Customization view is a prerequisite to updating an image in the code during advanced customization of the logon page.
-
On the Main tab, click Access > Profiles / Policies > Customization > General.
-
Expand these folders Customization Settings > Access Profiles > NameOfYourProfile > Access > Logon Pages > NameOfALogonPage.
-
Click Advanced Customization Images.
Ten image names and values display in the right pane. The value of any image that has not been replaced with a custom image is
/public/images/my/tr.gif. -
Click the value of any image to replace it with a custom image.
An icon displays at the end of the row.
-
Click the icon.
A Replace button displays below the row.
-
Click Replace.
A popup screen opens displaying images that were imported into the image browser.
-
Locate
top.pngclick it, and click Change.The popup screen closes. A value similar to /Common/top.jpg displays in the value field.
-
Press Enter to finalize the change.
The value in the field changes to something like
/public/images/customization/Common/*ProfileName*_act_logon_page_ag/image*xx*_en.png. -
Copy the value for the custom image from the field; save it in a memo or notepad file.
-
Replace another of the default images with
bottom.png; copy the value for the image to the memo or notepad and note that it is the value forbottom.png.
Edit the logon page code provided in template 3 to add the logo to it and put the template code into effect by replacing the existing logon page code with it.
-
Navigate to the folder on your system with the template files.
-
Open the
login.inc-replacementfile with a text editor. -
Search for the characters ATTENTION.
The line after it looks similar to this: ``
-
Replace “logo.png” with the value that you saved to a memo when you updated the Advanced Customization Images setting. Retain the quotes around the value.
The result should be similar to this.
<img id='logo' src='/public/images/customization/Common/profilename_act_logon_page_ag/image00_en.png'> -
Select and copy the entire contents of the
logon.inc-replacementfile. -
From the View list at the top right of the screen, select Advanced Customization.
The Customization tool switches to the advanced view.
-
Expand these folders Customization Settings > Access Profiles > NameOfYourProfile > Access > Logon Pages > NameOfALogonPage.
-
Click logon.inc., same as above, right? cmc 12/2016
Code displays in the right pane.
-
Select all of the code in the right pane and replace it by pasting the contents of the
logon.inc-replacementfile in its place. -
At the top of the right pane, click Save Draft.
The name of the file that you saved now displays in italics.
-
On the menu bar, click Save.
The name of any file that you saved as a draft changes to display without italics.
-
To change the label for any logon page input field (Username, Password, and so on), you can:
- Edit the logon page properties using the visual policy editor.
- Edit the logon page text from the General Customization view.
-
Click the Apply Access Policy link at the top of the screen.
To create session variables to record the values that the user selected on the logon screen, you add more fields to the logon page.
Note: You must make this change using the visual policy editor.
-
On the Main tab, click Access > Profiles / Policies.
The Access Profiles (Per-Session Policies) screen opens.
-
In the Per-Session Policy column, click the Edit link for the access profile you want to configure.
The visual policy editor opens the access policy in a separate screen.
-
Click the Logon Page item link.
If you retained the default item name, the link is labeled Logon Page.
A Properties popup screen opens.
-
To record whether the user logged on from a public or a private computer, in the table with the five numbered rows update an empty row.
-
From the Type list, select text.
-
In the field in the Post Variable Name column, type pubpriv.
-
In the field in theSession Variable Name column, type pubpriv.
-
-
To record whether the user selected the light version of OWA, in the table with the five numbered rows update an empty row.
-
From the Type list, select text.
-
In the field in the Post Variable Name column, type light.
-
In the field in the Session Variable Name column, type light.
-
-
Click Save.
The properties screen closes and the policy displays.
-
Click the Apply Access Policy link to apply and activate the changes to the policy.
To apply this access policy to network traffic, add the access profile to a virtual server.
Note: To ensure that logging is configured to meet your requirements, verify the log settings for the access profile.
Access Policy Manager advanced customization template 2 provides for configuring these options:
- Multiple background images that display randomly (or one static background image)
- A branding image to display on the logon page
- User-configured lists and radio button fields on the logon page
The end result of customization with template 2 should look very similar to this.
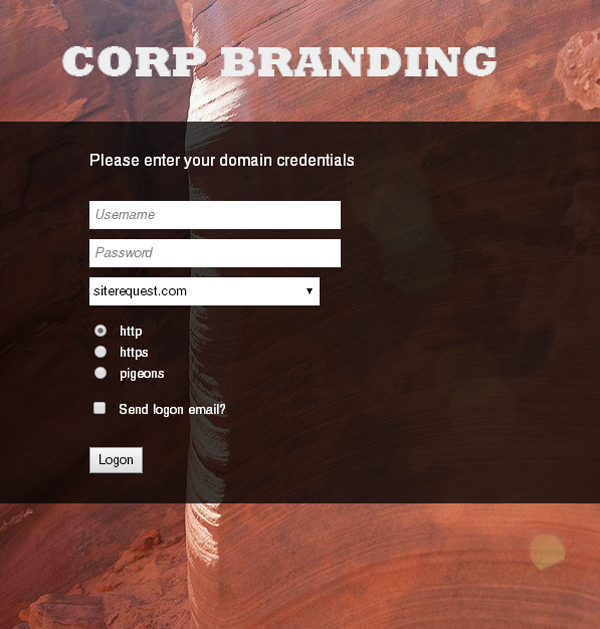
Note: This example uses the background.jpg file from the template.
Before you start these tasks, download the template, import the graphics from the template into the Customization tool, and complete the steps for replacing the background image in the code.
Adding an image to Advanced Customization Images in the General Customization view is a prerequisite to changing the name of the branding image in the code during advanced customization of the logon page.
-
On the Main tab, click Access > Profiles / Policies > Customization > General.
The Customization tool appears in General Customization view, displaying Form Factor: Full/Mobile Browser settings.
-
Expand these folders Customization Settings > Access Profiles > NameOfYourProfile > Access > Logon Pages > NameOfALogonPage.
-
Click Advanced Customization Images.
Ten image names and values display in the right pane. The value of any image that has not been replaced with a custom image is
/public/images/my/tr.gif. -
Click the value of any image to replace it with a custom image.
An icon displays at the end of the row.
-
Click the icon.
A Replace button displays below the row.
-
Click Replace.
A popup screen opens displaying images that were imported into the image browser.
-
Locate the
branding.jpgimage, click it, and click Change.The popup screen closes. A value similar to /Common/branding.jpg displays in the value field.
-
Press Enter to finalize the change.
The value in the field changes to something like
/public/images/customization/Common/*ProfileName*_act_logon_page_ag/image*xx*_en.png. -
Copy the value for the custom image from the field; save it in a memo or notepad file.
-
On the menu bar, click Save.
Edit the logon page code provided in template 3 to add the logo to it and put the template code into effect by replacing the existing logon page code with it.
-
Navigate to the folder on your system with the template files.
-
Open the
login.inc-replacementfile with a text editor. -
Search for the characters ATTENTION.
The line after it looks similar to this: ``
-
Replace “logo.png” with the value that you saved to a memo when you updated the Advanced Customization Images setting. Retain the quotes around the value.
The result should be similar to this.
<img id='logo' src='/public/images/customization/Common/profilename_act_logon_page_ag/image00_en.png'> -
Select and copy the entire contents of the
logon.inc-replacementfile. -
From the View list at the top right of the screen, select Advanced Customization.
The Customization tool switches to the advanced view.
-
Expand these folders Customization Settings > Access Profiles > NameOfYourProfile > Access > Logon Pages > NameOfALogonPage.
-
Click logon.inc., same as above, right? cmc 12/2016
Code displays in the right pane.
-
Select all of the code in the right pane and replace it by pasting the contents of the
logon.inc-replacementfile in its place. -
At the top of the right pane, click Save Draft.
The name of the file that you saved now displays in italics.
-
On the menu bar, click Save.
The name of any file that you saved as a draft changes to display without italics.
-
To change the label for any logon page input field (Username, Password, and so on), you can:
- Edit the logon page properties using the visual policy editor.
- Edit the logon page text from the General Customization view.
-
Click the Apply Access Policy link at the top of the screen.
To add radio buttons or a list to a logon page and to provide values for them, you must use the visual policy editor.
-
On the Main tab, click Access > Profiles / Policies.
The Access Profiles (Per-Session Policies) screen opens.
-
In the Per-Session Policy column, click the Edit link for the access profile you want to configure.
The visual policy editor opens the access policy in a separate screen.
-
Click the link for the logon page item.
If you retained the default item name, the link is labeled Logon Page.
A Properties popup screen opens.
-
To add a list to the logon page and values for it, in the table with five numbered rows update an empty row.
-
From the Type list, select select.
-
In the field in the Post Variable Name column, type a name.
-
In the field in theSession Variable Name column, type a name.
-
Click the Values field.
A popup screen displays.
-
For each value that you want users to be able to select, click Option, type a name into the Value field, and if you want to display something different from the value, type it in the Text (Optional) field.
For example, type
domainin the Value field and type a domain name in the Text (Optional) field. -
When you are done with adding values, click Finished.
The popup screen closes.
-
-
To add radio buttons to the logon page and values for them, , in the table with five numbered rows update an empty row.
-
From the Type list, select radio.
-
In the field in the Post Variable Name column, type a name.
-
In the field in theSession Variable Name column, type a name.
-
Click the Values field.
A popup screen displays.
-
To add names for radio buttons, click Option, type a name into the Value field; if you want to display something different from the value, type it in the Text (Optional) field.
For example, type
regionin the Value field and type comma-separated names, such asEastern,Westernin the Text (Optional) field. -
When you are done adding options, click Finished.
The popup screen closes.
-
-
Click Save.
The properties screen closes and the policy displays.
-
Click the Apply Access Policy link to apply and activate the changes to the policy.
To apply this access policy to network traffic, add the access profile to a virtual server.
Note: To ensure that logging is configured to meet your requirements, verify the log settings for the access profile.
Access Policy Manager advanced customization template 3 provides the code and images to produce a logon page with this look and feel.
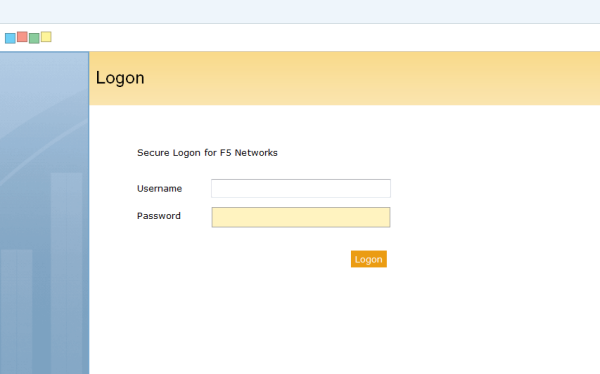
Before you start these tasks, download the template, import the graphics from the template into the Customization tool, and complete the steps for replacing the background image in the code.
Adding an image to Advanced Customization Images in the General Customization View is a prerequisite to updating an image in the code during advanced customization of the logon page.
-
On the Main tab, click Access > Profiles / Policies > Customization > General.
The Customization tool appears in General Customization view, displaying Form Factor: Full/Mobile Browser settings.
-
Expand these folders Customization Settings > Access Profiles > NameOfYourProfile > Access > Logon Pages > NameOfALogonPage.
-
Click Advanced Customization Images.
Ten image names and values display in the right pane. The value of any image that has not been replaced with a custom image is
/public/images/my/tr.gif. -
Click the value of any image to replace it with a custom image.
An icon displays at the end of the row.
-
Click the icon.
A Replace button displays below the row.
-
Click Replace.
A popup screen opens displaying images that were imported into the image browser.
-
Locate the
logo.pngfile, click it, and click Change.The popup screen closes. A value similar to /Common/logo.png displays in the value field.
-
Press Enter to finalize the change.
The value in the field changes to something like
/public/images/customization/Common/*ProfileName*_act_logon_page_ag/image*xx*_en.png. -
Copy the value for the custom image from the field; save it in a memo or notepad file.
-
On the menu bar, click Save.
Edit the logon page code provided in template 3 to add the logo to it and put the template code into effect by replacing the existing logon page code with it.
-
Navigate to the folder on your system with the template files.
-
Open the
login.inc-replacementfile with a text editor. -
Search for the characters ATTENTION.
The line after it looks similar to this: ``
-
Replace “logo.png” with the value that you saved to a memo when you updated the Advanced Customization Images setting. Retain the quotes around the value.
The result should be similar to this.
<img id='logo' src='/public/images/customization/Common/profilename_act_logon_page_ag/image00_en.png'> -
Select and copy the entire contents of the
logon.inc-replacementfile. -
From the View list at the top right of the screen, select Advanced Customization.
The Customization tool switches to the advanced view.
-
Expand these folders Customization Settings > Access Profiles > NameOfYourProfile > Access > Logon Pages > NameOfALogonPage.
-
Click logon.inc., same as above, right? cmc 12/2016
Code displays in the right pane.
-
Select all of the code in the right pane and replace it by pasting the contents of the
logon.inc-replacementfile in its place. -
At the top of the right pane, click Save Draft.
The name of the file that you saved now displays in italics.
-
On the menu bar, click Save.
The name of any file that you saved as a draft changes to display without italics.
-
To change the label for any logon page input field (Username, Password, and so on), you can:
- Edit the logon page properties using the visual policy editor.
- Edit the logon page text from the General Customization view.
-
Click the Apply Access Policy link at the top of the screen.