Updated Date: 07/07/2026
Protecting APIs with Access Policy Manager
If you want to manually configure API protection, this section describes the tasks required. For a simpler automated setup procedure, you can instead follow the steps in the API Protection template using Access > Guided Configuration. You can still customize the components when you use Guided Configuration.
The manual procedure for implementing API protection includes the following tasks:
- Creating an API protection profile
- Adding servers, paths, and responses to the API protection profile
- Optionally, add a single sign-on configuration and log settings
- Optionally, configure rate limiting (see Rate Limiting API Requests)
- Associate the API protection profile with a virtual server
- If needed, edit the per-request policy automatically created for API protection
Before you set up API protection, make sure that basic system configuration is complete including configuring network interfaces, routes, VLANs, self IPs, DNS, and NTP. For this task, you need to have an OpenAPI specification 2.0 file or OpenAPI specification 3.0 file that describes the API.
An API protection profile specifies the URI paths, servers, and default properties of the API. You can easily create it using an OpenAPI spec file. You can develop custom responses to API calls, use a relevant single sign-on configuration, and specify log settings.
-
On the Main tab, click Access > API Protection > Profile.
-
Click Create.
-
For Name, type a name for the API protection profile.
-
For OpenAPI File, browse to select the file.
-
If using HTTPS, select the name of SSL Profile.
-
For DNS Resolver Mode, select whether to query DNS nameservers using IPv4, IPv6, or IPv6 Prefer (both).
-
For DNS Resolver, select the name of the DNS resolver to use for converting web links.
If you need to create a DNS resolver, click Network > DNS Resolvers.
-
If you are protecting a pool of API servers, select Ignore Default Server.
If you use this option, the default server is not used.
-
For Authorization, you can add one or both of the following:
- HTTP Basic: Validates user logins that use HTTP or HTTPS protocol.
- OAuth 2.0: Validates user logins using OAuth 2.0 to issue tokens to the client after successfully authenticating the resource owner.
-
Click Save.
Access Policy Manager creates an API protection profile and opens new tabs. The profile includes paths, servers, properties, and responses using the details specified in the OpenAPI spec file.
The API protection profile is created. In addition, Access Policy Manager automatically develops a per-request policy that is associated with the protection profile.
You can adjust the policy as needed using the visual policy editor to access all of the features per-request policies provide. For example, you can
- Add or delete paths
- Modify path information, such as changing the server
- Add or modify servers
- Add or modify responses
- Add or modify log settings
- Add or modify SSO configuration
If the API changes, you can manually make changes to the API profile.
Before you set up API protection, make sure that basic system configuration is complete including configuring network interfaces, routes, VLANs, self IPs, DNS, and NTP.
An API protection profile specifies the URI paths, servers, and default properties of the API. You can create it manually by adding the necessary paths and servers. You can also develop custom responses to API calls, use a relevant single sign-on configuration, and specify log settings.
-
On the Main tab, click Access > API Protection > Profile.
-
Click Create.
-
For Name, type a name for the API protection profile.
-
If you are protecting a pool of API servers, select Ignore Default Server.
If selected, the default server is not used.
-
For Authorization, you can add none, one, or both of the following:
- HTTP Basic: Validates user logins that use HTTP or HTTPS protocol. For HTTP Basic mode, the credential must be checked using an APM AAA server. You can use different AAA servers depending on any request criteria, geolocation, time, path, source IP, and so on.
- OAuth 2.0: Validates user logins using OAuth 2.0 to issue tokens to the client after successfully authenticating the resource owner. For OAuth mode, token validation (introspection) can be performed internally if JWKs are available and Java Web tokens used, OR externally against an external OAuth AS. When either option is selected, the per-request policy creates a macro named OAuth Scope Check AuthZ to handle the authentication. Despite the name, this subsession macro is usually used for handling both HTTP Basic and OAuth.
-
Click Save.
Access Policy Manager creates an API protection profile and opens new tabs where you can manually add paths, servers, and responses. In addition, Access Policy Manager automatically develops a per-request policy that is associated with the protection profile. You can adjust the policy as needed using the visual policy editor to access all of the features per-request policies provide.
You can manually develop the policy as needed. For example, you can
- Add paths
- Add servers
- Create responses
- Specify log settings
- Add SSO configurations
If the API changes, locate the API profile in the list, then click Edit to edit the associated per-request policy.
You add servers to an API protection profile so you need to have created a profile. Also, if the URL is HTTPS, you need to have a server SSL profile (or use the default serverssl profile). Create SSL profiles using Local Traffic > Profiles > SSL > Server.
You create paths to define different endpoints to access services provided by the API. If you used an OpenAPI Spec file, a server is automatically created and listed on the Paths tab. If creating the protection profile manually, you need to add the necessary API servers.
-
On the Main tab, click Access > API Protection > Profile.
-
Click the name of the API protection profile to which you want to add servers.
-
On the Paths tab, in the Servers section, click Create.
The Server Properties section opens where you define the servers.
-
For Name, type a name for the API server.
-
For URL, type the full path to the server. For example,
https://store.order.io/v1. -
From the SSL Profile list, select an SSL profile for initiating secure connections to the server, or use one of the defaults provided.
-
From the Server list, select the name of the API server.
The server must be listed in the Servers section below.
-
Click Active to make this path available.
-
Click Add to add the path to the profile.
-
Add as many servers as are needed.
-
To specify an optional URL prefix for all API paths, enter the path in the Base Path field in the Properties section. The Base Path field is available only for OpenAPI v2.0 specification.
-
From the Default Server list, select the name of the API server to use by default.
-
From DNS Resolver Mode, select whether the DNS resolver uses IPv4, IPv6, or IPv6 Prefer (both).
-
From DNS Resolver, select the DNS resolver the server uses to resolve addresses.
-
Click Save.
The servers are listed on the Paths tab of the API protection profile.
You add paths to an API protection profile so you need to have created a profile. You also need to have specified one or more API servers on the Paths tab.
You create paths to define different endpoints to access services provided by the API. If you used an OpenAPI Spec file, the paths are automatically imported and listed on the Paths tab. If creating the protection profile manually, you need to add the paths to each of the API services. In either case, you can adjust the paths as needed.
-
On the Main tab, click Access > API Protection > Profile.
-
Click the name of the API protection profile to which you want to add paths.
-
On the Paths tab, in the Paths section, click Create.
The Path Properties section opens where you define the paths for the APIs being protected.
-
For URI, type the URI for the path you are creating starting with
/. For example,/user/login.The URI pattern can use asterisk * wildcards to represent a segment of an API path; wildcards do not go beyond the path segment boundaries, and are not regular expressions. For example,
/f5/util/*. -
From the Method list, select the method allowed for this API operation.
The server must be listed in the Servers section below.
-
From the Server list, select the name of the API server for this type of request.
The server must be listed in the Servers section below.
-
Click Active to make this path available.
-
Click Add to add the path to the profile.
-
Add as many paths as are required to support the API.
-
To specify an optional URL prefix for all API paths, enter the path in the Base Path field in the Properties section. This field is available only for OpenAPI v2.0 specification.
-
Click Save.
The paths are listed on the Paths tab of the API protection profile. Note that deleting a path on the Paths tab does not delete the path from the profile in the visual policy editor. So it is recommended that you edit the paths in the editor.
You create responses in an API protection profile so you need to have created a profile.
You can create responses that indicate the results of processing an API request. If you used an OpenAPI Spec file that includes responses when creating the API protection profile, the responses are automatically imported and listed on the Responses tab. If developing the protection profile manually, you need to create the responses that you want to use. In either case, you can add, delete, or edit the responses as needed.
-
On the Main tab, click Access > API Protection > Profile.
-
Click the name of the API protection profile to which you want to add responses.
-
On the Responses tab, click Create.
The API Response Properties section opens where you define the responses for the APIs being protected.
-
For Name, type a name for the response.
-
For Status Code, type the 3-digit HTTP status code resulting from the attempt to satisfy the API request. For example,
404or%{perflow.oauth.scope.status_code}. -
For Status, type a short textual description of the status code. For example,
Invalid inputor%{perflow.oauth.scope.status_string}. -
If specifying headers for the response, for Headers, click +, then type the name-value pairs for the header that appears in the API response.
You can specify multiple response headers, if needed, to allow the server to provide additional information about the response.
-
To add text for the response, type it in Body.
The message in the body may include a file or resource.
-
Click Add to add the response to the profile.
-
Add as many responses as are required to support the APIs.
-
In the Properties section, for Default Response, select the response to use by default.
-
Click Save.
The responses are listed on the Responses tab of the API protection profile.
You can specify access control including an existing SSO configuration and log settings in an API protection profile. In addition, you can edit the per request policy the system creates for API protection.
-
On the Main tab, click Access > API Protection > Profile.
-
Click the name of the API protection profile you want to work on.
-
Click the Access Control tab.
-
From SSO Configuration, select the SSO configuration to use for API Protection.
Note: If using Single Sign-On with API protection, you can use only the following SSO authentication methods:
- HTTP Basic
- Kerberos
- OAuth Bearer To add an SSO Configuration, go to Access > Single Sign-On. See Access Policy Manager: Single Sign-On Concepts and Configuration.
-
From Log Settings, select the format to use for logs, or use the default-log-setting.
To configure custom log settings, refer to Logging and Reporting in the Access Policy Manager: Network Access Guide.
-
Click Save.
-
To see the per-request policy that was developed for API protection, click Edit.
The visual policy editor opens in a new tab and shows the policy contents. You can edit the policy as needed to customize it for API protection. See Access Policy Manager: Visual Policy Editor.
The specified SSO configuration and log settings are associated with the API protection profile.
You create a virtual server to act as the traffic destination address. Then you associate an API protection profile so that the system can apply API protection to incoming API requests. The virtual server can have only one protection profile assigned to it.
If you have already created a virtual server, simply assign the API protection profile to it. No other access policy can be associated with that virtual server.
-
On the Main tab, click Local Traffic > Virtual Servers.
The Virtual Server List screen opens.
-
Click Create.
The New Virtual Server screen opens.
-
In the Name field, type a unique name for the virtual server.
-
For the Destination Address/Mask setting, confirm that the Host button is selected, and type the IP address in CIDR format.
The supported format is address/prefix, where the prefix length is in bits. For example, an IPv4 address/prefix is
10.0.0.1or10.0.0.0/24, and an IPv6 address/prefix isffe1::0020/64or2001:ed8:77b5:2:10:10:100:42/64. When you use an IPv4 address without specifying a prefix, the BIG-IP system automatically uses a/32prefix.Note: The IP address you type must be available and not in the loopback network.
-
In the Service Port field, type
80(for HTTP) or443(for HTTPS), or select HTTP or HTTPS from the list. -
From the HTTP Profile list, select http.
-
In the API protection area, from the API Protection Profile list, select the protection profile that you configured earlier.
-
Optional: Customize other settings as needed.
-
Click Finished.
The virtual server is created and the API protection profile is associated with it. API requests directed through the virtual server are protected by the profile.
When you create an API protection profile, the system automatically develops a per-request policy based on the settings you provided. You can edit the per-request policy later to add or remove servers, paths, responses, or to otherwise customize the policy for your networking environment.
-
On the Main tab, click Access > API Protection > Profile.
-
Click Edit in the Per-Request Policy column for the API protection profile.
The visual policy editor opens in a new tab and shows the policy contents. You can edit the policy as needed to customize it for API protection.
-
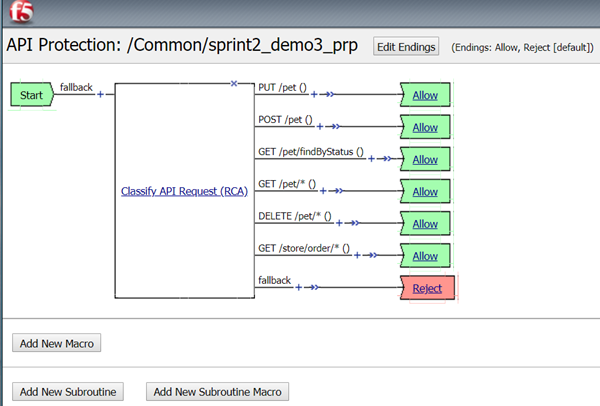
To see how requests are classified using the paths and methods added in the API protection profile, locate Classify API Request (RCA), the Request Classification Agent. For example:
-
Click Classify API Request (RCA) to display the properties.
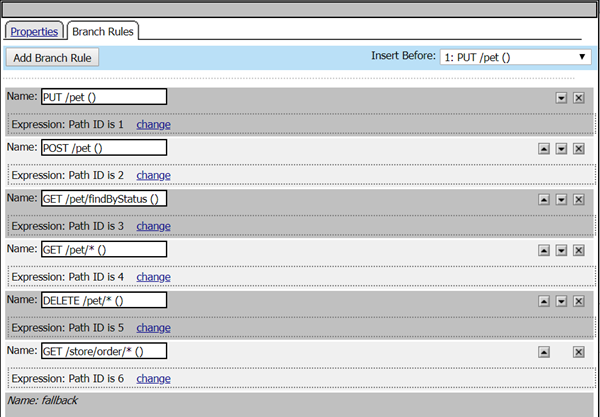
You can edit the paths here.
Note: Adding or modifying paths in the API protection profile adds them to the Classify API Request (RCA) in the visual policy editor. But deleting or modifying paths in the profile on the Paths tab does not delete or modify the path in the editor. So we recommend modifying or deleting paths in the editor.
The Classify API Request object reads connection data and can steer the request to a specific policy branch. The branch can contain any logic you like, and generally it terminates in an Allow or Reject ending.
-
Click any other object to view and edit properties. Click the + between objects to see which options are available to add to the policy.
See Access Policy Manager: Visual Policy Editor for details on editing policies.