Updated Date: 07/07/2026
Configuring APM as a SAML IdP for Inline SSO
You can configure the BIG-IP APM system as a Security Assertion Markup Language (SAML) Identity Provider (IdP) to provide inline single sign-on (SSO) for service providers (SP) not directly reachable by the client.
SAML inline SSO is an APM + LTM use case where Service Provider (SP) is located behind BIG-IP as Identity Provider. After the client is authenticated with BIG-IP (configured as IdP), the client’s request will reach the protected back-end (configured as a pool), resulting in SP initiated SAML SSO. SP will generate an authentication request which will reach the client and get forwarded to IdP. IdP shall consume authentication request and create “inline” SAML assertion to be sent directly to the SP (bypassing the User-Agent).
Requirements for configuring APM as a SAML IdP for inline SSO
- The external DNS should point the apps/SP’s hostname to the APM. For example, if the internal SP is named app.domain.com, it should resolve to the APM virtual server externally.
- After configuring the SP connector (preferably with metadata), edit and set its SP Location Settings to Internal.
- SSO is configured on Access Profile SSO/Auth Domains configuration page.
- If using a webtop link, create a webtop link configured with the full URI with the app. For example, using simplesamlphp’s default app, the full URI is https://app.domain.com/<default path>/module.php/core/authenticate.php?as=ssPHPSP2. The URL points back to the IdP (https).
The flow is summarized in the following chart.
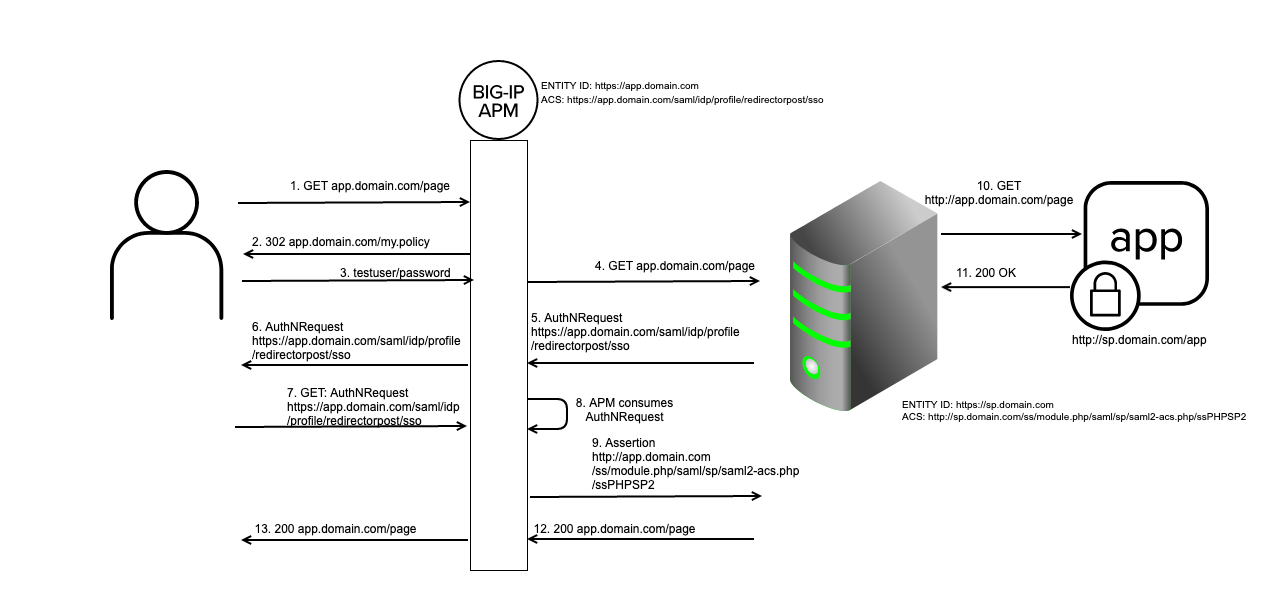
- The user sends a request to https://app.domain.com/page, which resolves to the APM virtual server.
- APM asks for credentials by sending its logon page.
- The user responds with a username and password, and the APM stores this information in session variables.
- APM falls into LTM+APM mode and sends the original request to the SP pool member.
- SP responds with its AuthNRequest to the APM as IdP’s SAML endpoint.
- AuthNRequest goes to the client.
- The client sends the AuthNRequest back to the APM for SSO.
- APM consumes the AuthNRequest and becomes the user-agent to the SP. This is the result of marking the SP-connector as internal.
- APM sends the assertion to the SP’s ACS URL.
- SP consumes the successful assertion and GETs the app page.
- App responds with its page.
- SP forwards that response to the APM.
- APM forwards the app page to the user’s browser.
In a webtop link scenario, the user request will be to / instead of a full URI. The user will be presented with a webtop link. After clicking on the webtop link, a new tab will open, and the request configured in the webtop link will be sent to the SP pool member.
To configure SAML inline SSO, you need to create an access profile to support the LTM-APM profile type with single domain SSO.
-
On the Main tab, click Access > Profiles / Policies.
The Access Profiles (Per-Session Policies) screen opens.
-
Click Create.
The New Profile screen opens.
-
In the Name field, type a unique name for the access profile.
-
From the Profile Type list, select LTM-APM.
Additional settings display.
-
From the Profile Scope list, select the appropriate scope to grant to users being examined by this policy.
-
In the SSO Across Authentication Domains (Single Domain mode) area:
-
Retain default settings for Domain Cookie (blank) and Cookie Options (with only the Secure check box selected).
-
From SSO Configuration, select the SSO configuration to apply to the domain.
-
-
In the Language Settings area, add and remove accepted languages, and set the default language.
If no browser language matches one in the accepted languages list, the browser uses the default language.
-
Click Finished.
This creates an access profile with a default access policy.
The access profile displays in the Access Profiles List. Default-log-setting is assigned to the access profile.
Before you start this task, configure a client SSL profile and a server SSL profile.
Specify a host virtual server to use as the SAML IdP.
-
On the Main tab, click Local Traffic > Virtual Servers.
The Virtual Server List screen opens.
-
Click Create.
The New Virtual Server screen opens.
-
In the Name field, type a unique name for the virtual server.
-
For the Destination Address/Mask setting, confirm that the Host button is selected, and type the IP address in CIDR format.
The supported format is address/prefix, where the prefix length is in bits. For example, an IPv4 address/prefix is
10.0.0.1or10.0.0.0/24, and an IPv6 address/prefix isffe1::0020/64or2001:ed8:77b5:2:10:10:100:42/64. When you use an IPv4 address without specifying a prefix, the BIG-IP system automatically uses a/32prefix.Note: The IP address you type must be available and not in the loopback network.
-
In the Service Port field, type
443or select HTTPS from the list. -
For the HTTP Profile (Client) setting, verify that the default HTTP profile, http, is selected.
-
For the SSL Profile (Client) setting, from the Available list, select the name of the Client SSL profile you previously created and move the name to the Selected list.
-
For the SSL Profile (Server) setting, from the Available list, select the name of the Server SSL profile you previously created and move the name to the Selected list.
-
In the Access Policy area, from the Access Profile list, select the access profile that you configured earlier.
-
In the Resources area of the screen, from the Default Pool list, select the pool containing the service provider IP address.
-
Click Finished.
The virtual server for the BIG-IP system configured for SAML inline SSO now appears on the Virtual Server List.
The steps to finish configuring APM as a SAML Identity Provider (IdP) for SAML inline SSO (or SAML multi-domain inline SSO) are included in the section Using APM as a SAML IdP (SSO portal), which appears in the SAML Configuration guide.
- Configuring an artifact resolution service
- Configuring SAML SP connectors
- Configuring a SAML IdP service for one SP connector
- Binding a SAML IdP service to one SP connector
- Exporting SAML IdP metadata from APM
- Configuring a SAML resource and attaching a SAML IdP service
- Configuring an access policy for a SAML SSO portal
- Adding IdP metadata from APM to external SAML SPs
Note: The BIG-IP APM webtop is not required when configuring LTM+APM mode.
You can configure multi-domain inline SAML SSO when multiple service providers (SPs) are located behind different virtual servers. All SPs share a single access profile with SAML assertions generated on request by the Identity Provider (IdP).
A user can connect to any of the SPs protected by the virtual servers in the domain group and be authenticated by the IdP. Subsequent connections to other SPs within the domain group do not require users to authenticate.
As a result, inline SAML SSO with multi-domain deployment behaves as follows:
- IdP objects assigned in a multi-domain access policy (either in a Resource Assign agent or in an advanced Resource Assign Agent) are applied to requests from all authentication domains.
- When the Cookie Scope for the application virtual in the multi-domain SSO is set to Domain, the system also uses the SSO configuration (IdP object) created for that domain in the SSO Config attribute, provided the primary authentication URI is in the same domain.
- When the Cookie Scope for the application virtual in the multi-domain SSO is set to Host, the system ignores the SSO Config created for that host when processing authentication requests from an internal SP. This is because SAML authentication requests are processed by the primary authentication virtual hosting the IdP. Instead, IdP objects assigned in an access policy for primary authentication URI will be applied when processing authentication requests from internal SP.
The flow is summarized in the following chart.
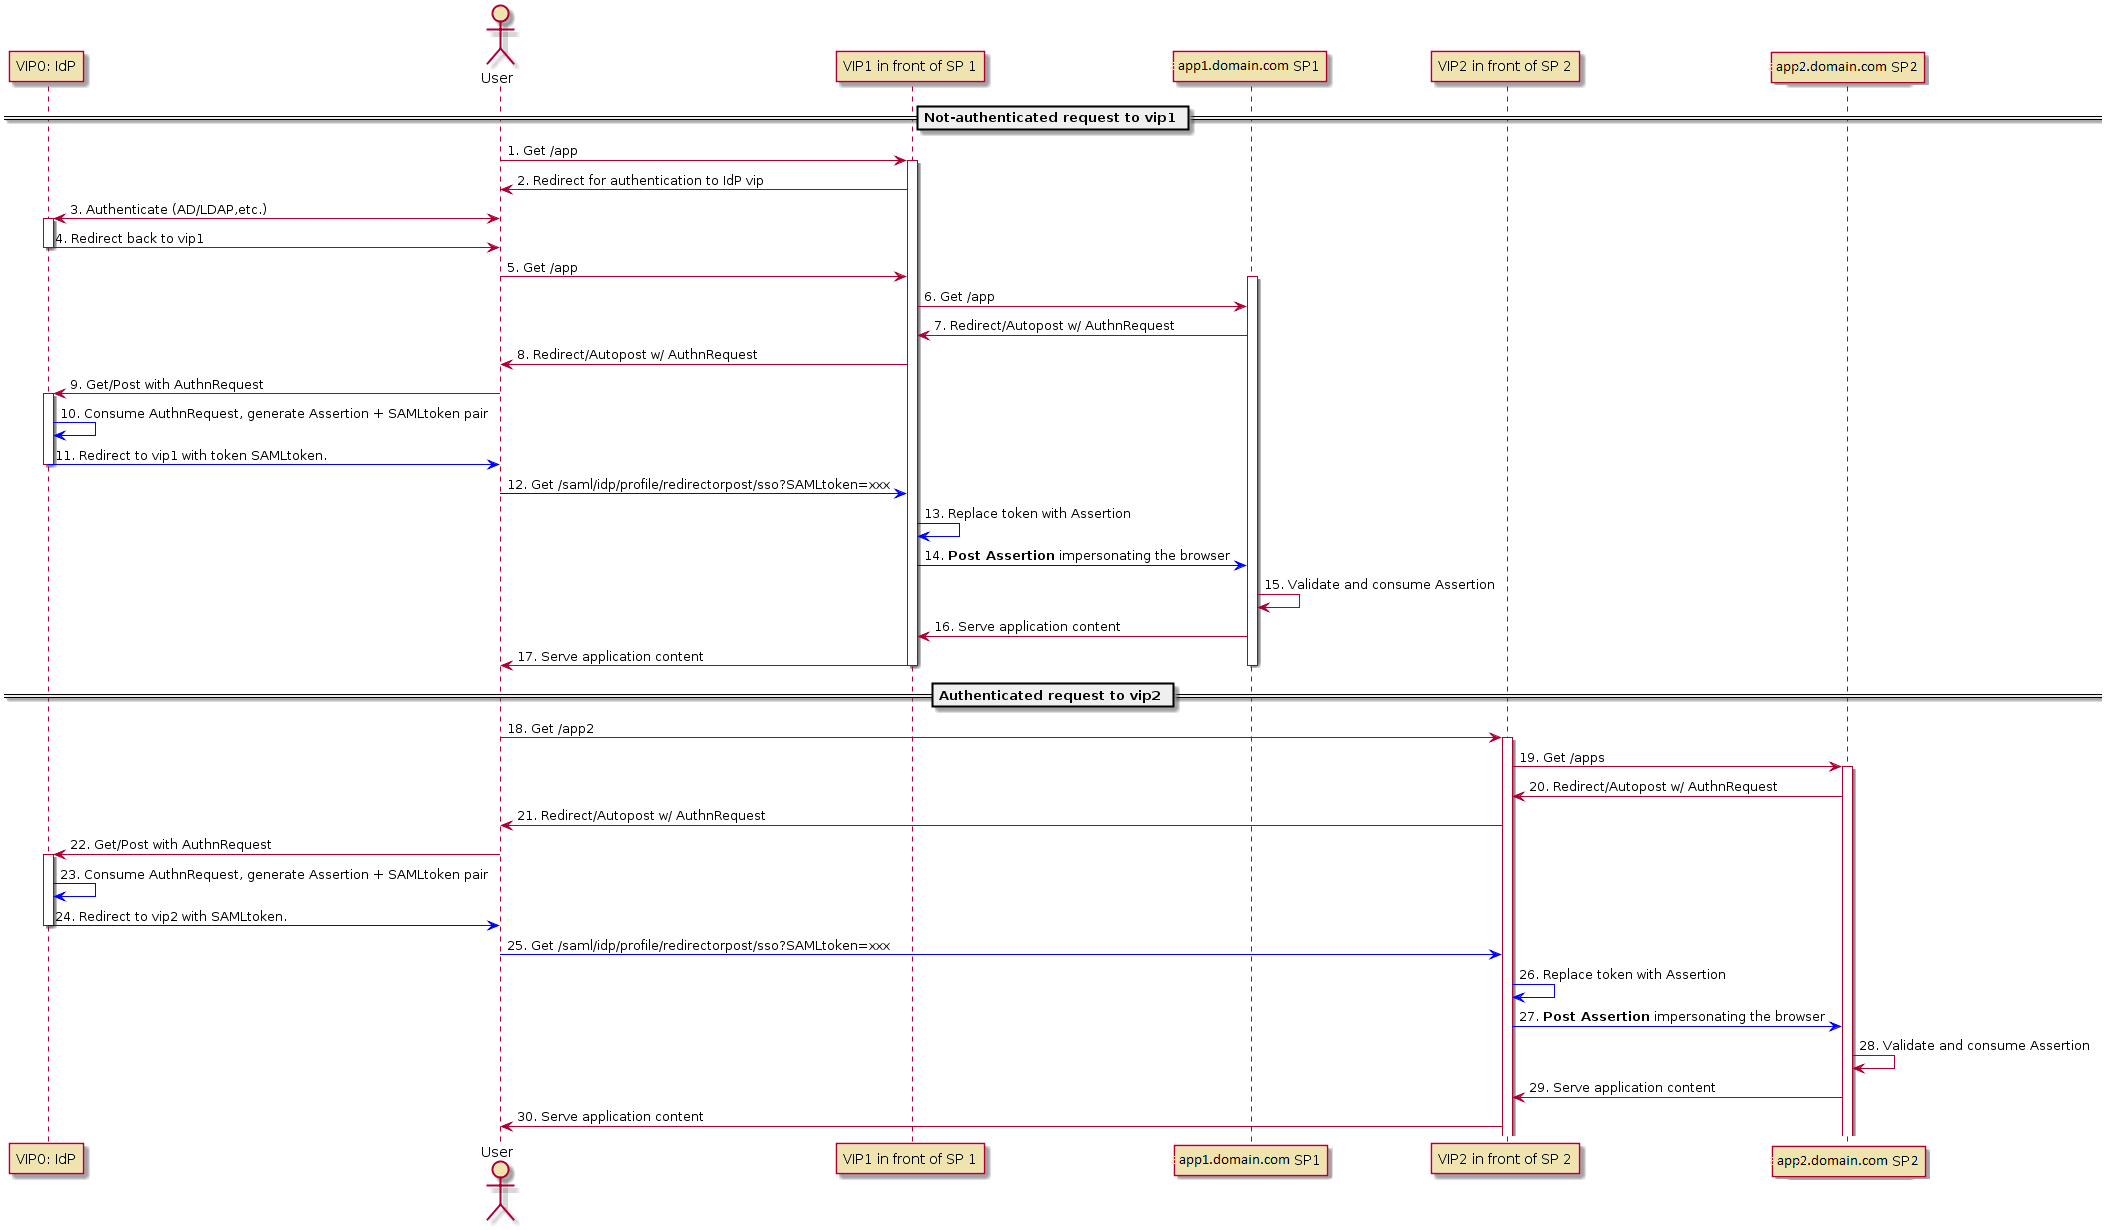
-
The user attempts to access the resource app1.domain.com located on virtual server 1(VIP1), protected by the BIG-IP APM system.
-
VIP1 is configured for multi-domain SSO and redirects the user to the Primary Authentication URI for authentication.
-
The IdP authenticates the user.
-
After successful authentication, the user is redirected back to VIP1.
5 - 6. VIP1 load balances the user request and directs it to one of the pool members.
- Because the user does not have a valid session, the internal SP (or SAML enabled application) initiates SAML SSO by generating an AuthRequest and redirects the user to IdP.
8 - 9. The authentication request is forwarded through the user-agent to IdP (idp.domain.com).
- The IdP consumes and validates the authentication request. Upon successful validation, a new SAML assertion and token are generated. The assertion is stored in the session database, and the token SAMLtoken is sent back to the client through the HTTP-Redirect binding. The location of the original virtual is derived from the Referer header of request 8.
11 - 12. The user is redirected back to the application virtual server together with the SAMLtoken.
13 - 14. VIP1 consumes the SAMLtoken request and modifies the client request to inject a SAML assertion inline.
- app1.domain.com validates and consumes the assertion.
16 - 17. Upon successful validation of the assertion, the application content is served to the user.
18 - 19. Because the user-agent already has a valid cookie for domain.com, the user request (18) is allowed to reach the pool member SP2 app2.domain.com.
- However, since app2.domain.com does not have a valid session with the client, an authentication request is generated by the SP2 app2.domain.com.
21 - 22. The authentication request reaches IdP through the user-agent.
23 - 30. This sequence is similar to 10 through 17.
To configure SAML multi-domain inline SSO, you need to create an access profile to support the LTM-APM profile type with multi-domain SSO.
-
On the Main tab, click Access > Profiles / Policies.
The Access Profiles (Per-Session Policies) screen opens.
-
Click Create.
The New Profile screen opens.
-
In the Name field, type a unique name for the access profile.
-
From the Profile Type list, select LTM-APM.
Additional settings display.
-
From the Profile Scope list, select the appropriate scope to grant to users being examined by this policy.
-
In the Language Settings area, add and remove accepted languages, and set the default language.
If no browser language matches one in the accepted languages list, the browser uses the default language.
-
Click Finished.
This creates an access profile with a default access policy.
-
From the list, click the name of the access profile you just created.
-
On the menu bar, click SSO/Auth Domains.
-
For the Domain Mode setting, select Multiple Domains.
-
For Primary Authentication URI, type the URI to the IdP, for example,
http://idp.domain.com.Each domain that you configure indicates the domain to which the APM session (established by the primary authentication URI) is bound.
-
In the Authentication Domain Configuration area, for Cookie, select Host or Domain, and for the host, type the IP address, or for domain, type the fully qualified domain name.
-
Configure the Cookie Options.
The default is Secure.
Note: When Cookie Scope for application virtual servers in a multi-domain SSO is set to Domain, the BIG-IP system also uses the SSO configuration (IdP object) configured for that domain in the SSO Config attribute, provided that the Primary Authentication URI is in the same domain.
Note: When Cookie Scope for application virtual servers in a multi-domain SSO is set to Host, the BIG-IP system ignores the SSO Config (IdP object) for that host when processing authentication requests from the internal SP; SAML authentication requests are processed by the primary authentication virtual server hosting the IdP. Instead, IdP objects assigned in the access policy and access profile for the Primary Authentication URI are applied when processing authentication requests from the internal SP.
-
From SSO Configuration, select the configuration that you want to associate with each host or domain.
-
Click Update.
The access profile is created and updated for multi-domain inline SSO.
Before you start this task, configure client and server SSL profiles.
You need to create virtual servers for every domain to support SAML multi-domain inline SSO.
-
On the Main tab, click Local Traffic > Virtual Servers.
The Virtual Server List screen opens.
-
Click Create.
The New Virtual Server screen opens.
-
In the Name field, type a unique name for the virtual server.
-
For the Destination Address/Mask setting, confirm that the Host button is selected, and type the IP address in CIDR format.
The supported format is address/prefix, where the prefix length is in bits. For example, an IPv4 address/prefix is
10.0.0.1or10.0.0.0/24, and an IPv6 address/prefix isffe1::0020/64or2001:ed8:77b5:2:10:10:100:42/64. When you use an IPv4 address without specifying a prefix, the BIG-IP system automatically uses a/32prefix.Note: The IP address you type must be available and not in the loopback network.
-
In the Service Port field, type
443or select HTTPS from the list. -
For the HTTP Profile (Client) setting, verify that the default HTTP profile, http, is selected.
-
For the SSL Profile (Client) setting, from the Available list, select the name of the Client SSL profile you previously created and move the name to the Selected list.
-
For the SSL Profile (Server) setting, from the Available list, select the name of the Server SSL profile you previously created and move the name to the Selected list.
-
In the Access Policy area, from the Access Profile list, select the access profile that you configured earlier.
-
Click Finished.
The virtual server is created. You need to create a similar virtual server for any other domains.
The steps to finish configuring APM as a SAML Identity Provider (IdP) for SAML inline SSO (or SAML multi-domain inline SSO) are included in the section Using APM as a SAML IdP (SSO portal), which appears in the SAML Configuration guide.
- Configuring an artifact resolution service
- Configuring SAML SP connectors
- Configuring a SAML IdP service for one SP connector
- Binding a SAML IdP service to one SP connector
- Exporting SAML IdP metadata from APM
- Configuring a SAML resource and attaching a SAML IdP service
- Configuring an access policy for a SAML SSO portal
- Adding IdP metadata from APM to external SAML SPs
Note: The BIG-IP APM webtop is not required when configuring LTM+APM mode.