Updated Date: 07/07/2026
Forward Proxy Chaining with APM
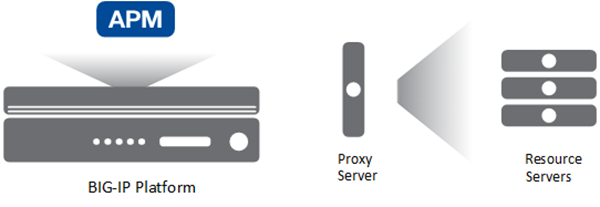
The BIG-IP system supports forward proxy chaining which enables connection to a next hop proxy server. Access Policy Manager (APM®) brings these abilities to forward proxy chaining:
- Offload authentication from and support authentication to the next hop on the client’s behalf.
- Support single sign-on to the next hop and to resources at the next hop.
- Select different proxy servers for different requests.
- Select different SSO configurations for different requests.
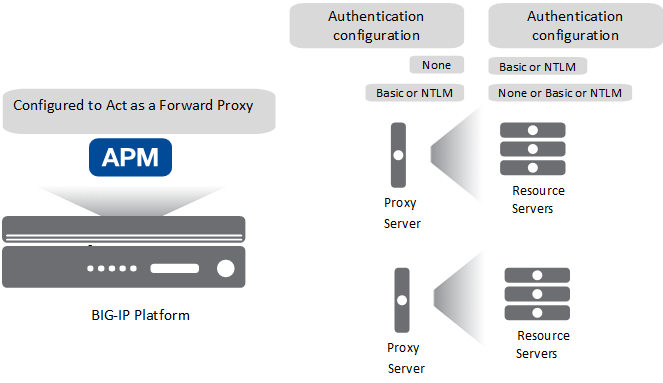
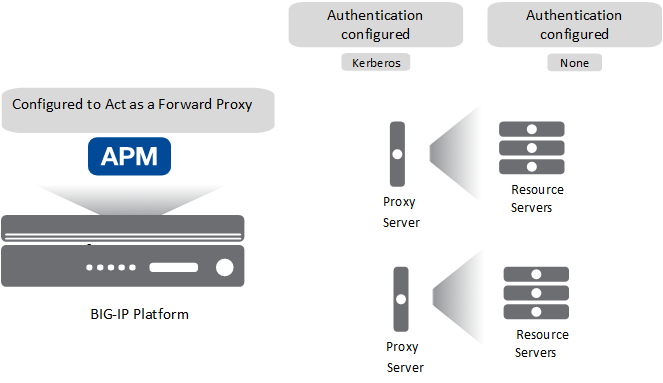
In a forward proxy chain, Access Policy Manager (APM®) selects the next hop proxy server, and interacts with it and resource servers behind it.
Note: A proxy server can be located in the cloud. It can be located in another department of an enterprise.
For the BIG-IP system, proxy server, and resource servers behind the proxy server, let’s focus on these configuration characteristics.
- Forward proxy mode
- APM can be configured to act as an explicit or as a transparent forward proxy. The proxy server can be configured to act as explicit or transparent forward proxy. APM supports any combination of forward proxy modes.
- SSL bypass mode
- APM can be configured for SSL bypass or SSL intercept. The proxy server can be configured for SSL bypass or SSL intercept. APM supports all combinations of SSL bypass mode.
- Authentication
- Authentication might be configured on one or more servers:
- On APM, you can configure no authentication or any type of authentication that APM supports for an SWG-Explicit or SWG-Transparent access profile.
- On a proxy server, if you have HTTP Basic, NTLM, or Kerberos authentication configured, APM should authenticate to the proxy server. You can also have no authentication configured on the proxy server.
- On a resource server, if you have HTTP Basic, NTLM, or Kerberos authentication configured, APM should authenticate to the resource server. You can also have no authentication configured on the resource server.
- Single sign-on
- APM supports these types of SSO configuration to the proxy server or to a resource server: HTTP Basic, NTLMv1, NTLMv2, or Kerberos.
To a large extent, APM supports combinations of these configuration characteristics. However, given the number of possible configuration combinations and the varying capabilities of proxy servers, some configuration constraints can exist. Refer to BIG-IP Access Policy Manager: Secure Web Gateway and to Release Note: BIG-IP APM (for the product version you are using) on the AskF5™ web site located at support.f5.com.
When configured to act as an explicit or transparent forward proxy, Access Policy Manager (APM®) supports forward proxy chaining, with or without an SWG subscription. These configuration elements are key to forward proxy chaining:
-
One or more pools of proxy servers. All servers in a pool must support the same forward proxy mode: explicit or transparent.
-
A per-request policy that includes a Proxy Select agent, which specifies a pool of proxy servers.
Note: Only the Proxy Select agent signals that a connection must be made to a next hop. A Pool Assign agent does not.
-
An HTTP Proxy Connect profile configured with its state disabled.
-
The virtual server that processes HTTPS traffic for the forward proxy configuration with the disabled HTTP Proxy Connect profile specified.
In this example, Access Policy Manager (APM®) performs authentication on behalf of the proxy server and the resource servers.
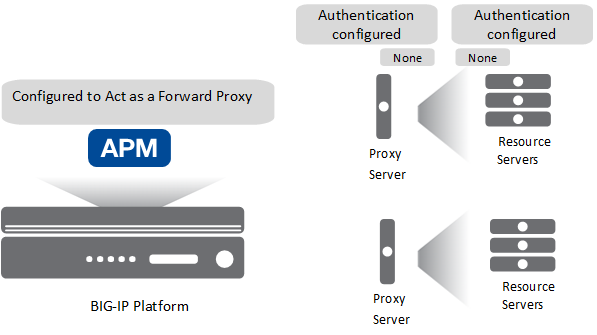
You need an access policy configured with any type of authentication that APM supports for an SWG-Explicit or SWG-Transparent access profile type, and a per-request policy that selects the next hop.
You configure an access policy to authenticate users on behalf of a proxy server.
Note: You can configure any type of authentication that Access Policy Manager (APM) supports for the access profile type (SWG-Explicit or SWG-Transparent) that is used in your forward proxy configuration.
This example uses LDAP.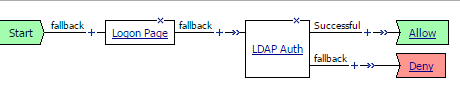
-
On the Main tab, click Access > Profiles / Policies.
The Access Profiles (Per-Session Policies) screen opens.
-
Locate the access profile for the forward proxy configuration you are updating.
Look in the Profile Type field for SWG-Explicit or SWG-Transparent.
-
In the Per-Session Policy column, click the Edit link
The visual policy editor opens the access policy in a separate screen.
-
Click the (+) icon anywhere in the access policy to add a new item.
Note: Only an applicable subset of access policy items is available for selection in the visual policy editor for any access profile type.
A popup screen opens, listing predefined actions on tabs such as General Purpose, Authentication, and so on.
-
On the Logon tab, select Logon Page and click the Add Item button.
The Logon Page Agent properties screen opens.
-
Click Save.
The properties screen closes and the policy displays.
-
On a policy branch, click the (+) icon to add an item to the policy.
-
On the Authentication tab, select LDAP Auth and click Add Item.
A Properties screen opens.
-
For Server, select the LDAP server you want to use from the list.
Servers are defined in the Access > Authentication area of the Configuration utility.
-
For SearchDN, type the base node of the LDAP server search tree where you want to start the search.
-
For SearchFilter, type the search criteria to use when querying the LDAP server for the user’s information.
Session variables are supported as part of the search query string.
When you type a string, enclose it in parentheses.
For example, type
(sAmAccountName=%{session.logon.last.username})or(sAmAccountName=%{subsession.logon.last.username}). -
For UserDN, specify the Distinguished Name (DN) of the user.
-
Click Save.
The properties screen closes and the policy displays.
-
Click the Apply Access Policy link to apply and activate the changes to the policy.
Before you start, you must have configured a pool of proxy servers that all support the same forward proxy mode: explicit or transparent. (Create pools using Local Traffic > Pools.)
You create a per-request policy that uses a Proxy Select agent to select the next hop in a forward proxy chain.
Note: If you include SSL Intercept or SSL Bypass agents in the policy, be sure to place them before other agents.
-
On the Main tab, click Access > Profiles / Policies > Per-Request Policies.
The Per-Request Policies screen opens.
-
To create a new per-request policy, click Create, type a name that is unique among all access profiles and per-request policies, select the accepted languages, and click Finished.
The Per-Request Policies screen displays the new per-request policy.
-
In the Name field, locate the policy that you want to update, then in the Per-Request Policy field, click the Edit link.
The visual policy editor opens in another tab.
-
On a policy branch, click the (+) icon to add an item to the policy.
The actions you can use for building a per-request policy are displayed on a popup screen with actions on tabs, such as Authentication, Classification, and General Purpose, and a search field.
-
On the Traffic Management tab, select Proxy Select and click Add Item.
A Properties popup screen opens.
-
From the Pool list, select a pool of one or more proxy servers to serve as the next hop.
Important: All proxy servers in the pool that you select must support the forward proxy mode that you specify in the Upstream Proxy Mode setting.
-
From Upstream Proxy Mode, select:
- Explicit if the proxy servers in the pool support explicit forward proxy.
- Transparent if the proxy servers in the pool support transparent forward proxy.
-
For Username and Password, most of the time you can retain the default values (blank).
These fields support the use of static credentials to authenticate the user at the next hop using HTTP Basic authentication.
-
Click Save.
The properties screen closes. The visual policy editor displays.
Be sure to add a disabled HTTP Connect Profile to the virtual server that processes SSL traffic for the forward proxy configuration.
Note: A per-request policy is not in effect unless it and an access profile are specified in virtual servers in the forward proxy configuration.
NTLM pass-through describes a configuration where authentication is not specified on Access Policy Manager (APM®), but where NTLM authentication is configured at the next hop or at a resource server behind the next hop.
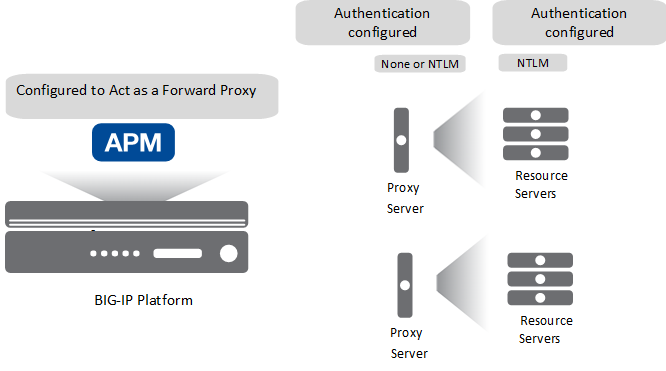
Note: APM supports NTLM pass-through only for HTTP traffic, and only when both APM and the proxy server are configured for explicit forward proxy.
To support this configuration, you need an access policy, but no specific configuration is required in it. You also need a per-request policy configured to select the next hop.
Before you start, you must have configured a pool of proxy servers that all support the same forward proxy mode: explicit or transparent. (Create pools using Local Traffic > Pools.)
You create a per-request policy that uses a Proxy Select agent to select the next hop in a forward proxy chain.
Note: If you include SSL Intercept or SSL Bypass agents in the policy, be sure to place them before other agents.
-
On the Main tab, click Access > Profiles / Policies > Per-Request Policies.
The Per-Request Policies screen opens.
-
To create a new per-request policy, click Create, type a name that is unique among all access profiles and per-request policies, select the accepted languages, and click Finished.
The Per-Request Policies screen displays the new per-request policy.
-
In the Name field, locate the policy that you want to update, then in the Per-Request Policy field, click the Edit link.
The visual policy editor opens in another tab.
-
On a policy branch, click the (+) icon to add an item to the policy.
The actions you can use for building a per-request policy are displayed on a popup screen with actions on tabs, such as Authentication, Classification, and General Purpose, and a search field.
-
On the Traffic Management tab, select Proxy Select and click Add Item.
A Properties popup screen opens.
-
From the Pool list, select a pool of one or more proxy servers to serve as the next hop.
Important: All proxy servers in the pool that you select must support the forward proxy mode that you specify in the Upstream Proxy Mode setting.
-
From Upstream Proxy Mode, select:
- Explicit if the proxy servers in the pool support explicit forward proxy.
- Transparent if the proxy servers in the pool support transparent forward proxy.
-
For Username and Password, most of the time you can retain the default values (blank).
These fields support the use of static credentials to authenticate the user at the next hop using HTTP Basic authentication.
-
Click Save.
The properties screen closes. The visual policy editor displays.
Be sure to add a disabled HTTP Connect Profile to the virtual server that processes SSL traffic for the forward proxy configuration.
Note: A per-request policy is not in effect unless it and an access profile are specified in virtual servers in the forward proxy configuration.
Access Policy Manager (APM) supports inserting the X-Authenticated-User HTTP header and, optionally, the X-Forwarded-For HTTP header to authenticate on the user’s behalf to a next hop proxy server or to a resource server behind the proxy. In this example, you can configure either HTTP Basic or NTLM authentication on the proxy server or on the resource server.
You need an access policy configured with any type of authentication that APM supports for an SWG-Explicit or SWG-Transparent access profile type and a per-request policy that inserts the header and selects the next hop.
You configure an access policy to authenticate users on behalf of a proxy server.
Note: You can configure any type of authentication that Access Policy Manager (APM) supports for the access profile type (SWG-Explicit or SWG-Transparent) that is used in your forward proxy configuration.
This example uses LDAP.
-
On the Main tab, click Access > Profiles / Policies.
The Access Profiles (Per-Session Policies) screen opens.
-
Locate the access profile for the forward proxy configuration you are updating.
Look in the Profile Type field for SWG-Explicit or SWG-Transparent.
-
In the Per-Session Policy column, click the Edit link
The visual policy editor opens the access policy in a separate screen.
-
Click the (+) icon anywhere in the access policy to add a new item.
Note: Only an applicable subset of access policy items is available for selection in the visual policy editor for any access profile type.
A popup screen opens, listing predefined actions on tabs such as General Purpose, Authentication, and so on.
-
On the Logon tab, select Logon Page and click the Add Item button.
The Logon Page Agent properties screen opens.
-
Click Save.
The properties screen closes and the policy displays.
-
On a policy branch, click the (+) icon to add an item to the policy.
-
On the Authentication tab, select LDAP Auth and click Add Item.
A Properties screen opens.
-
For Server, select the LDAP server you want to use from the list.
Servers are defined in the Access > Authentication area of the Configuration utility.
-
For SearchDN, type the base node of the LDAP server search tree where you want to start the search.
-
For SearchFilter, type the search criteria to use when querying the LDAP server for the user’s information.
Session variables are supported as part of the search query string.
When you type a string, enclose it in parentheses.
For example, type
(sAmAccountName=%{session.logon.last.username})or(sAmAccountName=%{subsession.logon.last.username}). -
For UserDN, specify the Distinguished Name (DN) of the user.
-
Click Save.
The properties screen closes and the policy displays.
-
Click the Apply Access Policy link to apply and activate the changes to the policy.
Before you start, make sure that the proxy servers at the next hop are capable of processing the HTTP header you insert.
You configure a per-request policy to insert an X-Authenticated-User HTTP header with the value of a successfully authenticated user name to authenticate to the next hop proxy server or to resource servers behind it.
Note: You cannot use HTTP Headers following an SSL Bypass agent in the policy. If you need to use SSL Bypass for proxy chaining, you should do it within an HTTP_PROXY_CONNECT iRule event. However, you can use HTTP Headers after SSL Intercept.
-
On the Main tab, click Access > Profiles / Policies > Per-Request Policies.
The Per-Request Policies screen opens.
-
To create a new per-request policy, click Create, type a name that is unique among all access profiles and per-request policies, select the accepted languages, and click Finished.
The Per-Request Policies screen displays the new per-request policy.
-
In the Name field, locate the policy that you want to update, then in the Per-Request Policy field, click the Edit link.
The visual policy editor opens in another tab.
-
On a policy branch, click the (+) icon to add an item to the policy.
The actions you can use for building a per-request policy are displayed on a popup screen with actions on tabs, such as Authentication, Classification, and General Purpose, and a search field.
-
On the General Purpose tab, select HTTP Headers and click Add Item.
A Properties screen opens.
-
In the HTTP Header Modify area, click Add new entry.
-
For Header Operation, retain the default value insert.
-
In the Header Name field, type
X-Authenticated-User. -
In the Header Value field, type the value of a successfully authenticated username.
For example, type
%{session.logon.last.userrname}. -
To also add an X-Forwarded-For HTTP header, perform these substeps:
-
In the HTTP Header Modify area, click Add new entry.
-
In the Header Name field, type
X-Forwarded-For. -
In the Header Value field, type the value of the client IP address.
For example, type
%{session.user.clientip}.
-
-
Click Save.
The properties screen closes. The visual policy editor displays.
-
Add any additional items you want to the policy.
-
Click the (+) icon anywhere in the per-request policy to add a new item.
-
On the Traffic Management tab, select Proxy Select and click Add Item.
A Properties popup screen opens.
-
From the Pool list, select a pool of one or more proxy servers to serve as the next hop.
Important: All proxy servers in the pool that you select must support the forward proxy mode that you specify in the Upstream Proxy Mode setting.
-
From Upstream Proxy Mode, select:
- Explicit if the proxy servers in the pool support explicit forward proxy.
- Transparent if the proxy servers in the pool support transparent forward proxy.
-
For Username and Password, most of the time you can retain the default values (blank).
These fields support the use of static credentials to authenticate the user at the next hop using HTTP Basic authentication.
-
Click Save.
The properties screen closes. The visual policy editor displays.
Be sure to add a disabled HTTP Connect Profile to the virtual server that processes SSL traffic for the forward proxy configuration.
Note: A per-request policy is not in effect unless it and an access profile are specified in virtual servers in the forward proxy configuration.
Before configuring Access Policy Manager (APM®) to forward X-Authenticated-User and X-Forwarded-For headers to a third-party proxy server, consider the capabilities of the specific proxy server. How a proxy server responds to X-Authenticated-User and X-Forwarded-For headers is completely dependent on the proxy server capabilities, and on the settings that a proxy server might provide for resource protection. Not all proxy servers can process the headers. Others might process and trust the headers but, based on configuration settings, require authentication regardless.
With no authentication configured on Access Policy Manager (APM), you can still use HTTP Basic to authenticate to a next hop proxy server.
You don’t need any particular configuration in the access policy. You do need to select the next hop proxy, and specify static credentials in the Proxy Select agent in the per-request policy.
Before you start, you must have configured a pool of proxy servers that are all configured to support the same forward proxy mode: explicit or transparent. (Pools are configured in the Local Traffic****Pools area of the product.)
You configure a per-request policy to select the next hop in a forward proxy chain and provide static credentials for HTTP Basic authentication.
Note: If you include SSL Intercept or SSL Bypass agents in the policy, be sure to place them before other agents.
-
On the Main tab, click Access > Profiles / Policies > Per-Request Policies.
The Per-Request Policies screen opens.
-
To create a new per-request policy, click Create, type a name that is unique among all access profiles and per-request policies, select the accepted languages, and click Finished.
The Per-Request Policies screen displays the new per-request policy.
-
In the Name field, locate the policy that you want to update, then in the Per-Request Policy field, click the Edit link.
The visual policy editor opens in another tab.
-
On a policy branch, click the (+) icon to add an item to the policy.
The actions you can use for building a per-request policy are displayed on a popup screen with actions on tabs, such as Authentication, Classification, and General Purpose, and a search field.
-
On the Traffic Management tab, select Proxy Select and click Add Item.
A Properties popup screen opens.
-
From the Pool list, select a pool of one or more proxy servers to serve as the next hop.
Important: All proxy servers in the pool that you select must support the forward proxy mode that you specify in the Upstream Proxy Mode setting.
-
From Upstream Proxy Mode, select:
- Explicit if the proxy servers in the pool support explicit forward proxy.
- Transparent if the proxy servers in the pool support transparent forward proxy.
-
For Username and Password, type the user name and password that APM can use to authenticate to the proxy server.
-
Click Save.
The properties screen closes. The visual policy editor displays.
Be sure to add a disabled HTTP Connect Profile to the virtual server that processes SSL traffic for the forward proxy configuration.
Note: A per-request policy is not in effect unless it and an access profile are specified in virtual servers in the forward proxy configuration.
The table lists some activities that you might observe with forward proxy chaining between Access Policy Manager (APM) and a third-party proxy server that uses Basic authentication. The table provides additional explanation.
| Activity | Description |
|---|---|
| A client achieves single sign-on to a next hop proxy server that uses Basic authentication. However, the configuration on Access Policy Manager (APM) configuration does not include SSO. | The initial client request includes one these HTTP headers: Proxy Authorization or Authorization. This can happen when, for example, the user logged on as a domain user. Some third-party proxy servers accept these credentials at the initial request. |
Packet captures show that a next hop proxy server rejected an initial client request with one of these HTTP headers: Proxy Authorization or Authorization. |
Some third-party proxy servers deny such an initial request because the header is not expected. The proxy server then sends HTTP status code 407 (Proxy Authentication Required) or 401 (Authentication Required). APM responds to the HTTP code. If Basic SSO is configured, APM invokes it. |
Access Policy Manager® (APM®) supports the HTTP Basic, Kerberos, NTLMv1, and NTLMv2 types of SSO configuration to and behind a next hop proxy server. This example specifies the configuration for a Basic or NTLM type SSO. Authentication can be configured on the proxy server or on a resource server behind it.
You need an access policy to gather and cache user credentials. You need a per-request policy to specify an SSO configuration and select the next hop proxy.
To support SSO to the next hop proxy server in a forward proxy chain or to a resource server behind the next hop, you configure an access policy to collect credentials and cache them.
Note: This example policy uses the Logon Page item to collect credentials; you can use other items.
-
On the Main tab, click Access > Profiles / Policies.
The Access Profiles (Per-Session Policies) screen opens.
-
In the Per-Session Policy column, click the Edit link for the access profile you want to configure.
The visual policy editor opens the access policy in a separate screen.
-
Click the (+) icon anywhere in the access policy to add a new item.
Note: Only an applicable subset of access policy items is available for selection in the visual policy editor for any access profile type.
A popup screen opens, listing predefined actions on tabs such as General Purpose, Authentication, and so on.
-
On the Logon tab, select Logon Page and click the Add Item button.
The Logon Page Agent properties screen opens.
-
Click Save.
The properties screen closes and the policy displays.
-
On a policy branch, click the (+) icon to add an item to the policy.
-
On the Assignment tab, select SSO Credential Mapping and click Add Item.
A properties screen opens.
-
Click Save.
The properties screen closes and the policy displays.
Before you start, you need to have configured:
-
An HTTP Basic, NTLMv1, or NTLMv2 SSO configuration.
Note: SSO configurations are configured in the Access > Single Sign-On area of the product.
-
A pool of proxy servers, each of which is configured for the same forward proxy mode: explicit or transparent.
Note: Pools are configured in the Local Traffic > Pools area of the product.
To support SSO from Access Policy Manager (APM) in a forward proxy chain, you configure a per-request policy to select an SSO configuration and later select the next hop.
Note: If you include SSL Intercept or SSL Bypass agents in the policy, be sure to place them before other agents.
-
On the Main tab, click Access > Profiles / Policies > Per-Request Policies.
The Per-Request Policies screen opens.
-
To create a new per-request policy, click Create, type a name that is unique among all access profiles and per-request policies, select the accepted languages, and click Finished.
The Per-Request Policies screen displays the new per-request policy.
-
In the Name field, locate the policy that you want to update, then in the Per-Request Policy field, click the Edit link.
The visual policy editor opens in another tab.
-
On a policy branch, click the (+) icon to add an item to the policy.
The actions you can use for building a per-request policy are displayed on a popup screen with actions on tabs, such as Authentication, Classification, and General Purpose, and a search field.
-
On the General Purpose tab, select SSO Configuration Select and click Add Item.
A Properties screen opens.
-
From SSO Configuration Name, select an SSO configuration, and click Save.
The properties screen closes. The visual policy editor opens.
-
Add any additional items you want to the policy.
-
Click the (+) icon anywhere in the per-request policy to add a new item.
-
On the Traffic Management tab, select Proxy Select and click Add Item.
A Properties popup screen opens.
-
From the Pool list, select a pool of one or more proxy servers to serve as the next hop.
Important: All proxy servers in the pool that you select must support the forward proxy mode that you specify in the Upstream Proxy Mode setting.
-
From Upstream Proxy Mode, select:
- Explicit if the proxy servers in the pool support explicit forward proxy.
- Transparent if the proxy servers in the pool support transparent forward proxy.
-
For Username and Password, most of the time you can retain the default values (blank).
These fields support the use of static credentials to authenticate the user at the next hop using HTTP Basic authentication.
-
Click Save.
The properties screen closes. The visual policy editor displays.

Be sure to add a disabled HTTP Connect Profile to the virtual server that processes SSL traffic for the forward proxy configuration.
Note: A per-request policy is not in effect unless it and an access profile are specified in virtual servers in the forward proxy configuration.
Access Policy Manager (APM®) does not support SSO to a resource server for SSL bypass traffic when the resource server performs authentication.
Access Policy Manager (APM®) supports the HTTP Basic, Kerberos, NTLMv1, and NTLMv2 types of SSO configuration to and behind a next hop proxy server. This example specifies the configuration you need for Kerberos single sign-on to the next hop in a forward proxy chain.
Important: APM does not support Kerberos SSO to a proxy server for HTTPS traffic.
For Kerberos SSO, you need a delegation account in Active Directory for the next hop proxy server and a Kerberos SSO configuration in APM that references the delegation account.
For forward proxy chaining, you need an access policy to authenticate the user and cache credentials. You need a per-request policy to specify an SSO configuration and select the next hop proxy.
To support SSO to a next hop proxy server with Kerberos authentication configured on it, you need a delegation account in Active Directory for the next hop proxy server.
-
Open the Active Directory Users and Computers administrative tool, and create a new user account.
The user account should be dedicated for delegation, and the Password never expires setting enabled.
-
Set the service principal name (SPN) on the Windows server for the user account.
For the support tools that you can use and for the commands that you can use, such as
setspnandktpass, refer to Microsoft documentation.Note: If you use the
ktpasscommand, it sets the SPN on the Windows server and creates a keytab file. Access Policy Manager (APM) Kerberos SSO does not need or use a keytab file. -
Verify the result of setting the SPN.
This example is purely for illustration. Refer to Microsoft documentation for up-to-date commands and correct usage.
C:\Users\Administrator>``setspn-L **apm4**Registered ServicePrincipalNames for CN=fproxy1,OU=users,DC=myhostname,DC=lab,DC=mynet,DC=com: HTTP/fproxy1.myhostname.lab.mynet.comwhere fproxy1 is the name of the user account that you created. -
Take note of the service principal name.
Important: You will need to type the service principal name in the Kerberos SSO configuration that you create in APM.
-
Return to the Active Directory Users and Computers screen to open your account again.
A Delegation tab should appear.
-
Click the Delegation tab.
-
Select Trust this user for delegation to specified services only.
-
Select Use any authentication protocol, and add all your services to the list under Services to which this account can present delegated credentials.
Every service should have Service Type HTTP (or http) and host name of the forward proxy server that you will use in your configuration.
-
Click OK.
This creates the new delegation account.
Before you start, you must have configured a delegation account in Active Directory for the next hop proxy server.
To support Kerberos single sign-on to a next hop proxy server from Access Policy Manager (APM), you must create a Kerberos SSO configuration.
Note: To complete this task, you need to know the service principal name (SPN) for the delegation account.
-
On the Main tab, click Access > Single Sign-On > Kerberos.
The Kerberos screen opens.
-
Click Create.
The New SSO Configuration screen opens.
-
In the Name field, type a name for the SSO configuration.
The maximum length of a single sign-on configuration is 225 characters, including the partition name.
-
From the Log Setting list, select one of the following options:
- Select an existing APM log setting.
- Click Create to create a new log setting.
-
In the Credentials Source area, specify the credentials that you want cached for Single Sign-On.
-
In theKerberos Realm field, type the name of the realm in uppercase.
For example, type
MYHOSTNAME.LAB.MYNET.COM. -
In the Account Name field, type the name of the Active Directory account configured for delegation.
Type the account name in SPN format.
In this example
HTTP/fproxy1.myhostname.lab.mynet.com@MYHOSTNAME.LAB.MYNET.COM,fproxy1is the delegation account,fproxy1.myhostname.lab.mynet.comis its fully qualified domain name, andMYHOSTNAME.LAB.MYNET.COMis the realm. -
In the Account Password and Confirm Account Password fields, type the delegation account password.
-
Click Finished.
You configure an access policy to support single sign-on to a next hop proxy server or to a resource server that has Kerberos authentication configured on it.
Note: You need a logon item to collect credentials in this policy. You can use HTTP 407 Response (for explicit forward proxy), or Logon Page, or HTTP 401 Response (for transparent forward proxy). This example uses HTTP 401 Response.
-
On the Main tab, click Access > Profiles / Policies.
The Access Profiles (Per-Session Policies) screen opens.
-
Locate the access profile for the forward proxy configuration you are updating.
Look in the Profile Type field for SWG-Explicit or SWG-Transparent.
-
In the Per-Session Policy column, click the Edit link.
The visual policy editor opens the access policy in a separate screen.
-
Click the (+) icon anywhere in the access policy to add a new item.
Note: Only an applicable subset of access policy items is available for selection in the visual policy editor for any access profile type.
A popup screen opens, listing predefined actions on tabs such as General Purpose, Authentication, and so on.
-
On the Logon tab, select HTTP 401 Response and click Add Item.
A Properties screen opens.
-
From the HTTP Auth Level list, select negotiate and click Save.
In a transparent forward proxy configuration, APM does not support Kerberos request-based authentication
The properties screen closes.
-
Click the (+) icon on the negotiate branch.
A popup screen opens.
-
For Kerberos authentication to work correctly with forward proxy, you must assign the domain name for the forward proxy virtual server to a session variable:
-
On the Assignment tab, select Variable Assign and click Add Item.
-
Click Add new entry.
An empty entry appears in the Assignment table.
-
Click the change link in the new entry.
A popup screen opens.
-
In the left pane, retain the selection of Custom Variable and type this variable name:
session.server.network.name. -
In the right pane, in place of Custom Variable, select Text and type the domain name for the proxy virtual server.
-
Click Finished.
The popup screen closes.
-
Click Save.
The properties screen closes. The policy displays.
-
-
On a policy branch, click the (+) icon to add an item to the policy.
-
On the Assignment tab, select SSO Credential Mapping and click Add Item.
A properties screen opens.
-
Click Save.
The properties screen closes and the policy displays.
Before you start, you need to have configured a pool of proxy servers, each of which is configured for the same forward proxy mode: explicit or transparent. (Pools are configured in the Local Traffic > Pools area of the product.)
To support SSO in a forward proxy chain, you configure a per-request policy that selects a supported SSO configuration and later selects the next hop.
Note: If you include SSL Intercept or SSL Bypass agents in the policy, be sure to place them before other agents.
-
On the Main tab, click Access > Profiles / Policies > Per-Request Policies.
The Per-Request Policies screen opens.
-
To create a new per-request policy, click Create, type a name that is unique among all access profiles and per-request policies, select the accepted languages, and click Finished.
The Per-Request Policies screen displays the new per-request policy.
-
In the Name field, locate the policy that you want to update, then in the Per-Request Policy field, click the Edit link.
The visual policy editor opens in another tab.
-
Click the (+) icon anywhere in the subroutine to add a new item.
A small set of actions are provided for building a subroutine.
A popup screen displays actions on tabs, such as General Purpose and Authentication, and provides a search field.
-
On the General Purpose tab, select SSO Configuration Select and click Add Item.
A Properties screen displays.
-
From SSO Configuration Name, select a Kerberos SSO configuration.
-
Click the (+) icon anywhere in the per-request policy to add a new item.
-
Click Save.
The properties screen closes. The visual policy editor displays.
-
Add any additional items you want to the policy.
-
Click the (+) icon anywhere in the per-request policy to add a new item.
-
On the Traffic Management tab, select Proxy Select and click Add Item.
A Properties popup screen opens.
-
From the Pool list, select a pool of one or more proxy servers to serve as the next hop.
Important: All proxy servers in the pool that you select must support the forward proxy mode that you specify in the Upstream Proxy Mode setting.
-
From Upstream Proxy Mode, select:
- Explicit if the proxy servers in the pool support explicit forward proxy.
- Transparent if the proxy servers in the pool support transparent forward proxy.
-
For Username and Password, most of the time you can retain the default values (blank).
These fields support the use of static credentials to authenticate the user at the next hop using HTTP Basic authentication.
-
Click Save.
The properties screen closes. The visual policy editor displays.

Be sure to add a disabled HTTP Connect Profile to the virtual server that processes SSL traffic for the forward proxy configuration.
Note: A per-request policy is not in effect unless it and an access profile are specified in virtual servers in the forward proxy configuration.
Access Policy Manager (APM®) supports the HTTP Basic, Kerberos, NTLMv1, and NTLMv2 types of SSO configuration to and behind a next hop proxy server. This example specifies the configuration you need for Kerberos single sign-on to a resource server after the next hop in a forward proxy chain.
Important: APM supports this configuration for HTTP traffic only.
For Kerberos SSO, you need a delegation account in Active Directory for the next hop proxy server and a Kerberos SSO configuration in APM that references the delegation account and specifies On 401 Status Code as the value for the Send Authentication setting.
For forward proxy chaining, you need an access policy to authenticate the user and cache credentials. You need a per-request policy to specify an SSO configuration and select the next hop proxy.
Before you can configure Kerberos SSO in Access Policy Manager, you must create a delegation account in Active Directory.
Note: For every server realm, you must create a delegation account in that realm.
-
Open the Active Directory Users and Computers administrative tool and create a new user account.
The user account should be dedicated for delegation, and the Password never expires setting enabled.
-
Set the service principal name (SPN) on the Windows server for the user account.
For the support tools that you can use, and for the commands, such as
setspnandktpass, refer to Microsoft documentation.Note: If you use the
ktpasscommand, it sets the SPN on the Windows server and creates a keytab file. APM Kerberos SSO does not need or use a keytab file. -
Verify the result of setting the SPN.
This example is purely for illustration. Refer to Microsoft documentation for up-to-date commands and correct usage.
C:\Users\Administrator>``setspn-L **apm4**Registered ServicePrincipalNames for CN=apm4,OU=users,DC=yosemite,DC=lab,DC=dnet,DC=com: HTTP/apm4.yosemite.lab.dnet.comwhere apm4 is the name of the user account that you created. -
Return to the Active Directory Users and Computers screen to open your account again.
A Delegation tab should appear.
-
Click the Delegation tab.
-
Select Trust this user for delegation to specified services only.
-
Select Use any authentication protocol, and add all your services to the list under Services to which this account can present delegated credentials.
Every service should have Service Type HTTP (or http) and host name of the pool member or web application resource host that you will use in your configuration.
-
Click OK.
This creates the new delegation account.
Before you start, you must have configured a delegation account in Active Directory for Access Policy Manager (APM) .
To support Kerberos single sign-on authentication from Access Policy Manager (APM) to a resource server, you must create a Kerberos SSO configuration with the Send Authentication field set to On 401 Status Code.
Note: To complete this task, you need to know the service principal name (SPN) for the delegation account.
-
On the Main tab, click Access > Single Sign-On > Kerberos.
The Kerberos screen opens.
-
Click Create.
The New SSO Configuration screen opens.
-
In the Name field, type a name for the SSO configuration.
The maximum length of a single sign-on configuration is 225 characters, including the partition name.
-
From the Log Setting list, select one of the following options:
- Select an existing APM log setting.
- Click Create to create a new log setting.
-
In the Credentials Source area, specify the credentials that you want cached for Single Sign-On.
-
In theKerberos Realm field, type the name of the realm in uppercase.
For example, type
MY.HOST.LAB.MYNET.COM. -
In the Account Name field, type the name of the Active Directory account configured for delegation.
Type the account name in SPN format.
In this example
HTTP/apm4.my.host.lab.mynet.com@MY.HOST.LAB.MYNET.COM,apm4is the delegation account,apm4.my.host.lab.mynet.comis its fully qualified domain name, andMY.HOST.LAB.MYNET.COMis the realm. -
In the Account Password and Confirm Account Password fields, type the delegation account password.
-
For Send Authorization, select On 401 Status Code.
-
Click Finished.
You configure an access policy to support single sign-on to a next hop proxy server or to a resource server that has Kerberos authentication configured on it.
Note: You need a logon item to collect credentials in this policy. You can use HTTP 407 Response (for explicit forward proxy), or Logon Page, or HTTP 401 Response (for transparent forward proxy). This example uses HTTP 401 Response.
-
On the Main tab, click Access > Profiles / Policies.
The Access Profiles (Per-Session Policies) screen opens.
-
Locate the access profile for the forward proxy configuration you are updating.
Look in the Profile Type field for SWG-Explicit or SWG-Transparent.
-
In the Per-Session Policy column, click the Edit link.
The visual policy editor opens the access policy in a separate screen.
-
Click the (+) icon anywhere in the access policy to add a new item.
Note: Only an applicable subset of access policy items is available for selection in the visual policy editor for any access profile type.
A popup screen opens, listing predefined actions on tabs such as General Purpose, Authentication, and so on.
-
On the Logon tab, select HTTP 401 Response and click Add Item.
A Properties screen opens.
-
From the HTTP Auth Level list, select negotiate and click Save.
In a transparent forward proxy configuration, APM does not support Kerberos request-based authentication
The properties screen closes.
-
Click the (+) icon on the negotiate branch.
A popup screen opens.
-
For Kerberos authentication to work correctly with forward proxy, you must assign the domain name for the forward proxy virtual server to a session variable:
-
On the Assignment tab, select Variable Assign and click Add Item.
-
Click Add new entry.
An empty entry appears in the Assignment table.
-
Click the change link in the new entry.
A popup screen opens.
-
In the left pane, retain the selection of Custom Variable and type this variable name:
session.server.network.name. -
In the right pane, in place of Custom Variable, select Text and type the domain name for the proxy virtual server.
-
Click Finished.
The popup screen closes.
-
Click Save.
The properties screen closes. The policy displays.
-
-
On a policy branch, click the (+) icon to add an item to the policy.
-
On the Assignment tab, select SSO Credential Mapping and click Add Item.
A properties screen opens.
-
Click Save.
The properties screen closes and the policy displays.
Before you start, you need to have configured a pool of proxy servers, each of which is configured for the same forward proxy mode: explicit or transparent. (Pools are configured in the Local Traffic > Pools area of the product.)
To support SSO in a forward proxy chain, you configure a per-request policy that selects a supported SSO configuration and later selects the next hop.
Note: If you include SSL Intercept or SSL Bypass agents in the policy, be sure to place them before other agents.
-
On the Main tab, click Access > Profiles / Policies > Per-Request Policies.
The Per-Request Policies screen opens.
-
To create a new per-request policy, click Create, type a name that is unique among all access profiles and per-request policies, select the accepted languages, and click Finished.
The Per-Request Policies screen displays the new per-request policy.
-
In the Name field, locate the policy that you want to update, then in the Per-Request Policy field, click the Edit link.
The visual policy editor opens in another tab.
-
Click the (+) icon anywhere in the subroutine to add a new item.
A small set of actions are provided for building a subroutine.
A popup screen displays actions on tabs, such as General Purpose and Authentication, and provides a search field.
-
On the General Purpose tab, select SSO Configuration Select and click Add Item.
A Properties screen displays.
-
From SSO Configuration Name, select a Kerberos SSO configuration.
-
Click the (+) icon anywhere in the per-request policy to add a new item.
-
Click Save.
The properties screen closes. The visual policy editor displays.
-
Add any additional items you want to the policy.
-
Click the (+) icon anywhere in the per-request policy to add a new item.
-
On the Traffic Management tab, select Proxy Select and click Add Item.
A Properties popup screen opens.
-
From the Pool list, select a pool of one or more proxy servers to serve as the next hop.
Important: All proxy servers in the pool that you select must support the forward proxy mode that you specify in the Upstream Proxy Mode setting.
-
From Upstream Proxy Mode, select:
- Explicit if the proxy servers in the pool support explicit forward proxy.
- Transparent if the proxy servers in the pool support transparent forward proxy.
-
For Username and Password, most of the time you can retain the default values (blank).
These fields support the use of static credentials to authenticate the user at the next hop using HTTP Basic authentication.
-
Click Save.
The properties screen closes. The visual policy editor displays.
Be sure to add a disabled HTTP Connect Profile to the virtual server that processes SSL traffic for the forward proxy configuration.
Note: A per-request policy is not in effect unless it and an access profile are specified in virtual servers in the forward proxy configuration.
Access Policy Manager (APM®) does not support Kerberos SSO to a resource server for SSL traffic when: the resource server performs Kerberos authentication; and, the next hop proxy server simply passes the Kerberos credential to the resource server without performing Kerberos authentication.
For forward proxy chaining, Access Policy Manager® (APM®) requires an HTTP proxy connect profile configured with its state disabled. The HTTP proxy connect profile must be specified in the virtual server that processes the HTTPS traffic for the explicit or transparent forward proxy configuration.
For Access Policy Manager (APM) to support forward proxy chaining, you need an HTTP proxy connect profile with its default state disabled.
-
On the Main tab, select Local Traffic > Profiles > Other > HTTP Proxy Connect.
-
Click Create.
-
Type a name for the profile and, for the Parent Profile setting, retain http-proxy-connect.
-
In the Settings area, for Default State clear the Enabled check box.
-
Click Finished.
For Access Policy Manager (APM) to support forward proxy chaining, you must specify an HTTP proxy connect profile on the virtual server that processes SSL traffic in the forward proxy configuration.
Important: If this virtual server functions as a captive portal or processes HTTP traffic, you must retain the default value of None for the HTTP Proxy Connect Profile setting.
-
On the Main tab, click Local Traffic > Virtual Servers.
The Virtual Server List screen opens.
-
Click the name of the virtual server you want to modify.
-
In the Configuration area from HTTP Proxy Connect Profile, select a profile that you know to be configured with the Default State setting disabled.
-
Click Update to save the changes.
F5 recommends multiple virtual servers for configurations where Access Policy Manager (APM) acts as an explicit or transparent forward proxy. This table lists forward proxy configurations, the virtual servers recommended for each, and whether an access profile and per-request policy should be specified on the virtual server.
| Forward proxy | Recommended virtual servers (by purpose) | Specify access profile? | Specify per-request policy? |
|---|---|---|---|
| Explicit | Process HTTP traffic | Yes | Yes |
| Process HTTPS traffic | Yes | Yes | |
| Reject traffic other than HTTP and HTTPS | N/A | N/A | |
| Transparent Inline | Process HTTP traffic | Yes | Yes |
| Process HTTPS traffic | Only when a captive portal is also included in the configuration | Only when a captive portal is also included in the configuration | |
| Forward traffic other than HTTP and HTTPS | N/A | N/A | |
| Captive portal | Yes | No | |
| Transparent | Process HTTP traffic | Yes | Yes |
| Process HTTPS traffic | Only when a captive portal is also included in the configuration | Only when a captive portal is also included in the configuration | |
| Captive portal | Yes | No |