Updated Date: 07/07/2026
Hardware HSM Setup and Administration
You can configure a device group using two platforms from the same series with a FIPS hardware security module (HSM) installed in each unit. When setting up an embedded FIPS solution on a device group, you install the two systems and can connect to a serial console to remotely manage the systems. In the event that network access is impaired or not yet configured, the serial console might be the only way to access your system.
After you have set up and configured the systems, you can create the FIPS security domain by initializing the HSM and creating a security officer (SO) password. You must configure the same security domain name on all HSMs in the group.
After you have set up and configured your BIG-IP systems, you create a FIPS security domain by initializing the embedded HSM and then synchronizing all applicable HSMs.
You must initialize the hardware security module (HSM) installed in each unit before you can use it. When you are creating a device group using more than one FIPS platform, you initialize the HSM on one unit, and then initialize the HSM on a peer unit using the same security domain label that you used on the first unit.
Note: You can initialize the HSM and create the security domain before you license the system and create a traffic management configuration.
-
Log in to the command line of the system using an account with root access.
-
Open the TMOS Shell (
tmsh).tmsh -
Initialize the HSM and set a security officer (SO) password.
run util fips-util -f initImportant: Running this command deletes all keys in the HSM and makes any previously exported keys unusable.
Note: The initialization process takes a few minutes to complete.
The initialization process begins. When prompted, type an SO password.
Note: F5 recommends that you choose a strong value for the SO password. You cannot use the keyword
defaultas the SO password.WARNING: This erases all keys from the FIPS 140 device. Any configuration objects dependent on FIPS keys will cause the configuration fail to load. ==================== WARNING ================================ The FIPS device will be reset to factory default state. All keys and user identities currently stored in the device will be erased. Any configuration objects dependent on FIPS keys will cause the configuration fail to load. Press <ENTER> to continue or Ctrl-C to cancel Resetting the device ... The FIPS device is now in factory default state. Enter new Security Officer password (min. 7, max. 14 characters): Re-enter Security Officer password: -
When this message displays, type a security domain label.
NOTE: security domain label must be identical on peer
FIPS devices in order to be able to synchronize with them.
Enter security domain label (max. 50 chars, default: F5FIPS):
Be sure to keep the security domain label and password in a secure location. You need the domain label and password when you initialize the HSM on a peer unit. You can use the same password or choose a new one. This information is also required when replacing a unit (for RMA or other reasons). Since keys are synchronized from the working unit to a new unit, the domain label and password are required.
Initializing new security domain (F5FIPS)... Creating crypto user and crypto officer identities Waiting for the device to re-initialize ... Creating key encryption key (KEK) The FIPS device has been initialized. -
Enable the HSM device using one of these options:
-
Reboot the unit.
-
Restart all services:
restart sys service all.Note: Restarting services disrupts load-balanced traffic and might terminate remote login sessions to the system.
-
After you complete the initialization process on the first unit, you can initialize a peer system and add it to the security domain of the first unit. You must use the same security domain label that you used on the first unit.
You must initialize the hardware security module (HSM) installed in each unit before you can use it. When you are creating a device group using more than one FIPS platform, you initialize the HSM on one unit, and then initialize the HSM on a peer unit using the same security domain label that you used on the first unit. You can choose to use a different password on the peer unit.
Note: You can initialize the HSM and create the security domain, before you license the system and create a traffic management configuration.
-
Log in to the command line of the system using an account with root access.
-
Open the TMOS Shell (
tmsh).tmsh -
Initialize the HSM and set a security officer (SO) password.
run util fips-util initImportant: Running this command deletes all keys in the HSM and makes any previously exported keys unusable.
Note: The initialization process takes a few minutes to complete.
The initialization process begins. When prompted, type an SO password. You cannot use the keyword
defaultas the SO password.Note: F5 recommends that you choose a strong value for the SO password.
Warning: If this text displays in the message below, you need to first delete all keys from the device before running the command:
There are keys stored in the FIPS device Delete all keys from the device before re-initializing it. You can use the -f option to force initialization, which deletes all user-generated keys (util fips-util -f init).WARNING: This erases all keys from the FIPS 140 device. Any configuration objects dependent on FIPS keys will cause the configuration fail to load. ==================== WARNING ================================ The FIPS device will be reset to factory default state. All keys and user identities currently stored in the device will be erased. Any configuration objects dependent on FIPS keys will cause the configuration fail to load. Press <ENTER> to continue or Ctrl-C to cancel Resetting the device ... The FIPS device is now in factory default state. Enter new Security Officer password (min. 7, max. 14 characters): Re-enter Security Officer password: -
When this message displays, type a security domain label.
NOTE: security domain label must be identical on peer
FIPS devices in order to be able to synchronize with them.
Enter security domain label (max. 50 chars, default: F5FIPS):
Be sure to keep the security domain label and password in a secure location. You need the domain label and password when you initialize the HSM on a peer unit. You can use the same password or choose a new one. This information is also required when replacing a unit (for RMA or other reasons). Since keys are synchronized from the working unit to a new unit, the domain label and password are required.
Initializing new security domain (F5FIPS)... Creating crypto user and crypto officer identities Waiting for the device to re-initialize ... Creating key encryption key (KEK) The FIPS device has been initialized. -
Enable the HSM device using one of these options:
-
Reboot the unit.
-
Restart all services:
restart sys service all.Note: Restarting services disrupts load-balanced traffic and might terminate remote login sessions to the system.
-
After you complete the initialization process on the first unit, you can initialize a peer system and add it to the security domain of the first unit. You can choose to use the same SO password that you used on the first unit.
You must initialize the hardware security module (HSM) installed in each unit before you can use it. When you are creating a device group using more than one FIPS platform, you initialize the HSM on one unit, and then initialize the HSM on a peer unit using the same security domain label that you used on the first unit. You can choose to use a different password on the peer unit.
Note: You can initialize the HSM and create the security domain, before you license the system and create a traffic management configuration.
-
Log in to the command line of the system using an account with root access.
-
Open the TMOS Shell (
tmsh).tmsh -
Initialize the HSM and set a security officer (SO) password.
run util fips-util initImportant: Running this command deletes all keys in the HSM and makes any previously exported keys unusable.
Note: The initialization process takes a few minutes to complete.
The initialization process begins. When prompted, type an SO password. You cannot use the keyword
defaultas the SO password.Note: F5 recommends that you choose a strong value for the SO password.
Warning: If this text displays in the message below, you need to first delete all keys from the device before running the command:
There are keys stored in the FIPS device Delete all keys from the device before re-initializing it. You can use the -f option to force initialization, which deletes all user-generated keys (util fips-util -f init).WARNING: This erases all keys from the FIPS 140 device. Any configuration objects dependent on FIPS keys will cause the configuration fail to load. ==================== WARNING ================================ The FIPS device will be reset to factory default state. All keys and user identities currently stored in the device will be erased. Any configuration objects dependent on FIPS keys will cause the configuration fail to load. Press <ENTER> to continue or Ctrl-C to cancel Resetting the device ... The FIPS device is now in factory default state. Enter new Security Officer password (min. 7, max. 14 characters): Re-enter Security Officer password: -
When this message displays, type a security domain label.
NOTE: security domain label must be identical on peer
FIPS devices in order to be able to synchronize with them.
Enter security domain label (max. 49 chars, default: F5FIPS):
Be sure to keep the security domain label and password in a secure location. You need the domain label and password when you initialize the HSM on a peer unit. You can use the same password or choose a new one. This information is also required when replacing a unit (for RMA or other reasons). Since keys are synchronized from the working unit to a new unit, the domain label and password are required.
Initializing new security domain (F5FIPS)... Creating crypto user and crypto officer identities Waiting for the device to re-initialize ... Creating key encryption key (KEK) The FIPS device has been initialized. -
Enable the HSM device using one of these options:
-
Reboot the unit.
-
Restart all services:
restart sys service all.Note: Restarting services disrupts load-balanced traffic and might terminate remote login sessions to the system.
-
After you complete the initialization process on the first unit, you can initialize a peer system and add it to the security domain of the first unit. You can choose to use the same SO password that you used on the first unit.
You can use the Traffic Management Shell (tmsh) to view information about the hardware security module (HSM). If you have a 10350v-FIPS platform provisioned for Virtual Clustered Multiprocessing (vCMP), you can also view information about any FIPS partitions on the HSM.
-
Log in to the command line of the system using an account with root access.
-
Open the TMOS Shell (
tmsh).tmsh -
View information about the HSM.
run util fips-util infoDepending on the HSM installed in your system, a summary similar to this example (from a 10350 platform) displays.
Label: F5FIPS Model: NITROX-III CNN35XX-NFBE Serial Number: 3.0G1501-ICM000059 FIPS state: 2 MaxSessionCount: 2048 SessionCount: 13 MaxPinLen: 14 MinPinLen: 7 TotalPublicMemory: 557540 FreePublicMemory: 234552 TotalUserKeys: 10075 AvailableUserKeys: 10075 Logging failures: user: 0 officer: 0 Temperature: 72 C HW version: 0.0 Firmware version: CNN35XX-NFBE-FW-1.0-27 -
View information about FIPS partitions on the HSM.
run util fips-util ptninfo
Before you can synchronize the FIPS hardware security modules (HSMs), you must ensure that the target HSM:
- Is already initialized
- Has an identical security domain name
- Does not contain existing keys
- Is the same hardware model
- Contains the same firmware version
Before you run the fips-card-sync command, ensure that you have this information:
- The SO password for the source F5 device
- The SO password for the target F5 device
- The root password for the target F5 device
The target device must also be reachable using SSH from the source device.
Be sure that you meet all prerequisites before synchronizing the hardware security modules (HSMs) in your devices.
Synchronizing the HSMs enables you to copy keys from one HSM to another. This is also required to synchronize the software configuration in a device group.
Note: You only need to perform the synchronization process during the initial configuration of a pair of devices. After the two devices are in sync, they remain in sync.
-
Log on to the command line of the source F5 device using an account with root access.
-
Open the TMOS Shell (
tmsh).tmsh -
Synchronize the masking from the HSM on the source F5 device to the HSM on the target F5 device, where <hostname> is the IP address or hostname of the target F5 device.
run util fips-card-sync *<hostname>*Note: Be sure to run this command on a device that contains a valid masking key. Otherwise, you might invalidate all keys loaded in the HSM.
Note: A masking key is shared between the HSMs on each F5 device. This shared masking key is used to encrypt the SSL private keys when the keys leave the cryptographic boundary of the HSM.
-
When prompted, type the security officer (SO) password for the local device.
-
When prompted, type the SO password for the remote device or press Enter if the password is the same as for the local device.
A message similar to this example displays:
Connecting to 192.0.2.255 as user root ... -
When prompted, type the root password.
When the synchronization operation completes, a message similar to this example displays:
FIPS devices have been synchronized.
-
-
Synchronize the software configuration in the device group.
Important: You must run
fips-card-syncbefore runningconfig-sync. Otherwise, the FIPS keys will not load on the remote device.run cm config-sync [ to-group | from-group ] <*device-group-name*>
The BIG-IP 10350v-FIPS platform model contains a FIPS-validated hardware security module (HSM) that supports Single Root I/O Virtualization (SR-IOV) mode on Virtual Clustered Multiprocessing (vCMP)-enabled systems.
The benefit of SR-IOV mode is that for a BIG-IP system on a 10350v-FIPS platform provisioned for Virtual Clustered Multiprocessing (vCMP), you can create a virtual HSM (known as a FIPS partition) for each guest on the system. A FIPS partition is a portion of cores and private key slots on the HSM that a host administrator can dedicate to a guest for cryptographic functions.
This illustration shows a BIG-IP system where three guests each have their own FIPS partition for FIPS hardware-based processing.
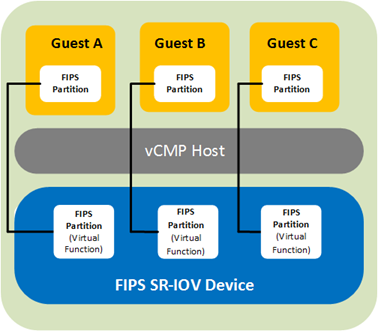
You can create up to 32 FIPS partitions on the HSM, with some number of cores allocated to each partition. The number of cores you allocate to a FIPS partition depends on the processing needs of the guest you assign the partition to. The only limit is that the combined number of cores for all partitions cannot exceed 63, the total number of cores that the HSM supports.
To determine how you want to deploy FIPS partitioning for your vCMP guests, you should:
- Identify the guests that need dedicated cores.
- Decide how many cores and private key slots you want to allocate to each guest’s partition.
For example, to decide how many cores to dedicate to each guest, suppose guests A and B have equal core requirements, but guest C has twice the needs of both A and B. In this case, you could allocate 12 cores each to A and B, and 24 cores to C. This would mean a total core allocation of 48 HSM cores, leaving 15 cores unallocated and available for future guest needs.
Once you have assigned a FIPS partition to a guest, the guest administrator can log in to the guest to create, convert, or import FIPS private SSL keys, which are stored on the HSM. The FIPS partition assigned to the guest dictates the amount of storage available for FIPS keys on the HSM for the guest.
Before vCMP guest administrators can create and manage FIPS keys in their own secure partitions on the FIPS hardware security module (HSM), a host administrator must initialize the FIPS HSM, resize the default partition to free up cores for other FIPS partitions, and create those other partitions on the HSM. As host administrator, you’ll create one unique partition for each guest.
Before you set up FIPS partitions for your Virtual Clustered Multiprocessing (vCMP) guests, confirm that the vCMP host prerequisites have been met, on each device that hosts vCMP guests in your high availability configuration. Confirm all prerequisites by logging into the BIG-IP system using the management IP address of the vCMP host.
Important: Your BIG-IP user account must have a role of Administrator assigned to it.
| Prerequisites | Verification tool | Verification instructions |
|---|---|---|
| The BIG-IP system is provisioned for Virtual Clustered Multiprocessing (vCMP). | BIG-IP Configuration utility | On the Main tab, click System > Resource Provisioning. In the Module column, locate Virtual CMP (vCMP) and then view the Provisioning column. |
| You have created vCMP guests on the system. | BIG-IP Configuration utility | On the Main tab, click vCMP > vCMP Guest List. View the list of vCMP guests. |
You have permission to use the TMOS Shell (tmsh) command-line interface. |
BIG-IP Configuration utility | On the Main tab, click System > Users. Then click your account name and view the Terminal Access list. This setting must be set to either tmsh or Advanced shell. |
| The license type is 10350v-FIPS. | An SSH application such as PuTTY | At the tmsh prompt, type show sys hardware and under Platform, look for a Name property of 10350F. |
| The hardware security module (HSM) is initialized and the security label matches the label on all other devices hosting BIG-IP device group members (that is, vCMP guests). | An SSH application such as PuTTY | At the tmsh prompt, type fips-util -v info. |
| The HSMs on the appliances hosting the vCMP guests in the BIG-IP device group are synchronized. | An SSH application such as PuTTY | At the tmsh prompt, type run util fips-card-sync *hostname*. |
| You know the Security Officer password for managing the FIPS HSM. | Not applicable. | If you do not know the Security Officer password, see your security administrator. |
| The BIG-IP configurations on all members of the BIG-IP device group (that is, vCMP guests) are synchronized. | BIG-IP Configuration utility | On the Main tab, click Device Management > Overview. Then verify that all device group members have a status of In Sync. |
For more information, see BIG-IP Device Service Clustering: Administration at the F5 support site support.f5.com.
After all vCMP guests are deployed with FIPS partitions assigned to them, you might decide later that you need to increase or decrease the number of cores for a specific guest.
When you resize a guest’s partition, you use the TMOS Shell (tmsh) command-line interface, and it’s helpful to understand the output that tmsh displays during the resizing process. For example, suppose you initially resized PARTITION_1 and created three other partitions, with these core allocations:
PARTITION_1: 32 coresPARTITION_2: 8 coresPARTITION_3: 10 coresPARTITION_4: 4 cores
This shows that we have a total of 54 of the 63 cores on the HSM allocated, leaving 9 cores still unallocated.
Now suppose you decide to adjust the number of cores allocated to PARTITION_2, from 8 cores to 6. In this case, you’ll need to use the fips-util ptnresize command within tmsh. For example, if you type:
`tmsh /util fips-util ptnresize`
The system prompts you for a password and the relevant partition name and displays other fields showing their currently-configured values:
Enter Security Officer password: `*SO-password*`
Enter partition name: `PARTITION_2`
Enter max keys (1-82160, current 5000): `4000`
Enter max accel devs (0 to 25, current 8):
In the Enter max accel devs field, the system shows that there are 0 to 25 cores available to PARTITION_2 for resizing, with 8 cores currently allocated. The system calculates this 0 to 25 value using this formula:
(Total cores on the HSM - The sum of cores for the three other partitions) + (cores currently assigned to `PARTITION_2`)which translates to:
63 - (32 + 10 + 4) + 8 = 25
Important: Notice that the displayed number of maximum cores available to PARTITION_2 (25) includes the current allocation of 8 cores.
For Enter mac accel devs, once you specify a new value of 6, the number of unallocated cores on the HSM increases from 9 to 11.
If your BIG-IP system was provisioned for vCMP prior to upgrading to this BIG-IP version, you must enable a BigDB variable, kernel.iommu.
Important: Be sure to do this before you manage the hardware security module (HSM) to create FIPS partitions for vCMP guests.
-
Log in to the command line of the system using an account with root access.
-
Open the TMOS Shell (
tmsh).tmsh -
Enable the kernel.iommu DB variable.
modify /sys db kernel.iommu value enable -
Save your BIG-IP configuration.
save /sys config -
Reboot the system.
sys reboot
Whenever you initialize the FIPS hardware security module (HSM) on a vCMP host, the process creates a FIPS partition named PARTITION_1 that you can assign to one of your vCMP guests. By default, PARTITION_1 contains all available FIPS cores on the HSM (63).
To free up cores for other guests, you’ll need to reduce the number of cores assigned to PARTITION_1. You can then allocate those freed-up cores to other FIPS partitions that you create.
-
Log in to the command line of the system using an account with root access.
-
Open the TMOS Shell (
tmsh).tmsh -
Resize the default partition.
fips-util ptnresize -
Enter the Security Officer password.
-
At the
Partition nameprompt, enter the name of the default partition,PARTITION_1. -
At the
Enter max keysprompt, re-type or change the current value for the maximum number of SSL keys allocated to the default partition. -
At the
Enter max accel devsprompt, reduce the current value of63.The specified value represents the number of cores currently allocated to
PARTITION_1.For example, if you intend to create three guests, and you know that for two of those guests, you’ll want to create
PARTITION_2andPARTITION_3and allocate 20 and 10 cores respectively, change the value forPARTITION_1from 63 to 33.Changing this value frees up the number of cores that you’ll need for the other partitions.
-
Press Enter.
-
Save your BIG-IP configuration.
save /sys config
After you complete this task, the HSM has available cores for you to allocate to other FIPS partitions that you create.
You can create a virtual hardware security module (HSM) for each vCMP guest on the system that processes FIPS-related traffic. After creating FIPS partitions on the HSM, you can provide each guest with its own dedicated FIPS hardware resource to use for cryptographic functions.
Note: You only need to create a FIPS partition for a guest when the guest is processing FIPS-related traffic.
-
Open the TMOS Shell (
tmsh).tmsh -
Create a FIPS partition.
fips-util ptncreateNote: If you receive an error message about acceleration, you’ll need to resize the default FIPS partition before creating FIPS partitions.
The system then prompts you for Security Officer password.
-
Type the Security Officer password.
-
At the Enter partition name prompt, assign a name to the partition, such as
PARTITION_2.Note: Do not assign the name
PARTITION_1. This is the name of the default FIPS partition. -
At the Max key count prompt, type the maximum number of private SSL keys that a guest administrator will be able to store in the guest’s partition.
-
At the Max accel devs prompt, type a value for the number of FIPS hardware cores that you want to allocate to the partition.
-
Press Enter.
-
Save your BIG-IP configuration.
save /sys config -
Repeat for each additional partition that you want to create.
After you complete this task, the HSM has a unique FIPS partition for each guest that you want to assign FIPS hardware SSL resources to. You can then provide a guest with its own dedicated FIPS hardware SSL resource by assigning the FIPS partition to the guest.
Before performing this task, confirm that you are logged in to the BIG-IP Configuration utility as a vCMP host administrator.
Before you assign a FIPS partition to a guest, you must set the guest to the Configured state.
Note: This task is based on the assumption that the guest you want to disable is currently in a Deployed or Provisioned state.
-
On the Main tab, click vCMP > Guest List.
This displays a list of guests on the system.
-
In the Name column, find the name of the guest you want to assign a FIPS partition to, and in the left-most column, select the check box.
-
Click Disable.
The guest state changes to
Configured. -
Repeat this task for each guest to which you plan on assigning a FIPS partition.
After performing this task, the guest can no longer process traffic, and you can now modify the guest to assign a FIPS partition.
Before performing this task, confirm that you are logged into the BIG-IP Configuration utility as a vCMP host administrator.
For BIG-IP systems containing a FIPS hardware security module (HSM) on which you have created FIPS partitions, you can assign a separate FIPS partition to each vCMP guest on the system. This provides each guest with its own virtual FIPS HSM to use for cryptographic functions when processing FIPS-related traffic.
It’s worth noting that in addition to using FIPS partitions for FIPS-related traffic, you can configure the SSL Mode setting for non-FIPS related traffic. This controls the non-FIPS hardware SSL resources on the system.
-
On the Main tab, click vCMP > Guest List.
This displays a list of guests on the system.
-
In the Name column, click the name of the guest that you want to modify.
This displays the configured properties of the guest.
-
From the FIPS Partition list, select a FIPS partition name.
-
From the Requested State list, select Deployed.
-
Click Update.
This action causes the guest to restart.
-
Repeat this task for each guest to which you want to assign a FIPS partition.
After you complete this task, each vCMP guest that you modified has a virtual FIPS HSM assigned to it to use for cryptographic functions.
When the FIPS hardware security module (HSM) in your BIG-IP® system contains FIPS partitions for multi-tenancy, you can display a list of the partitions at any time.
-
Open the TMOS Shell (
tmsh).tmsh -
View a list of partitions.
fips-util ptninfo -
Type the Security Officer password.
The system displays a list of existing FIPS partitions on the HSM.
When the FIPS hardware security module (HSM) in your BIG-IP system contains FIPS partitions for multi-tenancy, you can delete one or more of those partitions from the HSM if for some reason you no longer need them.
-
Open the TMOS Shell (
tmsh).tmsh -
Delete a partition.
fips-util ptndeleteThe system prompts you for the Security Officer password.
-
Type the Security Officer password.
-
At the
Enter partition nameprompt, type the name of the partition you want to delete. -
Press Enter.
-
Save your BIG-IP configuration.
save /sys config
When a vCMP guest has a FIPS partition assigned to it, the guest administrator can store private SSL keys on the FIPS hardware security module (HSM). Specifically, a guest administrator can use the BIG-IP Configuration utility to:
- Create and store FIPS keys in the HSM.
- Import non-FIPS keys (
.expfiles) or FIPS keys to the HSM. Importing FIPS keys requires the BIG-IP system to use the same masking key that was previously used to export the FIPS keys. - Convert non-FIPS keys to FIPS keys, which are then stored in the HSM.
For information about managing your FIPS keys, see the Key Management section of this guide.
Before you log in to a vCMP guest and manage private SSL keys, confirm that you have met these prerequisites:
- You have a user role that allows you to log in to the system as a vCMP guest administrator.
- You have permission to use the
tmshCLI. - You have permission to manage private SSL keys.
For more information, see the BIG-IP Digital Certificates: Administration guide at support.f5.com.
You can use one of two tools to manage keys on your embedded FIPS system: the BIG-IP Configuration utility or the F5 TMOS Shell (tmsh).
You can use the BIG-IP Configuration utility to create FIPS keys, import existing FIPS keys into a hardware security module (HSM), and convert existing keys into FIPS keys.
Existing FIPS keys (.exp files) can only be imported into an HSM that possesses the same masking key used when the FIPS keys were exported. The masking key is used to encrypt SSL private keys as they are exported from an HSM. Therefore, only the same masking key can be used to decrypt the SSL private keys as they are imported into the HSM.
Note: Import of FIPS keys is supported if the F5 system uses the same masking key that was used to export the FIPS keys.
You can use the Configuration utility to create a request for a certificate with FIPS type security from a certificate authority.
-
On the Main tab, click System > Certificate Management > Traffic Certificate Management > SSL Certificate List.
This displays the list of certificates installed on the system.
-
Click Create.
The New SSL Certificate screen opens.
-
In the Name field, type a unique name for the certificate.
-
From the Issuer list, specify the type of certificate that you want to use.
- To request a certificate from a CA, select Certificate Authority.
- For a self-signed certificate, select Self.
-
Configure the Common Name setting and any other settings as needed.
-
From the Security Type list, select FIPS.
-
From the Key Type list, select RSA, DSA, or ECDSA.
-
If you selected ECDSA, then from the Curve list, select an elliptic curve.
Note: The elliptic curve secp521r1 is not supported on the F5 10350v-FIPS hardware platform.
-
Click Finished.
You can use the BIG-IP Configuration utility to import existing keys into the system.
-
On the Main tab, click System > Certificate Management > Traffic Certificate Management > SSL Certificate List.
This displays the list of certificates installed on the system.
-
Click Import.
-
From the Import Type list, select Key.
-
For the Key Name setting, click Create New.
-
In the Key Name field, type a name for the key.
-
From the Key Source setting, click either Upload File or Paste Text.
- If you click Upload File, type a file name or click Browse and select a file.
- If you click Paste Text, copy the text from another source and paste the text into the Key Source screen.
-
Click Import.
After you import the key, you can convert it to a FIPS key.
You can use the BIG-IP Configuration utility to convert an existing key to a FIPS key.
-
On the Main tab, click System > Certificate Management > Traffic Certificate Management > SSL Certificate List.
This displays the list of certificates installed on the system.
-
Click a certificate name.
This displays the properties of that certificate.
-
On the menu bar, click Key.
This displays the type and size of the key associated with the certificate.
-
Click Convert to FIPS to convert the key to a FIPS key.
The key is converted and appears in the list as a FIPS key. After the key is converted, this process cannot be reversed.
You can use the TMOS Shell (tmsh) to create FIPS keys, import existing keys into an F5 system, and convert existing keys to FIPS keys.
You can use the TMOS Shell (tmsh) to create FIPS keys.
-
Log in to the command line of the system using an account with root access.
-
Open the TMOS Shell (
tmsh).tmsh -
Create a basic key.
create sys crypto key <*key-object-name*> security-type fipsFor information about additional options for this command, view the
sys crypto keyman page:help sys crypto keyNote: The key creation process takes a few minutes to complete.
-
View information about the generated key.
list sys crypto key <*key-object-name*>
You can use the TMOS Shell (tmsh) to import existing keys into the system.
-
Log in to the command line of the system using an account with root access.
-
Open the TMOS Shell (
tmsh).tmsh -
Import a key.
install sys crypto key <*key-object-name*> from-local-file <*path-to-key\_file*> security-type fipsThis example imports a FIPS key named
mykeyfrom a local key file stored in the/shared/tmpdirectory:install sys crypto key mykey from-local-file /shared/tmp/mykey.exp security-type fips
You can use the TMOS Shell (tmsh) to convert a key to a FIPS key.
-
Log in to the command line of the system using an account with root access.
-
Open the TMOS Shell (
tmsh).tmsh -
Convert an existing key to FIPS.
install sys crypto key <*key-object-name>* from-local-file <*key-file-path>* security-type fips
You can use the TMOS Shell (tmsh) to list the FIPS keys in the hardware security module (HSM).
-
Log in to the command line of the system using an account with root access.
-
Open the TMOS Shell (
tmsh).tmsh -
List the keys in the HSM.
tmsh show sys crypto fips keyA summary similar to this example displays:
-------------------------------------------
FIPS 140 Hardware Device
-------------------------------------------
=== private keys (2)
ID                                      MOD.LEN(bits)
dd83774207ea554ba1192439de75e1c1        2048
        /Common/testkey1.key
d750c989e6afeb5ac8ca8aec2b93461b        1024
        /Common/testkey2.key
You can use the TMOS Shell (tmsh) to list the FIPS keys in the F5 software configuration.
-
Log in to the command line of the system using an account with root access.
-
Open the TMOS Shell (
tmsh).tmsh -
List the keys in the hardware security module (HSM).
tmsh list sys crypto keyA summary similar to this example displays:
sys crypto key default.key {
    key-size 1024
    key-type rsa-private
    security-type normal
}
sys crypto key testkey2.key {
    key-id d750c989e6afeb5ac8ca8aec2b93461b
    key-size 1024
    key-type rsa-private
    security-type fips
}
sys crypto key testkey1.key {
    key-id dd83774207ea554ba1192439de75e1c1
    key-size 2048
    key-type rsa-private
    security-type fips
}
You can use the TMOS Shell (tmsh) to delete a key from the F5 software configuration and the hardware security module (HSM).
-
Log in to the command line of the system using an account with root access.
-
Open the TMOS Shell (
tmsh).tmsh -
Delete a specified key.
delete sys crypto key <*key-object-name*>
These are the supported key sizes for F5 FIPS platforms.
| FIPS platform | Supported key sizes (bits) |
|---|---|
| 5000 | 1024, 2048, 4096 |
| 7000 | 1024, 2048, 4096 |
| 10200 | 1024, 2048, 4096 |
| 10350 | 2048 |
| i5000 | 2048 |
| i7000 | 2048 |
| i15000 | 2048 |
This table lists additional tmsh commands that you can use to manage your FIPS platform.
| Command | Description |
|---|---|
show sys crypto fips key |
Lists information about FIPS keys stored in the FIPS hardware security module (HSM), including FIPS key ID, length, type, and key objects. |
list sys crypto key |
Lists keys in the F5 software configuration. |
delete sys crypto fips key <*key-id*> |
Deletes a FIPS key from the FIPS HSM only. |
You can use one of these options for recovering your embedded FIPS system.
- Configure an additional unit for recovery
- Save the keys on a disk
- Configure a device group
This table describes configuration options for FIPS system recovery.
|
Option |
Description |
|---|---|
|
Configure a device group |
Configure the F5 devices in a device group with the FIPS HSMs synchronized. In the event of a system failure, the standby unit becomes active and handles incoming traffic. Contact F5 to arrange a Return Material Authorization (RMA) for the failed device and then follow the steps for implementing a replacement unit to recover the failed device. |
|
Configure an additional unit for recovery |
Fully configure a third unit, add it to the security domain, and synchronize the configurations. Remove the unit from the network and store it in a secure location. If the F5 system in production is damaged or destroyed, you can use the backup unit to reconstitute the security domain. |
|
Save the keys on a disk |
Generate the private keys outside of the FIPS HSM. Copy the non-FIPS protected keys to a secure external location as a backup. Then convert the non-FIPS into FIPS keys on the F5 system. The keys on the F5 system are now protected by the FIPS HSM. If there is a catastrophic system failure, use the non-FIPS protected backup keys to repopulate the FIPS HSM. CAUTION: This method for backup is not FIPS-compliant. |
Before you recover hardware security module (HSM) information, ensure that the F5 software is configured and then install your saved UCS file on the new replacement system. For information about backup and recovery of a BIG-IP system UCS file, see BIG-IP System: Essentials at support.f5.com.
If one unit of a device group fails, the failover unit becomes active and maintains the HSM information. After you replace the failed unit in a device group, you need to restore the HSM information on the replacement unit.
-
Connect the currently active unit to the replacement unit.
-
On the replacement unit, initialize the FIPS hardware security module (HSM). For information about performing this initialization, see the appropriate HSM initialization procedure for your platform.
CAUTION:
Be sure to run this FIPS HSM initialization command sequence on the replacement unit. If you run it on the currently active unit, you will lose all of your existing keys.
Note: Be sure to use the same security domain that you specified when you initially set up the currently active unit.
-
On the currently active unit, copy information from the currently active unit to the replacement unit.
fipscardsync peerCAUTION:
Be sure to run this FIPS HSM initialization command from the currently active unit. If you run this command from the replacement unit, you will lose your original FIPS information.
-
On the currently active unit, synchronize the full software configuration to the replacement unit using
tmsh.tmsh run config-sync to-group /Common/<*device-group-name*>Important: Synchronizing the software configuration using this command sequence also synchronizes the keys stored in the HSM.
The replacement unit is now ready to function as the failover unit in a device group.
You must have a backup of your non-FIPS protected keys before you can restore the hardware security module (HSM) information on a standalone replacement device.
After you replace a failed standalone unit, you need to restore the HSM information on the replacement unit.
-
Copy the full software configuration to the replacement unit using
tmsh.tmsh load ucs <*ucs-filename*>Important: Synchronizing the configuration does not synchronize the keys stored in the HSM.
-
On the replacement unit, initialize the FIPS HSM. For information about performing this initialization, see the appropriate HSM initialization procedure for your platform.
-
Log in to the command line of the system using an account with root access.
-
Open the TMOS Shell (
tmsh).tmsh -
Convert an existing key to FIPS.
install sys crypto key <*key-object-name*> from-local-file <*key-file-path*> security-type fipsThis example converts an SSL private key named
mykeyfrom a local key file stored in the/shared/tmpdirectory:install sys crypto key mykey from-local-file /shared/tmp/mykey.key security-type fips
You can use one of these options for troubleshooting your embedded FIPS system.
You can use command line interface (CLI) utilities to troubleshoot common issues with your embedded FIPS device.
- How do I check that my system includes an embedded FIPS device (FIPS card)?
- Log in to the command line interface of your system and type
tmsh show sys hardwareto view details about your platform. If your system includes an embedded FIPS device, it displays as type “crypto” under one of the “Hardware Version Information” sections. This is an example of how the system output might appear when you run this command:Name n3-crypto0 Type crypto Model Cavium NITROX-3 Parameters -- -- version CNN35x-MC-SSL-0022 - How do I see which embedded FIPS device is installed in my system?
- Log in to the CLI of your system and view the model of FIPS device in your platform by typing
fipsdevice.Note: The
fipsdevicecommand is available only on BIG-IP software versions 11.0 and later. - Where does the system log messages from the embedded FIPS device?
- The Cavium device driver provides minimal logging, but you can view any log messages by logging in to the CLI of your system and typing
dmesg | grep -i cavium. - Which directories or files on my system pertain to FIPS?
- /config/ssl/ssl.key
- Contains key files on BIG-IP software versions 9.x and 10.x.
- /config/filestore/files_d/Common_d/certificate_key_d/
- Contains key files on BIG-IP software versions 11.x and later.
- /config/ssl/ssl.crt
- Contains certificate files on BIG-IP software versions 9.x and 10.x.
- /config/filestore/files_d/Common_d/certificate_d
- Contains certificate files on BIG-IP software versions 11.x and later.
- /config/ssl/ssl.cavfips
- Contains encrypted key files (.exp); used in config sync.
- /usr/bin/fipsutil
- Used to configure the embedded FIPS device.
- My alarm LED is blinking red, and I see this warning message on my LCD or in the system event log (SEL):
FIPS initialization error in booted slot asserted. - Clear the alarm using the LCD, then power cycle the system using one of these methods: AOM command menu, LCD display, or externally power cycling the system.