


Updated Date: 07/07/2026
Configuring a Simple Intranet
The simple intranet implementation is commonly found in a corporate intranet (see the following illustration). In this implementation, the BIG-IP system performs load balancing for several different types of connection requests:
- HTTP connections to the company’s intranet web site. The BIG-IP system load balances the two web servers that host the corporate intranet web site,
Corporate.main.net. - HTTP connections to Internet content. These are handled through a pair of cache servers that are also load balanced by the BIG-IP system.
- Non-HTTP connections to the Internet.
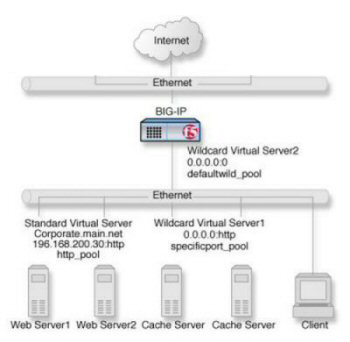
As the illustration shows, the non-intranet connections are handled by wildcard virtual servers; that is, servers with the IP address 0.0.0.0. The wildcard virtual server that is handling traffic to the cache servers is port specific, specifying port 80 for HTTP requests. As a result, all HTTP requests not matching an IP address on the intranet are directed to the cache server. The wildcard virtual server handling non-HTTP requests is a default wildcard server. A default wildcard virtual server is one that uses only port 0. This makes it a catch-all match for outgoing traffic that does not match any standard virtual server or any port-specific wildcard virtual server.
You can create pool of servers that you group together to receive and process traffic, to enable the BIG-IP system to efficiently distribute the load on servers.
-
On the Main tab, click Local Traffic > Pools.
The Pool List screen opens.
-
Click Create.
The New Pool screen opens.
-
In the Name field, type a unique name for the pool.
-
In the Resources area of the screen, use the New Members setting to add the pool members.
For example, the pool members for
http_poolare192.168.100.10:80and192.168.100.11:80. The pool members forspecificport_poolare192.168.100.20:80and192.168.100.21:80. -
Click Finished.
This task creates a destination IP address for application traffic. As part of this task, you must assign the relevant pool to the virtual server.
-
On the Main tab, click Local Traffic > Virtual Servers.
The Virtual Server List screen opens.
-
Click Create.
The New Virtual Server screen opens.
-
In the Name field, type a unique name for the virtual server.
-
For a host, in the Destination Address/Mask field, type an IPv4 or IPv6 address in CIDR format to allow all traffic to be translated.
The supported format is address/prefix, where the prefix length is in bits. For example, an IPv4 address/prefix is
0.0.0.0/0, and an IPv6 address/prefix is::/0. -
In the Service Port field, type
80, or select HTTP from the list. -
In the Configuration area of the screen, locate the Type setting and select either Standard or Forwarding (IP).
-
From the HTTP Profile list, select an HTTP profile.
-
In the Resources area of the screen, from the Default Pool list, select the relevant pool name.
-
Click Finished.
You now have a virtual server to use as a destination address for application traffic.