Updated Date: 07/07/2026
SSL Traffic Management
When you want the BIG-IP system to process application traffic over SSL, you can configure the system to perform the SSL handshake that destination servers normally perform. This ability for the BIG-IP system to offload SSL processing from a destination server is an important feature of the BIG-IP system.
Note: In this release, TLS 1.3 is supported with RFC 8446.
The most common way to configure the BIG-IP system is to create a Client SSL profile, which makes it possible for the BIG-IP system to decrypt client requests before sending them on to a server, and encrypt server responses before sending them back to the client.
Within a Client SSL profile specifically, you can specify multiple certificate/key pairs, one per key type. This enables the system to accept all types of cipher suites that a client might support as part of creating a secure connection. The system then decrypts the client data, manipulates any headers or payload according to the way that you configured the Client SSL profile, and by default, sends the request in clear text to the target server for processing.
For those sites that require enhanced security on their internal network, you can configure a Server SSL profile. With a Server SSL profile, the BIG-IP system re-encrypts the request before sending it to the destination server. When the server returns an encrypted response, the BIG-IP system decrypts and then re-encrypts the response, before sending the response back to the client.
You can manage the way that the BIG-IP system processes SSL application traffic by configuring two types of SSL profiles: A Client SSL profile, a Server SSL profile, or both. These profiles affect the way that the system manages SSL traffic passing through the system.
When you configure Client SSL or Server SSL profiles and assign them to a virtual server, the BIG-IP system offloads SSL processing from the destination server. This offloading not only conserves resource on destination servers, but enables the BIG-IP system to customize SSL traffic processing according to your configuration specifications.
You create a custom Client SSL profile when you want the BIG-IP system to terminate client-side SSL traffic for the purpose of decrypting client-side ingress traffic and encrypting client-side egress traffic. By terminating client-side SSL traffic, the BIG-IP system offloads these decryption/encryption functions from the destination server. When you perform this task, you can specify multiple certificate key chains, one for each key type (RSA, DSA, and ECDSA). This allows the BIG-IP system to negotiate secure client connections using different cipher suites based on the client’s preference.
Note: At a minimum, you must specify a certificate key chain that includes an RSA key pair. Specifying certificate key chains for DSA and ECDSA key pairs is optional, although highly recommended.
-
On the Main tab, click Local Traffic > Profiles > SSL > Client.
The Client SSL profile list screen opens.
-
Click Create.
The New Client SSL Profile screen opens.
-
In the Name field, type a unique name for the profile.
-
From the Parent Profile list, select clientssl.
-
Select the Custom check box.
The settings become available for change.
-
From the Configuration list, select Advanced.
-
For the Mode setting, select the Enabled check box.
-
For the Certificate Key Chain setting, click Add.
-
From the Certificate list, select a certificate name.
This is the name of a certificate that you installed on the BIG-IP system. If you have not generated a certificate request nor installed a certificate on the BIG-IP system, and the BIG-IP system is not part of a device service clustering (DSC) configuration, you can specify the name of the existing certificate named
default.Important: If the BIG-IP system is part of a DSC Sync-Failover group, always select a non-default certificate name, and ensure that this same certificate name is specified in every instance of this SSL profile in the device group. Taking these actions helps to ensure that SSL handshakes are successful after a failover event.
-
From the Key list, select the name of the key associated with the certificate specified in the previous step.
This is the name of a key that you installed on the BIG-IP system. If you have not installed a key on the BIG-IP system, and the BIG-IP system is not part of a device service clustering (DSC) configuration, you can specify the name of the existing key named
default.Important: If the BIG-IP system is part of a DSC Sync-Failover group, always select a non-default key name, and ensure that this same key name is specified in every instance of this SSL profile in the device group. Taking these actions helps to ensure that SSL handshakes are successful after a failover event.
-
From the Chain list, select the chain that you want to include in the certificate key chain.
A certificate chain can contain either a series of public key certificates in Privacy Enhanced Mail (PEM) format or a series of one or more PEM files. A certificate chain can contain certificates for Intermediate certificate Authorities (CAs).
Note: The default self-signed certificate and the default CA bundle certificate are not appropriate for use as a certificate chain.
-
For the Passphrase field, type a string that enables access to SSL certificate/key pairs that are stored on the BIG-IP system with password protection.
This setting is optional. For added security, the BIG-IP system automatically encrypts the pass phrase itself. This pass phrase encryption process is invisible to BIG-IP system administrative users.
-
Click Add.
-
-
In the Certificate Key Chain setting, click Add again, and repeat the process for all certificate key chains that you want to specify.
At a minimum, you must specify an RSA certificate key chain.
The result is that all specified key chains appear in the text box.
-
The OCSP Stapling setting allows you to select an SSL Online Certificate Status Protocol (OCSP) stapling profile which contains various OCSP stapling parameters. By default this setting is disabled. To enable OCSP stapling, select theOCSP Stapling check box.
To enable OCSP stapling, you must first create an OCSP Stapling profile. See Creating an OCSP stapling profile for detailed steps.
-
If you want to Notify Certificate Status to Virtual Server, select the check box.
Note: This setting is used to communicate SSL certificate revocation status to the virtual server. This is typically implemented in conjunction with an OCSP stapling configuration.
-
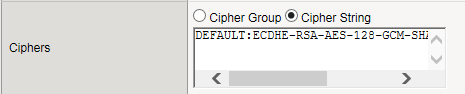
The Ciphers setting is optional. By default, the Client SSL profile uses the DEFAULT cipher string. In most cases, the DEFAULT cipher string is appropriate, but you can customize it as necessary to meet the security and performance needs of your site. Specify a cipher group or cipher string by choosing one of these options.
Note: If you specified an ECDSA certificate key chain in the Certificate Key Chain setting, you must include the cipher string
ECDHE_ECDSAin the cipher group or cipher string that you specify in the Ciphers setting. (At a minimum, you should specify a cipher group or string such asDEFAULT:ECDHE_ECDSA.) This is necessary to ensure successful cipher negotiation when the BIG-IP system is offered an ECDSA-based certificate only.
|
Option |
Description |
|---|---|
|
Cipher Group |
Select an existing cipher group from the list when you want to use a system-defined or custom cipher group to define the ciphers that the BIG-IP system uses for negotiating SSL connections. Here’s an example of the 
|
|
Cipher String |
Type a cipher string in the box if you want to manually specify a cipher string instead of selecting a cipher group. For security and performance reasons, consider following these recommendations:
|
-
When enabled, the Options setting, references the Options List setting, which are industry standard SSL options and workarounds use for handling SSL processing. The default setting is All Options Disabled. By default, TLSv1.3 is disabled in this configuration.
-
The Options List setting provides selection from a set of industry standard SSL options and workarounds for handling SSL processing.
-
The Data 0-RTT setting when Enabled, specifies that you can initiate a server connection for early data so to receive the benefits of early data delivered to the server-side early. The default value is Disabled.
-
When the Proxy SSL setting is enabled, the client can directly authenticate with the server, and the server can authenticate with the client, based on the client certificate presented. In a typical setup, with the BIG-IP system in the middle, the client and server cannot communicate directly to authenticate each other. The Proxy SSL setting requires both a Client SSL profile and a Server SSL profile, and you must enable the setting in both profiles. For information about the Proxy SSL setting, refer to the following resources:
-
The Implementing Proxy SSL on a Single BIG-IP system chapter in this guide.
-
The Proxy SSL Passthrough setting allows Proxy SSL to pass traffic when the cipher suite negotiated between client and server is not supported. Disabled by default. If you enable it, you should enable this setting on the server SSL profile as well.
-
The ModSSL Methods setting enables or disables ModSSL method emulation. Disabled (cleared) by default. Enable this setting when OpenSSL methods are inadequate. For example, enable it when you want to use SSL compression over TLSv1. When you enable this setting, you can then write an iRule, using the
HTTP::header insert_modssl_fieldscommand, which inserts some of the ModSSL options as headers into HTTP requests. See ModSSL options for use with iRules section of the Additional SSL Profile Configuration Options chapter in this guide. -
The Cache Size setting specifies the maximum number of SSL sessions allowed in the SSL session cache. The default value for Cache Size is 262144 sessions. A value of
0disallows session caching. -
The Cache Timeout setting specifies the number of seconds that the system allows SSL sessions to remain in the SSL session cache before removing them. The default value for Cache Timeout is 3600 seconds. The range of values configurable for Cache Timeout is between 0 and 86400 seconds inclusive.
Note: Longer cache timeout periods can increase the risk of SSL session hijacking.
-
The Alert Timeout setting specifies the duration that the system tries to close an SSL connection by transmitting an alert or initiating an unclean shutdown before resetting the connection. Select Indefinite to specify that the connection should not be reset after transmitting an alert or initiating an unclean shutdown. The BIG-IP system sends an RST once the Alert Timeout value has been reached, forcefully aborting the connection early and reducing the amount of data transferred between the peer system and the BIG-IP system. The Immediate value makes the BIG-IP system reset both client and server side flows after 1/1000 seconds.
-
The Handshake Timeout setting specifies the number of seconds that the system tries to establish an SSL connection before terminating the operation. Selecting Indefinite specifies that the system continues trying to establish a connection for an unlimited time.
-
Configure the Renegotiation setting to control if the virtual server allows midstream session renegotiation. When enabled (default), Renegotiation allows the BIG-IP system to process midstream SSL renegotiation requests. When disabled, the system either terminates the connection or ignores the request, depending on system configuration. See Additional SSL Profile Configuration Options chapter in this guide for more details.
-
The Renegotiation Period setting indicates the amount of time before the system renegotiates the SSL session after the initial connection. If you set it to Indefinite (default), the system does not renegotiate the SSL session.
-
The Renegotiation Size setting indicates the amount of application data in megabytes the system must receive from the time of initial connection before it renegotiates the SSL session. If set to Indefinite (default), the system does not renegotiate the SSL session.
-
The Renogotiate Max Record Delay setting indicates the number of SSL records allowed during the SSL renegotiation before the system terminates the connection. If set to Indefinite, the system allows an unlimited number.
-
The Secure Renegotiation setting specifies the method of secure renegotiation for SSL connections. The default value for the Client SSL profile is Require. The values for the Secure Renegotiation setting in the Client SSL profile are as follows:
-
Request: Specifies that the system requests secure renegotiation of SSL connections.
-
Require: Specifies that the system requires secure renegotiation of SSL connections. In this mode, the system permits initial SSL handshakes from clients but terminates renegotiations from clients that do not support secure renegotiation.
-
Require Strict: Specifies that the system requires strict, secure renegotiation of SSL connections. In this mode, the system denies initial SSL handshakes from clients that do not support secure renegotiation.
-
-
The Max Renegotiation setting specifies the maximum number of SSL renegotiation attempts per connection that the system can receive in one minute before renegotiating an SSL session. For example, one client with three connections may have a maximum number of SSL renegotiation attempts equal to three times the configured Max Renegotiation value. After the system receives this number of SSL renegotiation records, it closes the connection. This setting applies to client profiles only. The default value is 5.
-
The Max Aggregate Renegotiation setting specifies the maximum number of aggregated SSL renegotiation records that the system can receive before renegotiating an SSL session. After the system receives this number of aggregated SSL renegotiation records, it closes the connection. This setting applies to client profiles only. The default value is Indefinite.
-
The Server Name setting specifies the fully qualified DNS hostname of the server, or a wildcard string containing the asterisk (*) character to match multiple names, used in the TLS SNI connection. There is no default value for this setting. For information about configuring the TLS SNI feature on the BIG-IP system, see K13452: Configuring a virtual server to serve multiple HTTPS sites using TLS Server Name Indication feature.
-
When enabled, the Default SSL Profile for SNI setting indicates that the system should use the profile as the default SSL profile when there is no match to the server name or when the client does not support TLS SNI extension. This setting is disabled by default. For information about configuring the TLS SNI feature on the BIG-IP system, see K13452: Configuring a virtual server to serve multiple HTTPS sites using TLS Server Name Indication feature.
-
When enabled, the Require Peer SNI Support setting requires that the client support the TLS SNI extension; otherwise, the BIG-IP system disconnects the client connection with a fatal alert. This setting is disabled by default.
-
The Unclean Shutdown setting allows the BIG-IP system to perform an unclean shutdown of SSL connections by closing the underlying TCP connection without sending the SSL close notify alerts. By default, this setting is enabled (selected) and is useful for certain browsers that handle SSL shutdown alerts differently. For example, some versions of Internet Explorer require SSL shutdown alerts from the server while other versions do not, and the SSL profile cannot always detect this requirement. In the case where the browser expects a shutdown alert but the SSL profile has not exchanged one (the default setting), the browser displays an error message.
-
The Strict Resume setting enables or disables the resumption of SSL sessions after an unclean shutdown.
-
The BIG-IP SSL profiles support the stateless TLS session resumption mechanism as described in Internet Engineering Task Force (RFC 5077) . This mechanism allows the BIG-IP system to encapsulate the TLS session state as a ticket to the client and allows the client to subsequently resume a TLS session using the same ticket. Disabled (cleared) by default.
-
The Session Ticket Timeout setting specifies the timeout for the session ticket. The default is 0 seconds, which means the system uses the cache timeout.
-
The Session Mirroring setting enables or disables the mirroring of SSL session ID data to a high-availability peer. The default setting is Disabled, preventing the system from mirroring SSL session ID data.
-
When enabled (default), the Generic Alert setting causes the system to send all SSL alerts using a generic handshake failure message. When the setting is disabled, the system sends more specific SSL alert messages.
-
The Non SSL Connections setting enables or disables acceptance of non-SSL connections.
-
The Allow Dynamic Record Sizing setting allows a TLS performance improvement preventing buffering and delay of TLS record fragment delivery. The BIG-IP system dynamically adjusts the size of TLS records based on the state of the connection. The disabled by default.
-
The Maximum Record Size setting specifies the profile’s maximum record size. Set to enabled when you want to allow dynamic record sizing. The range is 128 - 16384. The default setting is 16384.
-
The SSL Sign Hash setting specifies the hash algorithm that the BIG-IP system uses to sign server key exchanges with the Diffie-Hellman (DHE), including Elliptic Curve (ECDHE) ciphers, and for certificate verify messages. Possible choices are SHA1, SHA256, SHA384, or Any. When you select Any, you authorize the system to choose any one of the hash algorithms. The BIG-IP system respects the client signature_algorithms extension as defined in TLS 1.2. When possible, the BIG-IP system prefers SHA256 in the handshake signature based on the content of the signature_algorithms extension. The BIG-IP system further upgrades the hash algorithm to Hash SHA384 from SHA256 when P-384 is used. The BIG-IP system attempts to avoid the use of SHA1 in a TLS handshake, except in the case when signatures are used in X.509 certificates (these signatures are created by the X.509 Certificate Authority). The only time the BIG-IP system uses the SHA1 handshake signature is when an RSA key is used and the signature_algorithms extension is missing or - signature_algorithms is present and only lists SHA1.
-
The Peer No-renegotiate Timeout setting specifies the number of seconds the system waits before resetting the connection to peer systems that do not renegotiate SSL sessions. The default is 10.
-
The Max Active Handshakes setting limits the number of concurrent SSL handshakes. When the number of active SSL handshakes reaches the specified limit, the system terminates the most recent SSL handshake. The default setting is Indefinite, which means that there is no limit.
-
For information about using the SSL Forward Proxy feature, refer to the Implementing SSL Forward Proxy on a Single BIG-IP system chapter of the SSL Administration guide.
-
In the Client Authentication section, the Client Certificate setting enables and disables client certificate authentication. The possible options for this setting are:
-
Ignore: The Ignore setting is the default setting. It disables Client Certificate Authentication. The BIG-IP system ignores any certificate presented and does not authenticate the client before establishing the SSL session.
-
Request: The Request setting enables optional Client Certificate Authentication. The BIG-IP system requests a client certificate and attempts to verify it. However, an SSL session is established regardless of whether a trusted CA presents a valid client certificate. The Request setting is often used in conjunction with iRules to provide selective access depending on the certificate presented. For example, this option is useful if you want to allow clients who present a certificate from the configured trusted CA to gain access to the application, while redirecting clients who do not provide the required certificate to a page that details the access requirements. However, if you are not using iRules to enforce a different outcome, depending on the certificate details, there is no functional benefit to using the Request setting instead of the default Ignore setting.
-
Require: The Require setting enforces Client Certificate Authentication. The BIG-IP system requests a client certificate and attempts to verify it. The system establishes an SSL session only if a trusted CA presents a valid client certificate. Use the Require setting to restrict access to only clients that present a valid certificate from a trusted CA.
-
-
The Frequency setting specifies the frequency of client authentication for an SSL session. The default value for this setting is once.
-
The Retain Certificate is enabled by default. When this setting is disabled, the client certificate is not stored in an SSL session.
-
The Certificate Chain Traversal Depth setting specifies the maximum number of certificates to be traversed in a client certificate chain. The default value is 9.
-
The Trusted Certificate Authorities setting specifies a client CA that the system trusts. The default is None.
-
None: Specifies that no CA is trusted for client-side processing.
-
ca-bundle: Uses the ca-bundle.crt file, which contains all well-known public certificate authority (CA) certificates, for client-side processing.
-
default: Specifies that the trusted CA for client-side processing is the default certificate on the system.
-
-
The Advertised Certificate Authorities setting specifies that the CAs that the system advertises to clients is being trusted by the profile. The default is None.
-
None: Specifies that the system does not advertise any chain as being trusted.
-
ca-bundle: Uses the ca-bundle.crt file, which contains all well-known public certificate authority (CA) certificates, for client-side processing.
-
default: Specifies that the name of the certificate on the system is the default certificate name, which the system advertises as trusted.
-
-
The CRL File setting allows you to specify a CRL that the BIG-IP system should use to check revocation status of a certificate prior to authenticating a client. If you want to use a CRL, you must import it to the BIG-IP system.
-
The Allow Expired CRL File setting instructs the system to use the specified CRL file, even if it has expired. Disabled by default.
-
The Client Certificate Constrained Delegation setting enables or disables the C3D feature. Using constrained delegation prevents users from having to provide credentials twice for certain authentication actions. For more information on this setting, refer to K72668381: Overview of the SSL Client Certificate Constrained Delegation feature article.
-
The Client Fallback Certificate setting specifies the client SSL profile name of the certificate file that is used as the client certificate when the client does not send one during SSL handshake. You can click the + icon to open the create-new OCSP object screen.
-
The OCSP setting specifies the SSL client certificate constrained delegation OCSP object that the BIG-IP system’s SSL should use to connect to the OCSP responder and check the client certificate status. You can click the + icon to open the create-new SSL Certifcate screen.
-
The Unknown OCSP Response Control setting specifies the action the system takes when the OCSP object returns an unknown status. The default value is Drop, which causes the connection to be dropped. Selecting Ignore causes the connection to ignore the unknown status and continue.
-
In the Logging section, the Log Publisher setting specifies the defined Log Publisher for the system to use for logging information.
-
Click Finished.
After performing this task, you can see the custom Client SSL profile in the list of Client SSL profiles on the system.
To use this profile, you must assign it to a virtual server. See Assigning SSL profiles to a virtual server for detailed information.
With a Server SSL profile, the BIG-IP system can perform decryption and encryption for server-side SSL traffic.
-
On the Main tab, click Local Traffic > Profiles > SSL > Server.
The Server SSL profile list screen opens.
-
Click Create.
The New Server SSL Profile screen opens.
-
In the Name field, type a unique name for the profile.
-
From the Parent Profile list, select serverssl.
-
From the Configuration list, select Advanced.
-
Select the Custom check box.
The settings become available for change.
-
From the Certificate list, select the name of an SSL certificate on the BIG-IP system.
Important: If the BIG-IP system is part of a DSC Sync-Failover group, always select a non-default certificate name, and ensure that this same certificate name is specified in every instance of this SSL profile in the device group. Taking these actions helps to ensure that SSL handshakes are successful after a failover event.
-
From the Key list, select the name of an SSL key on the BIG-IP system.
Important: If the BIG-IP system is part of a DSC Sync-Failover group, always select a non-default key name, and ensure that this same key name is specified in every instance of this SSL profile in the device group. Taking these actions helps to ensure that SSL handshakes are successful after a failover event.
-
In the Pass Phrase field, type a pass phrase that enables access to the certificate/key pair on the BIG-IP system.
-
From the Chain list, select the name of an SSL chain on the BIG-IP system.
-
The SSL Forward Proxy setting when Enabled, specifies that the system encrypts all traffic between a client and the BIG-IP system using one certificate, and encrypts all traffic between the BIG-IP system and the server using a different certificate. You must create both a Client SSL and a Server SSL profile, and enable SSL Forward Proxy and SSL Forward Proxy Bypass in both profiles.
-
The SSL Forward Proxy Bypass setting when Enabled, specifies that SSL traffic that meets the criteria specified in the SSL Forward Proxy Bypass settings of the assigned Client SSL profile of the virtual server can bypass SSL forward proxy.
-
The Bypass on Handshake Alert setting enables or disables SSL forward proxy bypass on receiving a handshake_failure, protocol_version, or unsupported_extension alert message during the server-side SSL handshake. When this occurs, SSL traffic bypasses the BIG-IP system untouched, without decryption/encryption. The default is Disabled.
-
The Bypass on Client Cert Failure setting enables or disables SSL forward proxy bypass on failing to get client certificate that the server asks for. When this occurs, SSL traffic bypasses the BIG-IP system untouched, without decryption/encryption. The default is Disabled.
-
The Verified Handshake setting when Enabled, specifies that in SSL forward proxy mode, the system should always do a TLS handshake with the server first before doing the client handshake. When Disabled, the system performs the server handshake first only if it has not previously forged and cached the server certificate; once the server certificate is ready, the system always perform a handshake first with the client. The default value is Disabled.
-
The Ciphers setting is optional. By default, the Client SSL profile uses the DEFAULT cipher string. In most cases, the DEFAULT cipher string is appropriate, but you can customize it as necessary to meet the security and performance needs of your site. Specify a cipher group or cipher string by choosing one of these options.
Note: If you specified an ECDSA certificate key chain in the Certificate Key Chain setting, you must include the cipher string
ECDHE_ECDSAin the cipher group or cipher string that you specify in the Ciphers setting. (At a minimum, you should specify a cipher group or string such asDEFAULT:ECDHE_ECDSA.) This is necessary to ensure successful cipher negotiation when the BIG-IP system is offered an ECDSA-based certificate only.
|
Option |
Description |
|---|---|
|
Cipher Group |
Select an existing cipher group from the list when you want to use a system-defined or custom cipher group to define the ciphers that the BIG-IP system uses for negotiating SSL connections. Here’s an example of the
|
|
Cipher String |
Type a cipher string in the box if you want to manually specify a cipher string instead of selecting a cipher group. For security and performance reasons, consider following these recommendations:
|
-
When enabled, (Options List) references the Options List setting, which are industry standard SSL options and workarounds for handling SSL processing. The default setting is All Options Disabled.
-
The Options List setting provides selection from a set of industry standard SSL options and workarounds for handling SSL processing.
-
The Data 0-RTT setting when Enabled, specifies that you can initiate a server connection for early data so to receive the benefits of early data delivered to the server-side early. The default value is Disabled.
-
When the Proxy SSL setting is enabled, the client can directly authenticate with the server, and the server can authenticate with the client, based on the client certificate presented. In a typical setup, with the BIG-IP system in the middle, the client and server cannot communicate directly to authenticate each other. The Proxy SSL setting requires both a Client SSL profile and a Server SSL profile, and you must enable the setting in both profiles. For information about the Proxy SSL setting, refer to the following resources:
-
The Implementing Proxy SSL on a Single BIG-IP system chapter in this guide.
-
The Proxy SSL Passthrough setting allows Proxy SSL to pass traffic when the cipher suite negotiated between client and server is not supported. Disabled by default. If you enable it, you should enable this setting on the server SSL profile as well.
-
The ModSSL Methods setting enables or disables ModSSL method emulation. Disabled (cleared) by default. Enable this setting when OpenSSL methods are inadequate. For example, enable it when you want to use SSL compression over TLSv1. When you enable this setting, you can then write an iRule, using the
HTTP::header insert_modssl_fieldscommand, which inserts some of the ModSSL options as headers into HTTP requests. See ModSSL options for use with iRules section of the Additional SSL Profile Configuration Options chapter in this guide. -
The Cache Size setting specifies the maximum number of SSL sessions allowed in the SSL session cache. The default value for Cache Size is 262144 sessions. A value of
0disallows session caching. -
The Cache Timeout setting specifies the number of seconds that the system allows SSL sessions to remain in the SSL session cache before removing them. The default value for Cache Timeout is 3600 seconds. The range of values configurable for Cache Timeout is between 0 and 86400 seconds inclusive.
Note: Longer cache timeout periods can increase the risk of SSL session hijacking.
-
The Alert Timeout setting specifies the duration in time for the system to try to close an SSL connection before resetting the connection. The default is Indefinite.
-
Specify: Specifies the number of seconds for the system to wait before resetting the connection.
-
Indefinite: Specifies that the connection does not time out.
-
Immediate: Specifies that the connection times out immediately.
-
-
The Handshake Timeout setting specifies the number of seconds that the system tries to establish an SSL connection before terminating the operation. Selecting Indefinite specifies that the system continues trying to establish a connection for an unlimited time.
-
Configure the Renegotiation setting to control if the virtual server allows midstream session renegotiation. When enabled (default), Renegotiation allows the BIG-IP system to process midstream SSL renegotiation requests. When disabled, the system either terminates the connection or ignores the request, depending on system configuration. See Additional SSL Profile Configuration Options chapter in this guide for more details.
-
The Renegotiation Period setting indicates the amount of time before the system renegotiates the SSL session after the initial connection. If you set it to Indefinite (default), the system does not renegotiate the SSL session.
-
The Renegotiation Size setting indicates the amount of application data in megabytes the system must receive from the time of initial connection before it renegotiates the SSL session. If set to Indefinite (default), the system does not renegotiate the SSL session.
-
The Secure Renegotiation setting specifies the method of secure renegotiation for SSL connections. The default value for the Client SSL profile is Require. The values for the Secure Renegotiation setting in the Client SSL profile are as follows:
-
Request: Specifies that the system requests secure renegotiation of SSL connections.
-
Require: Specifies that the system requires secure renegotiation of SSL connections. In this mode, the system permits initial SSL handshakes from clients but terminates renegotiations from clients that do not support secure renegotiation.
-
Require Strict: Specifies that the system requires strict, secure renegotiation of SSL connections. In this mode, the system denies initial SSL handshakes from clients that do not support secure renegotiation.
-
-
The Server Name setting specifies the fully qualified DNS hostname of the server, or a wildcard string containing the asterisk (*) character to match multiple names, used in the TLS SNI connection. There is no default value for this setting. For information about configuring the TLS SNI feature on the BIG-IP system, see K13452: Configuring a virtual server to serve multiple HTTPS sites using TLS Server Name Indication feature.
-
When enabled, the Default SSL Profile for SNI setting indicates that the system should use the profile as the default SSL profile when there is no match to the server name or when the client does not support TLS SNI extension. This setting is disabled by default. For information about configuring the TLS SNI feature on the BIG-IP system, see K13452: Configuring a virtual server to serve multiple HTTPS sites using TLS Server Name Indication feature.
-
When enabled, the Require Peer SNI Support setting requires that the client support the TLS SNI extension; otherwise, the BIG-IP system disconnects the client connection with a fatal alert. This setting is disabled by default.
-
The Unclean Shutdown setting allows the BIG-IP system to perform an unclean shutdown of SSL connections by closing the underlying TCP connection without sending the SSL close notify alerts. By default, this setting is enabled (selected) and is useful for certain browsers that handle SSL shutdown alerts differently. For example, some versions of Internet Explorer require SSL shutdown alerts from the server while other versions do not, and the SSL profile cannot always detect this requirement. In the case where the browser expects a shutdown alert but the SSL profile has not exchanged one (the default setting), the browser displays an error message.
-
The Strict Resume setting enables or disables the resumption of SSL sessions after an unclean shutdown.
-
The BIG-IP SSL profiles support the stateless TLS session resumption mechanism as described in Internet Engineering Task Force (RFC 5077) . This mechanism allows the BIG-IP system to encapsulate the TLS session state as a ticket to the client and allows the client to subsequently resume a TLS session using the same ticket. Disabled (cleared) by default.
-
The Session Mirroring setting enables or disables the mirroring of SSL session ID data to a high-availability peer. The default setting is Disabled, preventing the system from mirroring SSL session ID data.
-
When enabled (default), the Generic Alert setting causes the system to send all SSL alerts using a generic handshake failure message. When the setting is disabled, the system sends more specific SSL alert messages.
-
The SSL Sign Hash setting specifies the hash algorithm that the BIG-IP system uses to sign server key exchanges with the Diffie-Hellman (DHE), including Elliptic Curve (ECDHE) ciphers, and for certificate verify messages. Possible choices are SHA1, SHA256, SHA384, or Any. When you select Any, you authorize the system to choose any one of the hash algorithms. The BIG-IP system respects the client signature_algorithms extension as defined in TLS 1.2. When possible, the BIG-IP system prefers SHA256 in the handshake signature based on the content of the signature_algorithms extension. The BIG-IP system further upgrades the hash algorithm to Hash SHA384 from SHA256 when P-384 is used. The BIG-IP system attempts to avoid the use of SHA1 in a TLS handshake, except in the case when signatures are used in X.509 certificates (these signatures are created by the X.509 Certificate Authority). The only time the BIG-IP system uses the SHA1 handshake signature is when an RSA key is used and the signature_algorithms extension is missing or - signature_algorithms is present and only lists SHA1.
-
The Max Active Handshakes setting limits the number of concurrent SSL handshakes. When the number of active SSL handshakes reaches the specified limit, the system terminates the most recent SSL handshake. The default setting is Indefinite, which means that there is no limit.
-
In the Server Authentication section, the Server Certificate specifies how the system handles server certificates. The possible options for this setting are:
-
Ignore: The Ignore setting is the default setting. The BIG-IP system ignores certificates from the server and never authenticate the server.
-
Require: The Require setting enforces server authentication. The BIG-IP system requires the server to present a valid certificate before establishing the SSL session. A blank Authenticate Name setting indicates that all servers are authenticated, even though you have specified Require as the Server Certificate setting.
-
-
The Expire Certificate Response Control setting specifies how the system handles SSL connections when the server certificate expires. The default value for this setting is drop, which causes the SSL connection to be dropped. Conversely, configuring this setting to ignore causes the system to ignore the expired server certificate and proceed with establishing the connection.
-
The Untrusted Certificate Response Control setting specifies how the system handles SSL connections when the server certificate has an untrusted CA. The default value for this setting is drop, which causes the SSL connection to be dropped. Conversely, configuring this setting to ignore causes the system to ignore the untrusted CA and proceed with establishing the connection.
-
The Revoke Certificate Status Response Control setting takes effect when the Server Certificate setting is set to require. This setting specifies how the system handles SSL connections from clients when the server certificate status is revoked. The default value for this setting is drop. However in BIG-IP 16.1.0, the default value is ignore if the server SSL profile is enabled with ssl-forward-proxy; this is due to ID 911777. When the value is drop, the system drops SSL connections from clients when the server certificate status is revoked. When the value is ignore, the system ignores the revoked server certificate status and allows the SSL connection by forging a unique server certificate with revoked status to send to the client. When the value is mask, the system masks the server certificate status error and continues the SSL handshake with the client. This setting is typically used in SSL forward proxy configuration with certificate status service enabled such as an SSL Orchestrator L3 Outbound deployment with a local OCSP responder. For more information, refer to K65136200: Overview of the local OCSP responder feature for F5 SSL Orchestrator.
-
The Unknown Certificate Status Response Control setting takes effect when the Server Certificate setting is set to require. This setting specifies how the system handles SSL connections from clients when the server certificate status is unknown. The default value for this setting is ignore. When the value is ignore, the system ignores the unknown server certificate status and allows the SSL connection by forging a unique server certificate with unknown status to send to the client. When the value is mask, the system masks the server certificate status error and continues the SSL handshake with the client. When the value is drop, the system drops SSL connections from clients when the server certificate status is unknown. This setting is typically used in SSL forward proxy configuration with certificate status service enabled such as an SSL Orchestrator L3 Outbound deployment with a local OCSP responder. For more information, refer to K65136200: Overview of the local OCSP responder feature for F5 SSL Orchestrator.
-
The Frequency setting specifies the frequency of server authentication for an SSL session. The default value for this setting is Once, which causes the system to authenticate the server for an SSL session only once. When you configure this setting to Always, the system authenticates the server for an SSL session and every subsequent reuse of the SSL session.
-
The Retain Certificate setting when enabled, specifies that the server certificate is retained in SSL session. The default value is true (selected).
-
The Certificate Chain Traversal Depth setting specifies the maximum number of certificates that the system traverses in a server certificate chain. The default value is 9.
-
The Authenticate Name setting specifies a Common Name (CN) that is iframed in a server certificate. The system authenticates a server based on the specified CN. There is no default value for this setting.
-
The Trusted Certificate Authorities setting is optional. The system uses this setting to specify the CAs that the BIG-IP system trusts when verifying a server certificate. The default value for this setting is None, which causes the system to accept a server certificate signed by any CA. If you choose Require for the Server Certificate setting, you must specify a CA from the Trusted Certificate Authorities setting. The selected CA is trusted by the system when verifying a server certificate. The ca-bundle certificate may be appropriate for use as a Trusted Certificate Authorities certificate bundle. However, if this bundle is specified as the Trusted Certificate Authorities certificate store, any valid server certificate that is signed by one of the popular root CAs included in the default ca-bundle.crt is authenticated. This provides some level of identification, but very little access control because almost any valid server certificate could be authenticated.
If you want to trust only a server certificate that has been signed by a private PKI or set of private PKIs, F5 recommends that you create and install a custom certificate bundle that contains the private PKI certificates, including the CA that directly signed your servers’ certificates. You can then choose the new certificate bundle in the Trusted Certificate Authorities setting. For information about creating a custom certificate bundle, refer to K13302: Configuring the BIG-IP system to use an SSL chain certificate (11.x - 16.x).
-
The OCSP setting specifies the SSL client certificate constrained delegation OCSP object that the BIG-IP system’s SSL should use to connect to the OCSP responder and check the client certificate status. You can click the + icon to open the create-new OCSP object screen.
-
The CRL setting specifies the SSL client certificate constrained delegation CRL object that the BIG-IP system’s SSL should use. You can click the + icon to open the create-new CRL object screen.
-
The Certificate Revocation List (CRL) or CRL File setting allows you to specify a CRL that the BIG-IP system should use to check revocation status of a certificate before the system authenticates a server. If you want to use a CRL, you must import it to the BIG-IP system. You can then choose the name of the CRL file using the Certificate Revocation List (CRL) or CRL File setting. For information about importing an SSL CRL file, refer to K14620: Managing SSL certificates for BIG-IP systems using the Configuration utility. Because CRLs can quickly become outdated, F5 recommends that you use either OCSP or CRLDP profiles for more robust and current verification functionality.
-
The Allow Expired CRL setting instructs the system to use the specified CRL file, even if it has expired. Disabled by default.
-
The Client Certificate Constrained Delegation setting enables or disables SSL Client certificate constrained delegation.
-
The CA Certificate setting specifies the name of the certificate file that is used as the certification authority certificate. The certificate should be generated and installed by you on the system.
-
The CA Key setting specifies the name of the key file that is used as the certification authority key. The key should be generated and installed by you on the system.
-
The CA Passphrase setting specifies the passphrase of the key file that is used as the certification authority key.
-
The Confirm CA Passphrase setting confirms the CA Passphrase you specified.
-
The Certificate Lifespan setting specifies the lifespan of the certificate generated using the SSL client certificate constrained delegation. The default is 1 day, 0 hours.
-
The Certificate Extensions setting specifies the extensions of the client certificates to be included in the generated certificates.
-
Basic Constraints: Uses basic constraints to indicate whether the certificate belongs to a CA.
-
Extended Key Usage: Uses Extended Key Usage, typically on a leaf certificate, to indicate the purpose of the public key contained in the certificate.
-
Key Usage: Provides a bitmap specifying the cryptographic operations that may be performed using the public key contained in the certificate. For example, it may indicate that the key should be used for signature but not for encoding.
-
Subject Alternative Name: Allows identities to be bound to the subject of the certificate. These identities may be included in addition to, or in place of, the identity in the subject of the certificate.
-
-
The Certificate Extensions List setting provides the list of enabled extensions and a list of available extension. When you disable an extension in the Enabled Extensions list, it moves to the Available Extensions list. When you enable an extension in the Available Extensions list, it moves to the Enabled Extensions list. You can also specify a Custom Extension representing the OID of the client certificates to be included in the generated certificates.
-
In the Logging section, the Log Publisher setting specifies the defined Log Publisher for the system to use for logging information.
-
Click Finished.
After performing this task, you can see the custom Server SSL profile in the list of Server SSL profiles on the system.
Note: By default, TLSv1.3 is disabled in this configuration.
To use this profile, you must assign it to a virtual server. See the Assigning SSL profiles to a virtual server section for detailed information.
You create a custom Client SSL profile when you want the BIG-IP® system to terminate client-side SSL traffic for the purpose of decrypting client-side ingress traffic and encrypting client-side egress traffic. By terminating client-side SSL traffic, the BIG-IP system offloads these decryption/encryption functions from the destination server. When you perform this task, you can specify multiple certificate key chains, one for each key type (RSA, DSA, and ECDSA). This allows the BIG-IP system to negotiate secure client connections using different cipher suites based on the client’s preference.
F5 has added SM2, SM3, and SM4 Cryptographic Algorithm support for the Chinese market. The algorithms were independently developed by the China State Cryptography Administration, where SM2 is the public key algorithm, SM3 is the hash algorithm, and SM4 is the block cipher algorithm. SM2 is based on the Elliptic Curve Discrete Logarithm Problem (ECDLP). Also see the following sections for details importing, exporting, and managing a certificate and key with SM2 license.
Note:
Before you create a customer Client SSL profile that supports SM2, create an SM2 cipher rule and cipher group.
-
Create an SM2 Cipher Rule
-
On the Main tab, click Local Traffic > Ciphers > Rules.
The Ciphers Rules screen opens.
-
Click Create.
The New Cipher Rule screen opens.
-
In the Name field, type a unique name for your SM2 cipher rule.
-
In the Cipher Suites field, type the following cipher suites string: ECC-SM4-SM3
-
In the DH Groups field, type the following DH groups string: SM2P256
-
In the Signature Algorithms field, type the following signature algorithm string:SM2-SM3
-
Click Finished. You are now ready to create a cipher group.
-
Create an SM2 Cipher Group
-
On the Main tab, click Local Traffic > Ciphers > Groups.
The Ciphers Groups screen opens.
-
Click Create.
The New Cipher Group screen opens.
-
In the Name field, type a unique name for your SM2 cipher group.
-
In the Group Details area, select the check box next to the SM2 cipher rule from the Available Rules list.
-
Select the arrows next to the Allow the following field to move the selected SM2 cipher rule to this field.
-
Click Finished. You are now ready to create your custom Client SSL profile that supports SM2.
-
Create a Custom Client SSL Profile that supports SM2
-
On the Main tab, click Traffic > Profiles > SSL > Client.
he Client SSL profile list screen opens.
-
Click Create.
The New Client SSL Profile screen opens.
-
In the Name field, type a unique name for the profile.
-
From the Parent Profile list, select clientssl.
-
Select the Custom check box.
The settings become available for change.
-
From the Configuration list, select Advanced.
-
For the Mode setting, select the Enabled check box.
-
or the Certificate Key Chain setting, click Add. For SM2 client profile, select SM2 file type from the Certificate, Key, and Chain lists.
-
From the Certificate list, select a certificate name. // This is the name of a certificate that you installed on the BIG-IP system. If you have not generated a certificate request nor installed a certificate on the BIG-IP system, and the BIG-IP system is not part of a device service clustering (DSC) configuration, you can specify the name of the existing certificate named default. // Important: If the BIG-IP system is part of a DSC Sync-Failover group, always select a non-default certificate name, and ensure that this same certificate name is specified in every instance of this SSL profile in the device group. Taking these actions helps to ensure that SSL handshakes are successful after a failover event.
-
From the Key list, select the name of the key associated with the certificate specified in the previous step. // This is the name of a key that you installed on the BIG-IP system. If you have not installed a key on the BIG-IP system, and the BIG-IP system is not part of a device service clustering (DSC) configuration, you can specify the name of the existing key named default. // Important: If the BIG-IP system is part of a DSC Sync-Failover group, always select a non-default key name, and ensure that this same key name is specified in every instance of this SSL profile in the device group. Taking these actions helps to ensure that SSL handshakes are successful after a failover event.
-
From the Chain list, select the chain that you want to include in the certificate key chain. // A certificate chain can contain either a series of public key certificates in Privacy Enhanced Mail (PEM) format or a series of one or more PEM files. A certificate chain can contain certificates for Intermediate certificate Authorities (CAs). // Note: The default self-signed certificate and the default CA bundle certificate are not appropriate for use as a certificate chain.
-
For the Passphrase field, type a string that enables access to SSL certificate/key pairs that are stored on the BIG-IP system with password protection. // This setting is optional. For added security, the BIG-IP system automatically encrypts the pass phrase itself. This pass phrase encryption process is invisible to BIG-IP system administrative users.
-
-
Click Add
-
For the Ciphers setting, specify a Cipher Group and select the existing SM2 custom cipher group to define the ciphers that the BIG-IP system uses for negotiating SSL connections.
-
For the Options List setting, select the following as Enabled Options:
- GMSSLv1.1
- No SSL
- No TLS
- No DTLS
-
Click Finished.
After performing this task, you can see the custom Client SSL profile that supports SM2 in the list of Client SSL profiles on the system.
You create a custom Client SSL profile when you want the BIG-IP system to terminate client-side SSL traffic for the purpose of decrypting client-side ingress traffic and encrypting client-side egress traffic. By terminating client-side SSL traffic, the BIG-IP system offloads these decryption/encryption functions from the destination server. When you perform this task, you can specify multiple certificate key chains, one for each key type (RSA, DSA, and ECDSA). This allows the BIG-IP system to negotiate secure client connections using different cipher suites based on the client’s preference.
Note: At a minimum, you must specify a certificate key chain that includes an RSA key pair. Specifying certificate key chains for DSA and ECDSA key pairs is optional, although highly recommended.
-
On the Main tab, click Local Traffic > Profiles > SSL > Client.
The Client SSL profile list screen opens.
-
Click Create.
The New Client SSL Profile screen opens.
-
In the Name field, type a unique name for the profile.
-
From the Parent Profile list, select clientssl.
-
Select the Custom check box.
The settings become available for change.
-
From the Configuration list, select Advanced.
-
For the Mode setting, select the Enabled check box.
-
For the Certificate Key Chain setting, click Add.
-
From the Certificate list, select a certificate name.
This is the name of a certificate that you installed on the BIG-IP system. If you have not generated a certificate request nor installed a certificate on the BIG-IP system, and the BIG-IP system is not part of a device service clustering (DSC) configuration, you can specify the name of the existing certificate named
default.Important: If the BIG-IP system is part of a DSC Sync-Failover group, always select a non-default certificate name, and ensure that this same certificate name is specified in every instance of this SSL profile in the device group. Taking these actions helps to ensure that SSL handshakes are successful after a failover event.
-
From the Key list, select the name of the key associated with the certificate specified in the previous step.
This is the name of a key that you installed on the BIG-IP system. If you have not installed a key on the BIG-IP system, and the BIG-IP system is not part of a device service clustering (DSC) configuration, you can specify the name of the existing key named
default.Important: If the BIG-IP system is part of a DSC Sync-Failover group, always select a non-default key name, and ensure that this same key name is specified in every instance of this SSL profile in the device group. Taking these actions helps to ensure that SSL handshakes are successful after a failover event.
-
From the Chain list, select the chain that you want to include in the certificate key chain.
A certificate chain can contain either a series of public key certificates in Privacy Enhanced Mail (PEM) format or a series of one or more PEM files. A certificate chain can contain certificates for Intermediate certificate Authorities (CAs).
Note: The default self-signed certificate and the default CA bundle certificate are not appropriate for use as a certificate chain.
-
For the Passphrase field, type a string that enables access to SSL certificate/key pairs that are stored on the BIG-IP system with password protection.
This setting is optional. For added security, the BIG-IP system automatically encrypts the pass phrase itself. This pass phrase encryption process is invisible to BIG-IP system administrative users.
-
Click Add.
-
-
In the Certificate Key Chain setting, click Add again, and repeat the process for all certificate key chains that you want to specify.
At a minimum, you must specify an RSA certificate key chain.
The result is that all specified key chains appear in the text box.
-
To enable OCSP stapling, select theOCSP Stapling check box.
To enable OCSP stapling, you must first create an OCSP Stapling profile. See Creating an OCSP stapling profile for detailed steps.
-
If you want to Notify Certificate Status to Virtual Server, select the check box.
-
The Ciphers setting is optional. By default, the Client SSL profile uses the DEFAULT cipher string. In most cases, the DEFAULT cipher string is appropriate, but you can customize it as necessary to meet the security and performance needs of your site. Specify a cipher group or cipher string by choosing one of these options.
Note: If you specified an ECDSA certificate key chain in the Certificate Key Chain setting, you must include the cipher string
ECDHE_ECDSAin the cipher group or cipher string that you specify in the Ciphers setting. (At a minimum, you should specify a cipher group or string such asDEFAULT:ECDHE_ECDSA.) This is necessary to ensure successful cipher negotiation when the BIG-IP system is offered an ECDSA-based certificate only.
|
Option |
Description |
|---|---|
|
Cipher Group |
Select an existing cipher group from the list when you want to use a system-defined or custom cipher group to define the ciphers that the BIG-IP system uses for negotiating SSL connections. Here’s an example of the
|
|
Cipher String |
Type a cipher string in the box if you want to manually specify a cipher string instead of selecting a cipher group. For security and performance reasons, consider following these recommendations:
|
-
For the Client Authentication area, select the Custom check box.
-
For Client Certificate list, specify whether you want to ignore, require, or request the client certificate authentication.
-
If you are enabling C3D, from the Trusted Certificate Authorities list, you must select a trusted CA bundle.
-
Select the Custom check box for the Client Certificate Constrained Delegation area.
The settings become available for change.
Note: See About client certificate constrained delegation prior to enabling C3D.
-
For the Client Certificate Constrained Delegation setting, select Enabled.
-
From the OCSP list, select the object that the BIG-IP system’s SSL should use to connect to the OCSP responder and check the client certificate status.
You can click the + icon to open the create-new OCSP object screen. See Creating an OCSP stapling profile for detailed steps.
-
For the Unknown OCSP Response Control list, specify the action the system takes when the OCSP object returns an unknown status:
- If you want the connection to be dropped, retain the default value Drop.
- If you want the connection to ignore the unknown status and continue, Select Ignore.
-
Click Finished.
After performing this task, you can see the custom Client SSL profile in the list of Client SSL profiles on the system.
To use this profile, you must assign it to a virtual server. See Assigning SSL profiles to a virtual server for detailed information.
With a Server SSL profile, the BIG-IP system can perform decryption and encryption for server-side SSL traffic.
Note: For detailed information on how to complete the client certificate constrained delegation (C3D) configuration and ensure that your custom server SSL profile is set up properly, see About client certificate constrained delegation before completing your custom profile setup.
-
On the Main tab, click Local Traffic > Profiles > SSL > Server.
The Server SSL profile list screen opens.
-
Click Create.
The New Server SSL Profile screen opens.
-
In the Name field, type a unique name for the profile.
-
From the Parent Profile list, select serverssl.
-
From the Configuration list, select Advanced.
-
Select the Custom check box.
The settings become available for change.
-
From the Certificate list, select the name of an SSL certificate on the BIG-IP system.
Important: If the BIG-IP system is part of a DSC Sync-Failover group, always select a non-default certificate name, and ensure that this same certificate name is specified in every instance of this SSL profile in the device group. Taking these actions helps to ensure that SSL handshakes are successful after a failover event.
-
From the Key list, select the name of an SSL key on the BIG-IP system.
Important: If the BIG-IP system is part of a DSC Sync-Failover group, always select a non-default key name, and ensure that this same key name is specified in every instance of this SSL profile in the device group. Taking these actions helps to ensure that SSL handshakes are successful after a failover event.
-
In the Pass Phrase field, type a pass phrase that enables access to the certificate/key pair on the BIG-IP system.
-
From the Chain list, select the name of an SSL chain on the BIG-IP system.
-
The Ciphers setting is optional. By default, the Client SSL profile uses the DEFAULT cipher string. In most cases, the DEFAULT cipher string is appropriate, but you can customize it as necessary to meet the security and performance needs of your site. Specify a cipher group or cipher string by choosing one of these options.
Note: If you specified an ECDSA certificate key chain in the Certificate Key Chain setting, you must include the cipher string
ECDHE_ECDSAin the cipher group or cipher string that you specify in the Ciphers setting. (At a minimum, you should specify a cipher group or string such asDEFAULT:ECDHE_ECDSA.) This is necessary to ensure successful cipher negotiation when the BIG-IP system is offered an ECDSA-based certificate only.
|
Option |
Description |
|---|---|
|
Cipher Group |
Select an existing cipher group from the list when you want to use a system-defined or custom cipher group to define the ciphers that the BIG-IP system uses for negotiating SSL connections. Here’s an example of the
|
|
Cipher String |
Type a cipher string in the box if you want to manually specify a cipher string instead of selecting a cipher group. For security and performance reasons, consider following these recommendations:
|
-
In the same area of the screen, configure any other settings as needed.
-
Select the Custom check box for the Server Authentication area of the screen.
The settings become available for change.
-
Change or retain the values for all Server Authentication settings as needed.
-
If you intend to use OCSP stapling, then from the OCSP list, select the OCSP object that the BIG-IP system’s SSL should use to connect to the OCSP responder and to check the server certificate status. You can click the + icon to open the create-new OCSP object screen.
The OCSP stapling object can be added in both forward and reverse proxy configurations. When the server SSL Forward Proxy property is set to Enabled, the forward proxy OCSP object is used to validate and staple the web server’s certificate status. When the server SSL Forward Proxy property is set to Disabled, the reverse proxy OCSP object is used to reset the client connection if the web server certificate has been revoked.
-
Select the Custom check box for the Client Certificate Constrained Delegation section.
The settings become available for change.
Note: See About client certificate constrained delegation prior to enabling C3D.
-
From the Client Certificate Constrained Delegation setting, select Advanced.
-
From the Client Certificate Constrained Delegation list, select Enabled.
-
From the CA Certificate list, select the name of the certificate file that is used as the certification authority certificate.
-
From the CA Key list, select the name of the key file that is used as the certification authority key.
-
In the CA Passphrase field, type the passphrase of the key file that is used as the certification authority key.
Note: This should be the passphrase corresponding to the specified CA Key.
-
For the Confirm CA Passphrase field, type the identical passphrase.
-
For the Certificate Lifespan fields, type the lifespan of the certificate generated that is using the SSL client certificate constrained delegation.
The default is
1day,0hours. -
To define the extensions of the client certificates to be included in the generated certificates, from the Certificate Extensions list, select Extensions List.
-
For the Certificate Extensions List setting, click Disable or Enable to add or remove available extensions.
- Basic Constraints: Uses basic constraints to indicate whether the certificate belongs to a CA.
- Extended Key Usage: Uses Extended Key Usage, typically on a leaf certificate, to indicate the purpose of the public key contained in the certificate.
- Key Usage: Provides a bitmap specifying the cryptographic operations that may be performed using the public key contained in the certificate; for example, it could indicate that the key should be used for signature but not for enciphering.
- Subject Alternative Name: Allows identities to be bound to the subject of the certificate. These identities may be included in addition to, or in place of, the identity in the subject field of the certificate. You can also add extensions in the Custom extension field. Type in the extension name and click Add.
-
Click Finished.
To use this profile, you must assign it to a virtual server. See the Assigning SSL profiles to a virtual server section for detailed information.
With a Server SSL profile, the BIG-IP system can perform decryption and encryption for server-side SSL traffic.
A certificate revocation list (CRL) is a published list of revoked certificates issued and updated by the certificate authority who signed them. Clients like your internet browser, will check the certificate’s CRL URI to find out if the certificate is valid. When a certificate is revoked, the CRL is updated to reflect the revokation and published accordingly. Lists are not the most efficient way to maintain a record of revocation in high volume scenarios so some application vendors have deprecated their use in favor of online certificate status protcol (OCSP). However, you still need a CRL configuraiton as it is still a common scenario and recommended for backward compatibility.
Note:
Before you create a customer Server SSL profile that supports CRL, you must create either a configured DNS resolver or a configured BIG-IP LTM pool.
-
Create an internal proxy
Internal Proxy is used by services such as CRL cert-validator, for defining how to send/receive the outbound traffic for the service.
-
On the Main tab, click System > Services > Internal Proxies.
The Internal Proxies screen opens.
-
Click Create.
The New Internal Proxy screen opens.
-
In the Name field, type a unique name for your internal proxy.
-
Select the Use Proxy Server check box if you want to use the Proxy Server Pool instead of DNS Resolver. The Proxy Server Pool is the LTM pool with one or multiple proxies for forwarding the CRL request to the CRL server. The DNS Resolver is the internal DNS resolver the BIG-IP system uses to fetch the internal proxy response.
-
From the DNS Resolver list, select the internal DNS resolver the BIG-IP system uses to fetch the internal proxy response. This involves specifying one or more DNS servers in the DNS resolver configuration. Use this option when:
- There is a DNS server that can do the name-resolution of the internal proxy.
- The internal proxy can be reached on one of BIG-IP system’s interfaces. If you are not selecting a pre-existing DNS Resolver you can create one. Click + to define a new internal DNS resolver and then return to this screen.
-
From the Proxy Server Pool list, select the LTM pool for forwarding the CRL request to the CRL server.
-
-
From the Route Domain list, select the route domain for fetching an internal proxy using HTTP explicit proxy. It is common to have the Route Domain set to 0. Click + to define a new route domain.
You have now created an internal proxy and are ready to create a CRL configuration object.
-
Create a CRL configuration object
-
On the Main tab, click System > Certificate Management > Traffic Certificate Management > CRL.
The CRL screen opens.
-
Click Create.
The New CRL screen opens.
-
In the Name field, type a name that specifies the certificate revocation list.
-
Specify if you want to select Strict Revocation Check to protect your configuration from accidental future changes. The Strict Revocation Check specifies whether the strict revocation check for the certificate revocation list is enable or disabled. If the check box is selected it enables the strict revocation check and keymgmtd waits for the c fetching/caching to complete. If it is disabled, keymgmtd immediately replies with certificate status that is unknown and starts to download/cache the certificate revocation list file.
-
For the Internal Proxy section, select Internal Proxy List to define the CRL list that specifies the internal DNS resolver or a proxy server pool. Select either New Internal Proxy or Internal Proxy List to specify the internal proxy.
-
Click Update.
You are now ready to create your custom Server SSL profile that supports CRL.
-
Create a Custom Server SSL Profile that supports CRL
-
On the Main tab, click Local Traffic > Profiles > SSL > Server.
The Server SSL profile list screen opens.
-
Click Create.
The New Server SSL Profile screen opens.
-
In the Name field, type a unique name for the profile.
-
From the Parent Profile list, select serverssl.
-
From the Configuration list, select Advanced.
-
Select the Custom check box.
The settings become available for change.
-
From the Certificate list, select the name of an SSL certificate on the BIG-IP system.
Important: If the BIG-IP system is part of a DSC Sync-Failover group, always select a non-default certificate name, and ensure that this same certificate name is specified in every instance of this SSL profile in the device group. Taking these actions helps to ensure that SSL handshakes are successful after a failover event.
-
From the Key list, select the name of an SSL key on the BIG-IP system.
Important: If the BIG-IP system is part of a DSC Sync-Failover group, always select a non-default key name, and ensure that this same key name is specified in every instance of this SSL profile in the device group. Taking these actions helps to ensure that SSL handshakes are successful after a failover event.
-
In the Pass Phrase field, type a pass phrase that enables access to the certificate/key pair on the BIG-IP system.
-
From the Chain list, select the name of an SSL chain on the BIG-IP system.
-
For the Ciphers setting, specify a cipher group or cipher string by choosing one of these options.
Note: If you specified an ECDSA certificate key chain in the Certificate Key Chain setting, you must include the cipher string
ECDHE_ECDSAin the cipher group or cipher string that you specify in the Ciphers setting. (At a minimum, you should specify a cipher group or string such asDEFAULT:ECDHE_ECDSA.) This is necessary to ensure successful cipher negotiation when the BIG-IP system is offered an ECDSA-based certificate only.
|
Option |
Description |
|---|---|
|
Cipher Group |
Select an existing cipher group from the list when you want to use a system-defined or custom cipher group to define the ciphers that the BIG-IP system uses for negotiating SSL connections. Here’s an example of the
|
|
Cipher String |
Type a cipher string in the box if you want to manually specify a cipher string instead of selecting a cipher group. For security and performance reasons, consider following these recommendations:
|
-
In the same area of the screen, configure any other settings as needed.
-
Select the Custom check box for the Server Authentication area of the screen.
The settings become available for change.
-
Change or retain the values for all Server Authentication settings as needed.
-
From the CRL list, select the CRL object that specifies the SSL client certificate constrained delegation CRL object that the BIG-IP system’s SSL should use. You can click the + icon to open the create-new CRL object screen.
-
From the CRL File list, select the name of a file containing a list of revoked server certificates.
-
In the Allow Expired CRL File field, select the check box to instruct the system to use the specified CRL file even if it has expired. The default is disabled.
-
Complete any other settings and click Finished.
After performing this task, you can see the custom Server SSL profile that supports CRL in the list of Server SSL profiles on the system.
The final task in the process of implementing SSL profiles is to assign the SSL profile to a virtual server. If the relevant virtual server does not yet exist, you can assign the SSL profile (or profiles) to the virtual server when you create it.
-
On the Main tab, click Local Traffic > Virtual Servers.
The Virtual Server List screen opens.
-
Click the name of a virtual server.
-
From the Configuration list, select Advanced.
-
For the SSL Profile (Server) setting, from the Available list, select the name of the Server SSL profile you previously created and move the name to the Selected list.
-
Click Update to save the changes.
The BIG-IP system includes a default cipher string named DEFAULT, which contains a subset of the cipher suites that the BIG-IP system supports.
The full set of cipher suites that the BIG-IP system supports are contained in the NATIVE cipher string. The cipher suites contained in both the DEFAULT and NATIVE cipher string are eligible for hardware acceleration.
The BIG-IP system supports a large set of cryptographic parameters that you can use to modify how the BIG-IP manages SSL/TLS connections.
For TLS 1.2 and TLS 1.3, you can configure all or some of the cryptographic parameters:
- Ciphersuites.
- Key exchange algorithms, for example RSA, DH, or ECDHE.
- Signature algorithms, for example RSA or ECDSA.
- Encryption primitives, for example AES128 or CAMELLIA.
- Hash algorithms, for example SHA256.
- Message authentication codes, for example HMAC-SHA256 or HMAC-SHA384.
The BIG-IP system supports many cryptographic parameters used to negotiate SSL/TLS connections. The following list will help you understand how these parameters are organized on the BIG-IP system.
- Cipher Group
- A BIG-IP configuration object that specifies a list of cipher rules. The BIG-IP system offers several pre-built cipher groups, such as
f5-default,f5-ecc, andf5-secure. You can use a pre-built cipher group or create a new custom cipher group. Cipher Groups can be associated with a Client or Server SSL profile’s Cipher option to specify the allowed cryptographic parameters. - Cipher rule
- A BIG-IP configuration object that specifies a list of cipher suites used to negotiate SSL/TLS connections. The BIG-IP system offers several pre-built cipher rules, such as
f5-default,f5-ecc, andf5-secure. You can use a pre-built cipher rule or create a custom cipher rule. Cipher Rules are applied to Cipher Groups. - Cipher string
- A BIG-IP named object that specifies a list of one or more cipher suites, for example DEFAULT or NATIVE. You can combine cipher strings to create the final cipher string that the BIG-IP system uses to negotiate SSL security parameters with another system. Cipher Strings can be associated with a Client or Server profile’s Cipher option to specify the allowed cryptographic parameters.
- Cipher Suites
- A cipher suite is a combination of a key exchange method, authentication method, bulk encryption algorithm, and a message authentication code (MAC). The BIG-IP system uses cipher suites to negotiate the security parameters used to create SSL/TLS connections.
- Rule Audit
- The Rule Audit can be used when creating a custom Cipher Rule to display list of cipher suites contained in the cipher rule.
- Group Audit
- The Group Audit can be used when creating a custom Cipher Group, to display the list of cipher suites that will make up the final Cipher Group.
A cipher group contains a list of cipher rules, and the instructions that the BIG-IP system needs for building the cipher string it will use for security negotiation. The instructions tell the system which cipher rules to include in the string, and how to apply them (allow, restrict, or exclude, and in what order).
The BIG-IP system offers a few pre-built cipher groups that you can choose from to use as is to build your final cipher string, However, it’s common to create your own custom cipher group instead.
This illustration shows an example of a custom cipher group. Using this cipher group, the BIG-IP system builds the final cipher string using a user-created custom cipher rule named /Common/my_ecdhe_rsa and the pre-built cipher rule /Common/f5-default.
Notice that the system will exclude from the string any cipher suites defined in the pre-built cipher rule /Common/f5-hw_keys.
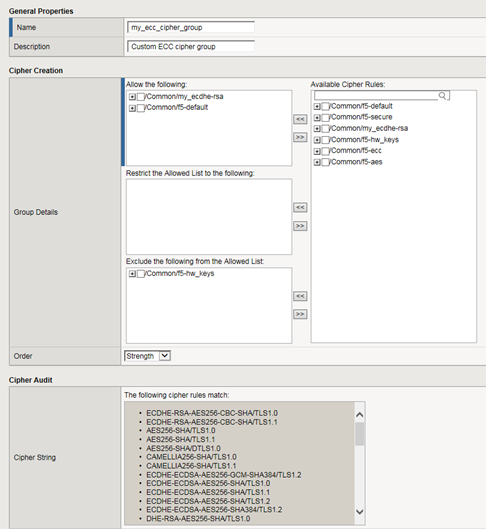
Also notice that the cipher group displays a preview of the final cipher string after the instructions are applied.
Note: To create a custom SM2 cipher group to use when creating a custom client SSL profile that supports SM2, see the Create a custom Client SSL profile that supports SM2 section for task details. This section also provides information on creating a custom SM2 cipher rule.
The BIG-IP system offers a set of pre-built cipher groups, with names containing the prefix f5-. Note that in general, a cipher group contains the cipher suites that you want to allow, restrict, or exclude when the system builds the cipher string used for SSL negotiation.
A pre-built cipher group allows all cipher suites specified in a corresponding pre-built cipher rule to be included in the final cipher string that the BIG-IP system builds for SSL negotiation. A prebuilt cipher group does not restrict the allowed cipher suites in any way, nor does it exclude any cipher suites.
This table lists and describes the pre-built cipher groups on the system.
| Cipher group name | Description |
|---|---|
f5-aes |
Allows all cipher suites specified in the pre-built cipher rule f5-aes. |
f5-default |
Allows all cipher suites specified in the pre-built cipher rule f5-default. |
f5-ecc |
Allows all cipher suites specified in the pre-built cipher rule f5-ecc. |
f5-hw_keys |
Allows all cipher suites specified in the pre-built cipher rule f5-hw_keys. |
f5-secure |
Allows all cipher suites specified in the pre-built cipher rule f5-secure. |
This illustration shows an example of a custom cipher group. Using this cipher group, the BIG-IP system builds the final cipher string using a user-created custom cipher rule named /Common/my_ecdhe_rsa and the pre-built cipher rule /Common/f5-default.
Notice that the system will exclude from the string any cipher suites defined in the pre-built cipher rule /Common/f5-hw_keys.
Also notice that the cipher group displays a preview of the final cipher string after the instructions are applied.
Before starting this task, make sure you’ve confirmed the need to create a custom cipher string instead of using a pre-built cipher group.
You build a final, custom cipher string by creating a cipher group. A cipher group contains the cipher rules and instructions that the BIG-IP system needs for building the cipher string it will use for security negotiation with a client or server system.
Note: To create a custom SM2 cipher group to use when creating a custom client SSL profile that supports SM2, see the Create a custom Client SSL profile that supports SM2 section for task details. This section also provides information on creating a custom SM2 cipher rule.
-
On the Main tab, click Local Traffic > Ciphers > Groups.
The screen displays a list of pre-built cipher groups.
-
Click Create.
-
In the Name field, type a name for the cipher group.
Note: Never include the prefix
f5-in a cipher rule name. This prefix is reserved for pre-built cipher groups only. -
If you created any custom rules, then in the Cipher Creation area of the screen in the Available Cipher Rules list, verify that the custom rules appear in the list.
-
For each cipher rule in the Available Cipher Rules list, click the plus sign to view the cipher suites included in the rule.
For example, this shows the cipher suites included in the pre-built cipher rule named
/Common/f5-ecc.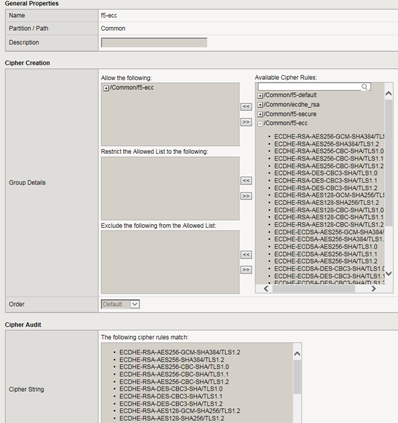
-
In the Available Cipher Rules list, select the boxes for the cipher rules you want to allow for negotiating security for SSL connections.
Important: We strongly recommend that you select the cipher rule
/Common/f5-default, and for added security, select other cipher rules, too.Here’s an example of a list of available cipher rules that you might see within a cipher group. Notice that we’ve selected both a pre-built cipher rule and a custom cipher rule:
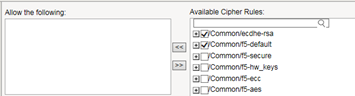
-
In the Group Details setting, move the selected cipher rules to the Allow the following box.
Here we see that we’re instructing the BIG-IP system to allow, during security negotiation, the cipher suites contained in the selected cipher rules:
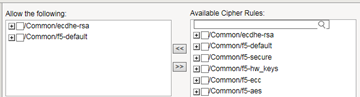
-
Again from the Available Cipher Rules list, select the boxes for the cipher rules you want to restrict the allowed cipher rules to when negotiating security for SSL connections.
-
Move the selected cipher rules to the Restrict the Allowed list to the following box.
-
If you want to exclude any cipher rules from the allowed list, then from the Available Cipher Rules list, select the boxes for the rules you want to exclude.
-
Move the selected cipher rules to the Exclude the following from the Allowed list box.
-
From the Order list, select the order that you want the BIG-IP system to use when negotiating SSL connections.
The choices are: Default, Speed, Strength, FIPS, and Hardware.
-
In the Cryptographic Parameters box, view the cipher suites that the BIG-IP system will use to construct the final cipher string, based on the selections you made in the previous steps.
-
Click Finished.
After you complete this task, the BIG-IP system has a custom cipher group that the BIG-IP system will use to build the final cipher string.
A cipher rule is an object that contains a list of cipher suites. After you create a cipher rule, you specify it within a cipher group. A cipher group is the object that builds the actual cipher string that the system will use during SSL negotiation.
You can use pre-defined cipher rules that the BIG-IP system provides, or you can create your own.
An example of a cipher rule might be one that specifies only cipher suites that use a particular bulk encryption algorithm and key exchange method.
Note: DH Groups and Signature Algorithms allow modification of TLS 1.2 and 1.3 key agreements and signature algorithms respectively.
Note: To create a custom SM2 cipher rule to use when creating a custom client SSL profile that supports SM2, see the Create a custom Client SSL profile that supports SM2 section for task details.
The BIG-IP system offers a set of pre-built cipher rules, with names containing the prefix f5-. This table lists these cipher rules and the cipher strings they represent.
| Cipher rule name | Associated cipher string |
|---|---|
f5-aes |
AES |
f5-default |
DEFAULT |
f5-ecc |
ECDHE:ECDHE_ECDSA |
f5-hw_keys |
ECDHE-RSA-AES256-GCM-SHA384:ECDHE-RSA-AES256-SHA384:ECDHE-RSA-AES256-CBC-SHA:DHE-RSA-AES256-GCM-SHA384:DHE-RSA-AES256-SHA256:DHE-RSA-AES256-SHA:ECDH-RSA-AES256-GCM-SHA384:ECDH-RSA-AES256-SHA384:ECDH |
f5-secure |
ECDHE:RSA:!SSLV3:!RC4:!EXP:!DES |
You can use the following cryptographic parameters to create custom cipher rules:
- Cipher suites
- These represent the bulk encryption and hash algorithms used to negotiate SSL/TLS connections. An example of a cipher suite is
ECDHE-RSA-AES128-CBC-SHA. - DH groups
- In TLS 1.2 and 1.3, these are the Elliptic Curve Diffie Hellman (ECDH) key agreement algorithms used to negotiate SSL/TLS connections. The available key agreement curves are:
P256,P384, andX25519. - Signature algorithms
- In TLS 1.2 and 1.3, these are the digital signature algorithms for authentication. Examples of signature algorithms are
rsa_pkcs1_sha256andecdsa_secp256r1_sha256.
When you create your own cipher rules for inclusion in a custom cipher group, the BIG-IP system builds a cipher string that includes or excludes the cipher suites and algorithms needed for negotiating SSL connections.
Note: To create a custom SM2 cipher rule to use when creating a custom client SSL profile that supports SM2, see the Create a custom Client SSL profile that supports SM2 section for task details.
-
On the Main tab, click Local Traffic > Ciphers > Rules.
The screen displays a list of pre-built cipher rules.
-
Click Create.
-
In the Name field, type a name for the cipher rule.
Note: Never include the prefix
f5-in a cipher rule name. This prefix is reserved for pre-built cipher rules only.For example:

-
In the Cipher Suites field, type one or more cipher suites.
For example:

-
In the DH Groupsfield, type one or more Elliptic Curve Diffie-Hellman key exchange algorithms, separated by commas (:). The available named groups (formerly known as curves) are:
secp256r1,secp384r1, andX25519.Note: You can also type a special keyword,
DEFAULT, which represents the recommended set of named groups.For example, you can specify
secp256r1:X25519. -
In the Signature Algorithms field, type one or more signature algorithms, separated by commas (:), that you want to include in the cipher rule. You can also type a special keyword,
DEFAULT, which represents the recommended set of signature algorithms.Note: The available signature algorithms are:
DSA-SHA1,DSA-SHA256,DSA-SHA384,DSA-SHA512,ECDSA-SHA1,ECDSA-SHA256,ECDSA-SHA384,ECDSA-SHA512,RSA-PKCS1-SHA1,RSA-PKCS1-SHA256,RSA-PKCS1-SHA384,RCS-PKCS1-SHA512,RSA-PSS-SHA256,RSA-PSS-SHA384, andRSA-PSS-SHA512.For example, you can specify
RSA_PKCS1_SHA256:ECDSA_P256_SHA256. -
Click Finished.
The cipher rule now appears within any custom cipher group, in the list of available cipher rules.
The DEFAULT cipher string appears as the default value in the Ciphers setting of the Client SSL and Server SSL profiles and represents a subset of the cipher suites found in the NATIVE cipher suite.
The NATIVE cipher string represents the full set of BIG-IP supported cipher suites.
Both the DEFAULT and NATIVE cipher strings represent cipher suites that are eligible for hardware acceleration.
Important: We strongly recommend that you use the default cipher string and, for added security, append other cipher suites to it.
Before you use this command, confirm that your BIG-IP user account grants you access to the advanced shell.
Follow these steps to display the cipher suites associated with the DEFAULT cipher string. This list of cipher suites is also included in the pre-built cipher rule f5-default.
-
Using an SSH client application such as PuTTY, access the advanced shell on the BIG-IP system.
-
At the system prompt, to view the DEFAULT cipher suites used for client-side negotiation, type the command
tmm --clientciphers DEFAULT. -
At the system prompt, to view the DEFAULT cipher suites used for server-side negotiation, type the command
tmm --serverciphers DEFAULT.
For security and performance reasons, consider the following recommendations:
- When modifying cipher suites, F5 strongly recommends that you append cipher suite modifications to the
DEFAULTcipher string. - Include a cipher string that specifies the ECC key type. Due to their smaller size, ECC keys reduce computing costs while maintaining a similar level of security.
- Disable ADH ciphers but also include the keyword
HIGH. To do this, just include both!ADHand:HIGHin your cipher string. - For AES, DES, and RC4 encryption types, make sure you specify the DHE key exchange method. DHE uses perfect forward secracy, which creates an ephemeral private key for each new secure connection. This ensures the same private key is never used twice.
- When you use DHE, make sure that the SSL private key isn’t being shared with a monitoring system or a security device like an intrusion detection or prevention system. And by the way, diagnostic tools like
ssldumpwon’t work when you’re using Forward Secrecy.
The BIG-IP system supports the Diffie-Hellman Ephemeral key exchange method, as well as other Diffie-Hellman variations. A Diffie–Hellman key exchange method is an alternative to RSA key exchange and allows the client and the BIG-IP system to establish a shared secret session key to use for communication.
Because Diffie-Hellman key exchange methods do not include authentication, use of Diffie-Hellman Ephemeral (DHE) requires that it be paired with an authentication mechanism. The DHE key exchange/authentication pairs that the BIG-IP system supports are:
- DHE-RSA-* (Diffie-Hellman Ephemeral-RSA)
- DHE-DSS-* (Diffie-Hellman Ephemeral-DSS)
- ECDHE-RSA-* (Elliptic Curve Diffie-Hellman Ephemeral-RSA)
- ECDHE-ECDSA-* (Elliptic Curve Diffie-Hellman Ephemeral-DSA)
Note: DHE key exchange methods, when paired with RSA and DSS authentication, are not included in the cipher rule f5-default nor in the cipher keyword DEFAULT.
The Diffie-Hellman Ephemeral (DHE) key exchange method provides Perfect Forward Privacy (PFP). With standard Diffie-Hellman, multiple key exchanges all use the same session key, which can compromise security. By contrast, DHE uses PFP, which generates a disposable key per session and thereby ensures that the same session key is never used twice. No key remains to be disclosed, and if the private key of the server is discovered, past communication remains secure.
The BIG-IP system supports all three Diffie-Hellman key exchange methods. They are:
- Diffie-Hellman Ephemeral (DHE)
- Diffie-Hellman Ephemeral uses temporary public keys. The authenticity of a temporary key can be verified by checking the digital signature included in the key exchange messages. The key exchange messages are signed using either the RSA or DSA algorithms, depending on the cipher being used. For example, DHE-RSA uses RSA to sign the key exchange messages. DHE includes Perfect Forward Secrecy (PFS), which means that a compromise of the system’s long-term signing key does not affect the privacy of past sessions. Like FIPS, DHE prevents private key disclosure.
- Diffie-Hellman (DH)
- Diffie-Hellman embeds the system’s public parameter in the certificate, and the CA then signs the certificate. That is, the certificate contains the Diffie-Hellman public-key parameters, and those parameters never change.
- Anonymous Diffie-Hellman (ADH)
- Anonymous Diffie-Hellman uses DH, but without authentication. The keys used in the exchange are not authenticated, resulting in keys being susceptible to security attacks.
Before using this command, confirm that your user account grants you access to the advanced shell.
You perform this task when you want to display a specific set of ciphers that the BIG-IP system supports.
-
Access the advanced shell on the BIG-IP system.
-
At the system prompt, type the command
tmm --clientciphers *ciphers*.For example, to see a list of DHE+DES ciphers, type
tmm --clientciphers DHE:DHE_DSS. To see a list of ECDHE ciphers, typetmm --clientciphers ECDHE:ECDHE_ECDSA.
Use this task to modify an existing Client SSL profile to enable support for Diffie-Hellman key exchange.
-
On the Main tab, click Local Traffic > Profiles > SSL > Client or Local Traffic > Profiles > SSL > Server.
The Client SSL or Server SSL profile list screen opens.
-
In the Name column, click the name of the profile you want to modify.
-
Select the Custom check box.
The settings become available for change.
-
To specify DHE ciphers:
-
From the Configuration list, select Advanced.
-
For the Ciphers setting, click Cipher String and type
DHE:DHE_DSS.
-
-
Click Update.
After you perform this task and assign the profile to a virtual server, the BIG-IP uses the DHE key exchange method to establish secure communication with the relevant client or server.
You can use the Traffic Management Shell (tmsh) to view statistics about the use of Diffie-Hellman ciphers in SSL negotiation.
-
Access the system prompt on the BIG-IP system.
-
From the BIG-IP system prompt, type
tmsh show ltm profile client-ssl *profile\_name*.An example of a name for a profile that specifies DHE ciphers is
my_dhe_profile.
After you type this command, the BIG-IP system displays output such as the following. In this example, the profile statistics show that Diffie-Hellman Ephemeral (DHE) with RSA certificates has been used once:

The BIG-IP system supports Elliptic Curve Cryptography (ECC). Because Elliptic Curve key sizes are significantly smaller than those of other key types, ECC is ideally suited for smaller, mobile devices for which key storage is an issue. On the BIG-IP system, ECC works with the SSL offload feature.
The BIG-IP system supports multiple ciphers that use Elliptic Curve Cryptography (ECC) encryption with Diffie-Hellman key exchange. On the BIG-IP system, EC is used with DHE to establish the shared secret; however, the subsequent bulk encryption of data cannot be done with any ECC-based algorithm and must be done using conventional crypto algorithms such as AES and 3DES. For example, a typical Elliptic Curve cipher is: ECDHE-RSA-AES128-CBC-SHA.
The specific ECC ciphers that the BIG-IP system supports are:
- ECDHE-RSA-*
- ECDHE-ECDSA-*
- ECDH-ECDSA-*
Because ECC with Diffie-Hellman does not include a mechanism for digitally signing handshake messages, the RSA or DSA algorithms are used to digitally sign the handshake messages to thwart Man-in-the-Middle attacks. For example, an ECDHE-ECDSA-* cipher suite uses the ECC DSA certificate specified in the Client SSL profile to digitally sign the handshake messages.
Note: Elliptic Curve ciphers with DSA are not included in the DEFAULT cipher suite.
You can use the Traffic Management Shell (tmsh) to view statistics about the use of Elliptic Curve Diffie-Hellman ciphers in SSL negotiation.
-
Access the system prompt on the BIG-IP system.
-
From the BIG-IP system prompt, type
tmsh show ltm profile client-ssl *profile\_name*| grep ECDH.An example of a name for a profile that specifies DHE ciphers is
my_ecdh_profile.
After you type this command, the BIG-IP system displays output such as the following. In this example, the profile statistics show that ECDH with RSA certificates has been used six times:

Use this task to modify an existing Client SSL profile to enable support for Elliptic Curve Diffie-Hellman Ephemeral (ECDHE) key exchange.
-
On the Main tab, click Local Traffic > Profiles > SSL > Client or Local Traffic > Profiles > SSL > Server.
The Client SSL or Server SSL profile list screen opens.
-
In the Name column, click the name of the profile you want to modify.
-
Select the Custom check box.
The settings become available for change.
-
For the Ciphers setting, click Cipher String and type
DEFAULT:ECDHE. -
Click Update.
After you perform this task and assign the profile to a virtual server, the BIG-IP system uses the ECDHE key exchange method to establish secure communication with the relevant client or server.
For security reasons, these cipher suites are unavailable in the BIG-IP system:
- EXP-EDH-RSA-DES-CBC-SHA
- EXP-ADH-DES-CBC-SHA
- EXP-RC2-CBC-MD5
- EXP-ADH-RC4-MD5
There are a few things you should know when specifying keywords to create a BIG-IP cipher string. These things apply whether or not you are creating a cipher string using cipher rules and groups or typing a raw cipher string into an SSL profile.
In previous BIG-IP releases, cipher support included the COMPAT cipher string, allowing the use of OpenSSL cipher suites not natively supported by the BIG-IP. In this release, the COMPAT cipher string has been removed.
If your configuration includes the COMPAT cipher string, it will be replaced with NONE and secure connections relying on these cipher suites will fail.
This change:
- Optimizes the security of your cipher configuration by preventing any OpenSSL cipher suite vulnerabilities from being introduced into the BIG-IP system.
- Changes the meaning of the
NATIVEkeyword; this keyword now equivalent to the keywordALL.
When you manually configure a cipher string on the BIG-IP system (as opposed to using a cipher group), these keywords are invalid:
COMPATSSLV2(a subset ofCOMPAT)RC2(a subset ofCOMPAT)- Any other subsets of
COMPATorSSLv2
If you attempt to specify these keywords within a cipher string, the system displays an error message and prevents you from creating the relevant SSL profile.
Important: If you have an SSL profile in a previous BIG-IP version and then upgrade to version 14.0 or higher, the system automatically resolves the issue for you.
During a BIG-IP software upgrade to version 14.0 or higher, the system takes these actions:
- If the system detects the keywords
COMPAT,SSLv2,RC2, or any subset of these in an existing cipher string, the system logs a message in the file/var/log/ltmand changes any of these keywords toNone. - The system treats the keyword
NATIVEas being equivalent to keywordALL. - If a cipher string evaluates to an empty set, the system remaps the string to the default cipher string, represented by the keyword
DEFAULT. The default cipher string contains a subset of the cipher suites that are suitable for most SSL connections.
When you create a Client SSL profile, you can specify Online Certificate Status Protocol (OCSP) stapling to improve the certification response time. OCSP stapling is when a TLS server (acting as OCSP client) asks the OCSP server for a valid revocation status of its TLS certificate ahead of time and “staples” the signed OCSP response to the TLS handshake. The TLS client sees the stapled OCSP response and verifies the signature, thus validating the TLS server’s certificate and eliminating the round trip at the client for fetching the certificate status. It also helps protect the identity of the client.
By default, OCSP stapling is disabled. You can can create an OCSP stapling profile and then enable it from within a Client SSL profile. There is no default OCSP Stapling profile, so you must create one that specifies the parameters you want to use. For example, the default OCSP stapling profile setting is to use a DNS resolver to fetch the OCSP response, and you must specify the DNS resolver to use. Alternatively, you can choose to use a proxy server to fetch the OCSP response, and then you must specify the proxy server pool.
Before you start this task, be sure that you have configured a proxy server pool or a DNS resolver.
When you create an OCSP stapling profile and assign it to a client SSL profile, you speed up the time it takes for the client to get the certificate revocation status of the BIG-IP system.
-
On the Main tab, click System > Certificate Management > Traffic Certificate Management > OCSP.
-
Click Create.
The new OCSP Stapling Profile screen opens.
-
In the Name field, type a unique name for the OCSP stapling profile.
-
For the Use Proxy Server setting, specify how to fetch the OCSP response:
- If you want the BIG-IP system to use the Proxy Server Pool, select the check box. Use this when there are one or more servers that can act as a proxy an HTTP request to an external server and fetch the response.
- If you want to use the DNS Resolver, clear the check box. Use this when the OCSP responder can be reached on one of the BIG-IP system interfaces.
-
In the Proxy Server Pool or DNS Resolver field, select the proxy server pool or DNS resolver used for fetching the OCSP response.
-
In the Route Domain field, select the route domain for fetching an OCSP response using HTTP forward proxy.
-
In the Concurrent Connections Limit field, type the maximum number of connections per second allowed for the OCSP certificate validator.
The default value is 50 connections.
-
In the Responder URL field, type the name of a URL that will override the OCSP responder URL obtained from the certificate’s AIA extension.
This must be an HTTP or HTTPS-based URL.
-
In the Timeout field, type a time interval for the BIG-IP system to wait before dropping the connection to the OCSP responder.
-
From the Trusted Responders list, select the name of a certificate to use to verify the response from the OCSP responder.
-
In the Clock Skew field, type a value for the maximum tolerable absolute difference between the clocks of the responder and the BIG-IP system.
-
In the Status Age field, type a value for the maximum allowed lag time in the OCSP response that the BIG-IP system accepts.
If you type
0, the validation is skipped. The default value is 86400. -
To have the system check the responder’s certificate for the OCSP signing extension for the Options setting, select the Strict Responder Certificate Checking check box.
-
From the Timeout list, select a value that specifies the lifetime of the OCSP response.
The default is Indefinite, indicating that the response validity period takes precedence.
-
In the Error Timeout field, type a value for how long a BIG-IP system will cache an error response.
The default value is 3600 seconds.
Note: The Error Timeout must be greater than Connection Timeout.
-
From the Certificate list, select a certificate corresponding to the key used for signing the OCSP request.
-
From the Key list, select a key to use to sign an OCSP request.
-
In the Passphrase field, type the passphrase of the key used to sign an OCSP request.
-
From the Hash Algorithm list, select the hash algorithm used to sign an OCSP request.
The default is SHA256.
Note: This is not the algorithm used in the certificate itself. It is what the OCSP responder will use when validating the request.
-
Click Finished.
After you create an OCSP profile, make sure you enable the OCSP Stapling setting from within the relevant Client SSL profile.
You can use the OCSP stapling statistics to view output such as the number of successful cache requests, the number of Good, Revoked, and Unknown certificate status statistics, and the number of internal, connection, and response errors based on the OCSP definitions in the configuration.
-
On the Main tab, click System > Certificate Management > Traffic Certificate Management > OCSP > Statistics.
The System OCSP statistics screen opens.
-
From the Statistics Type list, verify that OCSP is selected.
-
From the Data Format list, select how the system presents the statistics information.
Option Description Normalized (default) Rounds values to the nearest whole number. Unformatted Presents the actual value, including all decimal places. -
From the Auto Refresh list, select a time interval to automatically update the statistics display screen information.
The default is Disabled.
When you specify an automatic-refresh interval, the system presents a Stop button for halting the operation, and counts down the seconds to the next update.
Note: Short automatic-refresh intervals may negatively affect system performance.
The BIG-IP system displays output such as the number of successful cache requests, the number of Good, Revoked, and Unknown certificate status statistics, and the number of internal, connection, and response errors based on the OCSP definitions in the configuration. Click Reset to clear the OCSP statistics display screen information.