Updated Date: 07/07/2026
OAuth Bearer Single Sign-On Method
You can configure OAuth Bearer SSO as passthrough to use the JSON Web Token (JWT) received from the client. The OAuth scope check authenticates the client, and sends the received token to the backend server.
Before you start, you need to have created an access policy, access profile, and a virtual server to meet your needs. Here we configure OAuth Bearer SSO using the passthrough option for the token source.
You create an OAuth bearer SSO configuration when you want to allow single-sign on using an OAuth token. In this task, the token is retrieved from the client, and is generated on an external OAuth authorization server.
-
On the Main tab, select Access > Single Sign-On > OAuth Bearer.
The OAuth Bearer Configurations screen opens.
-
Click Create.
The New SSO Configuration screen opens.
-
In the Name field, type a name for the SSO configuration.
The maximum length of a single sign-on configuration is 225 characters, including the partition name.
-
For Send Token, select when to send the token:
- To always send the token, select Always.
- To send the token when you receive a 4xx response from the server, select On 4xx Response and choose one or more 4xx responses.
-
For Log Settings, select the log settings to use for the access event logs.
By default, the log settings specified in the access profile are used. You can also create custom log settings or use the default-log-setting for this SSO configuration. Click + to create custom settings.
-
If getting the JWK token from the client, for Token Source, select Passthrough, and select a server from the OAuth Server list.
-
Click Finished.
When you configure an APM access policy that supports single sign-on, it includes an SSO Configuration property. Select the SSO bearer configuration from the object where you want to put SSO into effect.
For example, to use OAuth Bearer SSO, you need an access profile, access policy, and a virtual server. The access profile being used in this configuration must contain an OAuth Bearer SSO configuration. The virtual server needs to specify the access profile.
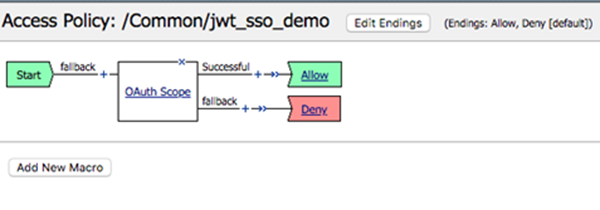
Here is an example access policy configured using passthrough. The JWT token received from the client is used, it goes through the OAuth scope check, and if the check is successful, the received JWT token is sent to the backend server.
You can configure OAuth Bearer SSO to create, sign, and send a JSON Web Token (JWT) to backend applications that require an access token.
Setting this up requires performing the following tasks:
- Create claims for the JWT, as needed
- Create a JSON Web Key (JWK) configuration
- Create an OAuth Bearer SSO configuration
- Associate the OAuth Bearer configuration with the access profile
- Use AAA (AD query), SAML, or other authentication method in the access policy
- Assign the access profile to the virtual server
Before you start, you need to have created an access policy, access profile, and a virtual server to meet your needs. Here we add the OAuth Bearer SSO configuration to your environment.
Bearer tokens are tokens that OAuth 2.0 uses to authorize clients to access protected resources.
OAuth Bearer SSO provides a JSON Web Token (JWT) in the form of a bearer token to the backend resource server. You can configure OAuth Bearer SSO as passthrough (where the JWT received from the client is used), or have APM generate and sign the JWT token for the backend SSO.
You can configure the claims that you want to include in the JSON Web Tokens (JWTs). (A claim specifies a string, and optionally, a value, that represents a resource.) This is only required if you plan to specify claims in your JWTs.
-
On the Main tab, select Access > Federation > OAuth Authorization Server > Claim.
-
Click Create.
-
In the Name field, type a name for the configuration.
-
From Claim Type, select the required claim type from the list. Available options are String, Number, Boolean, or Custom.
-
In the Claim Name field, type a name for the claim.
Note: The following names are reserved claim names, and you cannot use them in OAuth claim configuration:
iss,aud,sub,exp,nbf,iat,jti,x-jti,at_hash,c_hash,azp,acr,amr,sub-jwk,nonce,auth_time,_claim_names,_claim_sources,scope,scope_data,token_type,username, andid_token. -
In the Claim Value field, type a value for the claim depending on its type.
|
Claim Type |
Value can be |
|---|---|
|
String |
Enter ASCII characters or session variable in the Claim Value field. Do not encapsulate the provided claim value in the escaped quotes (\"). |
|
Number |
Enter a valid number or a session variable in the Claim Value field. |
|
Boolean |
Enter |
|
Custom |
Select this option when the claim value is a JSON value type array, object, or null in the Claim Value field.When the Claim Type is set to Custom, you can use both Object (array, null) or String (claim type String is recommended) in the claim value. Ensure the string value is encapsulated in the escaped quotes (\"). For example, if an array contains strings, number, boolean, and null, encapsulate only the string values in quotes within the array. Claim Value = [\“example\”, \“Strings\”, 5, true, null]. Note: For BIG-IP versions 14.1.4.2 or lower, you do not need to encapsulate the string value in escaped quotes for the Custom claim type. |
-
Click Save.
The newly created claim displays on the list.
You associate claims with tokens an OAuth bearer SSO configuration.
A JSON web key configuration specifies a cryptographic JSON web key (JWK). You configure JWKs for the system to use to sign the JSON web tokens that it issues. For example, you use JWK key configurations when setting up OAuth bearer single sign-on.
-
On the Main tab, select Access > Federation > JSON Web Token > Key Configuration.
The Key Configuration screen opens.
-
Click Create.
-
In the Name field, type a name.
-
In ID, type an ID.
This parameter is used to identity a specific JSON web key.
-
For the JWT Type, it specifies the type of JSON Web Token (JWT). Click the applicable JWT type radio button. Available options are JWS and JWE. Select the JWS (JSON Web Signature) or JWE (JSON Web Encryption) option to generate corresponding token type.
-
For Type, select RSA, Octet, or Elliptic Curve. This option specifies the type of cryptographic algorithm used to sign the JSON web key.
- RSA - Uses RSA algorithms
- Elliptic Curve - Uses ECDSA algorithms
- Octet - Uses HMAC algorithms Additional parameters display for the type that you select.
-
For Key Encryption Algorithm, select the required key. This option specifies the key encryption algorithm used in the JWE token generation. Available option is RSA-OAEP algorithm. Default option is None. This option appears when JWT Type is selected as JWE.
-
For Content Encryption Algorithm, select the required key. This option specifies the data encryption algorithm used in the JWE token generation. Supported options are A128GCM and A256GCM algorithms. Default option is None. This option appears when JWT Type is selected as JWE.
-
For Signing Algorithm, select the applicable options such as 256, 384, 512 from the list based on the Type selected. This option specifies RSA, ECDSA (Elliptic Curve), or HMAC (Octet) algorithms depending on the specific Type selected.
-
For the Octet type, you need to configure additional settings:
-
For Use Client Secret, click the checkbox as needed. If selected, the client secret is used by the OAuth client to authenticate to the authorization server for an Octet type. In addition, the encoding format and shared secret are not needed. If not selected, the shared secret is used. When the check box is selected, this option hides the Encoding Format and Shared Secret options.
-
For Encoding Format, select the required format. Available options are None and Base64url. Default selection is None.
-
In Shared Secret, type the secret.
Important: To maximize the security of the algorithm, use enough characters so that the resulting key size matches the block size for the signing algorithm: for HS256, 32 characters; for HS384, 48 characters; for HS512, 64 characters.
-
Click Save.
The newly created JWK displays on the list.
-
-
For the Octet type, you only need to configure one additional setting:
-
In Shared Secret, type a secret.
Important: To maximize the security of the algorithm, type enough characters so that the resulting key size matches the block size for the signing algorithm: for HS256, 32 characters; for HS384, 48 characters; for HS512, 64 characters.
-
Click Save.
The newly created JWK displays on the list.
-
-
To support an RSA or an Elliptic Curve key type, you must either configure settings in the Certificates area or in the Parameters area.
To get the necessary parameters from a certificate, go to the Certificates area and configure these settings:
-
In the Certificates area, for Certificate File, select a certificate.
Important: When BIG-IP acts as an Authorization Server to generate the JWE token, select the Certificate file. If BIG-IP acts as a Client or Resource Server to consume the JWE token, select both Certificate file and corresponding Certificate Key.
Important: When the BIG-IP system is on a chassis platform or is included in an HA pair, do not select the default certificate. F5 strongly discourages the use of the default certificate in a JWK in any configuration.
Note: The Include X5C, Certificate Key, and Key Passphrase settings apply only for a JWK for use with APM as an OAuth authorization server.
-
In the Certificates area, when the Include X5C checkbox is enabled, specifies that the JWKS endpoint response contains a chain of one or more PKIX certificates. This option appears when a certificate is selected from the Certificate File list.
-
In the Certificates area, for the Certificate Key, select a certificate key from the list. This option specifies the certificate key that this JSON web key uses to sign the JWT.
For a BIG-IP system on a chassis platform or in an HA pair, do not select the default certificate key, default.key. F5 strongly discourages the use of the default key in a JSON web key in any configuration.
-
In the Certificates area, for the Key Passphrase, enter a key passphrase. This option specifies the passphrase used to encrypt the certificate key provided in the Certificate Key field.
-
For Certificate Chain, select one.
-
Click Save.
The newly created JWK displays on the list.
-
-
For the RSA type, in the absence of a certificate, go to the Parameters area and complete these substeps:
-
For Modulus, type the modulus of the RSA public key.
-
For Public Exponent, type the public exponent of the RSA public key.
-
Supply values for the SHA-1 Thumbprint, and SHA-256 Thumbprint fields.
-
Click Save.
The newly created JWK displays on the list.
-
-
For the Elliptic Curve type, in the absence of a certificate, go to the Parameters area and complete these substeps:
-
For X Coordinate, type an X coordinate for the elliptic curve.
-
For Y Coordinate, type an Y coordinate for the elliptic curve.
-
For Curve, specify an elliptic curve.
For example, type
P-256. -
Supply values for the SHA-1 Thumbprint, and SHA-256 Thumbprint fields.
-
Click Save.
The newly created JWK displays on the list.
-
You create an OAuth bearer SSO configuration when you want to allow single-sign on using an OAuth token. SSO generates a signed JWT (JSON web token) and sends it to the backend as an OAuth bearer token.
-
On the Main tab, select Access > Single Sign-On > OAuth Bearer.
The OAuth Bearer Configurations screen opens.
-
Click Create.
The New SSO Configuration screen opens.
-
In the Name field, type a name for the SSO configuration.
The maximum length of a single sign-on configuration is 225 characters, including the partition name.
-
For Send Token, select when to send the token:
- To always send the token, select Always.
- To send the token when you receive a 4xx response from the server, select On 4xx Response and choose one or more 4xx responses.
-
For Log Settings, select the log settings to use for the access event logs.
By default, the log settings specified in the access profile are used. You can also create custom log settings or use the default-log-setting for this SSO configuration. Click + to create custom settings.
-
For Token Source, select Generate JWT and follow the remaining steps in this task to define the JWT.
-
For Issuer, type the URL for the JWT issuer. For example,
https://jwt-issuer.com. -
In Subject, retain the default value,
%{session.assigned.uuid}, or type a subject for the JWT.The session variable session.assigned.uuid contains the UUID that the system assigns to the session after the access policy completes.
-
To increase performance until the cached JWT expires, click Enable Token Cache to store the token in cache for the session and reuse it as needed.
-
For Access Token Lifetime, type the number of minutes you want the JWT access token to be considered valid.
The default is 5 minutes.
-
When the Ignore Expired Certificate Validation checkbox is selected, the certificate is used for signing a JWT access token even if it is expired. When cleared, the system sends an error message when the certificate has expired.
-
For the JWT Key Type, click the required JSON key type radio button. Specifies the type of JSON Web Token (JWT) key. Available options are JWS and JWE. This option is visible when the Generate JWT is selected from the Token Source dropdown. Select the JWS (JSON Web Signature) or JWE (JSON Web Encryption) option to generate corresponding token type. Based on the JWT key type selection (JWS or JWE), the respective JWT primary keys are populated and select the applicable keys from the dropdown list.
-
For the JWT Primary Key, select a JSON Web Key (JWK) configuration from the list. This option specifies the primary signing key for the JWT. This option is visible when the Generate JWT is selected from the Token Source dropdown. APM uses the JWK to retrieve the shared key (symmetric) or the private key (asymmetric) used to sign the JWT access token. If the key is asymmetric, the configured public key is returned as part of JWKS URL response.
Note: JSON web keys are configured in the Access > Federation > JSON Web Token area of the product.
-
From Signing Key, select the JWK key configuration previously created for signing the token.
-
For Audience, add the audience claim or claims for which the JWT access token is intended. This is a list of values. Each value in this list can be a string, URI, or session variable.
-
For Scope, type one or more space-separated scope strings (using the ASCII character set) or session variables. For example,
openid phone email.Note: For example, to create a JWT claim called
scope, specify it here. You cannot use reserved words such as scope as the name of a JWT claim. -
If you created claims for the token, for JWT Claims, move the previously created claims you want to use to the Selected list.
-
The other fields are not required but you can set them if needed.
-
Click Finished.
When you configure an APM object that supports single sign-on, it includes an SSO Configuration property. Select the SSO bearer configuration from the object where you want to put SSO into effect.
These settings are available when you create an OAuth Bearer SSO configuration.
|
Setting |
Value |
Additional Information |
|---|---|---|
|
Name |
Name of the SSO configuration. |
The name must begin with a letter, or underscore, and contain only letters, numbers, underscores, dashes, and periods. Maximum length including the partition name is 225 characters. Avoid using global reserved words in the name, such as all, delete, disable, enable, help, list, none, show, or None. |
|
SSO Method |
Displays the type of SSO configuration. |
Cannot be changed. |
|
Headers |
Header name-value pairs to send with the SSO method. |
Available when you select Advanced from the General Properties list. |
|
Send Token |
Specifies when to send the token (for OAuth Bearer). |
Specify Always to always send the token. Specify On 4xx Response to send the token when you receive a 4xx response from the server; select On 400, On 401, and/or On 403. The system first forwards the user’s HTTP request to the web server without inserting the token. If the server requests authentication by responding with a 4xx status code (that is enabled), the system retries the request with the token. |
|
Log Settings |
Specifies which log settings to use for the access event logs. By default, the log settings specified in the access profile are used. |
You can create custom log settings or use the default-log-settings for this SSO configuration. Click + to create custom settings. |
These are the settings to use when the bearer token is retrieved from another source.
| Setting | Value | Additional Information |
|---|---|---|
| Token Source | Specifies Passthrough to indicate that the user has a token from another source. | Default value |
| OAuth Server | Specifies the OAuth server that provided the token. | Required value |
These are the settings to use when the system generates and signs the OAuth bearer token. For this configuration, you need to have created a JWK key configuration and optional JWT claims.
| Setting | Value | Additional Information |
|---|---|---|
| Token Source | Specifies Generate JWT to indicate that you want the system to create a JWT access token. | The system creates a JWT token and sends it to the backend server as an OAuthBearer token. |
| Issuer | Specifies the issuer of the JWT. | This must be a URI and it is mandatory. For example, https://authserver/oauth2. |
| Subject | Specifies what the token is intended for. | The value can be a string, URI, or session variable, such as %{session.assigned.uuid}. |
| Enable Token Cache | When selected, stores the token in cache for the session and reuses it; enabling the cache provides increased performance. | When cleared, the token is generated for every request. |
| Access Token Lifetime | Specifies the number of minutes a JWT access token is considered valid. | The default is 5 minutes. |
| Ignore Expired Certificate Validation | When selected, the certificate is used for signing a JWT access token even if it is expired. | When cleared, the system sends an error message if the certificate has expired. |
| JWT Key Type | Click the required JSON key type radio button. Available options are JWS and JWE. | Specifies the type of JSON Web Token (JWT) key. This option is visible when the Generate JWT is selected from the Token Source dropdown. Select the JWS (JSON Web Signature) or JWE (JSON Web Encryption) option to generate corresponding token type. Based on the JWT key type selection (JWS or JWE), the respective JWT primary keys are populated and select the applicable keys from the dropdown list. |
| JWT Primary Key | Select a JSON Web Key (JWK) configuration from the list | This option specifies the primary signing key for the JWT. This option is visible when the Generate JWT is selected from the Token Source dropdown. APM uses the JWK to retrieve the shared key (symmetric) or the private key (asymmetric) used to sign the JWT access token. If the key is asymmetric, the configured public key is returned as part of JWKS URL response. |
| Signing Key | Specifies a JSON web key (JWK) configuration for signing the token. | It is mandatory. You can create JWKs in Access > Federation > JSON Web Token > Key Configuration. |
| Audience | Specifies the audience claim for which the JWT access token is intended. | This is a list of values. Each value in this list can be a string, URI, or session variable. For example, https://newapp. |
| Scope | Specifies one or more space-separated scope strings (using the ASCII character set) or session variables. | For example, openid phone email. |
| JWT Claims | Specifies a list of claims that define additional information that you want to transmit as part of the JWT access token. | You can create claims in Access > Federation > OAuth Authorization Server > Claim. |
You add an OAuth bearer SSO configuration to an access profile if you want to allow single sign-on using an OAuth bearer token.
Note: You can also select an SSO configuration from a portal access resource.
-
On the Main tab, click Access > Profiles / Policies > Access Profiles (Per-Session Policies).
The Access Profiles (Per-Session Policies) screen displays.
-
Click the name of the access profile that you want to edit.
The properties screen opens.
-
Click SSO / Auth Domains on the menu bar.
The SSO Across Authentication Domains screen opens.
-
From the SSO Configuration list, select the OAuth bearer SSO configuration you want the access profile to use.
Other settings on the screen are not relevant when using an OAuth bearer SSO configuration.
-
Click Update.
An access profile goes into effect when it is associated with a virtual server.
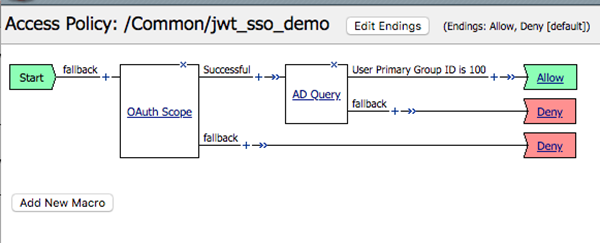
Here is an example access policy using an OAuth scope check. If the check is successful, an AD Query retrieves more user data. Then, SSO generates the JWT access token with the retrieved infromation and sends it to the backend server.
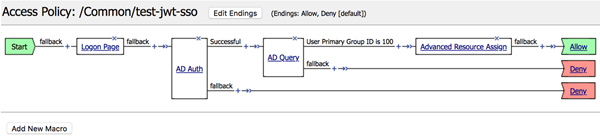
Here is an example access policy configured with an AAA agent. It goes through the OAuth scope check. If the check is successful, an AD Query retrieves more user data. Then, SSO generates the JWT token with the retrieved infromation and send to the backend server.
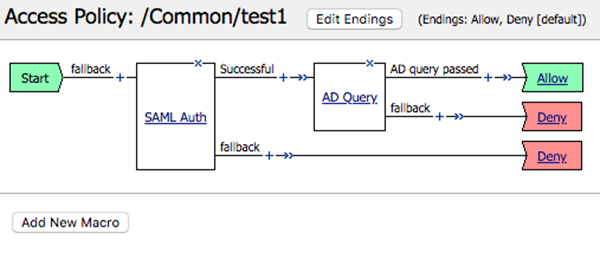
Here is an access policy configured with a SAML SP agent. SAML authentication retrieves the SAML2.0 bearer token and validates.
You associate the access profile with the virtual server so that the system can apply the profile to incoming traffic.
-
On the Main tab, click Local Traffic > Virtual Servers.
The Virtual Server List screen opens.
-
Click the name of the virtual server you want to modify.
-
In the Access Policy area, from the Access Profile list, select the access profile that you configured earlier.
-
Click Update to save the changes.