Updated Date: 07/07/2026
RSA SecurID Authentication
RSA SecurID is a two-factor authentication mechanism based on a one-time passcode (OTP) that is generated by using a token code provided by a software or hardware authenticator. Both BIG-IP Edge Client® for Windows and OS X systems support the RSA SecurID feature.
A token is a one-time authentication code generated every 60 seconds by an authenticator (hardware or software) assigned to the user.
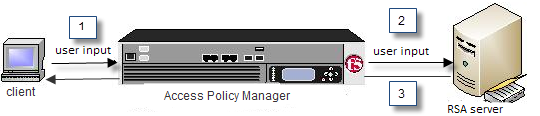
- Access Policy Manager displays the logon page to the user. The logon page accepts the username and PIN code provided by the user, requests the passcode from RSA Secure-ID Software Token software, and sends the username and passcode to Access Policy Manager.
- Access Policy Manager sends the user-specified inputs to the RSA authentication server.
- Based on the authentication results, Access Policy Manager grants or denies access to the client.
Before you can use a SecurID AAA server in Access Policy Manager (APM®), you must configure specific elements and settings on RSA SecurID. To provide RSA SecurID authentication for APM, RSA Authentication Manager requires:
- An authentication agent for APM in its database.
- A RADIUS client that corresponds to the authentication agent for APM.
- A SecurID token policy .
- Authentication agent
- To create an authentication agent from the RSA Security Console, you need to provide this information:
- Hostname
- IP addresses for all network interfaces
Note: You must set Agent Type to Standard Agent.
- RADIUS client
- To create a RADIUS client from the RSA Security Console, you need to provide this information:
- Hostname
- IP addresses for all network interface
- RADIUS secret (this RADIUS secret must match the corresponding RADIUS secret on the APM system).
- Character requirements setting in a SecurID token policy
- To avoid a problem in the RSA SDK with alphabetic-only PIN policies, do not use them. When you set up a SecurID token policy, set the character requirements to one of these values:
- Require numeric PINs
- Allow alpha-numeric PINs
For high availability to work with RSA SecurID, the same node secret is required on both members of the HA pair.
In addition, one of these configurations must be in place for IP addresses.
One alternative is to use a SNAT Pool on the BIG-IP system to force the same source IP address. For more information, see SOL15517: Specifying the source IP address used by BIG-IP APM AAA servers on the AskF5™ web site located at http://support.f5.com/.
Instead of using a SNAT Pool on the BIG-IP system, both self IP addresses can be specified in the RSA host agent definition. The definition must include:
- A floating IP address, created from the RSA server, for the host agent.
- The static self IP addresses of the nodes defined as secondary nodes.
The Configuration file generated on the RSA server contains all three IP addresses, so the originating traffic from any of the sub-nodes will be accepted.
This task list includes all steps required to set up this configuration and provides an example access policy that uses both RSA SecurID and Active Directory authentication. It is only an example. If you are adding RSA SecurID authentication to an existing access policy, you do not need to create another access profile.
Configure a SecurID AAA server for Access Policy Manager (APM) to request RSA SecurID authentication from an RSA Manager authentication server.
-
On the Main tab, click Access > Authentication.
The Authentication screen opens.
-
On the menu bar, click AAA Servers By Type, and select SecurID.
The SecurID screen opens and displays the servers list.
-
Click Create.
The New Server properties screen opens.
-
In the Name field, type a unique name for the authentication server.
-
In the Configuration area, for the Agent Host IP Address (must match the IP address in SecurID Configuration File) setting, select an option as appropriate:
- Select from Self IP List: Choose this when there is no NAT device between APM and the RSA Authentication Manager. Select an IP from the list of those configured on the BIG-IP system (in the Network area of the Configuration utility).
- Other: Choose this when there is a NAT device in the network path between Access Policy Manager and the RSA Authentication Manager server. If selected, type the address as translated by the NAT device. Note: This setting does not change the source IP address of the packets that are sent to the RSA SecurID server. (Layer 3 source addresses remain unchanged.) The agent host IP address is used only in Layer 7 (application layer) information that is sent to the RSA SecurID server.
-
For the SecurID Configuration File setting, browse to upload the sdconf.rec file.
Consult your RSA Authentication Manager administrator to generate this file for you.
-
Click Finished.
The new server displays on the list.
This adds a new RSA SecurID server to the AAA Servers list.
You create an access profile to provide the access policy configuration for a virtual server that establishes a secured session.
-
On the Main tab, click Access > Profiles / Policies > Access Profiles (Per-Session Policies).
The Access Profiles (Per-Session Policies) screen displays.
-
Click Create.
The New Profile screen displays.
-
In the Name field, type a unique name for the access profile.
-
From the Profile Type list, select one these options:
-
ALL: Select to support LTM-APM and SSL-VPN access types.
-
LTM-APM: Select for a web access management configuration.
-
OAuth-Resource Server: For configuring APM to act as an OAuth resource server that provides an OAuth authorization layer into an API gateway.
-
RDG-RAP: Select to validate connections to hosts behind APM when APM acts as a gateway for RDP clients.
-
SSL-VPN: Select to configure network access, portal access, or application access. (Most access policy items are available for this type.)
-
SSO: Select to configure matching virtual servers for Single Sign-On (SSO).
Note: No access policy is associated with this type of access profile
-
SWG - Transparent: Select to configure access using Secure Web Gateway transparent forward proxy.
-
SWG - Explicit: Select to configure access using Secure Web Gateway explicit forward proxy.
-
System Authentication: Select to configure administrator access to the BIG-IP system (when using APM as a pluggable authentication module).
-
Identity Service: Used internally to provide identity service for a supported integration. Only APM creates this type of profile.
Note: You can edit Identity Service profile properties.
Note: Depending on licensing, you might not see all of these profile types.
Additional settings display.
-
-
From the Profile Scope list, select one these options to define user scope:
- Profile: Access to resources behind the profile.
- Virtual Server: Access to resources behind the virtual server.
- Global: Access to resources behind any access profile with global scope.
- Named: Access for SSL Orchestrator users to resources behind any access profile with global scope.
- Public: Access to resources that are behind the same access profile when the Named scope has configured the session and is checked based on the value and string configured in the Named scope field.
-
For the Customization Type, use the default value Modern. For additional information, refer to the Creating an access profile topic.
-
The Client Inspection Settings option appears when the Profile Type is selected as All or SSL-VPN under the General Properties section.
-
The Check Interval option defines time (in seconds) between periodic inspections of recurring endpoint checks configured in the access policy to ensure compliance of the client with the required security policies while the session remains active. Any incompliance activity results in the VPN session termination. Default value is 90 seconds.
Note: Note: This option is applicable only for the upcoming F5 Access for Mac OS client releases.
-
In the Language Settings area, add and remove accepted languages, and set the default language.
If any browser language does not match with the accepted languages list, the browser uses the default language.
-
Click Finished.
The access profile displays in the Access Profiles List. Default-log-setting is assigned to the access profile.
Confirm that the correct log settings are selected for the access profile to ensure that events are logged as you intend.
Note: Log settings are configured in the Access > Overview > Event Log > Settings area of the product. They enable and disable logging for access system and URL request filtering events. Log settings also specify log publishers that send log messages to specified destinations.
-
On the Main tab, click Access > Profiles / Policies > Access Profiles (Per-Session Policies).
The Access Profiles (Per-Session Policies) screen displays.
-
Click the name of the access profile that you want to edit.
The properties screen opens.
-
On the menu bar, click Logs.
The access profile log settings display.
-
Move log settings between the Available and Selected lists.
You can assign up to three log settings that enable access system logging to an access profile. You can assign additional log settings to an access profile provided that they enable logging for URl request logging only.
Note: Logging is disabled when the Selected list is empty.
-
Click Update.
An access profile is in effect when it is assigned to a virtual server.
Before you add RSA SecurID authentication to an access policy, you must have at least one AAA SecurID server configured in Access Policy Manager (APM). You must also create a configuration file on the RSA SecurID console side to connect a BIG-IP system to an RSA server. You might need an AAA server configured for another type of authentication, depending on the number of authentication actions that you plan to add to this access policy.
You add RSA SecurID authentication to an access policy so that APM can request RSA SecurID authentication using the AAA SecurID server that you specify.
-
On the Main tab, click Access > Profiles / Policies > Access Profiles (Per-Session Policies).
The Access Profiles (Per-Session Policies) screen displays.
-
In the Per-Session Policy column, click the Edit link for the access profile you want to configure.
The visual policy editor opens the access policy in a separate screen.
-
Click the (+) icon anywhere in the access policy to add a new item.
Note: Only an applicable subset of access policy items is available for selection in the visual policy editor for any access profile type.
A popup screen opens, listing predefined actions on tabs such as General Purpose, Authentication, and so on.
-
On the Logon tab, select Logon Page and click the Add Item button.
The Logon Page Agent properties screen opens.
-
Click Save.
The properties screen closes and the policy displays.
-
Click the (+) icon anywhere in the access policy to add a new item.
Note: Only an applicable subset of access policy items is available for selection in the visual policy editor for any access profile type.
A popup screen opens, listing predefined actions on tabs such as General Purpose, Authentication, and so on.
-
On the Authentication tab, select RSA SecurID and click Add Item.
A properties popup screen opens.
-
From the AAA Server list in the properties popup screen, select the SecurID AAA server that you want to associate to the agent.
-
Set Max Logon Attempts to a value from 1 to 5.
-
From BIG-IP v14.0 onwards, you can use username and password source fields to add custom session variables. In the Username Source field, specify the session variable name from which RSA SecurID Auth agent should read the username. The default value is session.logon.last.username.
-
In the Password Source field, specify the session variable name from which RSA SecurID Auth agent should read the password. The default value is session.logon.last.password.
-
Click Save.
The properties screen closes and the policy displays.
-
Click the (+) icon anywhere in the access policy to add a new item.
Note: Only an applicable subset of access policy items is available for selection in the visual policy editor for any access profile type.
A popup screen opens, listing predefined actions on tabs such as General Purpose, Authentication, and so on.
-
On the Assignment tab, select Resource Assign and click Add Item.
A properties popup screen opens.
-
From the Network Access list in the properties popup screen, select the network connection for your remote connection.
-
Click Save.
The properties screen closes and the policy displays.
-
Add any other actions you require.
-
Click Apply Access Policy to save your configuration.
This adds RSA SecurID AAA authentication to the access policy.
When creating a virtual server for an access policy, specify an IP address for a single host as the destination address.
-
On the Main tab, click Local Traffic > Virtual Servers.
The Virtual Server List screen opens.
-
Click Create.
The New Virtual Server screen opens.
-
In the Name field, type a unique name for the virtual server.
-
For the Destination Address/Mask setting, confirm that the Host button is selected, and type the IP address in CIDR format.
The supported format is address/prefix, where the prefix length is in bits. For example, an IPv4 address/prefix is 10.0.0.1 or 10.0.0.0/24, and an IPv6 address/prefix is ffe1::0020/64 or 2001:ed8:77b5:2:10:10:100:42/64. When you use an IPv4 address without specifying a prefix, the BIG-IP system automatically uses a /32 prefix.
Note: The IP address you type must be available and not in the loopback network.
-
In the Service Port field:
- If you want to specify a single service port or all ports, confirm that the Port button is selected, and type or select a service port.
- If you want to specify multiple ports other than all ports, select the Port List button, and confirm that the port list that you previously created appears in the box.
-
From the HTTP Profile (Client) list, select a previously-created HTTP/2 profile for client-side traffic.
-
If you use server SSL for this connection, from the SSL Profile (Server) list, select a server SSL profile.
-
If you use client SSL for this profile, from the SSL Profile (Client) list, select a client SSL profile.
-
In the Access Policy area, from the Access Profile list, select the access profile that you configured earlier.
-
From the Connectivity Profile list, select a connectivity profile.
You can select the default connectivity profile, connectivity if you have not defined a specific profile for the traffic that is directed to this virtual server.
-
Click Finished.
Typically, when you configure an authentication action, you precede it with a Logon Page action to collect credentials. This example describes how to include more than one authentication item (RSA and AD authentication) in an access policy and present a Logon Page only once.
The RSA SecurID action accepts a user name and a token at logon, while Active Directory accepts a user name and password. To accommodate these differences, customize the Logon Page item. In this example, you customize the Logon Page action to collect the password for the AD Auth action, and the token for the RSA SecurID action.

On the logon page, configure the password settings for the fields as in the following example.
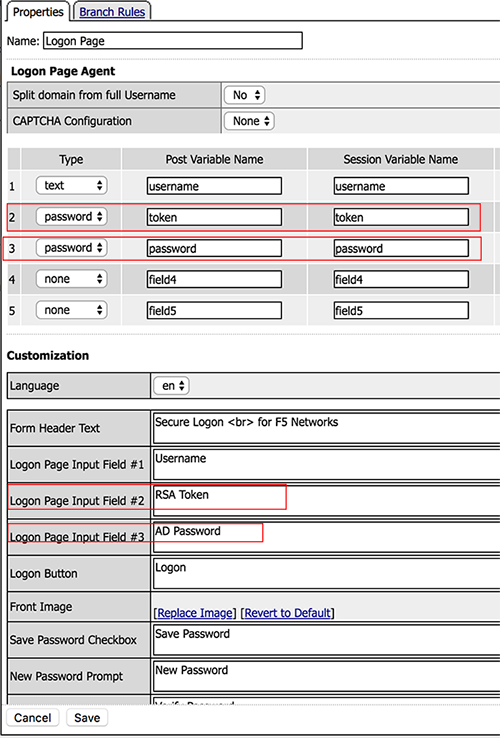
The first highlighted entry is configured as a password with the post variable name token and the session variable name token. The Logon Page Input Fields are also customized to indicate that Logon Page Input Field #2 is an RSA Token, and Logon Page Input Field #3 is a Password.
The highlighted entries in the Customization area change the labels that the Logon Page displays, from Password to RSA Token Code for the first password and to AD Password for the second password.
In the RSA SecurID action, you can configure the token session variable. In the Password Source field, change the password source to session.logon.last.token.
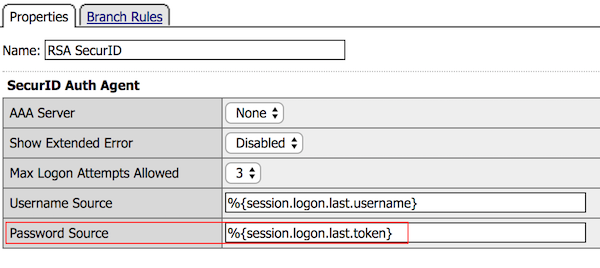
The AD Auth action automatically uses session.logon.last.password.
The Logon Page action now correctly captures the password for AD Auth and the Token for RSA SecurID.
When the RSA SecurID access policy item runs, it populates session variables which are then available for use in access policy rules. The tables list the session variables for the RSA SecurID access policy item and a logon access policy item.
| Session Variable | Description |
|---|---|
| session.securid.last.result | Provides the result of the RSA SecurID authentication. The available values are:
|
| Session Variable | Description |
|---|---|
| session.logon.last.username | Provides user credentials. The username string is stored after encrypting, using the system’s client key. |
| session.logon.last.password | Provides user credentials. The password string is stored after encrypting, using the system’s client key. |
You might run into problems with RSA SecurID on Windows using RADIUS configuration. Follow these tips to try to resolve any issues that you encounter.
| Possible error messages | Possible explanations and corrective actions |
|---|---|
| The RADIUS server is inactive | Even if the RADIUS server was started from the SecurID options window on the Windows SecurID server, the server might not be active. In Windows Services Manager, make sure that the server is set to start each time the server boots, and is currently running. RSA SecurID authentication using RADIUS takes place on a different port than the native securid ID. |
| The SecurID is configured incorrectly for RADIUS authentication | While using RSA SecurID over RADIUS, the SecurID server is a client of itself. The RADIUS service functions as a standalone process, and if the SecurID server is not set up as a client of itself, it rejects the Access Policy Manager authentication request and does not store anything in the logs. |
| No response from the RSA SecurID server | Check that RSA Authentication Manager is configured properly. To facilitate communication between Access Policy Manager and the RSA Authentication Manager, you must add an Authentication Agent record to the RSA Authentication Manager database. The Authentication Agent record identifies the Access Policy Manager within its database, and contains information about communication and encryption. To create the Authentication Agent record, you need this information.
|
RSA SecurID is a two-factor authentication mechanism based on a one-time passcode (OTP) that is generated by using a token code provided by a software or hardware authenticator. Both BIG-IP Edge Client for Windows and OS X systems support the RSA SecurID feature.
A token is a one-time authentication code generated every 60 seconds by an authenticator (hardware or software) assigned to the user.
- Access Policy Manager displays the logon page to the user. The logon page accepts the username and PIN code provided by the user, requests the passcode from RSA Secure-ID Software Token software, and sends the username and passcode to Access Policy Manager.
- Access Policy Manager sends the user-specified inputs to the RSA authentication server.
- Based on the authentication results, Access Policy Manager grants or denies access to the client.
For BIG-IP Edge Client ® for Windows or BIG-IP Edge Client for Mac to support RSA SecurID (with soft token) automation, RSA SecurID must be configured for pin plus tokencode.
This task list includes all steps required to set up this configuration, and provides an example access policy that uses RSA SecurID authentication for F5 BIG-IP Edge Client. It is only an example. If you are adding RSA SecurID authentication to an existing access policy, you do not need to create another access profile.
Configure a SecurID AAA server for Access Policy Manager (APM) to request RSA SecurID authentication from an RSA Manager authentication server.
-
On the Main tab, click Access > Authentication.
The Authentication screen opens.
-
On the menu bar, click AAA Servers By Type, and select SecurID.
The SecurID screen opens and displays the servers list.
-
Click Create.
The New Server properties screen opens.
-
In the Name field, type a unique name for the authentication server.
-
In the Configuration area, for the Agent Host IP Address (must match the IP address in SecurID Configuration File) setting, select an option as appropriate:
- Select from Self IP List: Choose this when there is no NAT device between APM and the RSA Authentication Manager. Select an IP from the list of those configured on the BIG-IP system (in the Network area of the Configuration utility).
- Other: Choose this when there is a NAT device in the network path between Access Policy Manager and the RSA Authentication Manager server. If selected, type the address as translated by the NAT device. Note: This setting does not change the source IP address of the packets that are sent to the RSA SecurID server. (Layer 3 source addresses remain unchanged.) The agent host IP address is used only in Layer 7 (application layer) information that is sent to the RSA SecurID server.
-
For the SecurID Configuration File setting, browse to upload the sdconf.rec file.
Consult your RSA Authentication Manager administrator to generate this file for you.
-
Click Finished.
The new server displays on the list.
This adds a new RSA SecurID server to the AAA Servers list.
You create an access profile to provide the access policy configuration for a virtual server that establishes a secured session.
-
On the Main tab, click Access > Profiles / Policies > Access Profiles (Per-Session Policies).
The Access Profiles (Per-Session Policies) screen displays.
-
Click Create.
The New Profile screen displays.
-
In the Name field, type a unique name for the access profile.
-
From the Profile Type list, select SSL-VPN.
Additional settings display.
-
From the Profile Scope list, retain the default value or select another.
- Profile: Gives an user access only to resources that are behind the same access profile. This is the default value.
- Virtual Server: Gives an user access only to resources that are behind the same virtual server.
- Global: Gives an user access to resources behind any access profile that has global scope.
- Named: Gives an SSL Orchestrator user access to resources behind any access profile that has global scope.
-
For Customization Type, select Modern.
You can also use Standard but Modern customization is simpler and provides better compatibility for modern cross-platform and cross-device applications.
-
To configure timeout and session settings, select the Custom check box.
-
In the Inactivity Timeout field, type the number of seconds that should pass before the access policy times out. Type 0 to set no timeout.
If there is no activity (defined by the Session Update Threshold and Session Update Window settings in the Network Access configuration) between the client and server within the specified threshold time, the system closes the current session.
-
In the Access Policy Timeout field, type the number of seconds that should pass before the access profile times out because of inactivity.
Type 0 to set no timeout.
-
In the Maximum Session Timeout field, type the maximum number of seconds the session can exist.
Type 0 to set no timeout.
-
In the Minimum Authentication Failure Delay field, type the minimum number of seconds to delay before displaying an error after authentication failure. The default value is 2. Delay affects the following authentication types: Active Directory, HTTP, Kerberos, LDAP, local user database, one-time password verification, Oracle Access Manager, RADIUS, SecurID, and TACACS+.
-
In the Maximum Authentication Failure Delay field, type the maximum number of seconds of delay before displaying an error after authentication failure. The default value is 5.
Note: Set this value to no more than one-half the Access Policy Timeout setting value and no more than 65 seconds greater than the value of the Minimum Authentication Failure Delay setting.
-
In the Max Concurrent Users field, type the maximum number of users that can use this access profile at the same time.
Type 0 to set no maximum.
-
In the Max Sessions Per User field, type the maximum number of concurrent sessions that one user can start.
Type 0 to set no maximum.
Note: Only a user in the administrator, application editor, manager, or resource administrator role has access to this field.
-
In the Max In Progress Sessions Per Client IP field, type the maximum number of concurrent sessions that can be in progress for a client IP address.
When setting this value, take into account whether users will come from a NAT-ed or proxied client address and, if so, consider increasing the value accordingly. The default value is 128.
Note: Only a user in the administrator, application editor, manager, or resource administrator role has access to this field.
Note: F5 does not recommend setting this value to 0 (unlimited).
-
Select the Restrict to Single Client IP check box to restrict the current session to a single IP address.
This setting associates the session ID with the IP address.
Note: Only a user in the administrator, application editor, manager, or resource administrator role has access to this field.
Upon a request to the session, if the IP address has changed the request is redirected to a logout page, the session ID is deleted, and a log entry is written to indicate that a session hijacking attempt was detected. If such a redirect is not possible, the request is denied and the same events occur.
-
To redirect users attempting to access the root URI in a validated session with a webtop, select Redirect client to webtop on root URI access.
Users are redirected to the webtop in this case. Otherwise, requests are forwarded.
-
To configure logout URIs, in the Configurations area, type each logout URI in the URI field, and then click Add.
-
In the Logout URI Timeout field, type the delay in seconds before logout occurs for the customized logout URIs defined in the Logout URI Include list.
-
To configure SSO:
- For users to log in to multiple domains using one SSO configuration, skip the settings in the SSO Across Authentication Domains (Single Domain mode) area. You can configure SSO for multiple domains only after you finish the initial access profile configuration.
- For users to log in to a single domain using an SSO configuration, configure settings in the SSO Across Authentication Domains (Single Domain mode) area, or you can configure SSO settings after you finish the initial access profile configuration.
-
In the Domain Cookie field, specify a domain cookie, if the application access control connection uses a cookie.
-
In the Cookie Options setting, specify whether to use a secure cookie.
- If the policy requires a secure cookie, select the Secure check box to add the secure keyword to the session cookie.
- If you are configuring an LTM access scenario that uses an HTTPS virtual server to authenticate the user and then sends the user to an existing HTTP virtual server to use applications, clear this check box.
-
If the access policy requires a persistent cookie, in the Cookie Options setting, select the Persistent check box.
This sets cookies if the session does not have a webtop. When the session is first established, session cookies are not marked as persistent; but when the first response is sent to the client after the access policy completes successfully, the cookies are marked persistent. Persistent cookies are updated for the expiration timeout every 60 seconds. The timeout is equal to session inactivity timeout. If the session inactivity timeout is overwritten in the access policy, the overwritten value will be used to set the persistent cookie expiration.
-
From the SSO Configuration list, select an SSO configuration.
-
The Client Inspection Settings option appears when the Profile Type is selected as All or SSL-VPN under the General Properties section.
-
The Check Interval option defines time (in seconds) between periodic inspections of recurring endpoint checks configured in the access policy to ensure compliance of the client with the required security policies while the session remains active. Any incompliance activity results in the VPN session termination. Default value is 90 seconds.
Note: Note: This option is applicable only for the upcoming F5 Access for Mac OS client releases.
-
In the Language Settings area, add and remove accepted languages, and set the default language.
If any browser language does not match with the accepted languages list, the browser uses the default language.
-
Click Finished. For additional information, refer to the Creating an access profile topic.
The access profile displays in the Access Profiles List. Default-log-setting is assigned to the access profile.
To add an SSO configuration for multiple domains, click SSO / Auth Domains on the menu bar. To provide functionality with an access profile, you must configure the access policy. The default access policy for a profile denies all traffic and contains no actions. Click Edit in the Access Policy column to edit the access policy.
Confirm that the correct log settings are selected for the access profile to ensure that events are logged as you intend.
Note: Log settings are configured in the Access > Overview > Event Log > Settings area of the product. They enable and disable logging for access system and URL request filtering events. Log settings also specify log publishers that send log messages to specified destinations.
-
On the Main tab, click Access > Profiles / Policies > Access Profiles (Per-Session Policies).
The Access Profiles (Per-Session Policies) screen displays.
-
Click the name of the access profile that you want to edit.
The properties screen opens.
-
On the menu bar, click Logs.
The access profile log settings display.
-
Move log settings between the Available and Selected lists.
You can assign up to three log settings that enable access system logging to an access profile. You can assign additional log settings to an access profile provided that they enable logging for URl request logging only.
Note: Logging is disabled when the Selected list is empty.
-
Click Update.
An access profile is in effect when it is assigned to a virtual server.
Before you add RSA SecurID authentication to an access policy, you must have at least one AAA SecurID server configured in Access Policy Manager (APM). You must also create a configuration file on the RSA SecurID console side to connect a BIG-IP system to an RSA server. You might need an AAA server configured for another type of authentication, depending on the number of authentication actions that you plan to add to this access policy.
You add RSA SecurID authentication to an access policy so that APM can request RSA SecurID authentication using the AAA SecurID server that you specify.
-
On the Main tab, click Access > Profiles / Policies > Access Profiles (Per-Session Policies).
The Access Profiles (Per-Session Policies) screen displays.
-
In the Per-Session Policy column, click the Edit link for the access profile you want to configure.
The visual policy editor opens the access policy in a separate screen.
-
Click the (+) icon anywhere in the access policy to add a new item.
Note: Only an applicable subset of access policy items is available for selection in the visual policy editor for any access profile type.
A popup screen opens, listing predefined actions on tabs such as General Purpose, Authentication, and so on.
-
On the Logon tab, select Logon Page and click the Add Item button.
The Logon Page Agent properties screen opens.
-
Click Save.
The properties screen closes and the policy displays.
-
Click the (+) icon anywhere in the access policy to add a new item.
Note: Only an applicable subset of access policy items is available for selection in the visual policy editor for any access profile type.
A popup screen opens, listing predefined actions on tabs such as General Purpose, Authentication, and so on.
-
On the Authentication tab, select RSA SecurID and click Add Item.
A properties popup screen opens.
-
From the AAA Server list in the properties popup screen, select the SecurID AAA server that you want to associate to the agent.
-
Set Max Logon Attempts to a value from 1 to 5.
-
From BIG-IP v14.0 onwards, you can use username and password source fields to add custom session variables. In the Username Source field, specify the session variable name from which RSA SecurID Auth agent should read the username. The default value is session.logon.last.username.
-
In the Password Source field, specify the session variable name from which RSA SecurID Auth agent should read the password. The default value is session.logon.last.password.
-
Click Save.
The properties screen closes and the policy displays.
-
Click the (+) icon anywhere in the access policy to add a new item.
Note: Only an applicable subset of access policy items is available for selection in the visual policy editor for any access profile type.
A popup screen opens, listing predefined actions on tabs such as General Purpose, Authentication, and so on.
-
On the Assignment tab, select Resource Assign and click Add Item.
A properties popup screen opens.
-
From the Network Access list in the properties popup screen, select the network connection for your remote connection.
-
Click Save.
The properties screen closes and the policy displays.
-
Add any other actions you require.
-
Click Apply Access Policy to save your configuration.
This adds RSA SecurID AAA authentication to the access policy.
When creating a virtual server for an access policy, specify an IP address for a single host as the destination address.
-
On the Main tab, click Local Traffic > Virtual Servers.
The Virtual Server List screen opens.
-
Click Create.
The New Virtual Server screen opens.
-
In the Name field, type a unique name for the virtual server.
-
For the Destination Address/Mask setting, confirm that the Host button is selected, and type the IP address in CIDR format.
The supported format is address/prefix, where the prefix length is in bits. For example, an IPv4 address/prefix is 10.0.0.1 or 10.0.0.0/24, and an IPv6 address/prefix is ffe1::0020/64 or 2001:ed8:77b5:2:10:10:100:42/64. When you use an IPv4 address without specifying a prefix, the BIG-IP system automatically uses a /32 prefix.
Note: The IP address you type must be available and not in the loopback network.
-
In the Service Port field:
- If you want to specify a single service port or all ports, confirm that the Port button is selected, and type or select a service port.
- If you want to specify multiple ports other than all ports, select the Port List button, and confirm that the port list that you previously created appears in the box.
-
From the HTTP Profile (Client) list, select a previously-created HTTP/2 profile for client-side traffic.
-
If you use server SSL for this connection, from the SSL Profile (Server) list, select a server SSL profile.
-
If you use client SSL for this profile, from the SSL Profile (Client) list, select a client SSL profile.
-
In the Access Policy area, from the Access Profile list, select the access profile that you configured earlier.
-
From the Connectivity Profile list, select a connectivity profile.
You can select the default connectivity profile, connectivity if you have not defined a specific profile for the traffic that is directed to this virtual server.
-
Click Finished.
Typically, when you configure an authentication action, you precede it with a Logon Page action to collect credentials. This example describes how to include RSA SecurID integration in an access policy.

Use the Variable Assign action to provide the appropriate password before the Logon Page action occurs.
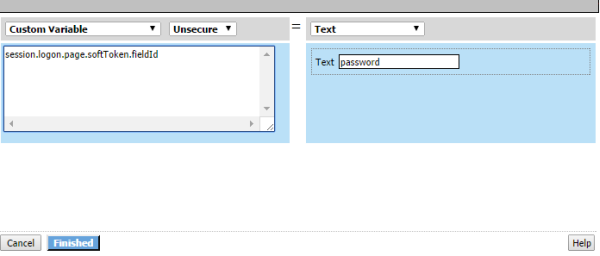
The Variable Assign action stores the text password in the custom variable, session.logon.page.softToken.fieldId; password is the name of the field that is used for RSA token authentication.