Updated Date: 07/07/2026
Replacing a DNS Server with BIG-IP DNS
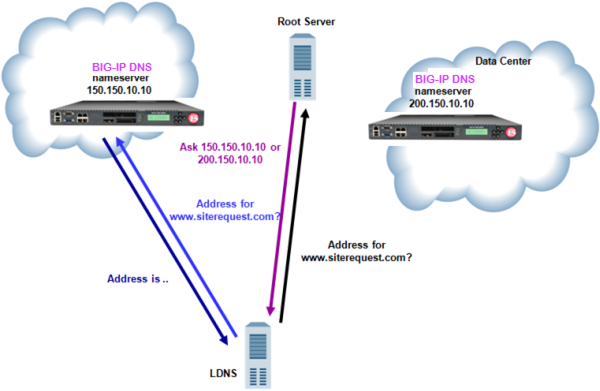
BIG-IP DNS load balances incoming wide IP traffic to your network resources. BIG-IP DNS can also replace a local DNS server as the authoritative nameserver for wide IPs, zones, and all other DNS-related traffic. You can configure BIG-IP DNS to replace the DNS server that currently manages www.siterequest.com. BIG-IP DNS becomes the authoritative nameserver for www.siterequest.com and load balances traffic across the web-based applications store.siterequest.com and checkout.siterequest.com.
A listener is a specialized virtual server that passively checks for DNS packets on port 53 and the IP address you assign to the listener. When a DNS request is sent to the IP address of the listener, the BIG-IP system either handles the request or forwards the request to the appropriate resource.
If you are unfamiliar with how to modify BIND server files, review the fifth edition of DNS and BIND, available from O’Reilly Media.
Typically, BIND servers allow zone transfers to any DNS name server requesting a zone transfer. That is, named.conf on a typical BIND server does not contain an allow-transfer statement. However, the BIND server on the BIG-IP system is configured to allow zone transfers to only the localhost. Thus, named.conf on the BIG-IP system contains this allow-transfer statement: allow-transfer { localhost; } ;.
When you want to improve the speed of responses to DNS queries you can configure a BIND server to allow zone transfers only to the DNS Express engine on the BIG-IP system. You do this by adding an allow-transfer statement to named.conf on the BIND server.
Note: Adding an allow-transfer statement to a BIND server actually restricts zone transfers to a specified list of DNS name servers.
-
Add to the BIND server an allow-transfer statement that specifies a self IP address on the BIG-IP system.
You can modify the following allow-transfer statement to use a self IP address on the BIG-IP system:
allow-transfer { localhost; <self IP address from which zone transfer request is sent to the server>; };allow-transfer { localhost; 10.10.10.1 ; };
Ensure that you have configured the legacy DNS server with an allow-transfer statement that authorizes zone transfers to BIG-IP DNS.
In order for BIG-IP DNS to perform a zone transfer from the legacy DNS server, create a new zone.
-
On the Main tab, click DNS > Zones > ZoneRunner > Zone List.
The Zone List screen opens.
-
Click Create.
The New Zone screen opens.
-
From the View Name list, select the view that you want this zone to be a member of.
The default view is external.
-
In the Zone Name field, type a name for the zone file in this format, including the trailing dot: db.[viewname].[zonename].
For example, db.external.siterequest.com.
-
From the Zone Type list, select Master.
-
From the Records Creation Method list, select Transfer from Server.
-
In the Records Creation area, type the values for the SOA and NS record parameters.
-
Click Finished.
To avoid a conflict on your network, unplug BIG-IP DNS from the network.
When you want BIG-IP DNS to handle DNS traffic previously handled by a DNS server, create a self IP address on BIG-IP DNS using the IP address of the legacy DNS server.
-
On the Main tab, click Network > Self IPs.
-
Click Create.
The New Self IP screen opens.
-
In the Name field, type a unique name for the self IP address.
-
In the IP Address field, type the IP address of the legacy DNS server.
The system accepts IPv4 and IPv6 addresses.
-
In the Netmask field, type the network mask for the specified IP address.
For example, you can type 255.255.255.0.
-
Click Finished.
The screen refreshes, and displays the new self IP address.
Ensure that you have created a self IP address on BIG-IP DNS using the IP address of the legacy DNS server.
Add this self IP address to the BIG-IP DNS server object, and then modify the DNS server based on your network configuration.
-
On the Main tab, click DNS > GSLB > Servers.
The Server List screen opens.
-
Click the name of the BIG-IP DNS system that you want to modify.
The server settings and values display.
-
In the Address List area, add the new self IP address.
-
Click Update.
-
Do one of the following based on your network configuration:
-
Modify the IP address of the legacy DNS server so that it becomes a secondary DNS server to BIG-IP DNS. Ensure that the IP address of the DNS server does not conflict with the self IP address that you added to the BIG-IP DNS server object.
Note: If you are using BIND servers, and you are unfamiliar with how to change a DNS server from a primary to a secondary, refer to the fifth edition of DNS and BIND, available from O’Reilly Media.
-
Remove the legacy DNS server from your network.
-
BIG-IP DNS is now the primary authoritative name server for the zone. The servers for the zone do not need to be updated, because the IP address of the legacy DNS server was assigned to BIG-IP DNS.
To alert the BIG-IP DNS system to DNS queries (previously handled by the DNS server), create four listeners: two that use the UDP protocol (one each for an IPv4 address and IPv6 address), and two that use the TCP protocol (one each for an IPv4 address and IPv6 address).
Note: DNS zone transfers use TCP port 53. If you do not configure a listener for TCP the client might receive the error: connection refused or TCP RSTs.
-
On the Main tab, click DNS > Delivery > Listeners.
The Listeners List screen opens.
-
Click Create.
The Listeners properties screen opens.
-
In the Name field, type a unique name for the listener.
-
For the Destination setting, in the Address field, type the IP address previously used by the legacy DNS server.
-
From the VLAN Traffic list, select All VLANs.
-
In the Service area, from the Protocol list, select UDP.
-
Click Finished.
Create another listener with the same IPv4 address and configuration, but select TCP from the Protocol list. Then, create two more listeners, configuring both with the same IPv6 address, but one with the UDP protocol and one with the TCP protocol.
Ensure that at least one load balancing pool exists in the configuration before you start creating a wide IP.
Create a wide IP to map an FQDN to one or more pools of virtual servers that host the content of the domain.
-
On the Main tab, click DNS > GSLB > Wide IPs.
The Wide IP List screen opens.
-
Click Create.
The New Wide IP List screen opens.
-
In the General Properties area, in the Name field, type a name for the wide IP.
Tip: You can use two different wildcard characters in the wide IP name: asterisk (*) to represent several characters and question mark (?) to represent a single character. This reduces the number of aliases you have to add to the configuration.
-
From the Type list, select a record type for the wide IP.
-
In the Pools area, for the Pool List setting, select the pools that this wide IP uses for load balancing.
The system evaluates the pools based on the wide IP load balancing method configured.
-
From the Pool list, select a pool.
A pool can belong to more than one wide IP.
-
Click Add.
-
-
Click Finished.