Updated Date: 05/19/2026
Adding Okta MFA to a per-request policy
Before you begin, the Okta site needs to be configured to enable APM policies to interact with Okta Factors API. You need to have created a per-request policy for Okta API.
For environments wanting to implement zero trust, APM lets you implement per-request policies that use Okta Multifactor Authentication (MFA) to authenticate requests at a more granular level. This example per-request policy performs a second level of authentication using Okta MFA, which must be created in a subroutine. Additional policy elements are added to make the use case work.
-
On the Main tab, click Access > Profiles / Policies > Per-Request Policies.
The Per-Request Policies screen opens.
-
In the Per-Request Policy column of the policy you created, click Edit.
The visual policy editor opens the per-request policy in a separate window.
-
In the policy, click Add New Subroutine, change the name to
Okta MFA, and click Save. -
Expand the subroutine, click (+) to add a new item.
-
Click the Assignment tab, select Variable Assign, and click Add Item.
This step is only needed when the Logon Page agent is configured in a per-session policy as in the use case being developed here. This step is not needed if the Logon Page agent is in the per-request policy.
-
Click Add new entry, then click change.
-
On the left, select Custom Variable, Secure, and type
subsession.logon.last.username. -
On the right, select Session Variable and type
session.logon.last.username.If, in the Logon Page agent, you enabled Split domain from full Username, then set the session variable to
session.logon.last.logonnameinstead. -
Click Finished, then Save.
-
-
Still in the subroutine, after Variable Assign, click (+) to add a new item.
-
Click the Authentication tab, select Okta MFA, and click Add Item.
-
For Okta Connector, select a previously created Okta Connector from the dropdown list.
-
In the Customization section, you can optionally change the text and captions that will appear to users during multifactor authentication.
-
Click Finished, then Save.
-
-
Highly recommended: In the subroutine, click Subroutine Settings/Rename and set Subroutine Timeout to the maximum allowed value of 600, which is equal to 10 mins.
If it takes the user more that two minutes to complete the Okta verification or enrollment and a subroutine timeout occurs, the per-request policy will restart.
-
Still in the subroutine, click Edit Terminals to change the terminals:
-
Click Add Terminal and add a terminal called Deny, make it red, and click Save.
-
On the Fallback branch, click the terminal, select Deny, then click Save.
-
-
In the main part of the policy, click (+) to add a new item.
-
Click the Subroutines tab, select the Okta MFA subroutine you created, and click Add Item.
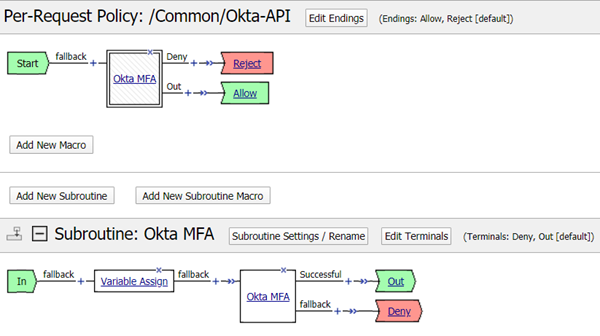
You created a simple per-request policy that performs Okta MFA, which is performed in the Okta MFA step-up subroutine. The per-request policy you created looks like this:
Make sure to associate the per-session policy and the per-request policy with the virtual server to protect the resources.