Updated Date: 07/07/2026
Configuring DNS Response Policy Zones
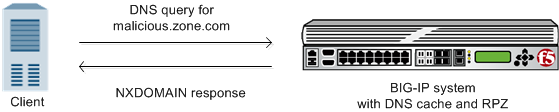
The BIG-IP system can utilize a domain name service (DNS) response policy zone (RPZ) as a firewall mechanism. An RPZ is a zone that contains a list of known malicious Internet domains. The list includes a resource record set (RRset) for each malicious domain. Each RRset includes the names of the malicious domain and any subdomains of the domain.
When the BIG-IP system receives a DNS query for a domain that is on the malicious domain list of the RPZ, the system responds in one of two ways based on your configuration. You can configure the system to return an NXDOMAIN record that indicates that the domain does not exist.
There are a number of vendors that host response policy zones (RPZs). The BIG-IP system supports RPZ vendors. F5 has tested the BIG-IP system with the vendors Spamhaus (http://www.spamhaus.org/organization/dnsblusage/) and SURBL (http://www.surbl.org/df). If you do not want to purchase a subscription from a vendor, you can use ZoneRunner on the BIG-IP system to create a custom RPZ.
Note: ZoneRunner is available only with a BIG-IP DNS license.
Determine the host name and IP address of the BIG-IP system on which you are configuring the RPZ. Note: These steps can be performed only on a BIG-IP system that is licensed for BIG-IP DNS. You can create your own RPZ when you do not want to subscribe to an RPZ vendor.
- On the Main tab, click DNS > Zones > ZoneRunner > Zone List. The Zone List screen opens.
- Click Create. The New Zone screen opens.
- From the View Name list, select external. The external view is a default view to which you can assign zones.
- In the Zone Name field, type a name for the zone file.
For example, to replicate the format of Spamhaus and SURBL DSN RPZ names, type
rpz.myblacklist.org - From the Zone Type list, select Master.
- Clear the Zone File Name field, and type the zone file name.
db.external.rpz.blacklist.org - In the Options field, add an also-notify statement to ensure that BIND notifies DNS Express when the zone is updated; for example:
also-notify { ::1 port 5353; }; - In the SOA Record section, type values for the record fields:
- In the TTL field, type the default time-to-live (TTL) for the records in the zone.
- In the Master Server field, type the name of the BIG-IP DNS on which you are configuring this zone.
- In the NS Record section, type values for the record fields:
- In the TTL field, type the time-to-live (TTL) for the nameserver record.
- In the NameServer field, type the name of the BIG-IP DNS on which you are configuring this zone.
- Click Finished. Add resource records that represent known malicious domains to your custom RPZ.
Determine the names of the known malicious domain names that you want to include in your custom DNS response policy zone (RPZ). Note: These steps can be performed only on a BIG-IP system that is licensed for BIG-IP DNS. For each malicious domain that you want to add your custom RPZ, create a resource record for the domain. Additionally, you can add a wildcard resource record to represent all subdomains of the malicious domain.
- On the Main tab, click DNS > Zones > ZoneRunner > Zone List. The Zone List screen opens.
- Click the name of a custom RPZ to which you want to add malicious zone names. The Zone Properties screen opens.
- Click Add Resource Record. The New Resource Record screen opens.
- In the Name field, type the name of the malicious domain in front of the RPZ zone name that displays:
[zone_name].rpz.myblacklist.org..maliciouszone.com.rpz.myblacklist.org.for the domain name or*.maliciouszone.com.rpz.myblacklist.org.for the subdomains. - In the TTL field, type the time-to-live (TTL) for the CNAME record.
- From the Type list, select
CNAME. - In the CNAME field, type
. - Click Finished.
- Create additional resource records for each malicious domain that you want to include in your customer RPZ. Remember to create a resource record for the domain and a resource record for the subdomains. You can now implement your RPZ on the BIG-IP system or on an external name server.
With an RPZ configuration, the BIG-IP system filters DNS queries for domains that are known to be malicious and returns custom responses that direct those queries away from the malicious domain.
Before adding a TSIG key for a DNS server that hosts an RPZ:
- Ensure that the DNS server is configured to allow the BIG-IP system to perform zone transfers.
- Ensure that the time on the systems that use TSIG keys are synchronized.
- Obtain the TSIG key for each DNS server. Add a TSIG key to the BIG-IP system configuration, when you want to validate zone transfer communications between DNS Express and a DNS server hosting an RPZ.
- On the Main tab, click DNS > Delivery > Keys > TSIG Key List. The TSIG Key List screen opens.
- Click Create. The New TSIG Key screen opens.
- In the Name field, type the name of the TSIG key.
- From the Algorithm list, select the algorithm that was used to generate the key.
- In the Secret field, type the TSIG key secret.
- Click Finished. Add the TSIG key to the DNS nameserver that represents the RPZ on the BIG-IP system.
Obtain the IP address of the authoritative DNS server that hosts the DNS response policy zone (RPZ). When you want to transfer an RPZ from an authoritative DNS server into the DNS Express engine, add a nameserver object that represents the server that hosts the zone.
- On the Main tab, click DNS > Delivery > Nameservers. The Nameservers List screen opens.
- Click Create. The New Nameserver screen opens.
- In the Name field, type a name for the authoritative DNS server.
- In the Address field, type the IP address on which the DNS server listens for DNS messages.
If the RPZ is hosted on BIND on the BIG-IP system, use the name
localhostand the default Address 127.0.0.1 and Service Port 53. - From the TSIG Key list, select the TSIG key that matches the TSIG key on this DNS server. The BIG-IP system uses this TSIG key to sign zone transfer requests to the DNS server hosting the zone.
- Click Finished. Create a DNS Express zone and add the nameserver object to the zone.
Before you create the DNS Express zone:
- Ensure that the authoritative DNS server that currently hosts the DNS response policy zone (RPZ) is configured to allow zone transfers to the BIG-IP system.
- Ensure a nameserver object that represents that authoritative DNS server exists in the BIG-IP system configuration.
- Determine the name you want to use for the DNS Express zone. The zone name must match the zone name on the authoritative DNS server exactly. Note: Zone names are case insensitive. Create a DNS Express zone on the BIG-IP system when you want to transfer an RPZ into DNS Express.
- On the Main tab, click DNS > Zones. The Zone List screen opens.
- Click Create. The New Zone screen opens.
- In the Name field, type the name of the DNS zone. The name must begin and end with a letter and contain only letters, numbers, and the period and hyphen (-) characters.
- In the DNS Express area, from the Server list, select the authoritative primary DNS server that currently hosts the zone. Note: The DNS Express engine requests zone transfers from this server.
- Select the Response Policy check box.
- Click Finished.
Ensure that the global DNS settings are configured based on your network architecture. Create a DNS cache on the BIG-IP system when you want to utilize an RPZ to protect your network from known malicious domains.
- On the Main tab, click DNS > Caches > Cache List. The DNS Cache List screen opens.
- Click Create. The New DNS Cache screen opens.
- In the Name field, type a name for the cache.
- From the Resolver Type list, select one of three types:
| **Option** | Description |
| **Resolver** | Resolves a DNS request and stores the response in the DNS cache. |
| **Validating Resolver** | Resolves a DNS request, verifies the response using a DNSSEC key, and stores the response in the DNS cache. |
| **Transparent \(None\)** | Sends a DNS request to a DNS server for resolution, and stores the response in the DNS cache. |
- Click Finished.
Ensure that a DNS cache with which you are implementing the RPZ is configured on the BIG-IP system. Obtain the resource records for the walled garden zone on your network. When you want the BIG-IP system to redirect DNS queries for known malicious domains to a specific domain, add a local zone that represents a walled garden on your network to the DNS cache you will use to implement an RPZ.
- On the Main tab, click DNS > Caches > Cache List. The DNS Cache List screen opens.
- Click the name of the cache you want to modify. The properties screen opens.
- On the menu bar, click Local Zones. The Local Zones screen opens.
- Click the Add button.
- In the Name field, type the domain name of the walled garden on your network.
Note: The domain you enter must be the exact name you want to use for the walled garden. Ensure that you use a zone name that does not match any other resources on your network, for example,
walledgarden.siterequest.com. - From the Type list, select Static.
- In the Records area, specify a resource record to identify the local zone, including domain name, type, class, TTL, and record data, separated by spaces, and then click Add.
For example, if the local zone name is walledgarden.siterequest.com, then this is an example of an A record entry:
walledgarden.siterequest.com. IN A 10.10.10.124, and this is an example of a AAAA record entry:walledgarden.siterequest.com. IN AAAA 2002:0:1:12:123:c:cd:cdf. - Click Finished.
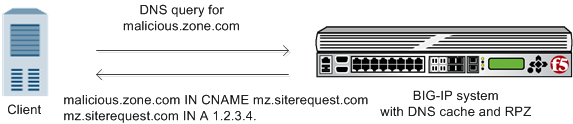
If you want the BIG-IP system to redirect DNS queries for known malicious domains to a specific location, ensure that you have associated a local zone that represents the RPZ with the DNS cache. Add an RPZ to a DNS cache on the BIG-IP system when you want to protect your network from known malicious domains.
- On the Main tab, click DNS > Caches > Cache List. The DNS Cache List screen opens.
- Click the name of the cache you just created. The properties screen opens.
- On the menu bar, click Response Policy Zones. The Response Policy Zones screen opens.
- Click the Add button.
- From the Zone list, select an RPZ.
- From the Action list, select an action:
Option Description NXDOMAIN Resolves a DNS query for a domain listed in the RPZ with an NXDOMAIN response, indicating that the domain does not exist. Walled Garden Redirects a DNS query for a domain listed in the RPZ to a designated IP address (walled garden), typically hosting a block page or informational portal. No Data Returns a NODATA response, which indicates that the domain exists but has no records of the requested type. Pass-through Exempts the response from RPZ policy processing and allows the DNS query to resolve normally. Drop Drops the DNS query without sending any response to the client. TCP Only Returns a truncated DNS response, signaling a possible retry over TCP. Primarily used to discourage abuse (e.g., DoS), not to guarantee TCP fallback. Given Instead of performing a predefined action, inspects the matching RPZ policy entry and executes the action specified there. This may include standard RPZ actions (for example, NXDOMAIN, Walled Garden, NODATA, Passthru, Drop, TCP Only) or returning arbitrary DNS responses (“local data”). Disabled Disables the RPZ policy rule and processes the DNS query as if no RPZ policy exists. - If you selected the type Walled Garden, from the Walled Garden IP list, select the local zone that represents the walled garden on your network.
- Configure the Priority for the RPZ:
- Each RPZ is assigned a priority value, starting at 0 for the first RPZ.
- Additional RPZs are automatically assigned increasing priority values (1, 2, 3, and so on).
- To modify priority manually:
- Select the RPZ and click Edit, then specify the desired priority value.
- Alternatively, use the Move Up and Move Down buttons to adjust the RPZ order in the list. Note: When you update the priority for any feed, the system automatically fills gaps. For example, if there are three feeds with priorities 0, 1, and 2, and you set a feed’s priority to a number higher than the total number of feeds, the system automatically assigns the maximum valid priority based on the number of feeds.
- Click Finished.
Ensure that a DNS cache configured with an RPZ exists on the system. When you want to test how using an RPZ affects your network environment, modify the RPZ by enabling the Logs and Stats Only setting.
- On the Main tab, click DNS > Caches > Cache List. The DNS Cache List screen opens.
- Click the name of the cache you want to modify. The properties screen opens.
- On the menu bar, click Response Policy Zones. The Response Policy Zones screen opens.
- Click the name of the RPZ you want to modify.
- Select the Logs and Stats Only check box. When checked, queries that match a malicious domain in the RPZ list are logged and statistics are created; however, RPZ policies are not enforced. That is, when a DNS query matches a malicious domain in the RPZ list, the system does not return an NXDOMAIN response or redirect the query to a walled garden. Warning: System performance is affected even when Logs and Stats Only is selected. This is because the system still performs RPZ lookups.
- Click Finished.
Ensure that at least one DNS cache exists on the BIG-IP system. You can create a custom DNS profile to configure the BIG-IP system to cache responses to DNS queries.
- On the Main tab, click Local Traffic > Profiles > Services > DNS. The DNS profile list screen opens.
- Click Create. The New DNS Profile screen opens.
- In the Name field, type a unique name for the profile.
- In the General Properties area, from the Parent Profile list, accept the default dns profile.
- Select the Custom check box.
- In the DNS Features area, from the DNS Cache list, select Enabled. When you enable the DNS Cache option, you must also select a DNS cache from the DNS Cache Name list.
- In the DNS Features area, from the DNS Cache Name list, select the DNS cache that you want to associate with this profile. You can associate a DNS cache with a profile, even when the DNS Cache option, is Disabled.
- Click Finished.
Create listeners to identify the DNS queries that DNS Express handles. When DNS Express is only answering DNS queries, only two listeners are required: one with an IPv4 address that handles UDP traffic and one with an IPv6 address that handles UDP traffic.
However, the best practice is to create four listeners, which allows DNS Express to handle zone transfers, should you decide to use this feature. DNS zone transfers use TCP port 53. With this configuration, you create one listener with an IPv4 address that handles UDP traffic, and one with the same IPv4 address that handles TCP traffic. You also create one listener with an IPv6 address that handles UDP traffic, and one with the same IPv6 address that handles TCP traffic.
Tip: If you have multiple BIG-IP DNS systems in a device group, perform these steps on only one system.
Note: These steps apply only to BIG-IP DNS-provisioned systems.
- On the Main tab, click DNS > Delivery > Listeners. The Listeners List screen opens.
- Click Create. The Listeners properties screen opens.
- In the Name field, type a unique name for the listener.
- For the Destination setting, in the Address field, type an IPv4 address on which the BIG-IP system listens for DNS queries.
- From the Listener list, select Advanced.
- If you are using SNATs on your network, from the Source Address Translation list, select SNAT.
- Optional: If you are using NATs on your network, for the Address Translation setting, select the Enabled check box.
- Optional: If you are using port translation on your network, for the Port Translation setting, select the Enabled check box.
- In the Service area, from the Protocol list, select UDP.
- In the Service area, from the DNS Profile list, select either dns or a custom DNS profile configured for DNS Express.
- Click Finished. Create another listener with the same IPv4 address and configuration, but select TCP from the Protocol list. Then, create two more listeners, configuring both with the same IPv6 address, but one with the UDP protocol and one with the TCP protocol.
Create virtual servers to process the DNS queries that DNS Express handles. When DNS Express is only answering DNS queries, only two virtual servers are required: one with an IPv4 address that handles UDP traffic and one with an IPv6 address that handles UDP traffic.
However, the best practice is to create four listeners, which allows DNS Express to handle zone transfers, should you decide to use this feature. DNS zone transfers use TCP port 53. With this configuration, you create one virtual server with an IPv4 address that handles UDP traffic, and one with the same IPv4 address that handles TCP traffic. You also create one virtual server with an IPv6 address that handles UDP traffic, and one with the same IPv6 address that handles TCP traffic.
Note: These steps apply only to LTM-provisioned systems.
- On the Main tab, click Local Traffic > Virtual Servers. The Virtual Server List screen opens.
- Click Create. The New Virtual Server screen opens.
- In the Name field, type a unique name for the virtual server.
- In the Destination Address/Mask field, type the IP address in CIDR format.
The supported format is address/prefix, where the prefix length is in bits. For example, an IPv4 address/prefix is
10.0.0.1or10.0.0.0/24, and an IPv6 address/prefix isffe1::0020/64or2001:ed8:77b5:2:10:10:100:42/64. When you use an IPv4 address without specifying a prefix, the BIG-IP system automatically uses a/32prefix. Note: The IP address for this field needs to be on the same subnet as the external self-IP. - In the Service Port field, type 53.
- From the Protocol list, select UDP.
- Optional: If you are using SNATs on your network, from the Source Address Translation list, select SNAT.
- Optional: From the SNAT pool list, select the name of an existing SNAT pool.
- From the Configuration list, select Advanced.
- From the DNS Profile list, select either dns or the custom DNS profile you created for DNS Express.
- Click Finished. Create another virtual server with the same IPv4 address and configuration, but select TCP from the Protocol list. Then, create two more virtual servers, configuring both with the same IPv6 address, but one with the UDP protocol and one with the TCP protocol.
You can view information about DNS zones.
- On the Main tab, click Statistics > Module Statistics > DNS > Zones. The Zones statistics screen opens.
- From the Statistics Type list, select Zones. Information displays about the traffic handled by the zones in the list.
- In the Details column for a zone, click View. Read the online help for an explanation of the statistics.
Ensure that you have created a DNS cache and a DNS profile and have assigned the profile to either an LTM virtual server or a BIG-IP DNS listener. You can view DNS cache statistics to determine how well a specific cache on the BIG-IP system is performing.
- On the Main tab, click Statistics > Module Statistics > DNS > Caches. The DNS Caches Status Summary screen opens.
- From the Statistics Type list, select Caches.
- In the Details column for a cache, click View to display detailed information about the cache.
You can configure an RPZ on the BIG-IP system and allow other nameservers to perform zone transfers of the RPZ. Warning: DNS Express supports only full zone transfers (AXFRs); therefore, transferring an RPZ from the BIG-IP system to another nameserver creates additional traffic on your internal network.
Ensure that you have created a DNS Express zone for the RPZ. Enable the DNS Express zone for the RPZ to be a distribution point on your network to allow other nameservers to perform zone transfers of the RPZ.
- On the Main tab, click DNS > Zones. The Zone List screen opens.
- Click the name of the zone you want to modify.
- In the Zone Transfer Clients area, move the nameservers that can initiate zone transfers from the Available list to the Active list.
- Optional: From the TSIG Key list, select the TSIG key you want the BIG-IP system to use to validate zone transfer traffic.
- Click Update.
To enable the BIG-IP system to respond to zone transfer requests for an RPZ zone, create a custom DNS profile.
- On the Main tab, click DNS > Delivery > Profiles > DNS. The DNS profile list screen opens.
- Click Create. The New DNS Profile screen opens.
- In the General Properties area, name the profile
dns_zxfr. - Select the Custom check box.
- In the DNS Traffic area, from the Zone Transfer list, select Enabled.
- Click Finished.
Determine which DNS nameservers will make zone transfer requests for an RPZ.
Create listeners to alert the BIG-IP system to zone transfer requests for an RPZ.
Note: DNS zone transfers use TCP port 53.
Note: This task applies only to BIG-IP DNS-provisioned systems.
- On the Main tab, click DNS > Delivery > Listeners. The Listeners List screen opens.
- Click Create. The Listeners properties screen opens.
- In the Name field, type a unique name for the listener.
- For the Destination setting, in the Address field, type the IPv4 address on which the BIG-IP system listens for DNS zone transfer requests for a zone hosted on pool of DNS servers.
- From the Listener list, select Advanced.
- From the VLAN Traffic list, select All VLANs.
- If you are using SNATs on your network, from the Source Address Translation list, select SNAT.
- Optional: If you are using NATs on your network, for the Address Translation setting, select the Enabled check box.
- Optional: If you are using port translation on your network, for the Port Translation setting, select the Enabled check box.
- In the Service area, from the Protocol list, select TCP.
- In the Service area, from the DNS Profile list, select dns_zxfr (the custom profile you created to enable the BIG-IP system to process zone transfer requests).
- Click Repeat.
- Create another listener with the same settings, except using a different name and an IPv6 address.
- Click Finished.
Determine which DNS nameservers will make zone transfer requests for an RPZ.
Create virtual servers to alert the BIG-IP system to zone transfer requests for a RPZ.
Note: DNS zone transfers use TCP port 53.
Note: This task applies only to LTM-provisioned systems.
- On the Main tab, click Local Traffic > Virtual Servers. The Virtual Server List screen opens.
- Click Create. The New Virtual Server screen opens.
- In the Name field, type a unique name for the virtual server.
- In the Destination Address/Mask field, type the IP address in CIDR format.
The supported format is address/prefix, where the prefix length is in bits. For example, an IPv4 address/prefix is
10.0.0.1or10.0.0.0/24, and an IPv6 address/prefix isffe1::0020/64or2001:ed8:77b5:2:10:10:100:42/64. When you use an IPv4 address without specifying a prefix, the BIG-IP system automatically uses a/32prefix. Note: The IP address for this field needs to be on the same subnet as the external self-IP. - In the Service Port field, type 53.
- From the Protocol list, select UDP.
- Optional: If you are using SNATs on your network, from the Source Address Translation list, select SNAT.
- Optional: From the SNAT pool list, select the name of an existing SNAT pool.
- From the Configuration list, select Advanced.
- From the DNS Profile list, select the custom DNS profile you created.
- Click Finished. Create another virtual server with the TCP protocol, but use an IPv6 address and configuration.