Updated Date: 07/07/2026
Upgrading BIG-IQ Centralized Management Version 5.2.0, 5.3.0, 5.4.0, or 6.0.0 to Version 6.0.1
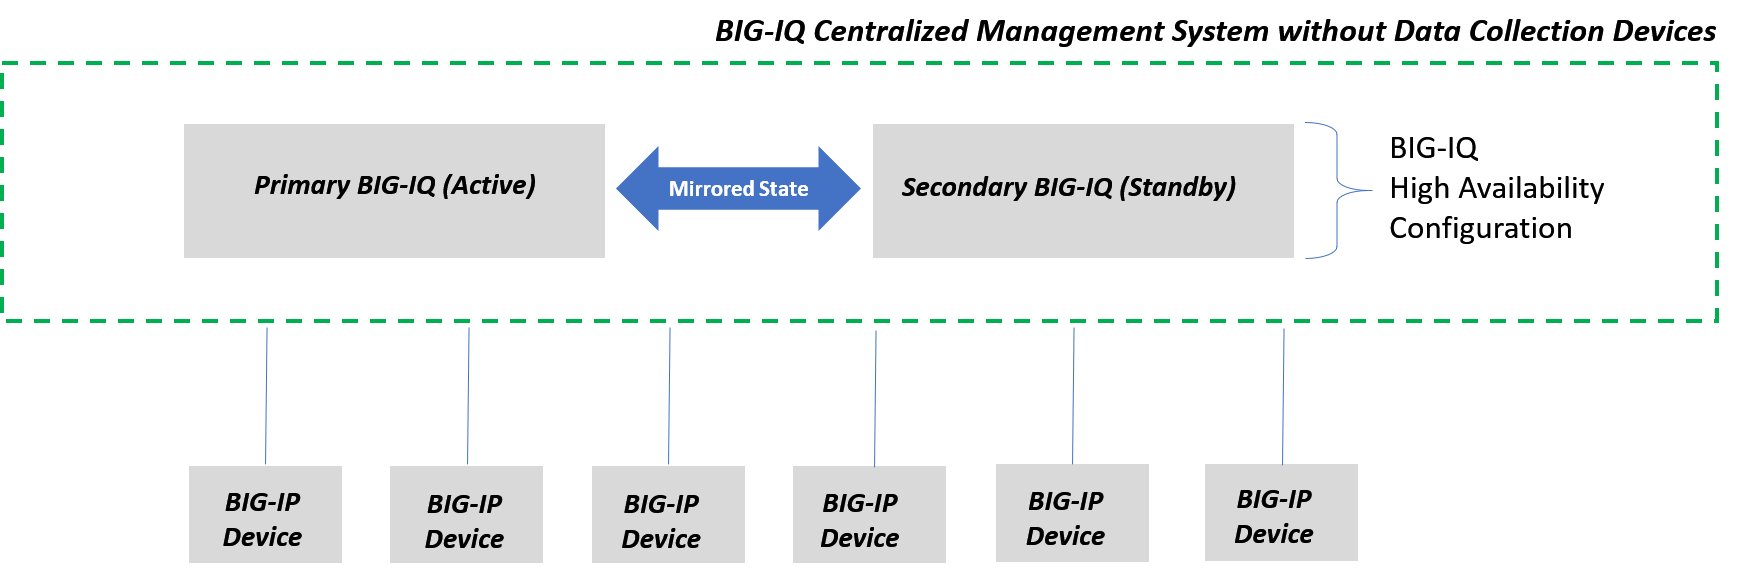
The following process to upgrade to F5 BIG-IQ Centralized Management version 6.0.1 is for setups that currently have one of the following versions installed: version 5.2, 5.3, 5.4, or 6.0, and do not have a data collection device cluster. If your system includes a data collection device cluster, refer to BIG-IQ Centralized Management: Supported Systems for Upgrades to Version 6.0.1.
This example represents a BIG-IQ setup that includes a high-availability (HA) pair of BIG-IQ systems. During the upgrade, the BIG-IQ services to BIG-IP devices are unavailable until the upgrade process is complete. This can result in a downtime of services. The amount of downtime depends on the size of your system’s setup. BIG-IQ services resume when the primary device is upgraded and restarted.
Before upgrading F5 BIG-IQ Centralized Management, complete these tasks.
| Tasks | Additional information |
|---|---|
| Deploy any staged configuration changes to your managed devices. | Deploy configuration changes you have staged for your devices. When addressing configuration conflicts for each BIG-IP device, F5 recommends you use BIG-IP to override the configuration settings stored on BIG-IQ. Refer to the section titled, Re-discover devices and re-import services from the user interface. |
| Decide which disk volume you want to install the upgrade on. You must have at least two volumes to upgrade. | If you don’t have two volumes and are upgrading from versions 5.2 or 5.3, refer to: K17406: Using the tmsh utility to create a new software volume for installing a new image or hotfix on the BIG-IQ system at:https://support.f5.com/csp/article/K17406. If you are upgrading from version 5.4 or later, you can add the second volume as part of the upgrade. |
| If you are currently using a self-IP address for device discovery, make a note of that IP address. | You’ll need to enter that IP address when you perform setup after you upgrade and reboot the BIG-IQ system. |
| Upgrade all managed BIG-IP devices to version 12.1 or later | For you to manage BIG-IP devices from BIG-IQ Centralized Management, the BIG-IP devices must be running version 12.1 or later. |
Before you upgrade BIG-IQ Centralized Management, it’s important to take inventory of the status of the running daemons. Then after you upgrade, you can verify that they’re in the same state, and make any necessary modifications. To view the daemons, type the following command: admin@(ip-10-1-1-4)(cfg-sync Standalone)(Active)(/Common)(tmos)# show /sys service.
| Daemon | Example of status |
|---|---|
| admd | down, Not provisioned |
| alertd | run (pid 6579) 22 hours |
| apmd | down, Not provisioned |
| asm | down, Not provisioned |
| autodosd | down, Not provisioned |
| avrd | down, Not provisioned |
| bigd | run (pid 5338) 22 hours |
| bigiqsnmpd | run (pid 5035) 22 hours |
| captured | down, Not provisioned |
| cbrd | run (pid 6117) 22 hours |
| chmand | run (pid 5678) 22 hours |
| clusterd | down, not required |
| csyncd | run (pid 5038) 22 hours |
| datasyncd | down, Not provisioned |
| dnscached | down, Not provisioned |
| dosl7d | down, Not provisioned |
| dosl7d_attack_monitor | down, Not provisioned |
| dwbld | down, Not provisioned |
| elasticsearch | run (pid 5041) 22 hours |
| errdefsd | run (pid 6112) 22 hours |
| eventd | run (pid 5043) 22 hours |
| evrouted | run (pid 6583) 22 hours |
| f5_update_checker | down, No action required |
| fpuserd | down, Not provisioned |
| fslogd | down, Not provisioned |
| grafana | run (pid 6107) 22 hours |
| gtmd | down, Not provisioned |
| guiserver | run (pid 6105) 22 hours |
| gunicorn | run (pid 6587) 22 hours |
| hwpd | down 22 hours, normally up |
| icontrolportald | run (pid 5337) 22 hours |
| iprepd | run (pid 6113) 22 hours |
| istatsd | run (pid 6109) 22 hours |
| lacpd | down, not required |
| lind | run (pid 6116) 22 hours |
| mcpd | run (pid 6110) 22 hours |
| merged | run (pid 6938) 22 hours |
| mgmt_acld | down, Not provisioned |
| monpd | run (pid 6578) 22 hours |
| named | run (pid 4855) 22 hours |
| nokiasnmpd | down, not enabled |
| ntlmconnpool | run (pid 6111) 22 hours |
| pabnagd | down, Not logging node |
| pccd | down, Not provisioned |
| pgadmind | run (pid 7310) 22 hours |
| pkcs11d | down, not required |
| restjavad | run (pid 4853) 22 hours |
| rethinkdb | run (pid 15058) 21 hours, 1 start |
| scriptd | run (pid 5344) 22 hours |
| sdmd | down, sdmd is not provisioned |
| searchd | run (pid 5343) 22 hours |
| sflow_agent | run (pid 6937) 22 hours |
| shmmapd | down, Not provisioned |
| snmpd | run (pid 5674) 22 hours |
| sod | run (pid 4810) 22 hours |
| statsd | run (pid 5336) 22 hours |
| syscalld | run (pid 6939) 22 hours |
| tamd | run (pid 5679) 22 hours |
| tmipsecd | run (pid 5341) 22 hours |
| tmm | run (pid 6581) 22 hours |
| tmrouted | run (pid 6581) 22 hours |
| tokumond | run (pid 7311) 22 hours |
| tokumx | run (pid 6580) 22 hours |
| webd | run (pid 6941) 22 hours |
| wr_urldbd | down, Not provisioned |
| zrd | down, Not provisioned |
| zxfrd | run (pid 5034) 22 hours |
Important: The upgrade process can take up to several hours depending on how many BIG-IP devices you are managing.
To upgrade F5 BIG-IQ Centralized Management from BIG-IQ version 5.2, 5.3, 5.4, or 6.0.0, perform these procedures. Upgrading BIG-IQ to the most recent version requires that you update its configuration to incorporate new features that have been introduced. It’s a good idea to set aside at least several hours to complete this process.
Note: It is important that you follow these tasks in the order stated.
Prepare to upgrade your BIG-IQ system
- Download the software image from the F5 Downloads site.
- Upload the BIG-IQ software image to the BIG-IQ system.
Upgrade the BIG-IQ systems in the HA pair
- Upgrade the primary BIG-IQ.
- Upload the BIG-IQ software image to the secondary BIG-IQ and upgrade it.
Complete the post-upgrade process
- Add the secondary BIG-IQ to the primary BIG-IQ to re-establish the HA pair.
- Upgrade the BIG-IP framework on your managed devices.
- Rediscover your BIG-IP devices, and re-import their services.
- If you have a VMware service scaling group configured, you’ll need to re-install the vCenter host root certificate on BIG-IQ.
Downloading a software image from F5 Networks is the first step to making it available to install on the BIG-IQ system.
-
Log in to the F5 Downloads site,
downloads.f5.com. -
Click the Find a Download button.
-
Click the name of the product line.
-
Click the product name, Centralized Management.
-
Click the version number you want to download.
-
Read the End User Software License agreement and click the I Accept button if you agree with the terms.
-
Click the BIG-IQ version
<version number>.isofile name that you want to download. -
Click the name of the closest geographical location to you.
The software image downloads to your local system.
The software image is now available for you to upload to your BIG-IQ system to make it available for this upgrade.
Before you can upload the software image to the BIG-IQ system, you must have first downloaded it from the F5 Downloads site, downloads.f5.com.
You upload the BIG-IQ version software image to the primary BIG-IQ system to make it available for this upgrade.
-
At the top of the screen, click System.
-
On the left click **** > Software Management > IMAGES.
-
Click the Upload Image button.
-
Click the Choose File button and go to the location to which you downloaded the image, and click the Open button to upload it to BIG-IQ.
Note: If the machine you are upgrading does not have two volumes, you must create one using the command line interface. The following steps provide options for either case.
Before upgrading the primary BIG-IQ you must download the most recent BIG-IQ .iso image from the F5 downloads site.
Warning: These procedures require that the BIG-IQ system is temporarily unavailable, and unable to manage BIG-IP devices until the upgrade is complete. BIG-IP devices can continue to manage traffic during this time. This process can take up to an hour.
You upgrade BIG-IQ to take advantage of the newest functionality and features.
-
At the top of the screen, click System.
-
On the left, click Software Management.
- If you are upgrading from BIG-IQ version 5.4.0 or 6.0.0:
- Click INSTALLATIONS, and then click Upgrade.
- For Software Image, select the image to install.
- If you are upgrading from BIG-IQ version 5.2.0 or 5.3.0, click Available Images, select the image, and click the Install button.
- If you are upgrading from BIG-IQ version 5.4.0 or 6.0.0:
-
From the Target Volume list, select the volume you want to install the image on.
Note: If the Target Volume list is empty, the machine you are upgrading does not have a second volume available for you to install the upgrade. You must create one to proceed.
- If you selected a target volume, complete the remaining steps to finish the upgrade.
- If you do not have a second volume, use the following procedure to install the upgrade for this machine:
- Use SSH to log in to the machine you want to upgrade. You must log in as
rootto perform this procedure. - Navigate to the folder where you install software using the command:
cd /shared/images - Install the upgrade to a new volume using one of the following commands:
- If you are upgrading a virtual machine:
tmsh install sys software image <full name of the iso file> volume hd1.2 create-volume reboot - If you are upgrading a BIG-IQ 7000 series platform:
tmsh install sys software image <full name of the iso file> volume md1.2 create-volume reboot
- If you are upgrading a virtual machine:
- While the system installs the upgrade to the new volume, you can check on the status of the upgrade using the command:
tmsh show sys software status. - When the upgrade finishes installing, the machine reboots. Proceed to the next to the last (login) step in this task.
- Use SSH to log in to the machine you want to upgrade. You must log in as
-
To prompt BIG-IQ to reboot into the new software installation volume, select the Reboot into Target Volume check box.
-
Select the Back up the BIG-IQ system before upgrade check box.
-
Click the Install button at the bottom of the screen.
The software installation begins. Depending on your configuration and the number of devices you are managing, this could take up to an hour. During this time, it is important that you not interrupt the installation process by restarting services or the server.
-
Wait while BIG-IQ loads the new software and reboots.
Depending on your configuration and the number of devices you are managing, this could take up to an hour. During this time, it is important that you not interrupt the installation process by restarting services or the server.
-
If needed, extend the
/varpartition.The default size of the
/varfile system in a newly installed or upgraded node is 30 GB. This amount of available storage might not be enough to store your data. If you previously extended your disk space, you’ll need to do it again after you upgrade. For information about how to do that, refer to: K16103: Extending disk space on BIG-IQ Virtual Edition And remember, upgrading a node requires at least two volumes, so be sure you can extend the/varfile system on both volumes to the same size, or upgrades might fail.
Even though you can log in to this BIG-IQ system after the software is installed, the system continues some database re-indexing processes in the background. For larger configurations, that can take up to an hour. If you perform any searches on objects before it’s done re-indexing, BIG-IQ might not return the expected results. During this time, you can continue with the rest of the upgrade process.
You can now upgrade the peer BIG-IQ system.
Before you can upload the software image to the BIG-IQ system, you must have first downloaded it from the F5 Downloads site, downloads.f5.com.
You upload the BIG-IQ version software image to the primary BIG-IQ system to make it available for this upgrade.
-
At the top of the screen, click System.
-
On the left click **** > Software Management > IMAGES.
-
Click the Upload Image button.
-
Click the Choose File button and go to the location to which you downloaded the image, and click the Open button to upload it to BIG-IQ.
Note: If the machine you are upgrading does not have two volumes, you must create one using the command line interface. The following steps provide options for either case.
You install the latest version of the BIG-IQ software on the peer BIG-IQ system so it will be running the same version as the primary BIG-IQ system you are upgrading. After you upgrade the secondary BIG-IQ, you can re-establish their connection and synchronize their configuration for high availability.
CAUTION:
Use the following command only in very specific circumstances, such as this one, since it clears the majority of a BIG-IQ system’s configuration. Before you run the command, be sure you are on the secondary BIG-IQ system. This command removes all stored data. If you run this command from the primary BIG-IQ system, you’ll permanently lose all of your saved data.
-
Log in as root to the system you are going to establish as the secondary BIG-IQ system’s command line and type the following command:
/usr/bin/clear-rest-storage.While this step is not required, it clears the database storage on the system so the upgrade goes more quickly. After you upgrade both peer systems and re-establish the HA pair, the peer BIG-IQ synchronizes its database with this BIG-IQ system, and repopulates the database.
-
Log in to the system you are going to establish as the secondary BIG-IQ system’s user interface.
-
At the top of the screen, click System.
-
On the left, click Software Management.
- If you’re upgrading from BIG-IQ version 5.4.0 or 6.0.0, click INSTALLATION button, and then click the Upgrade button.
- If you’re upgrading from BIG-IQ version 5.2.0 or 5.3.0, click Available Images, select the image, and click the Install button.
-
Select the Back up the BIG-IQ system before upgrade check box.
-
From the Target Volume list, select the volume you want to install the image on.
Note: If the Target Volume list is empty, the machine you are upgrading does not have a second volume available for you to install the upgrade. You must create one to proceed.
- If you selected a target volume, complete the remaining steps to finish the upgrade.
- If you do not have a second volume, use the following procedure to install the upgrade for this machine:
- Use SSH to log in to the machine you want to upgrade. You must log in as
rootto perform this procedure. - Navigate to the folder where you install software using the command:
cd /shared/images - Install the upgrade to a new volume using one of the following commands:
- If you are upgrading a virtual machine:
tmsh install sys software image <full name of the iso file> volume hd1.2 create-volume reboot - If you are upgrading a BIG-IQ 7000 series platform:
tmsh install sys software image <full name of the iso file> volume md1.2 create-volume reboot
- If you are upgrading a virtual machine:
- While the system installs the upgrade to the new volume, you can check on the status of the upgrade using the command:
tmsh show sys software status. - When the upgrade finishes installing, the machine reboots. Proceed to the next to the last (login) step in this task.
- Use SSH to log in to the machine you want to upgrade. You must log in as
-
To prompt BIG-IQ to reboot into the new software installation volume, select the Reboot into Target Volume check box.
-
Click the Install button.
-
Click the Continue button.
-
Wait while BIG-IQ loads the new software and reboots.
Depending on your configuration and the number of devices you are managing, this could take up to an hour. During this time, it is important that you not interrupt the installation process by restarting services or the server.
-
Log in to the BIG-IQ that will be the secondary BIG-IQ system to confirm that the upgrade succeeded and complete the setup wizard.
To complete the setup task, you must supply a master key pass phrase that all devices in the DCD cluster must share. Make note of the phrase you use. Each logging node, as well as the primary and secondary BIG-IQ systems must use this phrase before they can join the cluster.
-
If needed, extend the
/varpartition.The default size of the
/varfile system in a newly installed or upgraded node is 30 GB. This amount of available storage might not be enough to store your data. If you previously extended your disk space, you’ll need to do it again after you upgrade. For information about how to do that, refer to: K16103: Extending disk space on BIG-IQ Virtual Edition And remember, upgrading a node requires at least two volumes, so be sure you can extend the/varfile system on both volumes to the same size, or upgrades might fail.
After you upgrade both F5 BIG-IQ Centralized Management systems in a HA configuration, you can re-associate the secondary system with the primary BIG-IQ system.
Add the secondary BIG-IQ system to the primary BIG-IQ system to re-establish the high availability pair.
-
Log in to primary BIG-IQ system with your administrator user name and password.
-
At the top of the screen, click System.
-
On the left, click BIG-IQ HA.
-
Click the Add Secondary button.
-
In the IP Address field, type the discovery address you specified on the BIG-IQ system during setup.
This is the same IP address the peers in a high availability confirmation use to communicate.
-
Type the administrative User name and Password for the system.
-
Type the Root Password for the system.
-
Click the Add button to add this device to this high availability configuration.
Even though you can log in to the secondary BIG-IQ after the you re-establish the HA configuration, the system continues some database re-indexing processes in the background. For larger configurations, that can take up to an hour. If you perform any searches on objects before it’s done re-indexing, BIG-IQ might not return the expected results.
After the HA configuration is re-established, you’ll be automatically logged out of the primary BIG-IQ system for a few minutes while the secondary BIG-IQ system restarts.
After the secondary system restarts, you can log back into the primary BIG-IQ system.
After you upgrade F5 BIG-IQ Centralized Management, you must rediscover your managed devices and reimport their services for AFM, ASM, DNS, and LTM so you can start managing those devices with the new features introduced in this release.
Note: If you upgraded a BIG-IQ system that’s running Network Security or Web App Security services, you’ll see evaluation differences for the default logging profile objects imported from BIG-IP devices (global-network, log all requests, log illegal requests, and local-dos). This is expected because BIG-IQ version imports information about default logging profiles that were not present in version 6.0.0. After you complete the upgrade to version and re-import your Network Security or Web Application Security service, these differences should no longer occur.
-
At the top of the screen, click Devices.
-
Select the check box next to the devices for which you want to rediscover and reimport services.
-
Click the More button and select Re-discover and Re-import.
-
In the Name field, type a name for this task.
-
For the Shared Object Conflict Resolution Policy setting, select an option for how you want to handle any differences found between the configuration on BIG-IQ and the BIG-IP device during the re-discover and re-import task.
- Use BIG-IQ to use the configuration setting stored on BIG-IQ if any differences are found.
- Use BIG-IP to override the configuration settings stored on BIG-IQ with the settings from the BIG-IP device. Important:
Some new features are introduced with each BIG-IQ release, so it’s a good idea to use the BIG-IP device’s configuration after you upgrade BIG-IQ. This ensures that you don’t inadvertently overwrite a configuration that wasn’t previously supported. BIG-IP devices are re-imported in the order listed, from top to bottom. You can use the arrow keys to change the processing order.
When you select Use BIG-IP to resolve conflicts, the BIG-IP device used to resolve those conflicts should appear last in the re-import list. If two or more BIG-IP devices contain the same object with different values, only the value in the last imported BIG-IP is used to resolve the conflict for all the BIG-IP devices.
-
If you want to save a snapshot of the BIG-IP device’s configuration before importing these services, select the check box for Create a snapshot of the current configuration before importing.
-
Click the Create button at the bottom of the screen.
After you upgrade BIG-IQ Centralized Management, you can use a script to re-discover devices and re-import the LTM, ASM, AFM, and DNS services in bulk. To run this script, you must have root access to the BIG-IQ command line.
Warning: Before you run this script, make sure that you don’t have any pending configuration changes staged for your managed BIG-IP devices. This script prompts BIG-IQ to import the configurations for all your BIG-IP devices. So, if you don’t deploy staged configuration changes before you run this script, you will lose them after you run the script. If you need assistance, contact F5 Support.
You use this script to re-discover devices and re-import LTM, ASM, AFM, and DNS services all at once, so that you can start managing your devices with the new version of BIG-IQ software.
Note: If you’d rather re-discover devices and re-import their services individually through the user interface, refer to Re-discover devices and re-import LTM, ASM, AFM, and DNS services from the user interface.
-
Log in to the
downloads.f5.comsite, click the Find a Download button, and click BIG-IQ Centralized Management. -
Click the v6.0.1 link.
-
Review the End User Software License agreement and click the I Accept button to accept the terms.
The Select a Download screen opens.
-
Click the
bulkDiscovery.zipfile name, and unzip it on your local system. -
Log in to the BIG-IQ system as the root user and upload the script.
-
Enable executable permissions, by typing:
chmod +x ./bulkDiscovery.plNote: To access help for this script, type
./bulkDiscovery.pl -h -
Export the IP addresses for the BIG-IP devices in your network to a CSV file using the
bulkDiscoveryscript.To run this script, type:
./bulkDiscovery.pl -c masterDeviceList.csv -m -o -
Re-discover your BIG-IP devices and re-import their services, by using the associated command:
Note: This command prompts BIG-IQ to import all the configurations from the specified BIG-IP devices. It’s important that you’ve already deployed any configuration changes you have staged for these devices, because they’ll be overwritten on BIG-IQ after you run this script. If you’d rather re-discover devices and re-import services individually so you can address any potential configuration conflicts for each device, you can do that from the BIG-IQ system’s user interface instead of using this script. For more information, refer to, Re-discover devices and re-import services from the user interface.
-
For LTM, type
./bulkDiscovery.pl -c myDeviceList.csv -l -mNote: You must re-discover devices running the LTM service before re-discovering devices running any other service.
-
For ASM, type
./bulkDiscovery.pl -c myDeviceList.csv -l -s -m -
For AFM, type
./bulkDiscovery.pl -c myDeviceList.csv -l -f -m -
For DNS, type
./bulkDiscovery.pl -c myDeviceList.csv -l -d -m
-
You can now start managing your BIG-IP devices using the latest version of BIG-IQ Centralized Management.
If you have a VMware service scaling group (SSG) associated with a vCenter certificate that is self-signed or untrusted, after you upgrade BIG-IQ Centralized Management, you’ll need to re-add the vCenter host root certificate. For this procedure, you must have root access to the BIG-IQ system’s command line.
Providing BIG-IQ the vCenter host root certificate ensures secure communication between BIG-IQ and the vCenter.
-
From the BIG-IQ system’s command line, copy the root certificate from the vCenter host cert
/etc/vmware-sso/key/ssoserverRoot.crtfile to the BIG-IQ system’s/config/ssl/ssl.crtfile. -
Type this command to create a symbolic link to this certificate using the certificate’s hash:
ln -s ssoserverRoot.crtopenssl x509 -hash -noout -in ssoserverRoot.crt.0. -
Type this command to restart
gunicorn:bigstart restart gunicorn