Manual Chapter :
Monitoring ongoing DDoS attacks
Applies To:
Show Versions
BIG-IQ Centralized Management
- 7.0.0
Monitoring ongoing DDoS attacks
Identifying protected objects under DDoS attack
The status of your DDoS protected objects can indicate vulnerability to
attacks and potential object performance issues. You can identify which applications,
virtual servers, and Netflow protected servers are under attack, as well as identifying their
current health status. This helps you to isolate the need for changes in their configuration or protection
profile.
By identifying protected objects under attack, you can investigate, and if you need to, you can:
- Edit the DoS profile that corresponds with the protected object(s).
- Assign a different DoS profile to your virtual server or Netflow protected server.
- Assign a different DoS profile to an application template.
Identify the status of applications and virtual servers under DDoS attack
Before you can view data, you must have statistics collection
enabled for your managed BIG-IP devices. Visibility of DDoS data is available
to BIG-IP devices running version 13.1.0.5 or later.
You can identify the status of your objects while they
are under attack to ensure their protection prevents performance impact. Once you
identify objects with lower health or performance measures, you can further investigate
specific vulnerabilities to improve the DDoS protection profile.
- Go to .
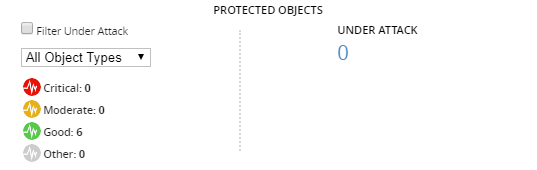
- ClickPROTECTED OBJECTSin the summary bar at the top of the screen.This displays all the applications and virtual servers with DDoS protection.
- To view only those objects that are under attack, filter the object list by selecting theFilter Under Attackbox found in thePROTECTED OBJECTSarea in the summary bar.
- Note the health of your objects from the Status column.
Once you have identified the health status of your
protected objects, you can either drill down into each object's performance data, edit
the DoS profile, or attach a new DoS profile.
Edit the DoS profile of objects under attack
Before you can display statistics and protected objects
in the Protection Summary screen, you must have:
- A BIG-IQ data collection device configured for the BIG-IQ device
- The BIG-IP device located in your network and running a compatible software version
- Statistics collection enabled for managed BIG-IP devices
- AVR provisioned on your BIG-IP devices
You can identify protected objects (virtual servers
or applications) that are under DDoS attack to improve their DoS
protection. This information allows you to evaluate whether you need to change the DoS
protection profile for an object under attack.
For HTTP virtual server and application data, you must have BIG-IP version
14.0.0.2 or later.
- Go to .
- Click the PROTECTED OBJECTS area in the summary bar at the top of the screen.
 The screen displays details of all protected objects, including the object's health status, number of attacks detected, protection mode, and host BIG-IP device.
 - To display only the protected objects that are currently under attack, clickFilter Under Attack.
- In the PROTECTED OBJECTS area, clickCritical,Moderate, orGoodto filter objects according their current health status.To view information about the specific attacks affecting your objects, seeMonitoring ongoing DDoS attacksand filter your search by the protected object's name.
- From the filtered list of protected objects under attack, note the protection mode which is marked to the left of the DDoS Profile column.If your object is under Monitoring, or Transparent, protection (
 )
the DoS profile is only recording the detected DoS attacks, and does not
apply mitigation or prevention measures.
)
the DoS profile is only recording the detected DoS attacks, and does not
apply mitigation or prevention measures. - From the DDoS Profile column, click the DoS profile's name.The screen display's the DoS profile's properties and protection settings.
You are now able to adjust the DoS profile protecting
your object.
You can edit your DoS profile's protection mode to
blocking, or adjust the settings for each protection protocol to ensure that your DoS
protection prevents attacks.
Edit a virtual server's protection in shared security
The protection needs of the virtual servers in
shared security might change over time due to changes in attacks or your overall network
requirements. Once you have identified issues with a virtual server's health, you can
edit the protection by adding a new DoS profile, eviction profile, or IP intelligence
policy.
- Go to .
- From theAll Typeslist at the upper left of the screen, selectVirtual Server.You can use the other lists to further filter the displayed objects. Additional objects include options to filter an object based on attack status, protection profiles under shared security, and additional policies.
- Click the name of the virtual server that requires changes in its protection profile.
- Use the summary area to evaluate the current security status, health, and traffic data for the selected virtual server.For details about the specific attacks, see the attack grid located at the bottom of the screen.
- Scroll to the Protection Settings area to edit the virtual server's protection profile.
- To edit the allowedThroughput Capacity (Mbps)of the virtual server (by Megabits per second ), type a value between 10 and 106.
- Select an option from theProtection Profilelist to assign a new DoS profile.
- Select an option from theEviction Policylist to assign a new eviction policy.
- Select an option from theIP Intelligencelist to assign a new IP intelligence policy.
- ClickSave & Closeto save your changes.
Edit a Netflow object's protection in shared security
The protection needs of a Netflow object might
change over time. You can edit an existing Netflow object's traffic matching criteria,
or capacity thresholds to improve protection according to your system needs.
- Go to .
- From theAll Typeslist at the top of the screen, selectNetflow Protected Object.You can use the other lists to further filter the displayed objects. Additional objects include options to filter an object based on attack status, protection profiles under shared security, and additional policies.
- Click the name of a Netflow object that requires changes in its traffic matching criteria or capacity thresholds.
- ForTraffic Matching Criteria, you can either select an existing traffic matching criteria for the Netflow object's device, or clickAddto create a new traffic matching criteria.Traffic Matching Criteria must be unique per Netflow object. If a traffic matching criteria is duplicated on Netflow objects on a device, both traffic matching criteria become invalid. For more information about creating a new Traffic Matching Criteria, see Create a Netflow protected server.
- To edit the allowed capacity, edit the settingsThroughput Capacity(between values 10-1010),Packet Capacity(between values 10-1010), orConnection Capacity(between values 10-106).Editing the capacity settings enables restriction past a set threshold. If you do not want a limitation on Netflow traffic, clickInfinity.
- ClickSave & Close.
Edit an application's shared security protection
Before you begin, you must identify the service
catalog template under which your application services are configured. You can do so by
viewing your applications and their corresponding services' configuration properties
from .
To add or edit security services, you must first ensure
that your security policies, DoS profiles, and logging profiles are configured on
the application's virtual servers.
The protection needs of your applications might change over time. You can edit an application's shared security protection profile in
application's service catalog template, which automatically deploys changes to
applications from the template's configured virtual servers.
BIG-IQ Centralized Management comes with several default service catalog templates
for standard scenarios. Using the clone option, you can make a copy of a service catalog
template and then add or remove only the objects that need to change to produce the
service catalog template you want. This allows you to maintain a consistent
environment. For non-default service catalog templates, you are not required create
a clone, but ensure that your changes are appropriate for all application services
under the edited template.
- At the top of the screen, clickApplications, then, on the left, clickAPPLICATION TEMPLATES.The screen lists the AS3 and service catalog templates defined on this BIG-IQ.
- Select the check box to the left of any service catalog template you want to clone.
- Click theMorebutton, and then clickClone.
- Type aNameand clickClone.The system creates a clone of the service catalog template, which is listed under the service templates.
- Click the name of the new template.
- On the left, clickSECURITY POLICIESto display all security settings for that template.
- Under the Shared Security area, you can add or edit DoS and Logging profiles to the virtual server's host device.
- ClickSave & Close.
- Select the check box to the left of your new cloned template, and clickPublish.
This deploys your
changes to the application's virtual servers.


