Updated Date: 07/07/2026
Create a Multi-Cloud Application
There are a variety of work flows that you can use to deploy a multi-cloud application. The following sequence of tasks provides an example of one work flow. In this example, you first deploy application services that host your production application to BIG-IP devices in multiple locations, then you deploy a DNS application service to route the web traffic.
Since you have copies of the application service in multiple locations, if one cloud service or data center goes offline, the services you’ve deployed stay up and available. The DNS application service processes and directs web traffic as conditions dictate. These are the basic tasks for creating this multi-cloud application:
- Create or modify an AS3 template that defines the objects you need in your application service.
- Use the AS3 template to deploy an application service to one cloud provider or data center.
- Use the AS3 template to deploy the same application service to a second cloud provider or data center.
- Use an AS3 template to create a DNS application service to load balance the traffic for the two application services.
If one cloud platform or data center experiences performance issues, traffic automatically routes to the other platform, so your application continues to perform. You could also set up the DNS application service to direct traffic to the closest regional data center.
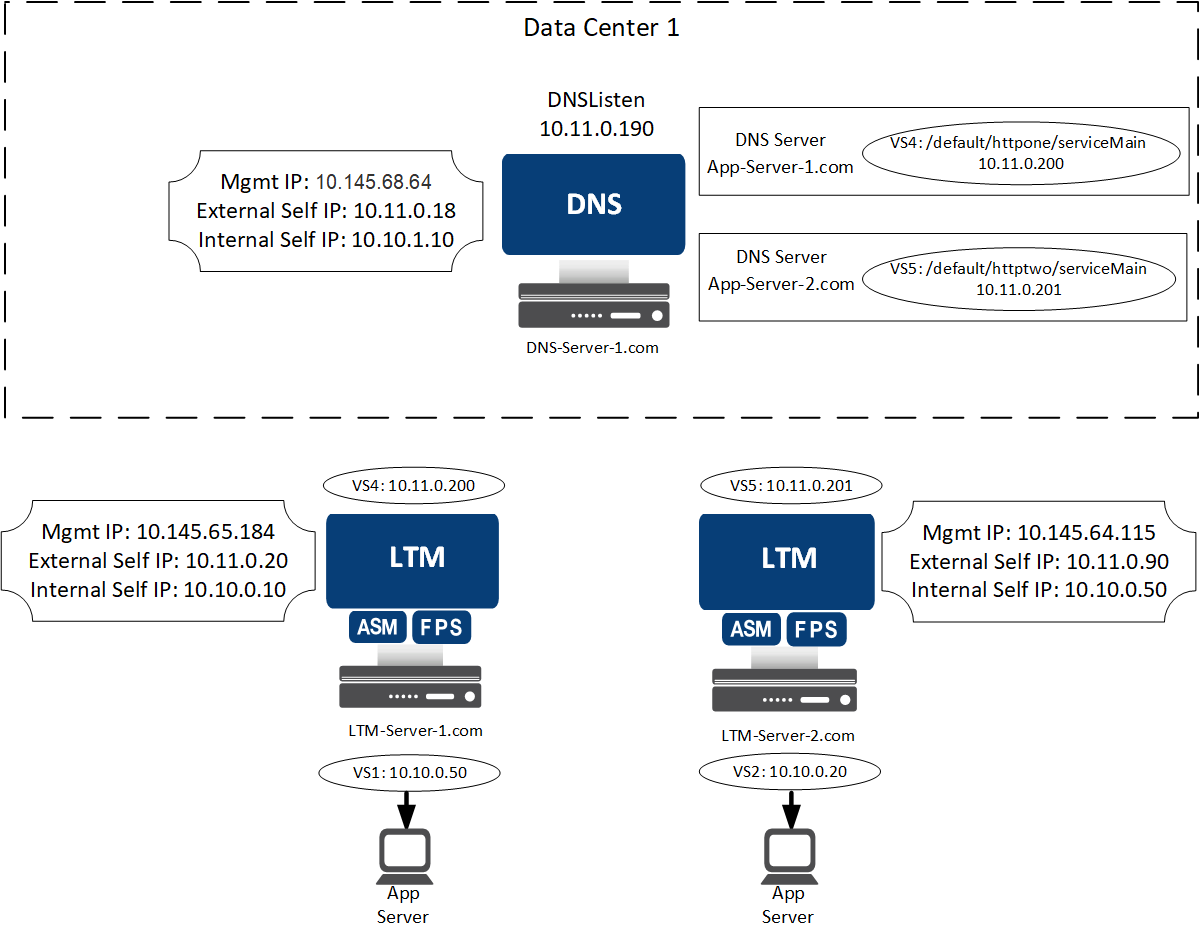
This diagram illustrates the very basic configuration deployed in this workflow.
Before you begin setting up a multi-cloud application, you need to make a couple of decisions and make sure a few things are in place.
- Determine which application you want to host and where you want to host it. For example, you might have an application that tracks buying trends, and you could have one version hosted in the Amazon cloud and another on the Azure cloud. Or, you could have an application that tracks customer feedback, and you could host multiple copies in regional data centers.
- Deploy and configure a BIG-IQ system that includes a data collection device (DCD) cluster. For help with these basic tasks, you can refer to Planning and Implementing a BIG-IQ Centralized Management Deployment on
support.f5.com. - Set up the resources you need in each cloud environment or data center. This setup would likely include one or more BIG-IP devices in each location. Configure each of these devices with the LTM resources your application needs (virtual servers, pools, pool members, and so on). For help with these basic tasks, you can refer to BIG-IP Local Traffic Manager: Implementations on
support.f5.com. - Determine whether you are going to host your DNS service in one of your data centers or in a cloud.Then set up a basic DNS environment (at least one GSLB data center, a server, a listener, and a DNS sync group). When you are done, your BIG-IP devices are all in a sync group, and listed in the DNS GSLB server list. For help with these basic tasks, you can refer to BIG-IP DNS Services: Implementations on
support.f5.com.
The F5 Application Services 3 (AS3) extension is a mechanism for managing application-specific configurations on a BIG-IP device. AS3 uses JSON declarations to manage the configuration objects. BIG-IQ AS3 templates provide you with a user interface that guides you through the process of creating the body of a well-formed JSON declaration without you having to learn JSON.
Note: Both AS3 templates and service catalog templates deploy application services to managed devices. However, the work flow for each template type is significantly different. For details about how service catalog templates work, refer to Manage BIG-IQ Service Catalog Templates on support.f5.com.
AS3 templates are usually created by a network engineer, and are used to create and deploy application services to managed devices. The AS3 template model simplifies the process of determining the objects (and their settings) by giving you a list of AS3 classes to choose from. These classes are defined in a JSON schema that includes full specifications for each object property.
Note: For detailed information about how AS3 works and a closer look at the JSON schema, refer to the Application Services 3 Extension Documentation article on clouddocs.f5.com.
Note: In this release, AS3 templates deploy application services to managed devices, not to service scaling groups.
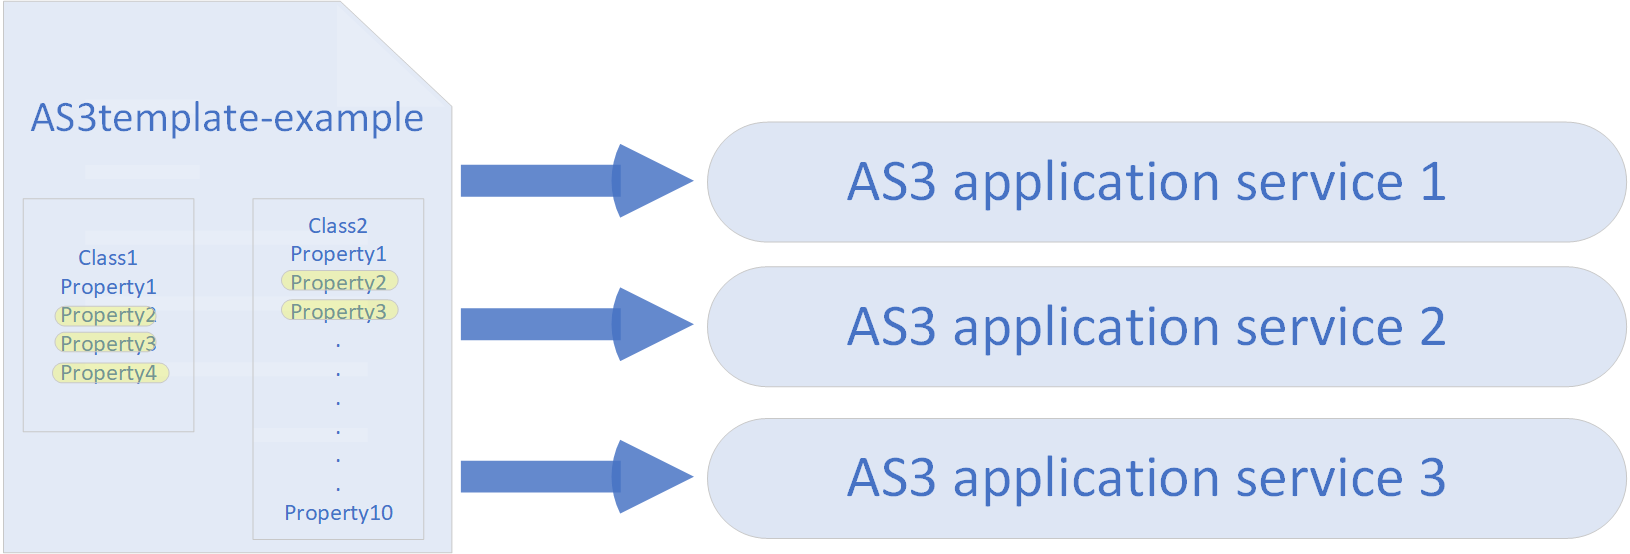
When you create or edit an AS3 template, you specify a set of object classes. These classes and their properties define an AS3 application service. You specify which classes to include, and then decide which properties are editable, and which property values to specify default values for. Later, when anyone uses this template to deploy an application service, they specify values for the editable properties. When the application service deploys, AS3 uses the classes and their properties to create configuration objects on the target device.
- Properties not defined as editable deploy with the default values.
- Editable properties deploy with the values specified by the application deployer.
- The application service classes defined in the AS3 template deploy to the target device as configuration objects (virtual servers, pools, security policies, and so on).
Only properties that the template defines as editable are visible when you create an application service, The other properties are included using the default values from the template. You can maintain a consistent environment by creating templates with some constant property values, and some values that can be revised. This provides both the consistency and flexibility needed when deploying application services.
Consider the diagram. This AS3 template is defined with two classes, each with its own set of properties. Class1 has three editable properties (2, 3, and 4), Class2 has just two (2 and 3). You decide to use this template to deploy three application services. All you do is specify values for the editable properties for each service. Each application service must have identical values for Class1, Property1, but most likely different values for Class1, Properties 2, 3, and 4. Similarly for Class2, of the 10 properties included for this class, only 2 and 3 will be unique; the rest will have identical values in each application service.
When you use this template to create an AS3 template application service, BIG-IQ creates an AS3 declaration, which is validated against the JSON schema; then, AS3 deploys the objects defined in the declaration to the BIG-IP devices targeted in the declaration.
To further simplify the application deployment process, F5 maintains a library of AS3 templates. This online library is accessible in a GIT repository, and continually updated so that you always have access to the most current version.
F5 Networks maintains a library of AS3 templates that contain all of the classes needed for the several common use case scenarios. The easiest way to set up the templates that so you can deploy your application services is to import these templates and then customize them. For a simple DNS load balancing application service, you import one of these templates and use it without any modification. Of course, you can also modify these templates if your needs dictate. For details, refer to Edit an AS3 template in the Use BIG-IQ to Manage AS3 Templatesarticle on support.f5.com.
-
At the top of the screen, click Applications, then, on the left, click APPLICATION TEMPLATES.
The screen lists the AS3 and service catalog templates defined on this BIG-IQ.
-
In the upper right corner, click the Import Templates link.
The link opens the F5 DevCentral GIT repository (https://github.com/f5devcentral/f5-big-iq).
-
Follow the step-by-step instructions titled Importing AS3 templates to your BIG-IQ using Postman located on this page.
When you complete the import process, the imported templates display on the BIG-IQ Application Templates screen.
-
Select the check box next to the template named AS3-F5-DNS-FQDN-template-default-V7, click Publish, and then click Publish again to confirm.
BIG-IQ makes the template read-only, so you can use it to create an application service.
To create the objects in this template, you need to use this template to deploy an application service.
Before you can create and deploy an AS3 application, you must have either imported the default AS3 templates or configured your own templates so you can use them to deploy your application services.
When you deploy a multi-cloud application with duplicate application services in multiple locations, and a load balancing DNS application service, your application services can stay up and available if one cloud service or data center goes offline.
Note: You can use either AS3 or service catalog templates to deploy a multi-cloud application. For simplicity and brevity, the steps that follow illustrate the work flow for using AS3 templates.
Important: When you specify the properties for an AS3 class that requires a block of text (for example, a certificate, a private key, or an iRule), you must use extra care to make sure that BIG-IQ can process the text that you provide. If you must type this text, do not use the backslash character (for example: \n as a new line or \r as a return). AS3 does not process text that contains these characters. If you find these characters in text that you need to use, you can:
- Copy the body text to a text editor.
- Replace any instances of
\nor\rwith an actual new line (press the Return or Enter key to get a new line). - Remove any instances of
\(For example\”10”\becomes“10”). - Copy the resulting text string and paste it in the text box.
When you deploy the application service, AS3 processes the text that you pasted in.
-
At the top of the screen, click Applications, then, on the left, click APPLICATION TEMPLATES.
The screen lists the AS3 and service catalog templates defined on this BIG-IQ.
-
Make the templates needed for this application read-only, so you can use them to create application services.
-
Select the check box next to the template for DNS type A global load balancing.
-
Select the check box next to the template for global load balancing an HTTP application on port 80.
-
Click Publish, and then click Publish again to confirm.
-
-
At the top of the screen, click Applications then, on the left, click APPLICATIONS.
The screen lists the applications currently defined on this device.
-
Click Create.
The Create Application Service screen opens.
-
For
Grouping, select New Application. -
Type an Application Name and an optional Description to identify the new application.
-
For the Template Type, select the template for global load balancing an HTTP application on port 80
BIG-IQ displays the editable settings specified in the template you selected. Required settings are highlighted and any default values are displayed.
-
Use the Application Service Name and Description settings to identify this application service.
-
For the Target setting, identify the BIG-IP device to which you want the application to deploy.
Because you are creating the first of two services, select a target device hosted in one cloud provider or data center and make a note of it. After you deploy this application service to the first target, you will deploy it again, but to a different provider or data center.
-
Specify the Tenant to which you want to deploy this application service.
Because the template you are using to deploy this application service specifies that the Tenant is editable, you can view it and revise it. When this application service deploys, the BIG-IQ creates a partition on the target device using the name you specify here.
Important: If you have deployed configuration objects to BIG-IP devices and you plan to use this template to deploy application services to those same devices, do not choose a Tenant name that might match the name of partitions on which your previously deployed configuration objects reside. For more detail on how AS3 uses the tenant name and guidelines for using this control effectively, see AS3 tenant name details.
-
Scroll down to the Pool area, and type values for the pool objects that deploy with this application service.
-
For the Service Port, type the port number that you use on the target BIG-IP device.
Generally, port 80 is used for HTTP traffic.
-
For the Server Addresses, type the IP address of the application server used by the target BIG-IP device.
-
-
For the Service_HTTP area Virtual addresses, type the IP address of the virtual server on the target BIG-IP device.
Note: For the purpose of this example workflow, you only need to specify values for the required settings. For your production purposes, you could, and most likely would, make revisions to any or all of the other editable parameters before you create the application service.
-
When you have configured the objects that you want to include in this application, click Create.
BIG-IQ creates the application with the application service you defined, then deploys it to the target you specified.
Before you can deploy additional application services to an application, you must create the application and at least one application service.
When you create a second copy of your application service to BIG-IP devices hosted in a different location, it provides an alternative resource for your application traffic. With copies of the application service in multiple locations, if one cloud service or data center goes offline, the services you’ve deployed can stay up and available.
-
At the top of the screen, click Applications then, on the left, click APPLICATIONS.
The screen lists the applications currently defined on this device.
-
In the list of applications, click the name of the one that you want to add an application service to.
The screen displays the list of application services defined for this application.
-
Click Create.
The Create Application Services screen opens and, because you are editing an existing application, the Grouping and Application Name settings are disabled.
-
Use the Application Service Name and Description settings to identify this application service.
-
For the Template Type, select the template AAS3-F5-HTTP-lb-template-default-v7.
-
For the Target setting, identify the BIG-IP device to which you want the application to deploy.
Your objective is to create the second of two services that are identical, except for where they reside. Select a target device that is set up in a different cloud provider or data center from the device you targeted with the first application service.
-
Scroll down to the Pools area and type values for the pool objects that deploy with this application service.
-
For the Service Port, type the port number that you use on the target BIG-IP device.
Generally, port 80 is used for HTTP traffic.
-
For the Server Addresses, type the IP address of the application server used by the target BIG-IP device.
-
-
For the Service_HTTP area Virtual addresses, type the IP address of the virtual server on the target BIG-IP device.
Note: For the purpose of this example workflow, you only need to specify values for the required settings. For your production purposes, you could, and most likely would, make revisions to any or all of the other editable parameters before you create the application service.
-
At the bottom of the screen, click Create.
BIG-IQ deploys the second application service to the new target you specified.
Before you can determine the GSLB server names for the application services in your application, you need to deploy these services, so you can view the names using the application services dashboard.
The DNS application service needs to have the GSLB server names for each of the application services for which you want it to direct traffic. You can find these names on the dashboard for each application service.
-
At the top of the screen, click Applications then, on the left, click APPLICATIONS.
The screen lists the applications currently defined on this device.
-
From the list of applications, click the name of the multi-cloud application you have been working on.
The screen displays a list of application services defined for this application.
-
From the list of application services, click the name of the first one you created.
The application dashboard for the selected service opens.
-
In the Application Configuration Map, under APPLICATION SERVICE, click Properties.
-
Near the middle of the screen, click CONFIGURATION.
The screen lists the objects defined for this application service.
-
Under General Properties, find the AS3 class named DNS Virtual Server Name, and record the value that BIG-IQ displays.
One easy way to get the complete name exactly correct is to copy and paste the path and file name into a text editor such as Notepad. It’s important that you capture every character precisely.
A typical DNS virtual server name looks like this:
/default/app3/serviceMain, wheredefaultis the name of the tenant,app3is the name of the application service, andserviceMainis a constant. -
Repeat the previous 4 steps, but this time, for step 3 select the second of the two application services you created.
When you complete this process, you should have captured the DNS virtual server name for each application service to which you plan to direct traffic for your multi-cloud application.
Before you deploy the DNS application service for your multi-cloud application, you must:
- Publish the AS3 template you plan to use to create the DNS application service.
- Create each of the application services for which you plan to route traffic. Make a note of the application server IP address for each service.
- Capture the GSLB server name that each application service uses.
- Configure the DNS environment (a GSLB data center, a server, and a DNS sync group). This diagram illustrates the essential elements of this environment.
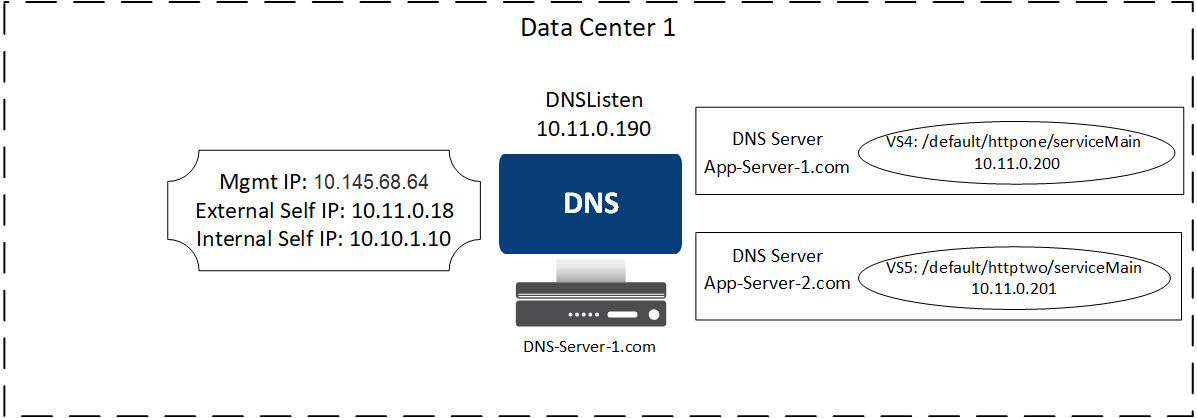
The DNS application service manages the traffic for your multi-cloud application. It routes traffic to your application services based on the parameter settings you specified in the template and here, when you deploy it.
Important: When you specify the properties for an AS3 class that requires a block of text (for example, a certificate, a private key, or an iRule), you must use extra care to make sure that BIG-IQ can process the text that you provide. If you must type this text, do not use the backslash character (for example: \n as a new line or \r as a return). AS3 does not process text that contains these characters. If you find these characters in text that you need to use, you can:
- Copy the body text to a text editor.
- Replace any instances of
\nor\rwith an actual new line (press the Return or Enter key to get a new line). - Remove any instances of
\(For example\”10”\becomes“10”). - Copy the resulting text string and paste it in the text box.
When you deploy the application service, AS3 processes the text that you pasted in.
-
At the top of the screen, click Applications then, on the left, click APPLICATIONS.
The screen lists the applications currently defined on this device.
-
In the list of applications, click the name of the one that you want to add an application service to.
The screen displays the list of application services defined for this application.
-
Click Create.
The Create Application Services screen opens and, because you are editing an existing application, the Grouping and Application Name settings are disabled.
-
For the Template Type, select the same AS3 template that you published for the DNS application service.
-
Use the Application Service Name and Description settings to identify this application service.
-
For the Target setting, identify the BIG-IP device that you want to use to host your DNS application service.
-
For the Domain Name, type the fully qualified domain name that you want to use for traffic inbound to your application.
-
If you changed the default values for the GSLB monitor, under GSLB_Monitor specify the Name, Monitor Type, Send String, and Receive String.
-
Under GSLB_Pool, specify the pool member’s values for each of the application services you just created.
Refer to the Data Center 1 diagram (preceding) for typical pool member settings.
-
For Members, under Server, type the partition and server name of the GSLB server on the target device on which the LTM application service is deployed.
In the example diagram:
Common\LTM-Server-1.comfor the server thathttponeis deployed to.Common\LTM-Server-2.comfor the server thathttptwois deployed to.
-
For the GSLB Server Name, paste in the values that you captured previously.
In the example diagram:
- /
default/httpone/serviceMainfor application servicehttpone /default/httptwo/serviceMainfor application servicehttptwoThese names tell the DNS application service where to route the traffic that it manages.
- /
-
-
When you have configured the objects that you want to include in this application, click Create.
BIG-IQ creates the application service you defined and adds it to the application.
When you to deploy an AS3 application service, BIG-IQ creates or updates the configuration objects defined by that service on the managed device you targeted. You can view these objects, as they perform their function as part of an application service, on the application services dashboard.
Before you can view these newly-deployed objects on the Configuration tab, you must rediscover and re-import services for each service impacted by the deployment. Keep in mind that objects deployed with AS3 are view-only on the Configuration tab. To make changes to these objects, you make changes to the AS3 application.