Updated Date: 07/07/2026
Deploying BIG-IQ Virtual Edition in Amazon Web Services
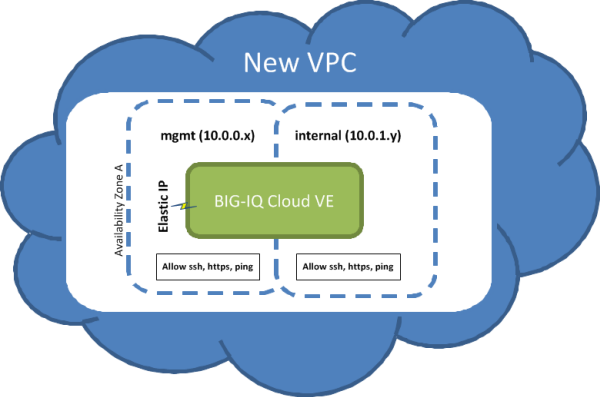
To deploy BIG-IQ Centralized Management, you perform a series of tasks using Amazon Web Services (AWS) to create an elastic compute cloud (EC2) that runs a public cloud virtual machine management service.
When you complete these tasks, your cloud environment will be similar to the basic cloud topology depicted here.
The tasks you perform to deploy the BIG-IQ Virtual Edition (VE) system on Amazon Web Services, depend on what you plan to do with the Amazon Web Services:
|
If you plan to manage BIG-IP devices with the BIG-IQ system |
If you plan to manage applications in a service scaling group housed in the AWS cloud |
|---|---|
|
Note: You can also manage devices in a service scaling group (SSG) from a BIG-IQ deployed outside of AWS. If you choose this option, use the hypervisor setup guide appropriate for your private cloud environment.
|
Note: When you deploy a VE for managing applications in an SSG, some parameter settings you specify are different. These settings are noted where appropriate.
An Amazon Identity and Access Management (IAM) user account provides access to specific Amazon Web Services (AWS) resources. Creating an IAM account provides you with more granular control of the AWS resources your users access.
Important: This task is optional; you can create a virtual machine without creating an IAM user account to control access, but it is best practice to use an IAM account. F5 recommends that you do not use the AWS root account and access keys. Instead, use IAM to create identities you can more easily manage and revoke in the case of a security breach.
Tip: When you manually deploy a virtual machine on AWS EC2, you must create an administrator password in addition to the IAM access keys. If you use the automated process to deploy a virtual server, only the access keys are required.
For this task, you must create a group and two IAM user accounts. For the most current instructions for performing these steps, refer to the IAM documentation web site, http://aws.amazon.com/documentation/iam/.
-
From
https://console.aws.amazon.com/iam, create a group with aws-full-access (Administrator Access). -
Create an AWS-Admin user and add that user to the aws-full-access group.
-
Create a BIG-IQ Connector user and add that user to the aws-full-access group.
For this user, you must download or copy an access key that you use to connect BIG-IQ Cloud to your AWS account
-
From the AWS dashboard, set up an account alias.
Note the IAM user login link. For example,
https://my-account-alias.signin.aws.amazon.com/console -
Log out of the AWS dashboard as the root user.
-
Navigate back to the user login link and sign in as the
AWS-Adminuser.
You can now create a new Virtual Private Cloud (VPC).
Before you can deploy a virtual machine on Amazon Web Services (AWS) Elastic Cloud Computing, you need an AWS account.
To create a virtual private cloud (VPC) on which you can deploy the BIG-IQ system, you need a (private-public encryption) key pair to authenticate your sessions. Key pairs are reusable, so if you have a key pair, you do not need to repeat this task.
-
For the most current instructions for creating a key pair, refer to the Amazon Virtual Private Cloud (VPC) Documentation web site,
http://aws.amazon.com/documentation/vpc/.Important: It is crucial to your success that you be consistent in the region that you choose throughout the configuration process. Objects configured in one region are not visible within other regions, so they cannot function together. There are a number of factors that determine which region will best suit your requirements. Refer to Amazon user documentation for additional details.
The file that downloads from Amazon Web Services uses the extension .pem. If you plan to use this key pair with the PuTTY terminal emulator application, you will need to convert the key pair from a .pem to a .ppk file. At the time of this release, PuTTY does not support the extension .pem. PuTTY does have a tool (called PuTTYgen) that converts your key pair to the required PuTTY format.
You need an Amazon Virtual Private Cloud (VPC) to deploy the BIG-IQ Cloud system, because AWS provides only multiple network interface card (NIC) support for instances that reside within a VPC.
You create a virtual network topology according to your networking needs. The standard network topology used for BIG-IQ Cloud integration includes three subnets. These subnets provide virtual private address spaces used to interconnect your machines and applications. You can use elastic self IP addresses for public internet accessibility.
For the most current instructions for creating a VPC, refer to the VPC Documentation web site, http://aws.amazon.com/documentation/vpc/.
-
Navigate to
https://console.aws.amazon.com/vpcand select the AWS Region in which you want to manage resources.For example, Oregon.
-
From the VPC Wizard’s VPC with Public and Private Subnets option, set the IP CIDR Block to
10.0.0.0/16. -
Set the public subnet to
10.0.0.0/24.This is the management network.
-
Select an availability zone.
For example, us-west-2c. It is crucial that you use this availability zone throughout the configuration process. Objects configured in one zone are not visible within other zones, so they cannot function together. This availability zone is required when you create a BIG-IQ Cloud connection.
-
Set the private subnet to
10.0.1.0/24.This is the external data network.
-
Create subnet
10.0.2.0/24.This is the internal network.
-
Create a security group named
allow-all-traffic, and associate it with the VPC you created.You must use this exact name.
-
Set the Inbound Rules ALL Traffic Source to
0.0.0.0/0. -
Set the Outbound Rules ALL Traffic Destination to
0.0.0.0/0. -
Create a Route Table for the external data network to reach the Internet.
-
Add a route to Destination 0.0.0.0/0 through Target
igw-<xxxx>.<xxxx>is the Internet Gateway that the VPC Wizard created automatically. -
Allocate two Elastic IP Addresses.
You can now create an EC2 cloud connector.
Important: If you want BIG-IQ Cloud to automatically provision and license BIG-IP VE devices (elasticity), you must activate a pool license before you create an EC2 cloud connector.
When you create a VPC, Amazon Web Services creates two subnets for it. The first subnet is the management subnet (10.0.0.0/24) and the second subnet is external (10.0.1.0/24). Many network topologies require three or more subnets (Management, External, and Internal). You can use this task to create an internal subnet (10.0.2.0/24).
- For the most current instructions for creating an internal subnet, refer to the Amazon Virtual Private Cloud (VPC) Documentation web site
http://aws.amazon.com/documentation/vpc/.
If you are following a typical deployment strategy, when you finish adding the Internal subnet, your VPC will have three subnets.
- a Management subnet on
10.0.0.0/24 - an External subnet on
10.0.1.0/24 - an Internal subnet on
10.0.2.0/24
To use your virtual private cloud (VPC) to deploy your virtual machine, the VPC needs two security groups; each with its own set of rules that govern the security behavior for the traffic that routes through it. The table details the rules required for each group to function properly.
| Group Name | Group Description | Rule Name | Source* | Rule Type |
|---|---|---|---|---|
allow-only-ssh-https-ping |
Allow only SSH HTTPS or PING | Inbound SSH | 0.0.0.0/0 | |
| Inbound HTTPS | 0.0.0.0/0 | |||
| Inbound Custom ICMP | 0.0.0.0/0 | Echo Request | ||
| Outbound Custom ICMP | 0.0.0.0/0 | Echo Request | ||
| Outbound Custom ICMP | 0.0.0.0/0 | Echo Reply | ||
allow-all-traffic |
Allow all traffic | Inbound All Traffic | 0.0.0.0/0 | |
| Outbound All Traffic | 0.0.0.0/0 | |||
allow-es-traffic |
Allow TCP traffic | Inbound Port 9200 | 0.0.0.0/0 | |
| Allow TCP traffic | Inbound Port 9300 | 0.0.0.0/0 | ||
| Allow TCP traffic | Outbound Port 9200 | 0.0.0.0/0 | ||
| Allow TCP traffic | Outbound Port 9300 | 0.0.0.0/0 |
Note: To meet your business security requirements, you may need to revise the Source settings to make it more restrictive. If you do need to revise the Source settings for your security group rules, make sure that these settings allow all of the HA peers and DCDs in your cluster to communicate.
-
Create the three security groups defined in the table.
-
Name the first one
allow-only-ssh-https-ping -
Name the second one
allow-all traffic -
Name the third one
allow-es-traffic
Tip: For the most current instructions for creating security groups, refer to the Amazon Virtual Private Cloud (VPC) Documentation web site
http://aws.amazon.com/documentation/vpc/.Important: The
allow-all-trafficsecurity group is critically important for successful operation of the BIG-IP VE on Amazon EC2. -
-
For each security group, create the rules described in the preceding table. For each rule, define the Group Description, Rule Name, Source, and Rule Type as shown in the table.
Important: No punctuation is permitted in the text of the Group Description that you type in.
When you finish adding the two groups and their associated rules, your VPC should be ready to go with three subnets and two security groups.
It is a good idea to test connectivity before proceeding. You should be able to communicate with your VPC NAT server at this point.
F5 recommends enhancing your security by using the security group source fields to restrict the subnets to allow only management access; however, we recognize that this does not complete your security solution. For enhanced security, you might want to deploy a topology with limited management network access.
Most network topologies require an Amazon Web Services route to the virtual private cloud (VPC) that makes the external subnet used by the virtual machine accessible to the Internet.
-
From the Services tab at the top of the Amazon Web Services Management Console screen, select VPC.
-
In the navigation pane, select Route Tables.
The Route Tables screen opens.
-
Select the routing table with one subnet.
-
Click the Associations tab at the bottom of the window.
-
From the Select a subnet list, select the 10.0.1.0/24 subnet.
-
Click Associate.
The Associate Route Table popup screen opens.
-
Click Yes, Associate.
Before you can complete this task, you need to know the name of your key pair and the Availability Zone from which it was created.
You launch an EC2 Amazon Machine Image (AMI) so that you can deploy the virtual machine.
Important: At publication, this task illustrates the Amazon web interface. However, F5 recommends that you refer to Amazon user documentation for the latest documentation.
-
Log in to your account on Amazon Web Services (AWS) marketplace.
-
In the Search AWS Marketplace bar, type
F5 BIG-IQand then click GO.The F5 BIG-IQ Virtual Edition for AWS option is displayed.
-
Click F5 BIG-IQ Virtual Edition for AWS and then click CONTINUE.
Tip: You might want to take a moment here to browse the pricing details to confirm that the region in which you created your security key pair provides the resources you require. If you determine that the resources you need are provided in a region other than the one in which you created your key pair, create a new key pair in the correct region before proceeding.
The Launch on EC2 page is displayed.
-
Click the Launch with EC2 Console tab.
Important: At the time this was written, the virtual machine must be launched in a VPC so that NICs can be attached. This configuration is supported from the Launch with EC2 Console option, but not the 1-Click Launch option.
Launching Options for your EC2 AMI are displayed.
-
Select the software version appropriate for your installation, and then click the Launch with EC2 button that corresponds to the Region that provides the resources you plan to use.
Important: The first time you perform this task, you need to accept the terms of the end user license agreement before you can proceed, so the Launch with EC2 button reads Accept Terms and Launch with EC2.
Important: There are a number factors that determine which region will best suit your requirements. Refer to Amazon user documentation for additional detail. Bear in mind that the region you choose must match the region in which you created your security key pair.
The Request Instances Wizard opens.
-
Select an Instance Type appropriate for your use.
-
From the Launch Instances list, select EC2-VPC.
-
From the Subnet list, select the 10.0.0.0/24 subnet and click CONTINUE.
The Advanced Instance Options view of the wizard opens.
-
From the Number of Network Interfaces list, select 2.
-
Click the horizontal eth1 tab to set values for the second network interface adapter, and then from the Subnet list, select the 10.0.1.0/24 subnet and click CONTINUE
The Storage Device Configuration view of the wizard opens.
-
In the Value field, type in an intuitive name that identifies this AMI and click CONTINUE (for example,
BIG-IQ VE <version>).The Create Key Pair view of the wizard opens.
-
From Your existing Key Pairs, select the key pair you created for this AMI and click CONTINUE.
The Configure Firewall view of the wizard opens.
-
Under Choose one or more of your existing Security Groups, select the allow-all-traffic security group, and then click CONTINUE.
The Review view of the wizard opens.
-
Confirm that all settings are correct, and then click Launch.
The Launch Instance Wizard displays a message to let you know your instance is launching.
-
Click Close.
Your new instance appears in the list of instances when it is fully launched.
When you first create a virtual private cloud (VPC), there are typically only two network interfaces associated with it. F5 Networks recommends adding a third network interface to the VPC before you use it to deploy the virtual machine.
-
From the Services tab at the top of the Amazon Web Services (AWS) Management Console screen, select EC2.
-
In the navigation pane, select Network Interfaces.
The Network Interfaces screen opens.
-
Click the Create Network Interface button (at top left).
The Create Network Interface popup screen opens.
-
In the Description field, type
Internal 10.0.2.0-24(or a similarly mnemonic name). -
In the Subnet field, select 10.0.2.0/24.
-
From the Security Groups list, select allow-all-traffic.
-
Click Yes, Create
AWS adds your network interface to the list.
-
Right-click the new network interface, and then select Attach.
The Attach Network Interface popup screen opens.
-
From the Instance list, select the VE AMI that you created.
The management port for your virtual machine might require accessibility over the Internet. However, there are alternative topologies that do not require exposing the management port to the Internet.
F5 Networks recommends, at a minimum, adding restrictions to your source addresses in the allow-only-ssh-https-ping security group.
Alternatively, you might find the Amazon Web Services EC2 VPN sufficiently effective so that you do not need to associate an Internet-accessible Elastic IP with the management port.
-
From the Services tab at the top of the Amazon Web Services Management Console screen, select EC2.
-
In the navigation pane, select Elastic IPs.
The Addresses screen opens.
-
Click Allocate New Address.
The Allocate New Address popup screen opens.
-
From the EIP used in list, select VPC.
-
Click Yes, Allocate.
-
In the Address column, right-click the newly created Elastic IP and select Associate from the popup menu.
The Associate Address popup screen opens.
-
From the Instance list, select the VE AMI that you created as an EC2 hypervisor.
-
From the Private IP Address list, select 10.0.0.0/24 (the Management subnet).
-
Click Yes, Associate.
To perform this task, you must have completed the following tasks:
- Created a key pair.
- Created and configured a VPC.
- Instantiated and launched a BIG-IQ Virtual Edition (VE) AMI.
- Made the virtual machine management port accessible through the Internet.
To access your BIG-IQ instance with a browser, you must create an admin user password. You can create an admin password using an SSH session and a set of tmsh commands.
Note: If you decide to create admin or root passwords, choose the passwords wisely. Bear in mind that depending on your Security Group policies, this login might provide external SSH access to the BIG-IQ.
Important: If you plan on setting this BIG-IQ up in a high availability configuration, both the active and the standby BIG-IQ systems must have root access enabled.
You do not need a password to gain admin access to this instance using SSH. Instead, you use the previously created security key pair.
-
Use the name of the key pair and the elastic IP address of your BIG-IQ to log in to the new BIG-IQ that you just launched using a command line interface.
For example:
$ ssh -i <*username*>-aws-keypair.pem admin@<*elastic IP address of BIG-IQ*>Tip: You can also use a terminal emulator such as PuTTY to test your connectivity. At publication, PuTTY does not support the extension
.pem, so remember that you will also need to convert the key pair.pemfile to a.ppkfile before you can use it with PuTTY. -
At the
tmshcommand prompt, typemodify auth password admin.Warning: Because this login is visible externally, make sure to use a strong, secure password.
The terminal window displays the message:
changing password for admin, and then prompts:new password. -
Type in your new password and then press Enter.
The terminal window displays the message:
confirm password. -
If you plan on setting this BIG-IQ up in a high availability configuration, perform this step to enable root access on this BIG-IQ VE. Otherwise, proceed to the next step to save your password changes.
-
At the
tmshcommand prompt, typetmsh modify /sys db systemauth.disablerootlogin value false.If the terminal window does not display an error message, then root access is now enabled.
-
At the
tmshcommand prompt, typemodify auth password root.Warning: Because this login is visible externally, make sure to use a strong, secure password.
The terminal window displays the message:
changing password for root, and then prompts:new password. -
Type your new password and press Enter.
The terminal window displays the message:
confirm password. -
Re-type the new password and then press Enter.
-
-
To ensure that the system retains the password change, at the
tmshcommand prompt typesave sys config, and then press Enter.
Before you can use this new BIG-IQ, you must license it. Refer to Deploying a BIG-IQ for Centralized Management in the Setting up and Configuring a BIG-IQ Centralized Management Solution guide for step by step instructions. You can find this guide on support.F5.com.